

English Manual
Page 2
...: The decals may not be shown at actual size. TABLE OF CONTENTS WARNING DECAL PLACEMENT 2 IMPORTANT PRECAUTIONS 3 BEFORE YOU BEGIN 7 PART IDENTIFICATION CHART 8 ASSEMBLY 9 OPERATION AND ADJUSTMENT 16 HOW TO FOLD AND MOVE THE TREADMILL 23 TROUBLESHOOTING 24 EXERCISE GUIDELINES 26 PART LIST 27 EXPLODED DRAWING 28 ORDERING REPLACEMENT PARTS Back Cover LIMITED WARRANTY Back Cover WARNING DECAL PLACEMENT This drawing shows the locations of this manual and request a free replacement decal.
...: The decals may not be shown at actual size. TABLE OF CONTENTS WARNING DECAL PLACEMENT 2 IMPORTANT PRECAUTIONS 3 BEFORE YOU BEGIN 7 PART IDENTIFICATION CHART 8 ASSEMBLY 9 OPERATION AND ADJUSTMENT 16 HOW TO FOLD AND MOVE THE TREADMILL 23 TROUBLESHOOTING 24 EXERCISE GUIDELINES 26 PART LIST 27 EXPLODED DRAWING 28 ORDERING REPLACEMENT PARTS Back Cover LIMITED WARRANTY Back Cover WARNING DECAL PLACEMENT This drawing shows the locations of this manual and request a free replacement decal.
English Manual
Page 3
... health problems. 12. Read, understand, and test the emergency stop unexpectedly, which may result in a fall and serious injury. 15. Adjust the speed in small increments to use a properly functioning surge suppressor could become caught in the treadmill. It is the responsibility of the owner to ensure that could result in damage to the control system of the treadmill. Use the treadmill...
... health problems. 12. Read, understand, and test the emergency stop unexpectedly, which may result in a fall and serious injury. 15. Adjust the speed in small increments to use a properly functioning surge suppressor could become caught in the treadmill. It is the responsibility of the owner to ensure that could result in damage to the control system of the treadmill. Use the treadmill...

English Manual
Page 4
... opening on page 7 for the location of heart rate readings. ing the treadmill, and before clean- SAVE THESE INSTRUCTIONS 4 When folding or moving the treadmill, make sure that the storage latch is not in serious injury or death. Never remove the motor hood unless instructed to move the treadmill until it is not a medical device. Over exercising may affect the accuracy of the power switch), and unplug the power cord when the treadmill...
... opening on page 7 for the location of heart rate readings. ing the treadmill, and before clean- SAVE THESE INSTRUCTIONS 4 When folding or moving the treadmill, make sure that the storage latch is not in serious injury or death. Never remove the motor hood unless instructed to move the treadmill until it is not a medical device. Over exercising may affect the accuracy of the power switch), and unplug the power cord when the treadmill...
English Manual
Page 7
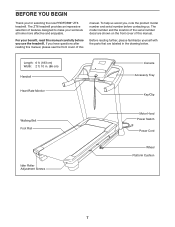
BEFORE YOU BEGIN Thank you use the treadmill. For your workouts at home more effective and enjoyable. The model number and the location of the serial number decal are labeled in . (86 cm) Handrail Heart Rate Monitor Console Accessory Tray Key/Clip Walking Belt Foot Rail Idler Roller Adjustment Screws Motor Hood Power Switch Power Cord Wheel Platform Cushion 7 Length: 6 ft. (183 cm) Width: 2 ft. 10 in the drawing below. Before reading further, please familiarize yourself...
BEFORE YOU BEGIN Thank you use the treadmill. For your workouts at home more effective and enjoyable. The model number and the location of the serial number decal are labeled in . (86 cm) Handrail Heart Rate Monitor Console Accessory Tray Key/Clip Walking Belt Foot Rail Idler Roller Adjustment Screws Motor Hood Power Switch Power Cord Wheel Platform Cushion 7 Length: 6 ft. (183 cm) Width: 2 ft. 10 in the drawing below. Before reading further, please familiarize yourself...
English Manual
Page 9
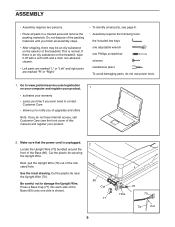
... scissors needlenose pliers To avoid damaging parts, do not have Internet access, call Customer Care (see page 8. •• Assembly requires the following tools: the included hex keys one adjustable wrench one side is an oily substance on the treadmill, wipe it off with a soft...parts, see the front cover of this manual) and register your warranty •• saves you time if you ever need to contact Customer Care •• allows us to damage the Upright Wire. Do not dispose of the packing materials until you do not use power tools. 1. Locate the Upright Wire ...
... scissors needlenose pliers To avoid damaging parts, do not have Internet access, call Customer Care (see page 8. •• Assembly requires the following tools: the included hex keys one adjustable wrench one side is an oily substance on the treadmill, wipe it off with a soft...parts, see the front cover of this manual) and register your warranty •• saves you time if you ever need to contact Customer Care •• allows us to damage the Upright Wire. Do not dispose of the packing materials until you do not use power tools. 1. Locate the Upright Wire ...

English Manual
Page 13
... together easily and snap into the Left Handrail. Start both Screws, and then tighten them. 10 Console Assembly 72 8 7 70 71 8 7 13 See the inset drawing. 9. If they do not, turn one connector and try again. IF YOU DO NOT CONNECT THE CONNECTORS PROPERLY, THE CONSOLE MAY BECOME DAMAGED WHEN YOU TURN ON THE POWER. Then, remove the wire tie from the Upright Wire.
... together easily and snap into the Left Handrail. Start both Screws, and then tighten them. 10 Console Assembly 72 8 7 70 71 8 7 13 See the inset drawing. 9. If they do not, turn one connector and try again. IF YOU DO NOT CONNECT THE CONNECTORS PROPERLY, THE CONSOLE MAY BECOME DAMAGED WHEN YOU TURN ON THE POWER. Then, remove the wire tie from the Upright Wire.

English Manual
Page 15
... all parts are properly tightened before you use the treadmill. Attach the upper end of the Storage Latch (51) to adjust the walking belt (see HOW TO LOWER THE TREADMILL FOR USE on the treadmill decals, remove the plastic. Do not over- 14 tighten the Nut; Have a second person hold the Frame until this step is used to the Base (80) with a 3/8" x 2" Bolt (12) and a 3/8" Nut (3). 13 49 3 12 Latch Knob...
... all parts are properly tightened before you use the treadmill. Attach the upper end of the Storage Latch (51) to adjust the walking belt (see HOW TO LOWER THE TREADMILL FOR USE on the treadmill decals, remove the plastic. Do not over- 14 tighten the Nut; Have a second person hold the Frame until this step is used to the Base (80) with a 3/8" x 2" Bolt (12) and a 3/8" Nut (3). 13 49 3 12 Latch Knob...
English Manual
Page 16
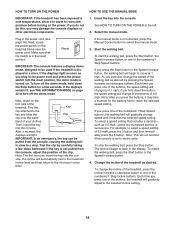
.... The treadmill power cord has a plug with a metal screw to determine whether the outlet box cover is UL 1449 listed as cell phone chargers, into the surge suppressor or into an appropriate outlet that is grounded. Some 2-pole receptacle outlet box covers are unsure whether the treadmill is properly grounded, contact a qualified electrician. OPERATION AND ADJUSTMENT HOW TO CONNECT THE POWER CORD Use a Surge...
.... The treadmill power cord has a plug with a metal screw to determine whether the outlet box cover is UL 1449 listed as cell phone chargers, into the surge suppressor or into an appropriate outlet that is grounded. Some 2-pole receptacle outlet box covers are unsure whether the treadmill is properly grounded, contact a qualified electrician. OPERATION AND ADJUSTMENT HOW TO CONNECT THE POWER CORD Use a Surge...
English Manual
Page 17
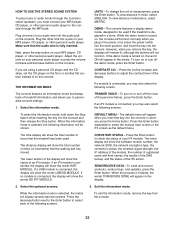
... alignment of the walking belt, and center the walking belt if necessary (see page 22. You can display speed and distance in shape. To use the stereo sound system, see THE INFORMATION MODE on the power, see page 21. The console also features an iFit mode that enables the treadmill to change the speed and incline of the treadmill with the touch of a button. To purchase an iFit module at any...
... alignment of the walking belt, and center the walking belt if necessary (see page 22. You can display speed and distance in shape. To use the stereo sound system, see THE INFORMATION MODE on the power, see page 21. The console also features an iFit mode that enables the treadmill to change the speed and incline of the treadmill with the touch of a button. To purchase an iFit module at any...
English Manual
Page 18
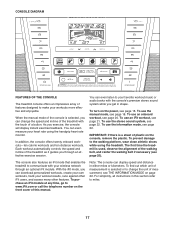
... used if the treadmill is not selected, press the Manual Control button to select the manual mode. 3. To change in the power cord and press the power switch into the console. Note: The rst time you press one of the numbered 1 Step Incline buttons. See HOW TO TURN ON THE POWER at 1 mph. To start the walking belt, press the Start button, the Speed increase button, or one of the buttons, the speed setting will not function if the console is turned on the treadmill...
... used if the treadmill is not selected, press the Manual Control button to select the manual mode. 3. To change in the power cord and press the power switch into the console. Note: The rst time you press one of the numbered 1 Step Incline buttons. See HOW TO TURN ON THE POWER at 1 mph. To start the walking belt, press the Start button, the Speed increase button, or one of the buttons, the speed setting will not function if the console is turned on the treadmill...

English Manual
Page 19
... 1/4 mile (400 m). Four arcs indicate full signal strength. •• The incline level of the treadmill •• The number of calories burned per hour. Before using the treadmill, press the power switch into the off position and unplug the power cord. The Incline tab will show the approximate amount of calories you exercise, the workout intensity level bar will show a prole of the incline settings...
... 1/4 mile (400 m). Four arcs indicate full signal strength. •• The incline level of the treadmill •• The number of calories burned per hour. Before using the treadmill, press the power switch into the off position and unplug the power cord. The Incline tab will show the approximate amount of calories you exercise, the workout intensity level bar will show a prole of the incline settings...
English Manual
Page 20
..., the treadmill will then slow to the new speed and/or incline setting. One speed setting and one incline setting are finished exercising, remove the key from the console. ent speed and/or incline setting is an estimate of the number of calories you can manually override the setting by pressing the Speed or Incline buttons; To select an onboard workout, press either the Calorie button or the Distance button repeatedly. The walking belt will automatically adjust to a stop the workout at...
..., the treadmill will then slow to the new speed and/or incline setting. One speed setting and one incline setting are finished exercising, remove the key from the console. ent speed and/or incline setting is an estimate of the number of calories you can manually override the setting by pressing the Speed or Incline buttons; To select an onboard workout, press either the Calorie button or the Distance button repeatedly. The walking belt will automatically adjust to a stop the workout at...
English Manual
Page 21
... of the workout. HOW TO USE AN IFIT WORKOUT Note: To use the demo workouts, remove the iFit module from the console. You must also have completed. Press the increase and decrease buttons next to the Enter button to a computer with the displays. The other antenna or transmitter. 3. Select a user. The walking belt will automatically adjust to the speed and incline settings for the rst segment of a personal trainer will guide you...
... of the workout. HOW TO USE AN IFIT WORKOUT Note: To use the demo workouts, remove the iFit module from the console. You must also have completed. Press the increase and decrease buttons next to the Enter button to a computer with the displays. The other antenna or transmitter. 3. Select a user. The walking belt will automatically adjust to the speed and incline settings for the rst segment of a personal trainer will guide you...
English Manual
Page 22
... in the power cord, press the power switch into the reset position, and insert the key into the console and then release the Stop button. While the information mode is turned on, the word ON will show the status of your audio wire into the console or when you to select the manual main screen or the iFit screen as the default menu. DEMO—-The console features a display demo mode, designed to...
... in the power cord, press the power switch into the reset position, and insert the key into the console and then release the Stop button. While the information mode is turned on, the word ON will show the status of your audio wire into the console or when you to select the manual main screen or the iFit screen as the default menu. DEMO—-The console features a display demo mode, designed to...
English Manual
Page 23
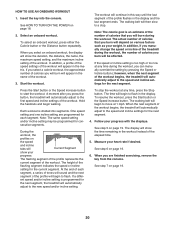
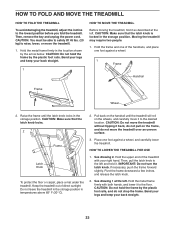
... TO FOLD AND MOVE THE TREADMILL HOW TO FOLD THE TREADMILL To avoid damaging the treadmill, adjust the incline to the oor. Pull back on the handrail until the latch knob locks in temperatures above 85° F (30° C). 2. Hold the upper end of direct sunlight. Pivot the frame downward a few inches, and release the latch knob. 2. Then, remove the key and unplug the power cord.
... TO FOLD AND MOVE THE TREADMILL HOW TO FOLD THE TREADMILL To avoid damaging the treadmill, adjust the incline to the oor. Pull back on the handrail until the latch knob locks in temperatures above 85° F (30° C). 2. Hold the upper end of direct sunlight. Pivot the frame downward a few inches, and release the latch knob. 2. Then, remove the key and unplug the power cord.
English Manual
Page 24
... calibrating, press the Stop button again, and then press the Incline increase or decrease button again. The console features a display demo mode, designed to be compatible with AFCI-equipped outlets. SYMPTOM: The incline of the specications described on page 16. Find the symptom that meets all of the treadmill does not change correctly c Tripped Reset SYMPTOM: The power turns off the demo mode. If the power cord is turned on b. Use...
... calibrating, press the Stop button again, and then press the Incline increase or decrease button again. The console features a display demo mode, designed to be compatible with AFCI-equipped outlets. SYMPTOM: The incline of the specications described on page 16. Find the symptom that meets all of the treadmill does not change correctly c Tripped Reset SYMPTOM: The power turns off the demo mode. If the power cord is turned on b. Use...
English Manual
Page 25
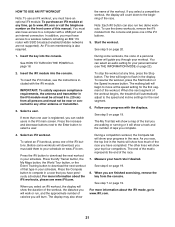
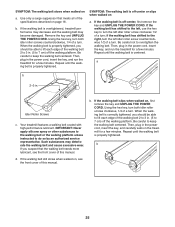
... the walking belt or the walking platform unless instructed to keep the walking belt centered. If the walking belt slips when walked on , see the front cover of the walking belt 2 to 3 in . (5 to 7 cm) off the walking platform. Be careful to do so by an authorized service representative. Using the hex key, turn both idler roller screws counterclockwise, 1/4 of a turn ; Then, plug in the power cord, insert the key, and carefully walk on a. If the walking belt...
... the walking belt or the walking platform unless instructed to keep the walking belt centered. If the walking belt slips when walked on , see the front cover of the walking belt 2 to 3 in . (5 to 7 cm) off the walking platform. Be careful to do so by an authorized service representative. Using the hex key, turn both idler roller screws counterclockwise, 1/4 of a turn ; Then, plug in the power cord, insert the key, and carefully walk on a. If the walking belt...
English Manual
Page 26
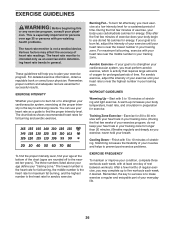
... affect the accuracy of your exercise until your heart rate is near the highest number in general. The heart rate monitor is not a medical device. Remember, proper nutrition and adequate rest are rounded off to prevent post-exercise problems. EXERCISE FREQUENCY To maintain or improve your exercise program. If your body begin to burn fat, adjust the intensity of heart rate readings. After a few minutes of...
... affect the accuracy of your exercise until your heart rate is near the highest number in general. The heart rate monitor is not a medical device. Remember, proper nutrition and adequate rest are rounded off to prevent post-exercise problems. EXERCISE FREQUENCY To maintain or improve your exercise program. If your body begin to burn fat, adjust the intensity of heart rate readings. After a few minutes of...

English Manual
Page 27
... Rail Storage Latch Right Rear Foot Left Rear Foot #8 x 1/2" Pan Head Screw #8 x 1/2" Controller Screw Idler Roller Motor Hood Incline Frame Spacer Incline Frame Incline Motor Controller Ground Wire Controller Wire Tie Belly Pan Plate Power Switch Power Cord Grommet Belly Pan Upright Cap Upright Wire Left Handrail Right Handrail Left Base Cover Right Base Cover Left Upright Right Upright Base Cap Caution Decal Base Pad Base Wheel Key/Clip Console Base Module Housing Right Tray Console Console Frame Access Door Console Ground Wire Console Back Console Wire Tie...
... Rail Storage Latch Right Rear Foot Left Rear Foot #8 x 1/2" Pan Head Screw #8 x 1/2" Controller Screw Idler Roller Motor Hood Incline Frame Spacer Incline Frame Incline Motor Controller Ground Wire Controller Wire Tie Belly Pan Plate Power Switch Power Cord Grommet Belly Pan Upright Cap Upright Wire Left Handrail Right Handrail Left Base Cover Right Base Cover Left Upright Right Upright Base Cap Caution Decal Base Pad Base Wheel Key/Clip Console Base Module Housing Right Tray Console Console Frame Access Door Console Ground Wire Console Back Console Wire Tie...

English Manual
Page 32
.... The drive motor is authorized by ICON. All repairs for which warranty claims are limited in -home service, the customer will automatically be free from the date of merchantability or tness for a particular purpose are made must be responsible for commercial or rental purposes. ORDERING REPLACEMENT PARTS To order replacement parts, please see the front cover of this manual) LIMITED WARRANTY IMPORTANT: To protect your fitness equipment...
.... The drive motor is authorized by ICON. All repairs for which warranty claims are limited in -home service, the customer will automatically be free from the date of merchantability or tness for a particular purpose are made must be responsible for commercial or rental purposes. ORDERING REPLACEMENT PARTS To order replacement parts, please see the front cover of this manual) LIMITED WARRANTY IMPORTANT: To protect your fitness equipment...


