
English Manual
Page 1
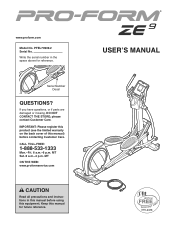
...precautions and instructions in the space above for future reference. USERʼS MANUAL please contact Customer Care. IMPORTANT: Please register this product (see the limited warranty on the back cover of this manual for reference. If you have questions, or if parts are damaged or ...missing, DO NOT CONTACT THE STORE; CALL TOLL-FREE: 1-888-533-1333 Mon.-Fri. 6 a.m.-6 p.m. www.proform.com Model No. MT Sat. 8 a.m.-4 p.m. Keep this manual) before using this equipment. PFEL70909...
...precautions and instructions in the space above for future reference. USERʼS MANUAL please contact Customer Care. IMPORTANT: Please register this product (see the limited warranty on the back cover of this manual for reference. If you have questions, or if parts are damaged or ...missing, DO NOT CONTACT THE STORE; CALL TOLL-FREE: 1-888-533-1333 Mon.-Fri. 6 a.m.-6 p.m. www.proform.com Model No. MT Sat. 8 a.m.-4 p.m. Keep this manual) before using this equipment. PFEL70909...

English Manual
Page 2
...other countries. PROFORM is a trademark of ICON IP, Inc. iPod is a registered trademark of Apple Computer, Inc., registered in the location shown. TABLE OF CONTENTS WARNING DECAL PLACEMENT 2 IMPORTANT PRECAUTIONS 3 BEFORE YOU BEGIN 4 ASSEMBLY 5 HOW TO USE THE ELLIPTICAL 12 MAINTENANCE ...AND TROUBLESHOOTING 23 EXERCISE GUIDELINES 25 PART LIST 28 EXPLODED DRAWING 30 ORDERING REPLACEMENT PARTS Back Cover LIMITED WARRANTY Back Cover WARNING DECAL PLACEMENT This drawing shows the location(s) of this manual and request a free replacement ...
...other countries. PROFORM is a trademark of ICON IP, Inc. iPod is a registered trademark of Apple Computer, Inc., registered in the location shown. TABLE OF CONTENTS WARNING DECAL PLACEMENT 2 IMPORTANT PRECAUTIONS 3 BEFORE YOU BEGIN 4 ASSEMBLY 5 HOW TO USE THE ELLIPTICAL 12 MAINTENANCE ...AND TROUBLESHOOTING 23 EXERCISE GUIDELINES 25 PART LIST 28 EXPLODED DRAWING 30 ORDERING REPLACEMENT PARTS Back Cover LIMITED WARRANTY Back Cover WARNING DECAL PLACEMENT This drawing shows the location(s) of this manual and request a free replacement ...

English Manual
Page 3
... pain while exercising, stop immediately and cool down. 3 Use the elliptical only as an exercise aid in determining heart rate trends in this manual and all parts regularly. Over exercising may affect the accuracy of the elliptical and 2 ft. (0.6 m) on your elliptical before using the elliptical. 4. Wear appropriate clothes while exercising; the pedals will continue...
... pain while exercising, stop immediately and cool down. 3 Use the elliptical only as an exercise aid in determining heart rate trends in this manual and all parts regularly. Over exercising may affect the accuracy of the elliptical and 2 ft. (0.6 m) on your elliptical before using the elliptical. 4. Wear appropriate clothes while exercising; the pedals will continue...

English Manual
Page 4
... see the front cover of features designed to make your benefit, read this manual. Before reading further, please familiarize yourself with the parts that are shown on the front cover of the serial number decal are labeled ...home more effective and enjoyable. If you use the elliptical. BEFORE YOU BEGIN Thank you , note the product model number and serial number before you have questions after reading this manual. The ZE 9 elliptical provides an impressive selection of this manual carefully before contacting us assist you for selecting the revolutionary PROFORM® ZE...
... see the front cover of features designed to make your benefit, read this manual. Before reading further, please familiarize yourself with the parts that are shown on the front cover of the serial number decal are labeled ...home more effective and enjoyable. If you use the elliptical. BEFORE YOU BEGIN Thank you , note the product model number and serial number before you have questions after reading this manual. The ZE 9 elliptical provides an impressive selection of this manual carefully before contacting us assist you for selecting the revolutionary PROFORM® ZE...

English Manual
Page 5
... not dispose of the packing materials until assembly is the key number of the part, from the PART LIST near the end of the elliptical in parentheses below to see if it has been preassembled. Place all parts of this manual. In addition to the included tool(s), assembly requires a Phillips screwdriver wrench .
... not dispose of the packing materials until assembly is the key number of the part, from the PART LIST near the end of the elliptical in parentheses below to see if it has been preassembled. Place all parts of this manual. In addition to the included tool(s), assembly requires a Phillips screwdriver wrench .

English Manual
Page 14
...trainer coaches you exercise, the console will display continuous exercise feedback. To use a my memory workout, see page 15. To create and use the manual mode, see pages 19 and 20. Note: If there is a sheet of the console, you through your workouts more effective and enjoyable. For example... unwanted pounds with the touch of a button. iFit cards are available separately. To use a timed workout, see the front cover of this manual. You can change the resistance of the pedals and the incline of the ramp with the 8-week Weight Loss workout. The console also offers ...
...trainer coaches you exercise, the console will display continuous exercise feedback. To use a my memory workout, see page 15. To create and use the manual mode, see pages 19 and 20. Note: If there is a sheet of the console, you through your workouts more effective and enjoyable. For example... unwanted pounds with the touch of a button. iFit cards are available separately. To use a timed workout, see the front cover of this manual. You can change the resistance of the pedals and the incline of the ramp with the 8-week Weight Loss workout. The console also offers ...

English Manual
Page 15
...numbered Quick Resistance buttons or by pressing any button on the left corner of the display. 3. Note: After you have selected a workout, reselect the manual mode by pressing the Quick Resistance increase and decrease buttons located on the console or on the power. The console offers several display modes. To... in the power cord (see HOW TO PLUG IN THE POWER CORD on the console, the manual mode will be ready for use. HOW TO TURN ON THE POWER IMPORTANT: If the elliptical has been exposed to cold temperatures, allow it will take a moment for the pedals to reach the ...
...numbered Quick Resistance buttons or by pressing any button on the left corner of the display. 3. Note: After you have selected a workout, reselect the manual mode by pressing the Quick Resistance increase and decrease buttons located on the console or on the power. The console offers several display modes. To... in the power cord (see HOW TO PLUG IN THE POWER CORD on the console, the manual mode will be ready for use. HOW TO TURN ON THE POWER IMPORTANT: If the elliptical has been exposed to cold temperatures, allow it will take a moment for the pedals to reach the ...

English Manual
Page 17
... next segment. During the workout, the workout profile will appear in the display. 3. Measure your current pace. See step 5 on page 15. 5. When you can manually override the setting by pressing the Quick Resistance buttons. When no arrows appear, maintain your heart rate if desired. One resistance level and one target...
... next segment. During the workout, the workout profile will appear in the display. 3. Measure your current pace. See step 5 on page 15. 5. When you can manually override the setting by pressing the Quick Resistance buttons. When no arrows appear, maintain your heart rate if desired. One resistance level and one target...
English Manual
Page 18
... show your heart rate if desired. During the workout, the workout profile will then change. See step 5 on page 15. 5. As you exercise, you can manually override the setting by pressing the Quick Resistance buttons. The height of the display for the workout will appear in this way until the desired...
... show your heart rate if desired. During the workout, the workout profile will then change. See step 5 on page 15. 5. As you exercise, you can manually override the setting by pressing the Quick Resistance buttons. The height of the display for the workout will appear in this way until the desired...

English Manual
Page 21
... card when you can continue exercising and changing the workout for the current segment, simply press the Quick Resistance buttons. 4. At the end of this manual. Insert an iFit card and select a workout. make sure that the iFit card is properly inserted, the indicator next to the iFit slot. To change...
... card when you can continue exercising and changing the workout for the current segment, simply press the Quick Resistance buttons. 4. At the end of this manual. Insert an iFit card and select a workout. make sure that the iFit card is properly inserted, the indicator next to the iFit slot. To change...

English Manual
Page 23
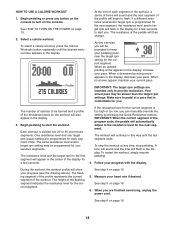
... (see step 5 on the console changes. 91 134 47 Press the Calorie Workouts button once. Press the Quick Ramp increase or decrease button to the manual mode. Remove the indicated #8 x 3/4" Screws (78) from the Magnet. Then, retighten the #8 x 1/2" Screw (91). If the ramp is correctly adjusted,... to be too high or too low, see the instructions below). MAINTENANCE AND TROUBLESHOOTING Inspect and tighten all parts of the elliptical regularly. Loosen, but do not remove, the #8 x 1/2" Screw (91). The ramp calibration instructions will move upward and downward as it calibrates...
... (see step 5 on the console changes. 91 134 47 Press the Calorie Workouts button once. Press the Quick Ramp increase or decrease button to the manual mode. Remove the indicated #8 x 3/4" Screws (78) from the Magnet. Then, retighten the #8 x 1/2" Screw (91). If the ramp is correctly adjusted,... to be too high or too low, see the instructions below). MAINTENANCE AND TROUBLESHOOTING Inspect and tighten all parts of the elliptical regularly. Loosen, but do not remove, the #8 x 1/2" Screw (91). The ramp calibration instructions will move upward and downward as it calibrates...

English Manual
Page 29
For information about ordering replacement parts, see the back cover of this manual. *These parts are subject to change without notice. Description 101 2 102 2 103 2 104 2 105 5 106 4 107 1 108 4 109 1 110 10 111 1 112 1 113 1 114 1 115 1 ... Resistance Motor Screw M6 Washer Pivot Screw iFit Universal iPod Connector Audio Cable Pulse Wire Grip Wire Power Cord Magnet Right Grip w/Buttons Userʼs Manual Assembly Tool Long Lift Motor Wire Short Lift Motor Wire Ground Wire Blue Wire White Wire Note: Specifications are not illustrated. 29 Key No.
For information about ordering replacement parts, see the back cover of this manual. *These parts are subject to change without notice. Description 101 2 102 2 103 2 104 2 105 5 106 4 107 1 108 4 109 1 110 10 111 1 112 1 113 1 114 1 115 1 ... Resistance Motor Screw M6 Washer Pivot Screw iFit Universal iPod Connector Audio Cable Pulse Wire Grip Wire Power Cord Magnet Right Grip w/Buttons Userʼs Manual Assembly Tool Long Lift Motor Wire Short Lift Motor Wire Ground Wire Blue Wire White Wire Note: Specifications are not illustrated. 29 Key No.

English Manual
Page 32
... to the original purchaser. ORDERING REPLACEMENT PARTS To order replacement parts, see the PART LIST and the EXPLODED DRAWING near the end of this manual) LIMITED WARRANTY IMPORTANT: You must be responsible for a lifetime. For in their scope and duration to products transported or purchased outside the US...when contacting us: • the model number and serial number of the product (see the front cover of this manual) • the name of the product (see the front cover of this manual) • the key number and description of the replacement part(s) (see the front cover of this...
... to the original purchaser. ORDERING REPLACEMENT PARTS To order replacement parts, see the PART LIST and the EXPLODED DRAWING near the end of this manual) LIMITED WARRANTY IMPORTANT: You must be responsible for a lifetime. For in their scope and duration to products transported or purchased outside the US...when contacting us: • the model number and serial number of the product (see the front cover of this manual) • the name of the product (see the front cover of this manual) • the key number and description of the replacement part(s) (see the front cover of this...


