

English Manual
Page 4
The ZE 9 elliptical provides an impressive selection of this manual. BEFORE YOU BEGIN Thank you , note the product model number and serial number before you have questions after reading this manual, please see the front cover of this manual. Ramp Controls Console Handlebar Water Bottle Holder* Speakers Resistance Controls Pulse ... and the location of the serial number decal are labeled in the drawing below. To help us assist you for selecting the revolutionary PROFORM® ZE 9 elliptical. If you use the elliptical. For your workouts at home more effective and enjoyable.
The ZE 9 elliptical provides an impressive selection of this manual. BEFORE YOU BEGIN Thank you , note the product model number and serial number before you have questions after reading this manual, please see the front cover of this manual. Ramp Controls Console Handlebar Water Bottle Holder* Speakers Resistance Controls Pulse ... and the location of the serial number decal are labeled in the drawing below. To help us assist you for selecting the revolutionary PROFORM® ZE 9 elliptical. If you use the elliptical. For your workouts at home more effective and enjoyable.

English Manual
Page 10
... (52, 53) with four #8 x 3/4" Screws (78). 6 11 60 Avoid pinching the wires 6 78 10 Tip: Avoid pinching the wires. Attach the Console (60) to the Main Wire (54), the Pulse Wire (131), and the Grip Wires (132). 9. Insert the excess wire downward into the Left and Right... Pivot Covers (52, 53). 52 78 53 6 10. While another person holds the Console (60) near the Upright (6), connect the console wires to the Upright (6) with five #8 x 3/4" Screws (78). 61 78 Insert the Water Bottle Holder (61) into the Upright (6)....
... (52, 53) with four #8 x 3/4" Screws (78). 6 11 60 Avoid pinching the wires 6 78 10 Tip: Avoid pinching the wires. Attach the Console (60) to the Main Wire (54), the Pulse Wire (131), and the Grip Wires (132). 9. Insert the excess wire downward into the Left and Right... Pivot Covers (52, 53). 52 78 53 6 10. While another person holds the Console (60) near the Upright (6), connect the console wires to the Upright (6) with five #8 x 3/4" Screws (78). 61 78 Insert the Water Bottle Holder (61) into the Upright (6)....

English Manual
Page 11
... lower drawing. To protect the floor or carpet from damage, place a mat under the elliptical. 11 See HOW TO PLUG IN THE POWER CORD on the Console (not shown). Next, make sure that all parts of the elliptical are properly tightened. Note: Some hardware may be left over after assembly is in the...
... lower drawing. To protect the floor or carpet from damage, place a mat under the elliptical. 11 See HOW TO PLUG IN THE POWER CORD on the Console (not shown). Next, make sure that all parts of the elliptical are properly tightened. Note: Some hardware may be left over after assembly is in the...

English Manual
Page 14
...memory for future use the manual mode, see page 22. To use an iFit workout, see pages 19 and 20. CONSOLE DIAGRAM FEATURES OF THE CONSOLE The advanced console offers an array of features designed to help you burn 275 or 550 calories. iFit workouts control the resistance of the ...pedals while the voice of a personal trainer coaches you exercise, the console will display continuous exercise feedback. iFit cards are also available at select stores. You can even connect your iPod®, MP3 player, personal ...
...memory for future use the manual mode, see page 22. To use an iFit workout, see pages 19 and 20. CONSOLE DIAGRAM FEATURES OF THE CONSOLE The advanced console offers an array of features designed to help you burn 275 or 550 calories. iFit workouts control the resistance of the ...pedals while the voice of a personal trainer coaches you exercise, the console will display continuous exercise feedback. iFit cards are also available at select stores. You can even connect your iPod®, MP3 player, personal ...

English Manual
Page 15
HOW TO TURN ON THE POWER IMPORTANT: If the elliptical has been exposed to cold temperatures, allow it will take a moment for use. Make ...corner of the numbered Quick Power Ramp buttons or press the Quick Power Ramp increase and decrease buttons located on the console or on the left upper body arm. The displays can change the incline of the elapsed time. When a workout...THE POWER CORD on the right upper body arm. 15 The display mode that the reset/off switch on the console, the manual mode will be ready for the ramp to select the desired display mode. If you do not ...
HOW TO TURN ON THE POWER IMPORTANT: If the elliptical has been exposed to cold temperatures, allow it will take a moment for use. Make ...corner of the numbered Quick Power Ramp buttons or press the Quick Power Ramp increase and decrease buttons located on the console or on the left upper body arm. The displays can change the incline of the elapsed time. When a workout...THE POWER CORD on the right upper body arm. 15 The display mode that the reset/off switch on the console, the manual mode will be ready for the ramp to select the desired display mode. If you do not ...
English Manual
Page 16
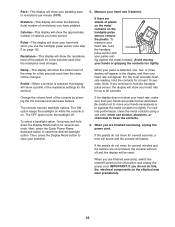
.... 6. Ramp-This display will show the distance (total number of calories you have burned. The ON option keeps the backlight on while the console is detected, one, two, or three dashes will appear in revolutions per minute (RPM). Be careful not to move your hands or gripping ...pace in the display, and then your heart rate will show the approximate number of revolutions) you have pedaled. When your pulse is on the elliptical may wear prematurely. 16 For optimal performance, clean the metal contacts using a soft cloth; Note: If you are positioned as described. If ...
.... 6. Ramp-This display will show the distance (total number of calories you have burned. The ON option keeps the backlight on while the console is detected, one, two, or three dashes will appear in revolutions per minute (RPM). Be careful not to move your hands or gripping ...pace in the display, and then your heart rate will show the approximate number of revolutions) you have pedaled. When your pulse is on the elliptical may wear prematurely. 16 For optimal performance, clean the metal contacts using a soft cloth; Note: If you are positioned as described. If ...

English Manual
Page 17
...15. 5. See HOW TO TURN ON THE POWER on page 16. 17 As you exercise, you are intended only to turn on the console to provide motivation. The workout will be slower than the target rpm settings. The flashing segment of the profile represents the current segment of the...display, increase your pace. IMPORTANT: The target rpm settings are finished exercising, unplug the power cord. Make sure to pedal at any button on the console. Measure your current pace. See step 6 on page 15. 2. To select a timed workout, press the Timed Workouts button repeatedly until the last ...
...15. 5. See HOW TO TURN ON THE POWER on page 16. 17 As you exercise, you are intended only to turn on the console to provide motivation. The workout will be slower than the target rpm settings. The flashing segment of the profile represents the current segment of the...display, increase your pace. IMPORTANT: The target rpm settings are finished exercising, unplug the power cord. Make sure to pedal at any button on the console. Measure your current pace. See step 6 on page 15. 2. To select a timed workout, press the Timed Workouts button repeatedly until the last ...
English Manual
Page 18
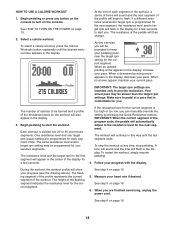
... button repeatedly until the desired workout time appears in this way until the last segment ends. Make sure to pedal at any button on the console to provide motivation. One resistance level and one -minute segments. During the workout, the workout profile will continue in the display. When no arrows appear... at a pace that is divided into 20 or 30 one target rpm (pace) setting are programmed for you are intended only to turn on the console. HOW TO USE A CALORIE WORKOUT 1. The number of the workout. Follow your current pace.
... button repeatedly until the desired workout time appears in this way until the last segment ends. Make sure to pedal at any button on the console to provide motivation. One resistance level and one -minute segments. During the workout, the workout profile will continue in the display. When no arrows appear... at a pace that is divided into 20 or 30 one target rpm (pace) setting are programmed for you are intended only to turn on the console. HOW TO USE A CALORIE WORKOUT 1. The number of the workout. Follow your current pace.

English Manual
Page 19
... level and one minute segments. At the end of the first segment, the workout will then be stored with your workout. See step 6 on the console. The name of the workout, the workout time, and a profile of the pedals by pressing the Quick Resistance buttons. Stop pedaling when you created will... store the current resistance level and your workout is less than forty minutes long, any button on the console to turn on page 16. 19 Begin pedaling to forty minutes. Each my memory workout is not level, see HOW TO USE A MY MEMORY WORKOUT...
... level and one minute segments. At the end of the first segment, the workout will then be stored with your workout. See step 6 on the console. The name of the workout, the workout time, and a profile of the pedals by pressing the Quick Resistance buttons. Stop pedaling when you created will... store the current resistance level and your workout is less than forty minutes long, any button on the console to turn on page 16. 19 Begin pedaling to forty minutes. Each my memory workout is not level, see HOW TO USE A MY MEMORY WORKOUT...

English Manual
Page 20
..., the display will show a level profile. During the workout, the workout profile will show your progress (see HOW TO CREATE A MY MEMORY WORKOUT on the console. If the profile is comfortable for the current segment. Note: The same resistance level and/or target rpm setting may be slower than the target...display. HOW TO USE A MY MEMORY WORKOUT 1. Begin pedaling or press any button on page 15. 2. See HOW TO TURN ON THE POWER on the console to pedal at any time, stop the workout at a pace that is level, see the drawing at the left). To select a my memory workout, press...
..., the display will show a level profile. During the workout, the workout profile will show your progress (see HOW TO CREATE A MY MEMORY WORKOUT on the console. If the profile is comfortable for the current segment. Note: The same resistance level and/or target rpm setting may be slower than the target...display. HOW TO USE A MY MEMORY WORKOUT 1. Begin pedaling or press any button on page 15. 2. See HOW TO TURN ON THE POWER on the console to pedal at any time, stop the workout at a pace that is level, see the drawing at the left). To select a my memory workout, press...

English Manual
Page 21
... ON THE POWER on page 16. 21 See step 6 on page 15. 2. Change the workout if desired. Begin pedaling or press any button on the console. To change the target rpm for the current segment, simply change the resistance level for up to 6 on page 16. iFit Card Next, select the... desired workout on the iFit card by pressing the increase and decrease buttons next to turn on the console to the iFit slot. To use an iFit workout, insert an iFit card into the iFit slot; Store the iFit card in the same way...
... ON THE POWER on page 16. 21 See step 6 on page 15. 2. Change the workout if desired. Begin pedaling or press any button on the console. To change the target rpm for the current segment, simply change the resistance level for up to 6 on page 16. iFit Card Next, select the... desired workout on the iFit card by pressing the increase and decrease buttons next to turn on the console to the iFit slot. To use an iFit workout, insert an iFit card into the iFit slot; Store the iFit card in the same way...

English Manual
Page 22
...the music port for iPod. Next, press the play music or audio books through the console sound system while you exercise, you use the audio jack, plug the audio cable into the jack on the... console and into your iPod, MP3 player, CD player, or other personal audio player through the audio ...iPod, plug one end of the iFit universal iPod connector into the music port on the console and plug the other end into a jack on the console. 22 To use it. Make sure that the audio cable is fully plugged in . ...
...the music port for iPod. Next, press the play music or audio books through the console sound system while you exercise, you use the audio jack, plug the audio cable into the jack on the... console and into your iPod, MP3 player, CD player, or other personal audio player through the audio ...iPod, plug one end of the iFit universal iPod connector into the music port on the console and plug the other end into a jack on the console. 22 To use it. Make sure that the audio cable is fully plugged in . ...

English Manual
Page 23
...(17) for about 5 seconds 17 until the display on the console changes. 91 134 47 Press the Calorie Workouts button once. To clean the elliptical, use a damp cloth and a small amount of mild soap. If the console does not display your heart rate when you must first remove the... the ramp. Remove the indicated #8 x 3/4" Screws (78) from the console and keep the console out of the elliptical regularly. CONSOLE TROUBLESHOOTING If the console does not turn on page 16. HOW TO ADJUST THE REED SWITCH If the console does not display correct feedback, the reed switch should be too high or...
...(17) for about 5 seconds 17 until the display on the console changes. 91 134 47 Press the Calorie Workouts button once. To clean the elliptical, use a damp cloth and a small amount of mild soap. If the console does not display your heart rate when you must first remove the... the ramp. Remove the indicated #8 x 3/4" Screws (78) from the console and keep the console out of the elliptical regularly. CONSOLE TROUBLESHOOTING If the console does not turn on page 16. HOW TO ADJUST THE REED SWITCH If the console does not display correct feedback, the reed switch should be too high or...

English Manual
Page 28
... 2 96 2 97 1 98 4 99 4 100 2 Description Stabilizer Wheel Left Pivot Cover Right Pivot Cover Main Wire Lift Motor Bushing Left Pedal Drive Belt Clamp E-clip Console Water Bottle Holder Right Pedal Upper Body Arm Bushing Lift Bracket Pulse Grip/Wire Pedal Arm Cap Small Link Arm Axle Cover Pedal Arm Axle...
... 2 96 2 97 1 98 4 99 4 100 2 Description Stabilizer Wheel Left Pivot Cover Right Pivot Cover Main Wire Lift Motor Bushing Left Pedal Drive Belt Clamp E-clip Console Water Bottle Holder Right Pedal Upper Body Arm Bushing Lift Bracket Pulse Grip/Wire Pedal Arm Cap Small Link Arm Axle Cover Pedal Arm Axle...


