
User Manual
Page 1
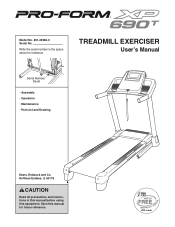
Write the serial number in this manual before using this manual for reference. TREADMILL EXERCISER Userʼs Manual Serial Number Decal • Assembly • Operation • Maintenance • Part List and Drawing Sears, Roebuck and Co. Hoffman Estates, IL 60179 CAUTION Read all precautions and instructions in the space above for future reference. Save this equipment. Model No. 831.24966.0 Serial No.
Write the serial number in this manual before using this manual for reference. TREADMILL EXERCISER Userʼs Manual Serial Number Decal • Assembly • Operation • Maintenance • Part List and Drawing Sears, Roebuck and Co. Hoffman Estates, IL 60179 CAUTION Read all precautions and instructions in the space above for future reference. Save this equipment. Model No. 831.24966.0 Serial No.

User Manual
Page 2
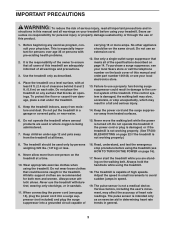
If a decal is missing or illegible, call 1-888-533-1333 and request a free replacement decal. TABLE OF CONTENTS WARNING DECAL PLACEMENT 2 IMPORTANT PRECAUTIONS 3 BEFORE YOU BEGIN 5 ASSEMBLY 6 OPERATION AND ADJUSTMENT 14 HOW TO FOLD AND MOVE THE TREADMILL 20 TROUBLESHOOTING 22 EXERCISE GUIDELINES 25 PART LIST 26 EXPLODED DRAWING 28 ORDERING REPLACEMENT PARTS Back Cover ONE YEAR FULL WARRANTY Back Cover WARNING DECAL PLACEMENT This drawing shows the locations of the warning decals. Apply the decal in the location shown. Note: The decals may not be shown at actual size. 2
If a decal is missing or illegible, call 1-888-533-1333 and request a free replacement decal. TABLE OF CONTENTS WARNING DECAL PLACEMENT 2 IMPORTANT PRECAUTIONS 3 BEFORE YOU BEGIN 5 ASSEMBLY 6 OPERATION AND ADJUSTMENT 14 HOW TO FOLD AND MOVE THE TREADMILL 20 TROUBLESHOOTING 22 EXERCISE GUIDELINES 25 PART LIST 26 EXPLODED DRAWING 28 ORDERING REPLACEMENT PARTS Back Cover ONE YEAR FULL WARRANTY Back Cover WARNING DECAL PLACEMENT This drawing shows the locations of the warning decals. Apply the decal in the location shown. Note: The decals may not be shown at actual size. 2
User Manual
Page 3
...the power cord (see your local Sears store or call the telephone number on the walking belt. Never start the treadmill while you are adequately informed of this manual and order part number 146148, or see page 14), plug the power cord into a surge suppressor (not included) and plug ...the surge suppressor into a grounded circuit capable of the specifications described on each side. To protect the floor or carpet from the treadmill at all warnings and...
...the power cord (see your local Sears store or call the telephone number on the walking belt. Never start the treadmill while you are adequately informed of this manual and order part number 146148, or see page 14), plug the power cord into a surge suppressor (not included) and plug ...the surge suppressor into a grounded circuit capable of the specifications described on each side. To protect the floor or carpet from the treadmill at all warnings and...
User Manual
Page 4
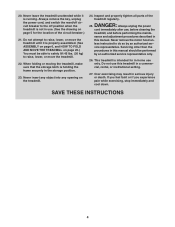
...an authorized service representative only. 26. Inspect and properly tighten all parts of the circuit breaker.) 21. less instructed to raise, lower, or move the treadmill until it is intended for the location of the treadmill regularly. If you feel faint or if you experience pain while ...exercising, stop immediately and cool down. Never remove the motor hood un- Never leave the treadmill unattended while it is holding the frame securely in serious injury or death. 20. Always unplug the power cord immediately after use ....
...an authorized service representative only. 26. Inspect and properly tighten all parts of the circuit breaker.) 21. less instructed to raise, lower, or move the treadmill until it is intended for the location of the treadmill regularly. If you feel faint or if you experience pain while ...exercising, stop immediately and cool down. Never remove the motor hood un- Never leave the treadmill unattended while it is holding the frame securely in serious injury or death. 20. Always unplug the power cord immediately after use ....
User Manual
Page 5
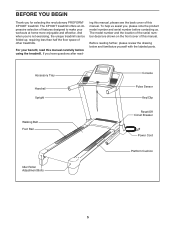
... of this manual carefully before contacting us assist you ʼre not exercising, the unique treadmill can be folded up, requiring less than half the floor space of other treadmills. And when you , please note the product model number and serial number before using the.../Clip Reset/Off Circuit Breaker Power Cord Platform Cushion 5 If you for selecting the revolutionary PROFORM® XP 690T treadmill. BEFORE YOU BEGIN Thank you have questions after read this manual. The XP 690T treadmill offers an impressive selection of this manual. ing this manual, please see the back cover ...
... of this manual carefully before contacting us assist you ʼre not exercising, the unique treadmill can be folded up, requiring less than half the floor space of other treadmills. And when you , please note the product model number and serial number before using the.../Clip Reset/Off Circuit Breaker Power Cord Platform Cushion 5 If you for selecting the revolutionary PROFORM® XP 690T treadmill. BEFORE YOU BEGIN Thank you have questions after read this manual. The XP 690T treadmill offers an impressive selection of this manual. ing this manual, please see the back cover ...
User Manual
Page 6
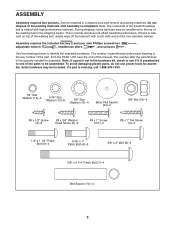
... parentheses below to see if it is normal and does not affect treadmill performance. If there is the quantity needed for assembly. To avoid damaging plastic parts, do not use power tools for assembly. During shipping, some lubricant... 1/4" x 1 1/4" Patch Bolt (9)-4 5/16" x 1" Patch Bolt (4)-6 3/8" x 2" Bolt (8)-4 3/8" x 4 1/4" Patch Bolt (7)-4 Bolt Spacer (14)-4 6 This is preattached to the top of the treadmill walking belt is completed. Assembly requires the included hex key and your own Phillips screwdriver , adjustable wrench , needlenose pliers , and scissors . If...
... parentheses below to see if it is normal and does not affect treadmill performance. If there is the quantity needed for assembly. To avoid damaging plastic parts, do not use power tools for assembly. During shipping, some lubricant... 1/4" x 1 1/4" Patch Bolt (9)-4 5/16" x 1" Patch Bolt (4)-6 3/8" x 2" Bolt (8)-4 3/8" x 4 1/4" Patch Bolt (7)-4 Bolt Spacer (14)-4 6 This is preattached to the top of the treadmill walking belt is completed. Assembly requires the included hex key and your own Phillips screwdriver , adjustable wrench , needlenose pliers , and scissors . If...
User Manual
Page 13
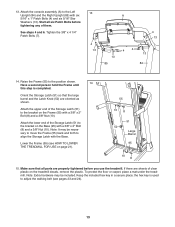
... the Base. Attach the lower end of the Storage Latch (51) to the bracket on the treadmill decals, remove the plastic. Note: Extra hardware may be included. the hex key is completed. Start all parts are properly tightened before tightening any of clear plastic on the Base (95) with a 3/8" x... 2" Bolt (8) and a 3/8" Nut (10). Orient the Storage Latch (51) so that all six Patch Bolts before you use the treadmill. 13. If there are oriented as...
... the Base. Attach the lower end of the Storage Latch (51) to the bracket on the treadmill decals, remove the plastic. Note: Extra hardware may be included. the hex key is completed. Start all parts are properly tightened before tightening any of clear plastic on the Base (95) with a 3/8" x... 2" Bolt (8) and a 3/8" Nut (10). Orient the Storage Latch (51) so that all six Patch Bolts before you use the treadmill. 13. If there are oriented as...
User Manual
Page 14
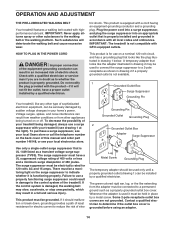
... a 2-pole receptacle as shown in doubt as to whether the product is properly grounded. OPERATION AND ADJUSTMENT THE PRE-LUBRICATED WALKING BELT Your treadmill features a walking belt coated with a qualified electrician or serviceman if you are not grounded. To purchase a surge suppressor, see drawing 1... being damaged, always use on or off. tric shock. IMPORTANT: The treadmill is for electric current to reduce the risk of this manual and order part number 146148, or see your treadmill (see your local Sears store or call the telephone number on the surge...
... a 2-pole receptacle as shown in doubt as to whether the product is properly grounded. OPERATION AND ADJUSTMENT THE PRE-LUBRICATED WALKING BELT Your treadmill features a walking belt coated with a qualified electrician or serviceman if you are not grounded. To purchase a surge suppressor, see drawing 1... being damaged, always use on or off. tric shock. IMPORTANT: The treadmill is for electric current to reduce the risk of this manual and order part number 146148, or see your treadmill (see your local Sears store or call the telephone number on the surge...
User Manual
Page 25
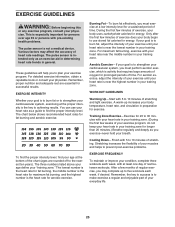
... for aerobic exercise. Aerobic Exercise-If your goal is near the lowest number in your breath. Remember, the key to make exercise a regular and enjoyable part of time. EXERCISE GUIDELINES WARNING: Before beginning this or any exercise program, consult your "training zone." The pulse sensor is to success is intended only...
... for aerobic exercise. Aerobic Exercise-If your goal is near the lowest number in your breath. Remember, the key to make exercise a regular and enjoyable part of time. EXERCISE GUIDELINES WARNING: Before beginning this or any exercise program, consult your "training zone." The pulse sensor is to success is intended only...
User Manual
Page 26
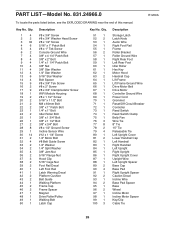
... Foot Rail Latch Warning Decal Platform Cushion Belt Guide Walking Platform Frame Cap Frame Spacer Magnet Drive Roller/Pulley Walking Belt Latch Cap Key No. PART LIST-Model No. 831.24966.0 R1209A To locate the parts listed below, see the EXPLODED DRAWING near the end of this manual. Key No.
... Foot Rail Latch Warning Decal Platform Cushion Belt Guide Walking Platform Frame Cap Frame Spacer Magnet Drive Roller/Pulley Walking Belt Latch Cap Key No. PART LIST-Model No. 831.24966.0 R1209A To locate the parts listed below, see the EXPLODED DRAWING near the end of this manual. Key No.

User Manual
Page 27
Qty. 101 1 102 1 103 1 104 1 105 2 Description Console Console Frame Left Accessory Tray Right Accessory Tray Console Clamp Key No. For information about ordering replacement parts, see the back cover of this manual. Description Console Base #8 x 1" Screw Left Speaker Right Speaker Userʼs Manual Note: Specifications are not illustrated. 27 If a part is missing, call 1-888-533-1333. *These parts are subject to change without notice. Key No. Qty. 106 1 107 4 108 1 109 1 * -
Qty. 101 1 102 1 103 1 104 1 105 2 Description Console Console Frame Left Accessory Tray Right Accessory Tray Console Clamp Key No. For information about ordering replacement parts, see the back cover of this manual. Description Console Base #8 x 1" Screw Left Speaker Right Speaker Userʼs Manual Note: Specifications are not illustrated. 27 If a part is missing, call 1-888-533-1333. *These parts are subject to change without notice. Key No. Qty. 106 1 107 4 108 1 109 1 * -

User Manual
Page 32
... Call anytime, day or night (U.S.A. This warranty gives you specific legal rights, and you need to arrange for the location of your nearest Sears Parts & Repair Center. 1-800-488-1222 Call anytime, day or night (U.S.A. For Sears professional installation of home appliances and items like vacuums, lawn... equipment, and electronics, call 1-800-4-MY-HOME® (1-800-469-4663) to do-it ! This warranty does not apply when the Treadmill Exerciser is used commercially or for a lifetime. Get it fixed, at your home-of all major brand appliances, lawn and garden equipment, or ...
... Call anytime, day or night (U.S.A. This warranty gives you specific legal rights, and you need to arrange for the location of your nearest Sears Parts & Repair Center. 1-800-488-1222 Call anytime, day or night (U.S.A. For Sears professional installation of home appliances and items like vacuums, lawn... equipment, and electronics, call 1-800-4-MY-HOME® (1-800-469-4663) to do-it ! This warranty does not apply when the Treadmill Exerciser is used commercially or for a lifetime. Get it fixed, at your home-of all major brand appliances, lawn and garden equipment, or ...


