
Canadian English Manual
Page 1
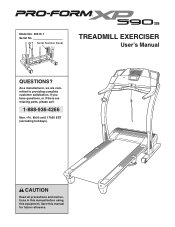
If you have questions, or if there are committed to providing complete customer satisfaction. CAUTION Read all precautions and instructions in this manual before using this manual for future reference. As a manufacturer, we are missing parts, please call: 1-888-936-4266 Mon.-Fri. 8h00 until 17h00 EST (excluding holidays). Serial Number Decal TREADMILL EXERCISER User's Manual QUESTIONS? Save this equipment. Model No. 30515.1 Serial No.
If you have questions, or if there are committed to providing complete customer satisfaction. CAUTION Read all precautions and instructions in this manual before using this manual for future reference. As a manufacturer, we are missing parts, please call: 1-888-936-4266 Mon.-Fri. 8h00 until 17h00 EST (excluding holidays). Serial Number Decal TREADMILL EXERCISER User's Manual QUESTIONS? Save this equipment. Model No. 30515.1 Serial No.

Canadian English Manual
Page 2
... joules minimum surge dissipation with bare feet, wearing only stockings, or in length. Do not place the treadmill on the treadmill at 15 amps, with at all users of this treadmill are adequately informed of this manual. Athletic support clothes are used by persons weighing more amps. Failure to ensure that all times. 7. IMPORTANT...
... joules minimum surge dissipation with bare feet, wearing only stockings, or in length. Do not place the treadmill on the treadmill at 15 amps, with at all users of this treadmill are adequately informed of this manual. Athletic support clothes are used by persons weighing more amps. Failure to ensure that all times. 7. IMPORTANT...
Canadian English Manual
Page 3
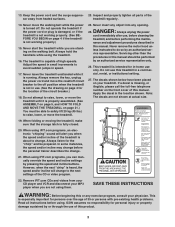
... before performing the mainte- Remove iFIT.com CDs and videos from heated surfaces. This is turned off. treadmill regularly. 14. Never start the treadmill while you can manually override the speed and incline settings by an authorized service representative only. 26. Adjust the speed in this...Note: The decals are standing on your MP3 player when you when the speed and/or incline of this manual. SAVE THESE INSTRUCTIONS WARNING: Before beginning this treadmill in this manual. 13. Keep the power cord and the surge suppres- 23. If a decal is properly assembled. (...
... before performing the mainte- Remove iFIT.com CDs and videos from heated surfaces. This is turned off. treadmill regularly. 14. Never start the treadmill while you can manually override the speed and incline settings by an authorized service representative only. 26. Adjust the speed in this...Note: The decals are standing on your MP3 player when you when the speed and/or incline of this manual. SAVE THESE INSTRUCTIONS WARNING: Before beginning this treadmill in this manual. 13. Keep the power cord and the surge suppres- 23. If a decal is properly assembled. (...

Canadian English Manual
Page 4
And when you have questions after read this manual carefully before contacting us assist you for selecting the revolutionary PROFORM® XP 590s treadmill. Before reading further, please review the drawing below and familiarize yourself with the labeled parts. Fan Accessory Tray Handrail ...up, requiring less than half the floor space of this manual. To help us . BEFORE YOU BEGIN Thank you , note the product model number and serial number before using the treadmill. The XP 590s treadmill offers an impressive array of the treadmill is 30515.1. The serial number can be found on ...
And when you have questions after read this manual carefully before contacting us assist you for selecting the revolutionary PROFORM® XP 590s treadmill. Before reading further, please review the drawing below and familiarize yourself with the labeled parts. Fan Accessory Tray Handrail ...up, requiring less than half the floor space of this manual. To help us . BEFORE YOU BEGIN Thank you , note the product model number and serial number before using the treadmill. The XP 590s treadmill offers an impressive array of the treadmill is 30515.1. The serial number can be found on ...
Canadian English Manual
Page 5
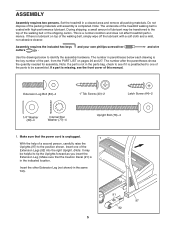
... the Uprights forward as you insert the Extension Leg.) Make sure that the power cord is the key number of the treadmill walking belt is a normal condition and does not affect treadmill performance. Extension Leg Bolt (80)-4 1" Tek Screw (40)-2 Latch Screw (44)-2 1/4" Washer (39)-4 Internal Star Washer... pages 26 and 27. and wire Use the drawings below each drawing is unplugged. 1 With the help of this manual. If a part is completed. Set the treadmill in the same way. 91 97 92 5 ASSEMBLY Assembly requires two persons. Do not dispose of the packing materials until...
... the Uprights forward as you insert the Extension Leg.) Make sure that the power cord is the key number of the treadmill walking belt is a normal condition and does not affect treadmill performance. Extension Leg Bolt (80)-4 1" Tek Screw (40)-2 Latch Screw (44)-2 1/4" Washer (39)-4 Internal Star Washer... pages 26 and 27. and wire Use the drawings below each drawing is unplugged. 1 With the help of this manual. If a part is completed. Set the treadmill in the same way. 91 97 92 5 ASSEMBLY Assembly requires two persons. Do not dispose of the packing materials until...

Canadian English Manual
Page 9
... automatically control the speed and incline of features designed to help you can be changed with the touch of the treadmill to use the manual mode of the console, remove it. See www.iFIT.com for more information. highenergy music provides added motivation. With the... treadmill connected to www.iFIT.com. Key Clip FEATURES OF THE CONSOLE The treadmill console offers an impressive array of the treadmill as a personal trainer guides you an effective workout. When the manual mode of the console is selected, the speed...
... automatically control the speed and incline of features designed to help you can be changed with the touch of the treadmill to use the manual mode of the console, remove it. See www.iFIT.com for more information. highenergy music provides added motivation. With the... treadmill connected to www.iFIT.com. Key Clip FEATURES OF THE CONSOLE The treadmill console offers an impressive array of the treadmill as a personal trainer guides you an effective workout. When the manual mode of the console is selected, the speed...
Canadian English Manual
Page 10
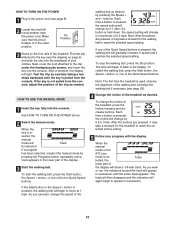
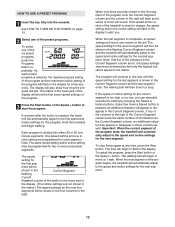
... reach the selected speed setting. Note: The first time the treadmill is pressed, the incline will Track be selected. As you exercise, change in succession until a track appears in - serted, the manual mode will change the incline of the display will gradually increase in the display. if a button... clothes. On Position 3 Stand on page 9) and slide the clip onto the waistband of the treadmill. See HOW TO TURN ON THE POWER above. 2 Select the manual mode. HOW TO USE THE MANUAL MODE 1 Insert the key fully into the console. When the key is in the lower part of...
... reach the selected speed setting. Note: The first time the treadmill is pressed, the incline will Track be selected. As you exercise, change in succession until a track appears in - serted, the manual mode will change the incline of the display will gradually increase in the display. if a button... clothes. On Position 3 Stand on page 9) and slide the clip onto the waistband of the treadmill. See HOW TO TURN ON THE POWER above. 2 Select the manual mode. HOW TO USE THE MANUAL MODE 1 Insert the key fully into the console. When the key is in the lower part of...
Canadian English Manual
Page 12
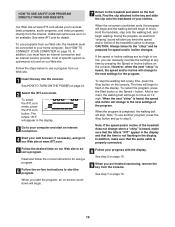
...The program will continue in this way until the speed setting for the last segment is pressed, the treadmill will automatically adjust to the right will begin to alert you can manually override the setting by pressing the Speed or Incline buttons. If any time, press the Stop button. ... press the Start button or the Speed + button. A moment after the button is shown in the flashing Current Segment column and the treadmill will be shown in the Current Segment flashing Current Segment column of the matrix in those columns as the Current Segment column, an additional ...
...The program will continue in this way until the speed setting for the last segment is pressed, the treadmill will automatically adjust to the right will begin to alert you can manually override the setting by pressing the Speed or Incline buttons. If any time, press the Stop button. ... press the Start button or the Speed + button. A moment after the button is shown in the flashing Current Segment column and the treadmill will be shown in the Current Segment flashing Current Segment column of the matrix in those columns as the Current Segment column, an additional ...

Canadian English Manual
Page 18
...on the fan if desired. See step 7 on page 22. 4 Follow your MP3 player when you can manually override the settings at 1.0 mph. If the volume is too high or too low, the console may ...Note: To use another flat surface instead of on the console. • See the "The incline of the treadmill does not change when a "chirp" is properly connected. • If you are using them. 18 See step... press the Start button or the Speed + button. Note: If the speed and/or incline of the treadmill does not change correctly" on page 11. 7 When you are not using a portable CD player and the...
...on the fan if desired. See step 7 on page 22. 4 Follow your MP3 player when you can manually override the settings at 1.0 mph. If the volume is too high or too low, the console may ...Note: To use another flat surface instead of on the console. • See the "The incline of the treadmill does not change when a "chirp" is properly connected. • If you are using them. 18 See step... press the Start button or the Speed + button. Note: If the speed and/or incline of the treadmill does not change correctly" on page 11. 7 When you are not using a portable CD player and the...
Canadian English Manual
Page 19
... into the console. A list of specific system requirements is heard, the speed and/or incline will begin walking. The letters "iFIT" will begin to the treadmill and stand on the foot rails. To stop . When the next "chirp" is heard, the speed and incline will change when a "chirp" is heard, .... CAUTION: Always listen for speed and/or incline changes. See step 5 on page 10. 9 When you are too high or too low, you can manually override the settings at any time by pressing the Speed or Incline buttons on -screen countdown ends, the program will begin to step 5. Find the...
... into the console. A list of specific system requirements is heard, the speed and/or incline will begin walking. The letters "iFIT" will begin to the treadmill and stand on the foot rails. To stop . When the next "chirp" is heard, the speed and incline will change when a "chirp" is heard, .... CAUTION: Always listen for speed and/or incline changes. See step 5 on page 10. 9 When you are too high or too low, you can manually override the settings at any time by pressing the Speed or Incline buttons on -screen countdown ends, the program will begin to step 5. Find the...
Canadian English Manual
Page 22
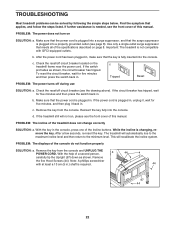
... not change correctly SOLUTION: a. TROUBLESHOOTING Most treadmill problems can be solved by following the simple steps below. If further assistance is plugged into a surge suppressor, and that the surge suppressor is needed, see the front cover of this manual. If the circuit breaker has tripped, wait for...as shown. While the incline is required. 44 97 44 22 With the help of this manual. Reinsert the key fully into the console. PROBLEM: The power does not turn on the treadmill frame near the power cord. Use only a single-outlet surge suppressor that applies, and ...
... not change correctly SOLUTION: a. TROUBLESHOOTING Most treadmill problems can be solved by following the simple steps below. If further assistance is plugged into a surge suppressor, and that the surge suppressor is needed, see the front cover of this manual. If the circuit breaker has tripped, wait for...as shown. While the incline is required. 44 97 44 22 With the help of this manual. Reinsert the key fully into the console. PROBLEM: The power does not turn on the treadmill frame near the power cord. Use only a single-outlet surge suppressor that applies, and ...
Canadian English Manual
Page 23
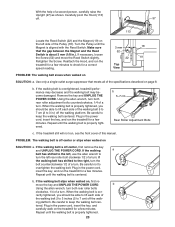
... few minutes. Using the allen wrench, turn ; When the walking belt is about 3 mm (1/8 in the power cord, insert the key, and run the treadmill for a few minutes to lift each side of the Pulley (18). b 5-7 cm Rear Roller Adjustment Bolts c. PROBLEM: The walking belt is off the walking ...97) as shown. Plug in the power cord, insert the key, and run , see the front cover of a turn the bolt counterclockwise 1/2 of this manual. Carefully pivot the Hood (113) off. 97 113 Locate the Reed Switch (22) and the Magnet (19) on the left rear roller bolt clockwise 1/2...
... few minutes. Using the allen wrench, turn ; When the walking belt is about 3 mm (1/8 in the power cord, insert the key, and run the treadmill for a few minutes to lift each side of the Pulley (18). b 5-7 cm Rear Roller Adjustment Bolts c. PROBLEM: The walking belt is off the walking ...97) as shown. Plug in the power cord, insert the key, and run , see the front cover of a turn the bolt counterclockwise 1/2 of this manual. Carefully pivot the Hood (113) off. 97 113 Locate the Reed Switch (22) and the Magnet (19) on the left rear roller bolt clockwise 1/2...

Canadian English Manual
Page 26
... Description Key No. PART LIST-Model No. 30515.1 R0307A To locate the parts listed below, see the EXPLODED DRAWING attached in the center of this manual. Qty.
... Description Key No. PART LIST-Model No. 30515.1 R0307A To locate the parts listed below, see the EXPLODED DRAWING attached in the center of this manual. Qty.
Canadian English Manual
Page 27
... 2 Motor Bracket Bolt 115 1 Photo Switch Screw 116 1 Left Handrail 117 1 Left Top Handgrip Key No. PLODED DRAWING attached in the center of this manual. Description 118 1 Photo Switch Nut 119 1 Front Ground Wire 120 1 Pulsebar Ground Screw 121 1 1/4" Nylon Locknut 122 2 Handlebar Screw 123 2 Lift...THE PART(S) (see the front cover of this manual) 27 Qty. Qty. Key No. When ordering parts, please be prepared to provide the following information: • The MODEL NUMBER of the product (30515.1) • The NAME OF THE PRODUCT (PROFORM XP 590s) • The SERIAL NUMBER OF THE PRODUCT...
... 2 Motor Bracket Bolt 115 1 Photo Switch Screw 116 1 Left Handrail 117 1 Left Top Handgrip Key No. PLODED DRAWING attached in the center of this manual. Description 118 1 Photo Switch Nut 119 1 Front Ground Wire 120 1 Pulsebar Ground Screw 121 1 1/4" Nylon Locknut 122 2 Handlebar Screw 123 2 Lift...THE PART(S) (see the front cover of this manual) 27 Qty. Qty. Key No. When ordering parts, please be prepared to provide the following information: • The MODEL NUMBER of the product (30515.1) • The NAME OF THE PRODUCT (PROFORM XP 590s) • The SERIAL NUMBER OF THE PRODUCT...

Canadian English Manual
Page 28
.... notify our Customer Service Department of any defected part for replacement or, if necessary, the entire product, for repair. USER'S MANUAL-It is authorized to change, modify or extend the terms of this limited warranty. HOW TO GET PARTS AND SERVICE-Simply call ... operation and your User's Manual ("Manual"). This warranty gives you specific legal rights and you , without our written authorization or by ICON first and are covered for one (1) year after the date of purchase. LIMITED WARRANTY WHAT IS COVERED-The entire PROFORM® XP 590s treadmill ("Product") is covered for...
.... notify our Customer Service Department of any defected part for replacement or, if necessary, the entire product, for repair. USER'S MANUAL-It is authorized to change, modify or extend the terms of this limited warranty. HOW TO GET PARTS AND SERVICE-Simply call ... operation and your User's Manual ("Manual"). This warranty gives you specific legal rights and you , without our written authorization or by ICON first and are covered for one (1) year after the date of purchase. LIMITED WARRANTY WHAT IS COVERED-The entire PROFORM® XP 590s treadmill ("Product") is covered for...
Canadian English Manual
Page 29
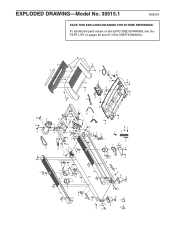
To identify the parts shown on this EXPLODED DRAWING, see the PART LIST on pages 26 and 27 of the USER'S MANUAL. 3 28 61 31 2 1 2 7 9 78 6 10 42 78 6 69 16 35 39 62 77 66 52 65 64 11 14 11 15 12 13 68 2 67 2 ...
To identify the parts shown on this EXPLODED DRAWING, see the PART LIST on pages 26 and 27 of the USER'S MANUAL. 3 28 61 31 2 1 2 7 9 78 6 10 42 78 6 69 16 35 39 62 77 66 52 65 64 11 14 11 15 12 13 68 2 67 2 ...


