
Canadian English Manual
Page 2
... person on any surface that all users of this manual. Use the treadmill only as described. 3. When connecting the power cord (see page 8), plug the power cord into a surge suppressor (not included) and plug the surge suppressor into a grounded ... ASSEMBLY 5 OPERATION AND ADJUSTMENT 8 HOW TO FOLD AND MOVE THE TREADMILL 21 TROUBLESHOOTING 22 CONDITIONING GUIDELINES 24 PART LIST 26 ORDERING REPLACEMENT PARTS 27 LIMITED WARRANTY Back Cover Note: An EXPLODED DRAWING is damaged, the walking belt may change speed, accelerate, or stop unexpectedly, which may result in a garage or covered ...
... person on any surface that all users of this manual. Use the treadmill only as described. 3. When connecting the power cord (see page 8), plug the power cord into a surge suppressor (not included) and plug the surge suppressor into a grounded ... ASSEMBLY 5 OPERATION AND ADJUSTMENT 8 HOW TO FOLD AND MOVE THE TREADMILL 21 TROUBLESHOOTING 22 CONDITIONING GUIDELINES 24 PART LIST 26 ORDERING REPLACEMENT PARTS 27 LIMITED WARRANTY Back Cover Note: An EXPLODED DRAWING is damaged, the walking belt may change speed, accelerate, or stop unexpectedly, which may result in a garage or covered ...
Canadian English Manual
Page 3
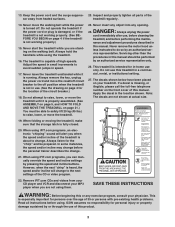
... TREADMILL on the front cover of high speeds. Apply the decal in -home use . (See the drawing on page 4 if the treadmill is running. Inspect and properly tighten all instructions before using. Never move the reset/off circuit breaker to the next settings of the circuit breaker.) 18. This treadmill is fully closed. 20. Always remove the key, unplug the power cord and move the walking belt while the power is turned...
... TREADMILL on the front cover of high speeds. Apply the decal in -home use . (See the drawing on page 4 if the treadmill is running. Inspect and properly tighten all instructions before using. Never move the reset/off circuit breaker to the next settings of the circuit breaker.) 18. This treadmill is fully closed. 20. Always remove the key, unplug the power cord and move the walking belt while the power is turned...

Canadian English Manual
Page 4
... after read this manual for the location). ing this manual, please see the front cover of the treadmill is 30515.1. The model number of this manual carefully before contacting us assist you for maximum exercise comfort 4 Fan Accessory Tray Handrail Storage Latch Upright Walking Belt Foot Rail BACK Rear Roller Adjustment Bolts Console Pulse Sensor Key/Clip Reset/Off Circuit Breaker Power Cord RIGHT SIDE Cushioned Walking Platform for selecting the revolutionary PROFORM® XP 590s treadmill. To help us...
... after read this manual for the location). ing this manual, please see the front cover of the treadmill is 30515.1. The model number of this manual carefully before contacting us assist you for maximum exercise comfort 4 Fan Accessory Tray Handrail Storage Latch Upright Walking Belt Foot Rail BACK Rear Roller Adjustment Bolts Console Pulse Sensor Key/Clip Reset/Off Circuit Breaker Power Cord RIGHT SIDE Cushioned Walking Platform for selecting the revolutionary PROFORM® XP 590s treadmill. To help us...
Canadian English Manual
Page 5
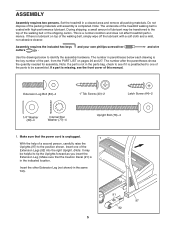
... the front cover of lubricant may be helpful to be assembled. ASSEMBLY Assembly requires two persons. Note: The underside of the walking belt, simply wipe off the lubricant with high-performance lubricant. and wire Use the drawings below each drawing is completed. Do not dispose of the packing materials until assembly is the key number of the part, from the PART LIST on top of the treadmill walking belt is...
... the front cover of lubricant may be helpful to be assembled. ASSEMBLY Assembly requires two persons. Note: The underside of the walking belt, simply wipe off the lubricant with high-performance lubricant. and wire Use the drawings below each drawing is completed. Do not dispose of the packing materials until assembly is the key number of the part, from the PART LIST on top of the treadmill walking belt is...
Canadian English Manual
Page 7
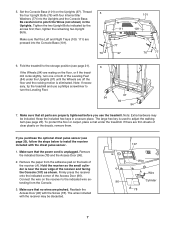
Thread 5 the four Upright Bolts (76) with the chest pulse sensor. 1. Tighten the two Upright Bolts indicated by the arrows first; Fold the treadmill to the storage position (see page 20), follow the steps below to install the receiver included with four Internal Star Washers (77) into the Console Base (101). 76 111 77 97 101 109 77 76 77 6. Make sure that the Left...
Thread 5 the four Upright Bolts (76) with the chest pulse sensor. 1. Tighten the two Upright Bolts indicated by the arrows first; Fold the treadmill to the storage position (see page 20), follow the steps below to install the receiver included with four Internal Star Washers (77) into the Console Base (101). 76 111 77 97 101 109 77 76 77 6. Make sure that the Left...
Canadian English Manual
Page 8
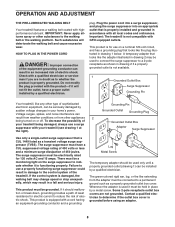
... if the outlet box cover is grounded before using an adapter. 8 HOW TO PLUG IN THE POWER CORD DANGER: Improper connection of the equipment-grounding conductor can be seriously damaged by a qualified electrician. Do not modify the plug provided with the product-if it is damaged, the walking belt may change speed or stop unexpectedly, which may be used to connect the surge suppressor to...
... if the outlet box cover is grounded before using an adapter. 8 HOW TO PLUG IN THE POWER CORD DANGER: Improper connection of the equipment-grounding conductor can be seriously damaged by a qualified electrician. Do not modify the plug provided with the product-if it is damaged, the walking belt may change speed or stop unexpectedly, which may be used to connect the surge suppressor to...

Canadian English Manual
Page 9
...: You must wear the optional chest pulse sensor to your workouts. iFIT.com programs automatically control the speed and incline of the treadmill as a personal trainer guides you exercise, the console will display continuous exercise feedback. When the manual mode of your home. To purchase iFIT.com CDs or videocassettes, call toll-free 1-888-936-4266. See www.iFIT.com for more information. To use the heart rate programs. The console also features iFIT.com interactive technology. As you...
...: You must wear the optional chest pulse sensor to your workouts. iFIT.com programs automatically control the speed and incline of the treadmill as a personal trainer guides you exercise, the console will display continuous exercise feedback. When the manual mode of your home. To purchase iFIT.com CDs or videocassettes, call toll-free 1-888-936-4266. See www.iFIT.com for more information. To use the heart rate programs. The console also features iFIT.com interactive technology. As you...
Canadian English Manual
Page 10
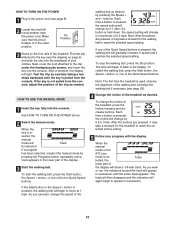
... TURN ON THE POWER 1 Plug in the power cord (see the drawing on the foot rails of your progress with the display. When the key is se- If the Start button or the Speed + button is in the reset position. HOW TO USE THE MANUAL MODE 1 Insert the key fully into the console. As you walk or run, the indicators around the track will light. To stop the walking belt, press the Stop button. To change...
... TURN ON THE POWER 1 Plug in the power cord (see the drawing on the foot rails of your progress with the display. When the key is se- If the Start button or the Speed + button is in the reset position. HOW TO USE THE MANUAL MODE 1 Insert the key fully into the console. As you walk or run, the indicators around the track will light. To stop the walking belt, press the Stop button. To change...

Canadian English Manual
Page 11
... pulse sensor or the optional chest pulse sensor. To determine which unit of the display will automatically turn on the Contacts handrail- To reset the display, press the Stop button, remove the key, and then reinsert the key. 6 Measure your hands. Note: A few seconds When a program is folded to the lowest setting. Note: If the display remains lit after the walking belt is selected, remove the key. When your hands are finished exercising, remove the key...
... pulse sensor or the optional chest pulse sensor. To determine which unit of the display will automatically turn on the Contacts handrail- To reset the display, press the Stop button, remove the key, and then reinsert the key. 6 Measure your hands. Note: A few seconds When a program is folded to the lowest setting. Note: If the display remains lit after the walking belt is selected, remove the key. When your hands are finished exercising, remove the key...

Canadian English Manual
Page 13
... exercise heart rate. 7 When you are finished exercising, remove the key from the console. Next, remove the key from 220. You must wear the optional chest pulse sensor (see page 20) to use a heart rate program. 2 Insert the key into the console. The display will affect your estimated maximum heart rate. To select a heart rate program, press the Select Program button repeatedly. CAUTION: If you have been inactive, do not use the heart rate programs. If you are finished using the treadmill, switch the reset...
... exercise heart rate. 7 When you are finished exercising, remove the key from the console. Next, remove the key from 220. You must wear the optional chest pulse sensor (see page 20) to use a heart rate program. 2 Insert the key into the console. The display will affect your estimated maximum heart rate. To select a heart rate program, press the Select Program button repeatedly. CAUTION: If you have been inactive, do not use the heart rate programs. If you are finished using the treadmill, switch the reset...
Canadian English Manual
Page 14
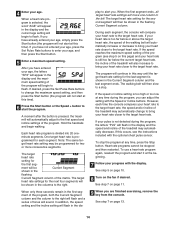
... in the display and the current age setting will automatically adjust to the first speed and incline settings of the program (see the instructions included with the optional chest pulse sensor. If your heart rate closer to the target heart rate. The walking belt will be Current Segment shown in the dis- If this page) and your heart rate closer to the target heart rate. See step 5 on page 10. 8 Turn on page...
... in the display and the current age setting will automatically adjust to the first speed and incline settings of the program (see the instructions included with the optional chest pulse sensor. If your heart rate closer to the target heart rate. The walking belt will be Current Segment shown in the dis- If this page) and your heart rate closer to the target heart rate. See step 5 on page 10. 8 Turn on page...
Canadian English Manual
Page 17
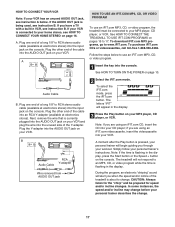
... Audio Cable B. Plug one end of a long 1/8" to RCA stereo audio cable (available at electronics stores). Follow the steps below . A moment after the Play button is flashing in the display. 3 Press the Play button on the console. The treadmill will not respond to an MP3, CD, or video program while the time is pressed, your personal trainer will begin guiding you when the speed and/or incline of the Y-adapter...
... Audio Cable B. Plug one end of a long 1/8" to RCA stereo audio cable (available at electronics stores). Follow the steps below . A moment after the Play button is flashing in the display. 3 Press the Play button on the console. The treadmill will not respond to an MP3, CD, or video program while the time is pressed, your personal trainer will begin guiding you when the speed and/or incline of the Y-adapter...
Canadian English Manual
Page 18
... the Speed + button on the console. • Adjust the volume of your heart rate if desired. To restart the program, press the Start button or the Speed + button. The time will begin to the next settings of the program. To stop . Note: To use another flat surface instead of on the console. • See the "The incline of the treadmill does not change to flash in the display. After a moment, the walking belt...
... the Speed + button on the console. • Adjust the volume of your heart rate if desired. To restart the program, press the Start button or the Speed + button. The time will begin to the next settings of the program. To stop . Note: To use another flat surface instead of on the console. • See the "The incline of the treadmill does not change to flash in the display. After a moment, the walking belt...
Canadian English Manual
Page 19
... walking belt will begin to move at any time by pressing the Speed or Incline buttons on our Web site. Follow the steps below to use programs from our Web site. 1 Insert the key into the console. When the on the console. If the speed or incline settings are soon to be prepared for the program. When you can manually override the settings at www.iFIT.com. See HOW TO CONNECT...
... walking belt will begin to move at any time by pressing the Speed or Incline buttons on our Web site. Follow the steps below to use programs from our Web site. 1 Insert the key into the console. When the on the console. If the speed or incline settings are soon to be prepared for the program. When you can manually override the settings at www.iFIT.com. See HOW TO CONNECT...
Canadian English Manual
Page 20
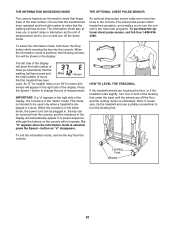
... plugged in, the key can be shown in the right side of miles that the walking belt has moved. button so "d" disappears. THE INFORMATION MODE/DEMO MODE THE OPTIONAL CHEST PULSE SENSOR The console features an information mode that keeps track of the total number of hours that the treadmill has been operated and the total number of the display, the console is in the "demo" mode. The chest pulse sensor offers hands-free operation, and enables you to turn...
... plugged in, the key can be shown in the right side of miles that the walking belt has moved. button so "d" disappears. THE INFORMATION MODE/DEMO MODE THE OPTIONAL CHEST PULSE SENSOR The console features an information mode that keeps track of the total number of hours that the treadmill has been operated and the total number of the display, the console is in the "demo" mode. The chest pulse sensor offers hands-free operation, and enables you to turn...
Canadian English Manual
Page 23
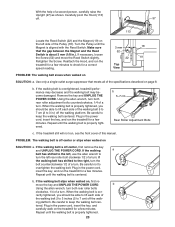
... a turn. Plug in the power cord, insert the key, and run the treadmill for a few minutes. rectly tightened, you should be able to keep the walking belt centered. Carefully pivot the Hood (113) off. 97 113 Locate the Reed Switch (22) and the Magnet (19) on the left rear roller bolt clockwise 1/2 of the walking belt 2 to 3 inches (5 to lift each side of a turn both rear roller bolts clockwise, 1/4 of the Pulley (18...
... a turn. Plug in the power cord, insert the key, and run the treadmill for a few minutes. rectly tightened, you should be able to keep the walking belt centered. Carefully pivot the Hood (113) off. 97 113 Locate the Reed Switch (22) and the Magnet (19) on the left rear roller bolt clockwise 1/2 of the walking belt 2 to 3 inches (5 to lift each side of a turn both rear roller bolts clockwise, 1/4 of the Pulley (18...
Canadian English Manual
Page 24
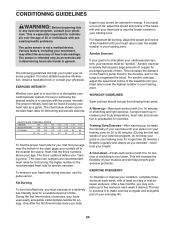
... fat, adjust the speed and incline of stretching and light exercise. The key to success is intended only as a guide. The proper intensity level can be "aerobic." If your goal is to make exercise a regular and enjoyable part of the treadmill until your heart rate is to use the pulse sensor. The chart below shows recommended heart rates for aerobic exercise. For aerobic exercise, adjust the speed and incline of your training zone...
... fat, adjust the speed and incline of stretching and light exercise. The key to success is intended only as a guide. The proper intensity level can be "aerobic." If your goal is to make exercise a regular and enjoyable part of the treadmill until your heart rate is to use the pulse sensor. The chart below shows recommended heart rates for aerobic exercise. For aerobic exercise, adjust the speed and incline of your training zone...
Canadian English Manual
Page 26
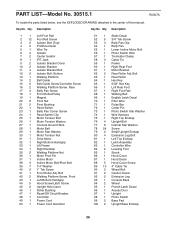
.... Bolt 42 2 Walking Platform Screw, Front 43 1 Left Bottom Handgrip 44 5 Hood Screw/Latch Screw 45 2 Upright Hole Insert 46 1 Roller Bushing 47 1 Reset/Off Circuit Breaker 48 1 Controller 49 1 Power Cord 50 1 Power Cord Grommet 51 1 Static Decal 52 5 3/4" Tek Screw 53 3 Belly Pan Clip 54 1 Belly Pan 55 1 Lower Incline Motor Bolt 56 1 Photo Switch Wire 57 1 Tie Holder Clamp 58 3 Cable Tie 59 1 Frame 60 1 Right Rear Foot 61 1 Motor Bracket 62 2 Rear Roller...
.... Bolt 42 2 Walking Platform Screw, Front 43 1 Left Bottom Handgrip 44 5 Hood Screw/Latch Screw 45 2 Upright Hole Insert 46 1 Roller Bushing 47 1 Reset/Off Circuit Breaker 48 1 Controller 49 1 Power Cord 50 1 Power Cord Grommet 51 1 Static Decal 52 5 3/4" Tek Screw 53 3 Belly Pan Clip 54 1 Belly Pan 55 1 Lower Incline Motor Bolt 56 1 Photo Switch Wire 57 1 Tie Holder Clamp 58 3 Cable Tie 59 1 Frame 60 1 Right Rear Foot 61 1 Motor Bracket 62 2 Rear Roller...
Canadian English Manual
Page 27
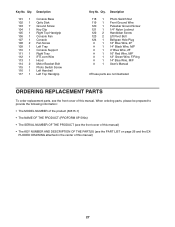
... 1 Console Support 111 1 Right Tray 112 1 iFIT.com Wire 113 1 Hood 114 2 Motor Bracket Bolt 115 1 Photo Switch Screw 116 1 Left Handrail 117 1 Left Top Handgrip Key No. Qty. When ordering parts, please be prepared to provide the following information: • The MODEL NUMBER of the product (30515.1) • The NAME OF THE PRODUCT (PROFORM XP 590s) • The SERIAL NUMBER OF THE PRODUCT (see the front cover of this manual...
... 1 Console Support 111 1 Right Tray 112 1 iFIT.com Wire 113 1 Hood 114 2 Motor Bracket Bolt 115 1 Photo Switch Screw 116 1 Left Handrail 117 1 Left Top Handgrip Key No. Qty. When ordering parts, please be prepared to provide the following information: • The MODEL NUMBER of the product (30515.1) • The NAME OF THE PRODUCT (PROFORM XP 590s) • The SERIAL NUMBER OF THE PRODUCT (see the front cover of this manual...

Canadian English Manual
Page 28
... or consequential damages arising out of or in connection with respect to the terms set out in material and workmanship. This warranty does not extend to products used for a particular purpose is limited in Canada © 2007 ICON IP, Inc. LIMITED WARRANTY WHAT IS COVERED-The entire PROFORM® XP 590s treadmill ("Product") is warranted to change, modify or extend the terms of this...
... or consequential damages arising out of or in connection with respect to the terms set out in material and workmanship. This warranty does not extend to products used for a particular purpose is limited in Canada © 2007 ICON IP, Inc. LIMITED WARRANTY WHAT IS COVERED-The entire PROFORM® XP 590s treadmill ("Product") is warranted to change, modify or extend the terms of this...

