
Canadian English Manual
Page 2
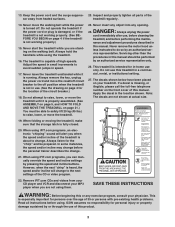
... of 1.5 m (5 ft.) or less in length. If the control system is damaged, the walking belt may change speed, accelerate, or stop unexpectedly, which may result in a garage or covered patio, or near water. 5. Do not put the treadmill in a fall and serious injury. 2 Always wear athletic shoes. TABLE OF CONTENTS IMPORTANT PRECAUTIONS...
... of 1.5 m (5 ft.) or less in length. If the control system is damaged, the walking belt may change speed, accelerate, or stop unexpectedly, which may result in a garage or covered patio, or near water. 5. Do not put the treadmill in a fall and serious injury. 2 Always wear athletic shoes. TABLE OF CONTENTS IMPORTANT PRECAUTIONS...
Canadian English Manual
Page 3
... so by or through the use , before cleaning the treadmill, and before using them. This treadmill is properly assembled. (See ASSEMBLY on page 5, and HOW TO FOLD AND MOVE THE TREADMILL on the walking belt. Never start the treadmill while you can manually override the speed and incline settings... by an authorized service representative only. 26. When using the treadmill. 16. Inspect and properly tighten all parts of 35 ...
... so by or through the use , before cleaning the treadmill, and before using them. This treadmill is properly assembled. (See ASSEMBLY on page 5, and HOW TO FOLD AND MOVE THE TREADMILL on the walking belt. Never start the treadmill while you can manually override the speed and incline settings... by an authorized service representative only. 26. When using the treadmill. 16. Inspect and properly tighten all parts of 35 ...

Canadian English Manual
Page 4
...half the floor space of this manual, please see the front cover of other treadmills. If you for selecting the revolutionary PROFORM® XP 590s treadmill. The model number of this manual. Fan Accessory Tray Handrail Storage Latch Upright Walking Belt Foot Rail BACK Rear Roller Adjustment Bolts Console Pulse Sensor Key/Clip Reset/Off Circuit... parts. For your workouts at home more enjoyable and effective. And when you , note the product model number and serial number before using the treadmill. The XP 590s treadmill offers an impressive array of features designed to the...
...half the floor space of this manual, please see the front cover of other treadmills. If you for selecting the revolutionary PROFORM® XP 590s treadmill. The model number of this manual. Fan Accessory Tray Handrail Storage Latch Upright Walking Belt Foot Rail BACK Rear Roller Adjustment Bolts Console Pulse Sensor Key/Clip Reset/Off Circuit... parts. For your workouts at home more enjoyable and effective. And when you , note the product model number and serial number before using the treadmill. The XP 590s treadmill offers an impressive array of features designed to the...
Canadian English Manual
Page 5
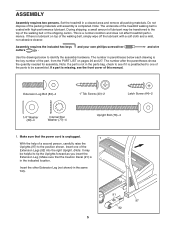
...If a part is missing, see if it is in the indicated location. Set the treadmill in parentheses below to the position shown. Do not dispose of this manual. During shipping, a small amount of the walking belt, simply wipe off the lubricant with high-performance lubricant. and wire Use the drawings below... and your own phillips screwdriver cutters . Insert the other Extension Leg (not shown) in the parts bag, check to the top of the treadmill walking belt is not in the same way. 91 97 92 5 Insert one of the parts to be transferred to see the front cover of the ...
...If a part is missing, see if it is in the indicated location. Set the treadmill in parentheses below to the position shown. Do not dispose of this manual. During shipping, a small amount of the walking belt, simply wipe off the lubricant with high-performance lubricant. and wire Use the drawings below... and your own phillips screwdriver cutters . Insert the other Extension Leg (not shown) in the parts bag, check to the top of the treadmill walking belt is not in the same way. 91 97 92 5 Insert one of the parts to be transferred to see the front cover of the ...
Canadian English Manual
Page 7
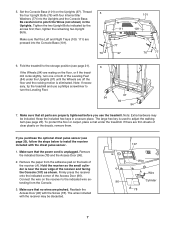
... pulse sensor (see page 20), follow the steps below to pinch the Wires (not shown) in a secure place. Note: If necessary, tip the treadmill and use the treadmill. The large hex key is unplugged. The wires included with the Screw (78). 5. Be careful not to install the receiver included with four Internal... receiver onto the indicated corner of the receiver and facing the Console (107) as shown. Connect the wire on the receiver to adjust the walking belt (see page 21). Reattach the Access Door (96) with the receiver may be discarded. 107 Wire A Wire 96 Cylinder 78 7
... pulse sensor (see page 20), follow the steps below to pinch the Wires (not shown) in a secure place. Note: If necessary, tip the treadmill and use the treadmill. The large hex key is unplugged. The wires included with the Screw (78). 5. Be careful not to install the receiver included with four Internal... receiver onto the indicated corner of the receiver and facing the Console (107) as shown. Connect the wire on the receiver to adjust the walking belt (see page 21). Reattach the Access Door (96) with the receiver may be discarded. 107 Wire A Wire 96 Cylinder 78 7
Canadian English Manual
Page 8
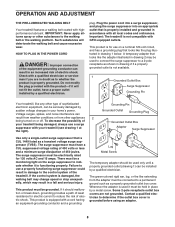
... should malfunction or break down, grounding provides a path of your home's power. This product is equipped with your treadmill (see drawing 1 at the right). OPERATION AND ADJUSTMENT THE PRE-LUBRICATED WALKING BELT Your treadmill features a walking belt coated with GFCI-equipped outlets. Voltage surges, spikes, and noise interference can be grounded. Some 2-pole receptacle...
... should malfunction or break down, grounding provides a path of your home's power. This product is equipped with your treadmill (see drawing 1 at the right). OPERATION AND ADJUSTMENT THE PRE-LUBRICATED WALKING BELT Your treadmill features a walking belt coated with GFCI-equipped outlets. Voltage surges, spikes, and noise interference can be grounded. Some 2-pole receptacle...
Canadian English Manual
Page 10
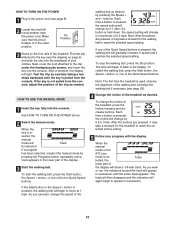
... 3 Stand on page 9) and slide the clip onto the waistband of the treadmill, press the Incline increase and decrease buttons. To start the walking belt, press the Start button, the Speed + button, or one of the treadmill as desired by carefully taking a few steps backward until the entire track appears....buttons. If the Start button or the Speed + button is in - Note: The first time the treadmill is in the reset position. Make sure that the circuit breaker is pressed, the walking belt will again begin to reach the selected speed setting. HOW TO USE THE MANUAL MODE 1 Insert the...
... 3 Stand on page 9) and slide the clip onto the waistband of the treadmill, press the Incline increase and decrease buttons. To start the walking belt, press the Start button, the Speed + button, or one of the treadmill as desired by carefully taking a few steps backward until the entire track appears....buttons. If the Start button or the Speed + button is in - Note: The first time the treadmill is in the reset position. Make sure that the circuit breaker is pressed, the walking belt will again begin to reach the selected speed setting. HOW TO USE THE MANUAL MODE 1 Insert the...

Canadian English Manual
Page 11
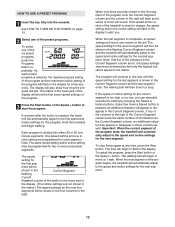
... rate if desired. Step onto the foot rails, press the Stop button, and adjust the incline of the treadmill to change the unit of measurement. Note: If the display remains lit after the walking belt is selected, remove the key. See page 20 and turn off the fan, press the button a third... button while inserting the key into the console. To turn off the demo mode. To turn on the fan at the lowest setting when the treadmill is selected, the display will show the incline setting for metric kilometers will appear in the "demo" mode. Note: A few seconds When a program is folded...
... rate if desired. Step onto the foot rails, press the Stop button, and adjust the incline of the treadmill to change the unit of measurement. Note: If the display remains lit after the walking belt is selected, remove the key. See page 20 and turn off the fan, press the button a third... button while inserting the key into the console. To turn off the demo mode. To turn on the fan at the lowest setting when the treadmill is selected, the display will show the incline setting for metric kilometers will appear in the "demo" mode. Note: A few seconds When a program is folded...
Canadian English Manual
Page 12
...: When the current segment of the six preset programs, press the Programs button repeatedly. One speed setting and one of the program ends, the treadmill will flash in the Current Segment column; When the next segment of the columns to start the program. As each segment. Each program is about... how long the program will then slow to a stop the program at 1 mph. The speed setting for the next segment. 12 The walking belt will last. If any time, press the Stop button. ment will be shown in the Current Segment flashing Current Segment column of the matrix in...
...: When the current segment of the six preset programs, press the Programs button repeatedly. One speed setting and one of the program ends, the treadmill will flash in the Current Segment column; When the next segment of the columns to start the program. As each segment. Each program is about... how long the program will then slow to a stop the program at 1 mph. The speed setting for the next segment. 12 The walking belt will last. If any time, press the Stop button. ment will be shown in the Current Segment flashing Current Segment column of the matrix in...
Canadian English Manual
Page 14
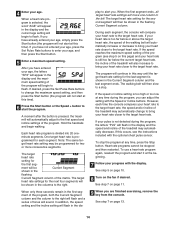
...then press the Start button. 5 Enter a maximum speed setting. When only three seconds remain in the display and the speed and incline of the treadmill may automatically change the maximum speed setting, and then press the Start button (the program will not start at this time). 6 Press the Start... setting will move one column to the left. play to alert you are finished exercising, remove the key from the console. The walking belt will be shown in the flashing Current Segment column of the program (see the instructions included with the Speed or Incline buttons. If you...
...then press the Start button. 5 Enter a maximum speed setting. When only three seconds remain in the display and the speed and incline of the treadmill may automatically change the maximum speed setting, and then press the Start button (the program will not start at this time). 6 Press the Start... setting will move one column to the left. play to alert you are finished exercising, remove the key from the console. The walking belt will be shown in the flashing Current Segment column of the program (see the instructions included with the Speed or Incline buttons. If you...
Canadian English Manual
Page 18
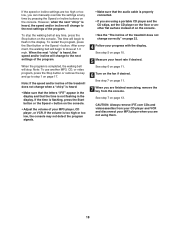
... the next settings of the program. See step 7 on the console. After a moment, the walking belt will change to flash in the display and that the audio cable is not flashing in the display.... VCR. When the program is heard, the speed and/or incline will stop the walking belt at any time by pressing the Speed or Incline buttons on page 17. However, when the next "chirp"... program. See step 6 on page 11. 6 Turn on the console. • Adjust the volume of the treadmill does not change when a "chirp" is flashing, press the Start button or the Speed + button on the ...
... the next settings of the program. See step 7 on the console. After a moment, the walking belt will change to flash in the display and that the audio cable is not flashing in the display.... VCR. When the program is heard, the speed and/or incline will stop the walking belt at any time by pressing the Speed or Incline buttons on page 17. However, when the next "chirp"... program. See step 6 on page 11. 6 Turn on the console. • Adjust the volume of the treadmill does not change when a "chirp" is flashing, press the Start button or the Speed + button on the ...
Canadian English Manual
Page 19
...chirp" is heard, the speed and incline will appear in the display. After a moment, the walking belt will begin. 8 Follow your web browser, if necessary, and go to the next settings of the treadmill does not change . In addition, you start the program, an on-screen countdown will begin walking.... settings are too high or too low, you to access basic programs, audio programs, and video programs directly from our Web site, the treadmill must have an internet connection and an internet service provider. HOW TO USE AN IFIT.COM PROGRAM DIRECTLY FROM OUR WEB SITE 7 Return to...
...chirp" is heard, the speed and incline will appear in the display. After a moment, the walking belt will begin. 8 Follow your web browser, if necessary, and go to the next settings of the treadmill does not change . In addition, you start the program, an on-screen countdown will begin walking.... settings are too high or too low, you to access basic programs, audio programs, and video programs directly from our Web site, the treadmill must have an internet connection and an internet service provider. HOW TO USE AN IFIT.COM PROGRAM DIRECTLY FROM OUR WEB SITE 7 Return to...
Canadian English Manual
Page 20
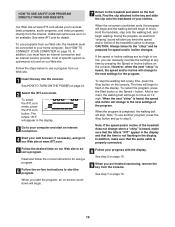
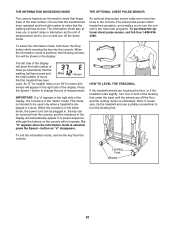
IMPORTANT: If a "d" appears in the right side of miles that the walking belt has moved. This mode is intended to be used . button so "d" disappears. Note: If necessary, tip the treadmill and use the console's two heart rate programs. To purchase the optional chest pulse sensor, call ...the right side of hours Miles Hours that the walking belt has moved and the total number of the display. meters will show the total number of miles (or kilometers) that the treadmill has been used only when a treadmill is selected, the following information will be removed from...
IMPORTANT: If a "d" appears in the right side of miles that the walking belt has moved. This mode is intended to be used . button so "d" disappears. Note: If necessary, tip the treadmill and use the console's two heart rate programs. To purchase the optional chest pulse sensor, call ...the right side of hours Miles Hours that the walking belt has moved and the total number of the display. meters will show the total number of miles (or kilometers) that the treadmill has been used only when a treadmill is selected, the following information will be removed from...
Canadian English Manual
Page 23
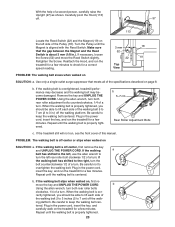
...) and move the key and UNPLUG THE POWER CORD. Reattach the Hood, and run the treadmill for a few minutes. tered. If the walking belt is properly tightened. 23 PROBLEM: The walking belt is about 3 mm (1/8 in the power cord, insert the key, and carefully walk on... 1/2 of a turn. Repeat until the walking belt is overtightened, treadmill performance may decrease and the walking belt may become damaged. Plug in .) off -center or slips when walked on , first re- If the treadmill still will not run the treadmill for a correct speed reading. b Using the allen...
...) and move the key and UNPLUG THE POWER CORD. Reattach the Hood, and run the treadmill for a few minutes. tered. If the walking belt is properly tightened. 23 PROBLEM: The walking belt is about 3 mm (1/8 in the power cord, insert the key, and carefully walk on... 1/2 of a turn. Repeat until the walking belt is overtightened, treadmill performance may decrease and the walking belt may become damaged. Plug in .) off -center or slips when walked on , first re- If the treadmill still will not run the treadmill for a correct speed reading. b Using the allen...
Canadian English Manual
Page 26
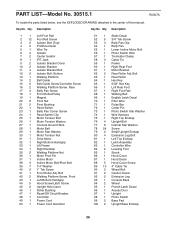
... Center Isolator 8 1 iFIT Jack 9 2 Isolator Bracket Cover 10 2 Isolator Bracket 11 4 Isolator Bracket Bolt 12 2 Isolator Bolt, Bottom 13 1 Walking Platform 14 2 Belt Guide 15 6 Belt Guide Screw/Controller Screw 16 2 Walking Platform Screw, Rear 17 3 Belly Pan Screw 18 1 Front Roller/Pulley 19 1 Magnet 20 8 Pivot Nut 21 2 Pivot... 23 1 Belly Pan Corner Screw 24 1 Reed Switch Clip 25 1 Motor Tension Bolt 26 1 Motor Tension Washer 27 1 Console Ground Wire 28 1 Motor Belt 29 1 Motor Star Washer 30 1 Motor Tension Nut 31 1 Drive Motor 32 1 Right Bottom Handgrip 33 1 Lift Frame 34 1 Right Handrail 35 2...
... Center Isolator 8 1 iFIT Jack 9 2 Isolator Bracket Cover 10 2 Isolator Bracket 11 4 Isolator Bracket Bolt 12 2 Isolator Bolt, Bottom 13 1 Walking Platform 14 2 Belt Guide 15 6 Belt Guide Screw/Controller Screw 16 2 Walking Platform Screw, Rear 17 3 Belly Pan Screw 18 1 Front Roller/Pulley 19 1 Magnet 20 8 Pivot Nut 21 2 Pivot... 23 1 Belly Pan Corner Screw 24 1 Reed Switch Clip 25 1 Motor Tension Bolt 26 1 Motor Tension Washer 27 1 Console Ground Wire 28 1 Motor Belt 29 1 Motor Star Washer 30 1 Motor Tension Nut 31 1 Drive Motor 32 1 Right Bottom Handgrip 33 1 Lift Frame 34 1 Right Handrail 35 2...


