
English Manual
Page 4
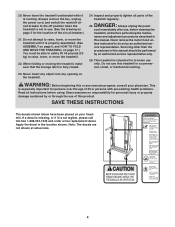
...to the off position when the treadmill is not in a commercial, ...this treadmill in use. (See the drawing on the treadmill. Always remove the key, unplug...treadmill, and before using. Inspect and properly tighten all instructions before performing the mainte- less instructed to raise, lower, or move the treadmill.... 22. Do not use only. This is properly assembled. (See ASSEMBLY on page 6, and HOW TO FOLD AND MOVE THE TREADMILL...treadmill unattended while it is especially important for the location of the treadmill... program, consult your treadmill. Sears assumes no ...
...to the off position when the treadmill is not in a commercial, ...this treadmill in use. (See the drawing on the treadmill. Always remove the key, unplug...treadmill, and before using. Inspect and properly tighten all instructions before performing the mainte- less instructed to raise, lower, or move the treadmill.... 22. Do not use only. This is properly assembled. (See ASSEMBLY on page 6, and HOW TO FOLD AND MOVE THE TREADMILL...treadmill unattended while it is especially important for the location of the treadmill... program, consult your treadmill. Sears assumes no ...
English Manual
Page 5
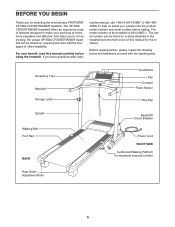
...Handrail Storage Latch Dumbbells Fan Console Pulse Sensor Key/Clip Upright Walking Belt Foot Rail BACK Reset/Off Circuit Breaker Power Cord RIGHT SIDE Cushioned Walking Platform for selecting the revolutionary PROFORM® XP 580s CROSSTRAINER treadmill. If you have questions after read this ... before using the treadmill. The model number of other treadmills. Before reading further, please review the drawing below and familiarize yourself with the labeled parts. The XP 580s CROSSTRAINER treadmill offers an impressive array of features designed to the treadmill (see the front...
...Handrail Storage Latch Dumbbells Fan Console Pulse Sensor Key/Clip Upright Walking Belt Foot Rail BACK Reset/Off Circuit Breaker Power Cord RIGHT SIDE Cushioned Walking Platform for selecting the revolutionary PROFORM® XP 580s CROSSTRAINER treadmill. If you have questions after read this ... before using the treadmill. The model number of other treadmills. Before reading further, please review the drawing below and familiarize yourself with the labeled parts. The XP 580s CROSSTRAINER treadmill offers an impressive array of features designed to the treadmill (see the front...
English Manual
Page 6
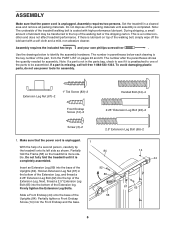
...own phillips screwdriver . Do not fully fold the treadmill until assembly is completed. Next, thread a 2.5" Extension Leg Bolt (65) into the top of the Extension Leg. Use the drawings below each drawing is the key number of the part, from the PART LIST on top of the walking belt, simply wipe... off the lubricant with high-performance lubricant. ASSEMBLY Make sure that the power cord is unplugged. 1 With the help of a second person, carefully tip the treadmill onto its left ...
...own phillips screwdriver . Do not fully fold the treadmill until assembly is completed. Next, thread a 2.5" Extension Leg Bolt (65) into the top of the Extension Leg. Use the drawings below each drawing is the key number of the part, from the PART LIST on top of the walking belt, simply wipe... off the lubricant with high-performance lubricant. ASSEMBLY Make sure that the power cord is unplugged. 1 With the help of a second person, carefully tip the treadmill onto its left ...
English Manual
Page 8
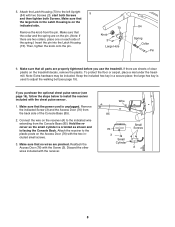
... If there are pinched. Connect the wire on the treadmill decals, remove the plastic. Make sure that no wires are sheets of clear plastic on the receiver (A) to install the receiver included with the chest pulse sensor. 1. Make sure that all parts are two collars, place one on the pin. ...sure that the collar and the spring are on each side of the Console Base (85). 2. Keep the included hex key in the Latch Housing is unplugged. the large hex key is facing the Console Back. Discard the other wires included with the Screw (3). Reattach the Access Door (76) with...
... If there are pinched. Connect the wire on the treadmill decals, remove the plastic. Make sure that no wires are sheets of clear plastic on the receiver (A) to install the receiver included with the chest pulse sensor. 1. Make sure that all parts are two collars, place one on the pin. ...sure that the collar and the spring are on each side of the Console Base (85). 2. Keep the included hex key in the Latch Housing is unplugged. the large hex key is facing the Console Back. Discard the other wires included with the Screw (3). Reattach the Access Door (76) with...
English Manual
Page 16
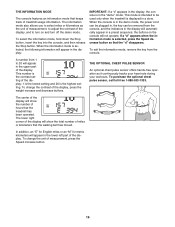
...is the contrast setting of the display; 1 is the lowest setting and 20 is displayed in the upper part of the display, press the weight increase and decrease buttons. The center of the display will show the number of treadmill usage information. To change the unit of miles or kilometers that the... buttons on and turn on the console will appear in the "demo" mode. To select the information mode, hold down the Stop button, insert the key into the console, and then release the Stop button. In addition, an "E" for English miles or an "M" for metric kilometers will not operate. When ...
...is the contrast setting of the display; 1 is the lowest setting and 20 is displayed in the upper part of the display, press the weight increase and decrease buttons. The center of the display will show the number of treadmill usage information. To change the unit of miles or kilometers that the... buttons on and turn on the console will appear in the "demo" mode. To select the information mode, hold down the Stop button, insert the key into the console, and then release the Stop button. In addition, an "E" for English miles or an "M" for metric kilometers will not operate. When ...
English Manual
Page 20
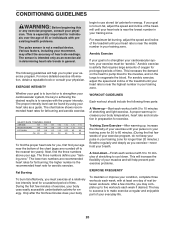
...off to exercise with at a relatively low intensity level for a sustained period of the treadmill until your heart rate is near the highest number in general. The sensor is intended only...minutes of exercise, your movement, may complete up -Start each week if desired. The following three parts: A Warm-up to five workouts each workout with 5 to 10 minutes of your age. A Cool... age near the lowest number in preparation for prolonged periods of rest between workouts. The key to success is especially important for 20 to cool down -Finish each week, with the...
...off to exercise with at a relatively low intensity level for a sustained period of the treadmill until your heart rate is near the highest number in general. The sensor is intended only...minutes of exercise, your movement, may complete up -Start each week if desired. The following three parts: A Warm-up to five workouts each workout with 5 to 10 minutes of your age. A Cool... age near the lowest number in preparation for prolonged periods of rest between workouts. The key to success is especially important for 20 to cool down -Finish each week, with the...
English Manual
Page 22
...-Model No. 831.24655.1 R1106A To locate the parts listed below, see the EXPLODED DRAWING on pages 24 to 27. Description Key No. Description 1 2 Foot Rail Cover 2 6 3/4" Screw 3 35 Screw 4 1 Reset/Off Circuit Breaker 5 8 Foot Rail Screw 6 4 Isolator 7 9 Hood Screw/Tie Screw 8 2 Extension Leg Base ... Walking Platform 50 1 Incline Motor/Controller Wire 51 1 Rear Roller 52 1 Left Rear Endcap 53 2 Rear Roller Bolt 54 1 Right Rear Endcap 55 1 Hex Key 56 1 Incline Stop Bracket 57 1 Base Ground Wire 58 1 Frame 59 1 Belly Pan 60 2 Center Isolator 61 1 Reed Switch Clip 62 2 Handrail Endcap 63...
...-Model No. 831.24655.1 R1106A To locate the parts listed below, see the EXPLODED DRAWING on pages 24 to 27. Description Key No. Description 1 2 Foot Rail Cover 2 6 3/4" Screw 3 35 Screw 4 1 Reset/Off Circuit Breaker 5 8 Foot Rail Screw 6 4 Isolator 7 9 Hood Screw/Tie Screw 8 2 Extension Leg Base ... Walking Platform 50 1 Incline Motor/Controller Wire 51 1 Rear Roller 52 1 Left Rear Endcap 53 2 Rear Roller Bolt 54 1 Right Rear Endcap 55 1 Hex Key 56 1 Incline Stop Bracket 57 1 Base Ground Wire 58 1 Frame 59 1 Belly Pan 60 2 Center Isolator 61 1 Reed Switch Clip 62 2 Handrail Endcap 63...
English Manual
Page 23
...Screw 107 4 Crossbar Star Washer 108 4 Console Screw 109 1 Crossbar 110 1 Fan Cover Assembly 111 1 Console Ground Wire Key No. Qty. If a part is missing, call toll-free 1-888-533-1333. 23 Key No. Description 112 1 Large Belly Pan Screw 113 3 Hood Clip 114 1 Front Roller Nut # 1 4" Blue Wire..., 2F # 1 10" Red Wire, M/F # 1 12" Blue Wire, 2F # 1 8" Black Wire, M/F # 1 12" Blue Wire, M/F # 1 User's Manual #These parts are not illustrated Specifications are ...
...Screw 107 4 Crossbar Star Washer 108 4 Console Screw 109 1 Crossbar 110 1 Fan Cover Assembly 111 1 Console Ground Wire Key No. Qty. If a part is missing, call toll-free 1-888-533-1333. 23 Key No. Description 112 1 Large Belly Pan Screw 113 3 Hood Clip 114 1 Front Roller Nut # 1 4" Blue Wire..., 2F # 1 10" Red Wire, M/F # 1 12" Blue Wire, 2F # 1 8" Black Wire, M/F # 1 12" Blue Wire, M/F # 1 User's Manual #These parts are not illustrated Specifications are ...

