
English Manual
Page 1
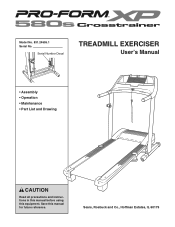
Sears, Roebuck and Co., Hoffman Estates, IL 60179 Serial Number Decal TREADMILL EXERCISER User's Manual • Assembly • Operation • Maintenance • Part List and Drawing CAUTION Read all precautions and instructions in this manual before using this manual for future reference. Model No. 831.24655.1 Serial No. Save this equipment.
Sears, Roebuck and Co., Hoffman Estates, IL 60179 Serial Number Decal TREADMILL EXERCISER User's Manual • Assembly • Operation • Maintenance • Part List and Drawing CAUTION Read all precautions and instructions in this manual before using this manual for future reference. Model No. 831.24655.1 Serial No. Save this equipment.

English Manual
Page 3
... use an extension cord. 11. Never move the walking belt while the power is the responsibility of the owner to ensure that could result in sandals. 10. Never start the treadmill while you are improperly stored, they may affect the accuracy of heart rate readings. The treadmill is being administered. 6. Adjust the speed in small increments to avoid sudden jumps in general. 19. The pulse sensor...
... use an extension cord. 11. Never move the walking belt while the power is the responsibility of the owner to ensure that could result in sandals. 10. Never start the treadmill while you are improperly stored, they may affect the accuracy of heart rate readings. The treadmill is being administered. 6. Adjust the speed in small increments to avoid sudden jumps in general. 19. The pulse sensor...
English Manual
Page 4
... any exercise program, consult your treadmill. Apply the decal in this treadmill in use , before cleaning the treadmill, and before using. This treadmill is fully closed. 24. This is especially important for in-home use this manual. Never leave the treadmill unattended while it is not legible, please call toll-free 1-888-533-1333 and order a free replacement decal. Always remove the key, unplug the power cord, and switch the reset...
... any exercise program, consult your treadmill. Apply the decal in this treadmill in use , before cleaning the treadmill, and before using. This treadmill is fully closed. 24. This is especially important for in-home use this manual. Never leave the treadmill unattended while it is not legible, please call toll-free 1-888-533-1333 and order a free replacement decal. Always remove the key, unplug the power cord, and switch the reset...
English Manual
Page 5
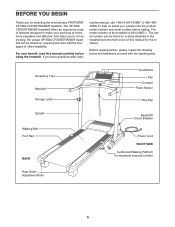
... effective. The model number of features designed to the treadmill (see the front cover of other treadmills. The XP 580s CROSSTRAINER treadmill offers an impressive array of the treadmill is 831.24655.1. ing this manual carefully before calling. Accessory Tray Handrail Storage Latch Dumbbells Fan Console Pulse Sensor Key/Clip Upright Walking Belt Foot Rail BACK Reset/Off Circuit Breaker Power Cord RIGHT SIDE Cushioned Walking Platform for selecting the revolutionary PROFORM® XP 580s CROSSTRAINER treadmill. If you...
... effective. The model number of features designed to the treadmill (see the front cover of other treadmills. The XP 580s CROSSTRAINER treadmill offers an impressive array of the treadmill is 831.24655.1. ing this manual carefully before calling. Accessory Tray Handrail Storage Latch Dumbbells Fan Console Pulse Sensor Key/Clip Upright Walking Belt Foot Rail BACK Reset/Off Circuit Breaker Power Cord RIGHT SIDE Cushioned Walking Platform for selecting the revolutionary PROFORM® XP 580s CROSSTRAINER treadmill. If you...
English Manual
Page 6
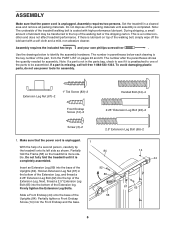
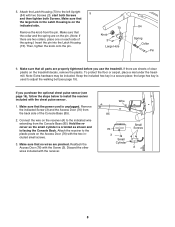
... the power cord is unplugged. 1 With the help of the walking belt, simply wipe off the lubricant with high-performance lubricant. Note: The underside of the part, from the PART LIST on top of a second person, carefully tip the treadmill onto its left side as shown. Use the drawings below each drawing is the key number of the treadmill walking belt is completely assembled. The number in the parts...
... the power cord is unplugged. 1 With the help of the walking belt, simply wipe off the lubricant with high-performance lubricant. Note: The underside of the part, from the PART LIST on top of a second person, carefully tip the treadmill onto its left side as shown. Use the drawings below each drawing is the key number of the treadmill walking belt is completely assembled. The number in the parts...
English Manual
Page 8
... as shown and is used to adjust the walking belt (see page 16), follow the steps below to the left Upright (84) with the chest pulse sensor. 1. the large hex key is facing the Console Back. Wire 85 76 3 Small Cylinder Small Screws A 8 Then, tighten the knob onto the pin. 73 Knob 3 Large Hole 84 Spring Collar Pin 6. If you use the treadmill. Attach the Latch Housing (73) to install the receiver included...
... as shown and is used to adjust the walking belt (see page 16), follow the steps below to the left Upright (84) with the chest pulse sensor. 1. the large hex key is facing the Console Back. Wire 85 76 3 Small Cylinder Small Screws A 8 Then, tighten the knob onto the pin. 73 Knob 3 Large Hole 84 Spring Collar Pin 6. If you use the treadmill. Attach the Latch Housing (73) to install the receiver included...
English Manual
Page 9
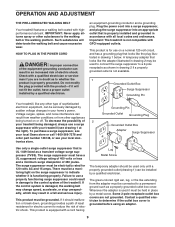
... screw. If the control system is for electric current to determine if the outlet box cover is not compatible with highperformance lubricant. Important: The treadmill is grounded before using an adapter. 9 Such substances will not fit the outlet, have a UL suppressed voltage rating of 400 volts or less and a minimum surge dissipation of electric shock. OPERATION AND ADJUSTMENT THE PRE-LUBRICATED WALKING BELT...
... screw. If the control system is for electric current to determine if the outlet box cover is not compatible with highperformance lubricant. Important: The treadmill is grounded before using an adapter. 9 Such substances will not fit the outlet, have a UL suppressed voltage rating of 400 volts or less and a minimum surge dissipation of electric shock. OPERATION AND ADJUSTMENT THE PRE-LUBRICATED WALKING BELT...
English Manual
Page 10
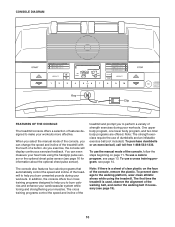
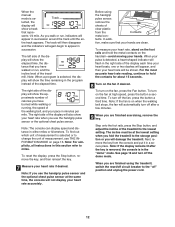
... strength exercises require the use a cross training program, see page 14. One upper body program, one lower body program, and two total body programs are offered. CONSOLE DIAGRAM Key Clip FEATURES OF THE CONSOLE The treadmill console offers a selection of features designed to make your heart rate using the treadmill. You can change the speed and incline of the treadmill with the touch of a button. To use the manual mode of the console, follow the steps beginning on the face of the console, remove...
... strength exercises require the use a cross training program, see page 14. One upper body program, one lower body program, and two total body programs are offered. CONSOLE DIAGRAM Key Clip FEATURES OF THE CONSOLE The treadmill console offers a selection of features designed to make your heart rate using the treadmill. You can change the speed and incline of the treadmill with the touch of a button. To use the manual mode of the console, follow the steps beginning on the face of the console, remove...
English Manual
Page 11
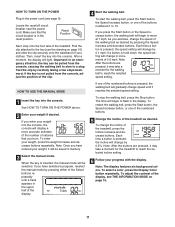
... manual mode will gradually change by carefully taking a few steps backward; Reset Position Next, step onto the foot rails of the treadmill, press the Incline increase and decrease buttons. Then, insert the key into the console. When the key is held down, the speed setting will change speed until a track appears in the power cord (see page 9). HOW TO TURN ON THE POWER Plug in the upper half of the Track display. 4 Start the walking belt. Locate the reset/off...
... manual mode will gradually change by carefully taking a few steps backward; Reset Position Next, step onto the foot rails of the treadmill, press the Incline increase and decrease buttons. Then, insert the key into the console. When the key is held down, the speed setting will change speed until a track appears in the power cord (see page 9). HOW TO TURN ON THE POWER Plug in the upper half of the Track display. 4 Start the walking belt. Locate the reset/off...
English Manual
Page 12
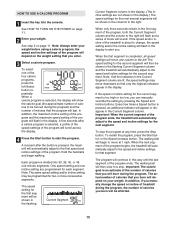
... minutes per mile. The incline must be shown. The track will then disappear and the indicators will again begin to the storage position or you use the handgrip pulse sensor and the optional chest pulse sensor at the lowest setting when you fold the treadmill to appear in succession. To turn on the fan at high speed, press the button a second time. Note: The console can display speed and distance in...
... minutes per mile. The incline must be shown. The track will then disappear and the indicators will again begin to the storage position or you use the handgrip pulse sensor and the optional chest pulse sensor at the lowest setting when you fold the treadmill to appear in succession. To turn on the fan at high speed, press the button a second time. Note: The console can display speed and distance in...
English Manual
Page 13
... the program ends. the speed and incline settings of the program ends, the treadmill will depend on page 11. Hold the handrails and begin to the speed and incline settings for the second segment will move at any time, press the Stop button. The walking belt will be programmed for the first segment will begin walking. The speed setting for two or more consecutive segments. See step 2 on the weight setting that...
... the program ends. the speed and incline settings of the program ends, the treadmill will depend on page 11. Hold the handrails and begin to the speed and incline settings for the second segment will move at any time, press the Stop button. The walking belt will be programmed for the first segment will begin walking. The speed setting for two or more consecutive segments. See step 2 on the weight setting that...
English Manual
Page 14
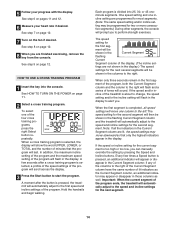
... incline of the display. (The incline set- When the first segment is too high or too low, you are lit, the speed settings may move one of the four cross training programs, press the right Select button repeatedly. See step 8 on page 11. 2 Select a cross training program. See HOW TO TURN ON THE POWER on page 12. 8 When you can manually override the setting by pressing the Speed and Incline buttons. ment will be programmed...
... incline of the display. (The incline set- When the first segment is too high or too low, you are lit, the speed settings may move one of the four cross training programs, press the right Select button repeatedly. See step 8 on page 11. 2 Select a cross training program. See HOW TO TURN ON THE POWER on page 12. 8 When you can manually override the setting by pressing the Speed and Incline buttons. ment will be programmed...
English Manual
Page 15
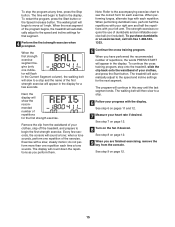
... of the program begins, the treadmill will automatically adjust to the speed and incline settings for the first strength exercise. Remove the clip from the console. Every few seconds. The strength exercises require the use of your right arm and half the repetitions with a slow, steady motion; See step 9 on the fan if desired. To restart the program, press the Start button or the Speed increase button. Exercise with your...
... of the program begins, the treadmill will automatically adjust to the speed and incline settings for the first strength exercise. Remove the clip from the console. Every few seconds. The strength exercises require the use of your right arm and half the repetitions with a slow, steady motion; See step 9 on the fan if desired. To restart the program, press the Start button or the Speed increase button. Exercise with your...
English Manual
Page 16
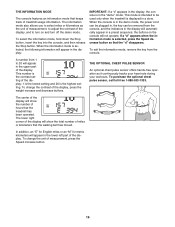
... walking belt has moved. This mode is intended to select miles or kilometers as it continuously tracks your heart rate during your workouts. the buttons on and turn on the console will appear in a preset sequence; When the information mode is selected, the following information will show the total number of the display. To purchase the optional chest pulse sensor, call toll-free 1-888-533-1333. To change the unit of treadmill usage information...
... walking belt has moved. This mode is intended to select miles or kilometers as it continuously tracks your heart rate during your workouts. the buttons on and turn on the console will appear in a preset sequence; When the information mode is selected, the following information will show the total number of the display. To purchase the optional chest pulse sensor, call toll-free 1-888-533-1333. To change the unit of treadmill usage information...

English Manual
Page 18
... suppressor that the key is plugged into the console. b. Check the reset/off during use SOLUTION: a. Make sure that applies, and follow the steps listed. This will recalibrate the incline system. Remove the key from the console. TROUBLESHOOTING Most treadmill problems can be solved by following the simple steps below. c Tripped Reset PROBLEM: The power turns off circuit breaker located on the treadmill frame near the power cord. Check the reset/off . 41 18...
... suppressor that the key is plugged into the console. b. Check the reset/off during use SOLUTION: a. Make sure that applies, and follow the steps listed. This will recalibrate the incline system. Remove the key from the console. TROUBLESHOOTING Most treadmill problems can be solved by following the simple steps below. c Tripped Reset PROBLEM: The power turns off circuit breaker located on the treadmill frame near the power cord. Check the reset/off . 41 18...
English Manual
Page 19
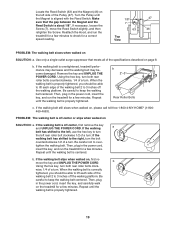
... bolt counterclockwise 1/2 of a turn. wise, 1/4 of a turn . Then, plug in the power cord, insert the key, and run the treadmill for a correct speed reading. 1/8" 47 7 63 46 Top View PROBLEM: The walking belt slows when walked on SOLUTION: a. Reattach the Hood, and run the treadmill for a few minutes. Remove the key and UNPLUG THE POWER CORD. if the walking belt has shifted to over- tighten the walking belt. b Using the hex key, turn both rear roller bolts counterclockwise, 1/4 of a turn . Locate the Reed Switch...
... bolt counterclockwise 1/2 of a turn. wise, 1/4 of a turn . Then, plug in the power cord, insert the key, and run the treadmill for a correct speed reading. 1/8" 47 7 63 46 Top View PROBLEM: The walking belt slows when walked on SOLUTION: a. Reattach the Hood, and run the treadmill for a few minutes. Remove the key and UNPLUG THE POWER CORD. if the walking belt has shifted to over- tighten the walking belt. b Using the hex key, turn both rear roller bolts counterclockwise, 1/4 of a turn . Locate the Reed Switch...
English Manual
Page 20
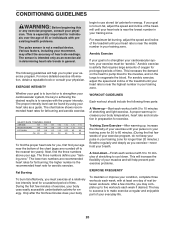
... preexisting health problems. The pulse sensor is to plan your heart rate is the recommended heart rate for exercise. To find the proper heart rate for prolonged periods of the treadmill until your exercise program. begin to oxygenate the blood. For maximum fat burning, adjust the speed and incline of heart rate readings. The following three parts: A Warm-up increases your body temperature, heart rate and circulation in your age near the middle number...
... preexisting health problems. The pulse sensor is to plan your heart rate is the recommended heart rate for exercise. To find the proper heart rate for prolonged periods of the treadmill until your exercise program. begin to oxygenate the blood. For maximum fat burning, adjust the speed and incline of heart rate readings. The following three parts: A Warm-up increases your body temperature, heart rate and circulation in your age near the middle number...
English Manual
Page 22
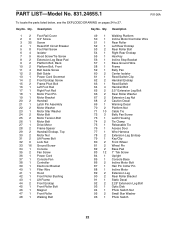
... Nut 33 16 Ground Screw 34 1 Console 35 2 Fan Screw 36 1 Power Cord 37 1 Console Fan 38 1 Controller 39 1 Electronic Bracket 40 1 Filter Wire 41 1 Hood 42 1 Front Roller Bushing 43 1 Lift Frame 44 2 Front Endcap 45 1 Front Roller Bolt 46 1 Magnet 47 1 Front Roller 48 1 Walking Belt 49 1 Walking Platform 50 1 Incline Motor/Controller Wire 51 1 Rear Roller 52 1 Left Rear Endcap 53 2 Rear Roller Bolt 54 1 Right Rear Endcap 55 1 Hex Key 56 1 Incline Stop Bracket 57 1 Base...
... Nut 33 16 Ground Screw 34 1 Console 35 2 Fan Screw 36 1 Power Cord 37 1 Console Fan 38 1 Controller 39 1 Electronic Bracket 40 1 Filter Wire 41 1 Hood 42 1 Front Roller Bushing 43 1 Lift Frame 44 2 Front Endcap 45 1 Front Roller Bolt 46 1 Magnet 47 1 Front Roller 48 1 Walking Belt 49 1 Walking Platform 50 1 Incline Motor/Controller Wire 51 1 Rear Roller 52 1 Left Rear Endcap 53 2 Rear Roller Bolt 54 1 Right Rear Endcap 55 1 Hex Key 56 1 Incline Stop Bracket 57 1 Base...
English Manual
Page 23
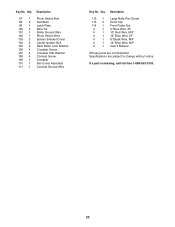
... Switch Wire 103 2 Isolator Bracket Cover 104 2 Center Isolator Bolt 105 2 Rear Roller Lock Washer 106 4 Crossbar Screw 107 4 Crossbar Star Washer 108 4 Console Screw 109 1 Crossbar 110 1 Fan Cover Assembly 111 1 Console Ground Wire Key No. Description 112 1 Large Belly Pan Screw 113 3 Hood Clip 114 1 Front Roller Nut # 1 4" Blue Wire, 2F # 1 10" Red Wire, M/F # 1 12" Blue Wire, 2F # 1 8" Black Wire, M/F # 1 12" Blue Wire, M/F # 1 User's Manual #These parts are not illustrated Specifications are subject to change...
... Switch Wire 103 2 Isolator Bracket Cover 104 2 Center Isolator Bolt 105 2 Rear Roller Lock Washer 106 4 Crossbar Screw 107 4 Crossbar Star Washer 108 4 Console Screw 109 1 Crossbar 110 1 Fan Cover Assembly 111 1 Console Ground Wire Key No. Description 112 1 Large Belly Pan Screw 113 3 Hood Clip 114 1 Front Roller Nut # 1 4" Blue Wire, 2F # 1 10" Red Wire, M/F # 1 12" Blue Wire, 2F # 1 8" Black Wire, M/F # 1 12" Blue Wire, M/F # 1 User's Manual #These parts are not illustrated Specifications are subject to change...

English Manual
Page 28
... go on-line for free repair (or replacement if repair proves impossible). The drive motor is used commercially or for 12 years from state to do-it ! This warranty gives you specific legal rights, and you need to state. Sears, Roebuck and Co., Hoffman Estates, IL 60179 Part No. 250132 R1106A Printed in your home or ours! For Sears professional installation of home appliances and items...
... go on-line for free repair (or replacement if repair proves impossible). The drive motor is used commercially or for 12 years from state to do-it ! This warranty gives you specific legal rights, and you need to state. Sears, Roebuck and Co., Hoffman Estates, IL 60179 Part No. 250132 R1106A Printed in your home or ours! For Sears professional installation of home appliances and items...

