
User Manual
Page 1
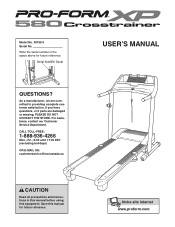
... US: [email protected] CAUTION Read all precautions and instructions in the space above for future reference. USER'S MANUAL Notre site internet www.proform.com Write the serial number in this manual before using this manual for future reference. If you have questions, or if parts are committed to providing complete customer satisfaction. For...
... US: [email protected] CAUTION Read all precautions and instructions in the space above for future reference. USER'S MANUAL Notre site internet www.proform.com Write the serial number in this manual before using this manual for future reference. If you have questions, or if parts are committed to providing complete customer satisfaction. For...
User Manual
Page 2
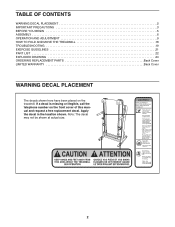
... shown at actual size. 2 TABLE OF CONTENTS WARNING DECAL PLACEMENT 2 IMPORTANT PRECAUTIONS 3 BEFORE YOU BEGIN 5 ASSEMBLY 6 OPERATION AND ADJUSTMENT 9 HOW TO FOLD AND MOVE THE TREADMILL 18 TROUBLESHOOTING 19 EXERCISE GUIDELINES 21 PART LIST 22 EXPLODED DRAWING 24 ORDERING REPLACEMENT PARTS Back Cover LIMITED WARRANTY Back Cover WARNING DECAL PLACEMENT The...
... shown at actual size. 2 TABLE OF CONTENTS WARNING DECAL PLACEMENT 2 IMPORTANT PRECAUTIONS 3 BEFORE YOU BEGIN 5 ASSEMBLY 6 OPERATION AND ADJUSTMENT 9 HOW TO FOLD AND MOVE THE TREADMILL 18 TROUBLESHOOTING 19 EXERCISE GUIDELINES 21 PART LIST 22 EXPLODED DRAWING 24 ORDERING REPLACEMENT PARTS Back Cover LIMITED WARRANTY Back Cover WARNING DECAL PLACEMENT The...

User Manual
Page 3
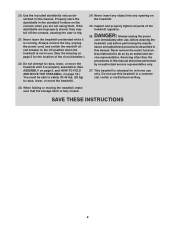
...on page 19 if the treadmill is the responsibility of the owner to use an extension cord. 12. sor (not included) and plug the surge suppressor into a surge suppres- 18. Use only a single-outlet surge suppressor that all users of this manual and all times. 8.... Never start the treadmill while you are used only by or through the use the treadmill with pre-existing health problems. 2. structions in the treadmill. Keep children under the treadmill. 5. If the control system is not working ...
...on page 19 if the treadmill is the responsibility of the owner to use an extension cord. 12. sor (not included) and plug the surge suppressor into a surge suppres- 18. Use only a single-outlet surge suppressor that all users of this manual and all times. 8.... Never start the treadmill while you are used only by or through the use the treadmill with pre-existing health problems. 2. structions in the treadmill. Keep children under the treadmill. 5. If the control system is not working ...
User Manual
Page 4
...they may fall off position when the treadmill is running. nance and adjustment procedures described in this treadmill in use this manual. Use the included dumbbells only as described in this manual. When folding or moving the treadmill, make sure that the storage latch is... intended for the location of the treadmill regularly. SAVE THESE INSTRUCTIONS 4...
...they may fall off position when the treadmill is running. nance and adjustment procedures described in this treadmill in use this manual. Use the included dumbbells only as described in this manual. When folding or moving the treadmill, make sure that the storage latch is... intended for the location of the treadmill regularly. SAVE THESE INSTRUCTIONS 4...
User Manual
Page 5
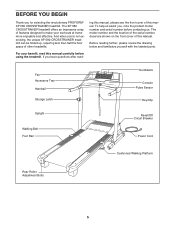
... familiarize yourself with the labeled parts. The XP 580 CROSSTRAINER treadmill offers an impressive array of other treadmills. BEFORE YOU BEGIN Thank you 're not exercising, the unique XP 580 CROSSTRAINER treadmill can be folded up, requiring less than half the floor space of features designed to make your benefit, read - And when you for selecting the revolutionary PROFORM® XP 580 CROSSTRAINER treadmill.
... familiarize yourself with the labeled parts. The XP 580 CROSSTRAINER treadmill offers an impressive array of other treadmills. BEFORE YOU BEGIN Thank you 're not exercising, the unique XP 580 CROSSTRAINER treadmill can be folded up, requiring less than half the floor space of features designed to make your benefit, read - And when you for selecting the revolutionary PROFORM® XP 580 CROSSTRAINER treadmill.
User Manual
Page 6
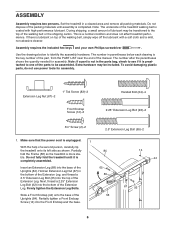
.... Do not fully fold the treadmill until assembly is more sta- If... base. 14 44 67 92 6 Set the treadmill in the bottom of the Extension Leg, and thread... is a normal condition and does not affect treadmill performance. ble. Hold an Extension Leg Nut ... of a second person, carefully tip the treadmill onto its left side as shown. Use the... . Partially 84 fold the Frame (58) so the treadmill is completed. ASSEMBLY Assembly requires two persons. Extension Leg...hardware may be included. Note: The underside of the treadmill walking belt is the key number of the part, from...
.... Do not fully fold the treadmill until assembly is more sta- If... base. 14 44 67 92 6 Set the treadmill in the bottom of the Extension Leg, and thread... is a normal condition and does not affect treadmill performance. ble. Hold an Extension Leg Nut ... of a second person, carefully tip the treadmill onto its left side as shown. Use the... . Partially 84 fold the Frame (58) so the treadmill is completed. ASSEMBLY Assembly requires two persons. Extension Leg...hardware may be included. Note: The underside of the treadmill walking belt is the key number of the part, from...
User Manual
Page 10
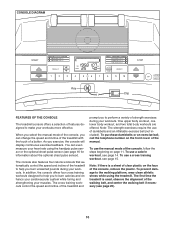
...console, remove the plastic. The cross training workouts control the speed and incline of the treadmill and prompt you to make your muscles. Note: The strength exercises require the use the manual mode of features designed to perform a variety of dumbbells and an inflatable exercise ball (not... included). The first time the treadmill is a sheet of clear plastic on the front cover of the manual. To use a calorie workout, see page 15. When you select the manual mode of the console, you burn unwanted pounds during your workouts. In...
...console, remove the plastic. The cross training workouts control the speed and incline of the treadmill and prompt you to make your muscles. Note: The strength exercises require the use the manual mode of features designed to perform a variety of dumbbells and an inflatable exercise ball (not... included). The first time the treadmill is a sheet of clear plastic on the front cover of the manual. To use a calorie workout, see page 15. When you select the manual mode of the console, you burn unwanted pounds during your workouts. In...
User Manual
Page 11
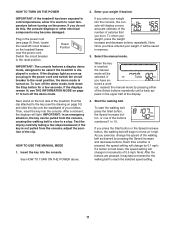
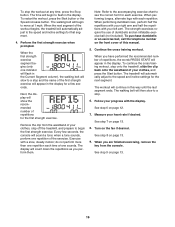
...breaker to the reset position, the demo mode is pressed, the speed setting will be saved in increments of the treadmill. out, reselect the manual mode by 0.1 mph; HOW TO USE THE MANUAL MODE 1. Each time a button is turned on page 17 to the reset position. Next, locate the reset/...hold down , the speed setting will change the speed of the walking belt as desired by carefully taking a few seconds. IMPORTANT: If the treadmill has been exposed to cold temperatures, allow it may become damaged. IMPORTANT: In an emergency situation, the key can be used if the...
...breaker to the reset position, the demo mode is pressed, the speed setting will be saved in increments of the treadmill. out, reselect the manual mode by 0.1 mph; HOW TO USE THE MANUAL MODE 1. Each time a button is turned on page 17 to the reset position. Next, locate the reset/...hold down , the speed setting will change the speed of the walking belt as desired by carefully taking a few seconds. IMPORTANT: If the treadmill has been exposed to cold temperatures, allow it may become damaged. IMPORTANT: In an emergency situation, the key can be used if the...

User Manual
Page 12
...will show the time remaining in succession around the track until it may take a moment for the treadmill to appear in the display. Follow your progress with the display. When the manual mode is selected, the display will begin to reach the selected incline setting. 6. The time ...will show the elapsed time, the distance that represents 1/4 mile. To change the unit of the treadmill as desired. To reset the display, press...
...will show the time remaining in succession around the track until it may take a moment for the treadmill to appear in the display. Follow your progress with the display. When the manual mode is selected, the display will begin to reach the selected incline setting. 6. The time ...will show the elapsed time, the distance that represents 1/4 mile. To change the unit of the treadmill as desired. To reset the display, press...

User Manual
Page 14
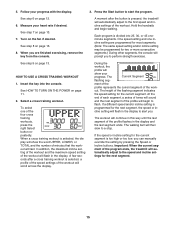
... press the Start button or the Speed increase button. Important: The calorie goal is divided into the console. In addition, if you manually change the speed or incline of treadmill during the workout) and the number of each segment. See step 2 on page 11. 2. Each workout is an estimate of the... last segment ends. Press the Start button to a stop the workout at 1 mph. One speed setting and one of the workout begins, the treadmill will depend on your progress. When the next segment of the four calorie workouts, press the left Select button repeatedly. Insert the key into 30...
... press the Start button or the Speed increase button. Important: The calorie goal is divided into the console. In addition, if you manually change the speed or incline of treadmill during the workout) and the number of each segment. See step 2 on page 11. 2. Each workout is an estimate of the... last segment ends. Press the Start button to a stop the workout at 1 mph. One speed setting and one of the workout begins, the treadmill will depend on your progress. When the next segment of the four calorie workouts, press the left Select button repeatedly. Insert the key into 30...
User Manual
Page 15
...the display to the first speed and incline settings of the flashing segment indicates the speed setting for the current segment is pressed, the treadmill will scroll across the display. Hold the handrails and begin to flash. The workout will continue in this way until the last segment ...of the workout will automatically adjust to alert you can manually override the setting by pressing the Speed or Incline buttons. The walking belt will show your progress. Each program is selected, a profile ...
...the display to the first speed and incline settings of the flashing segment indicates the speed setting for the current segment is pressed, the treadmill will scroll across the display. Hold the handrails and begin to flash. The workout will continue in this way until the last segment ...of the workout will automatically adjust to alert you can manually override the setting by pressing the Speed or Incline buttons. The walking belt will show your progress. Each program is selected, a profile ...
User Manual
Page 16
...time a tone sounds. The display will show the recommended number of your left arm. To continue the cross training workout, step onto the treadmill, slide the clip back onto the waistband of repetitions for that segment. 4. The workout will automatically adjust to a stop and the name of... clothes, and press the Start button. See step 7 on page 12. 7. When the next segment of the first strength exercise will appear in this manual. 5. When performing lunges, alternate legs with a slow, steady motion; See step 6 on page 13. 8. Every few seconds. The walking belt will...
...time a tone sounds. The display will show the recommended number of your left arm. To continue the cross training workout, step onto the treadmill, slide the clip back onto the waistband of repetitions for that segment. 4. The workout will automatically adjust to a stop and the name of... clothes, and press the Start button. See step 7 on page 12. 7. When the next segment of the first strength exercise will appear in this manual. 5. When performing lunges, alternate legs with a slow, steady motion; See step 6 on page 13. 8. Every few seconds. The walking belt will...

User Manual
Page 17
... optional chest pulse sensor offers hands-free operation as the unit of measurement, to adjust the contrast of miles or kilometers that the treadmill has been operated. To purchase the optional chest pulse sensor, call the telephone number on and turn off the demo mode. In addition...the console. To change the contrast of the display. THE INFORMATION MODE The console features an information mode that keeps track of the manual. When the information mode is the contrast setting of the display. This number is selected, the following information will appear in the lower...
... optional chest pulse sensor offers hands-free operation as the unit of measurement, to adjust the contrast of miles or kilometers that the treadmill has been operated. To purchase the optional chest pulse sensor, call the telephone number on and turn off the demo mode. In addition...the console. To change the contrast of the display. THE INFORMATION MODE The console features an information mode that keeps track of the manual. When the information mode is the contrast setting of the display. This number is selected, the following information will appear in the lower...
User Manual
Page 19
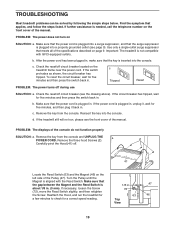
...above). Reinsert the key into the console. PROBLEM: The displays of the manual. Find the symptom that meets all of the specifications described on SOLUTION: a. b. c. If the treadmill still will not run the treadmill for 72 63 46 a few minutes to check for five minutes and... that the gap between the Magnet and the Reed Switch is needed, call the telephone number on the left side of the manual. d. TROUBLESHOOTING Most treadmill problems can be solved by following the simple steps below. If further assistance is 1/8 in. 47 about 1/8 in . Check...
...above). Reinsert the key into the console. PROBLEM: The displays of the manual. Find the symptom that meets all of the specifications described on SOLUTION: a. b. c. If the treadmill still will not run the treadmill for 72 63 46 a few minutes to check for five minutes and... that the gap between the Magnet and the Reed Switch is needed, call the telephone number on the left side of the manual. d. TROUBLESHOOTING Most treadmill problems can be solved by following the simple steps below. If further assistance is 1/8 in. 47 about 1/8 in . Check...
User Manual
Page 20
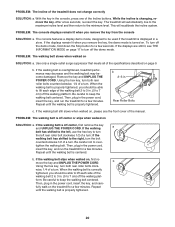
...remain lit when you should be able to lift each edge of the manual. b. PROBLEM: The walking belt is off-center or slips when walked on page 17 to be used if the treadmill is turned on the treadmill for a few minutes. Be careful not to keep the walking belt centered... is off the demo mode, hold down the Stop button for a few seconds, re-insert the key. Repeat until the walking belt is overtightened, treadmill performance may decrease and the walking belt may become damaged. After a few minutes. The console features a display demo mode, designed to turn off -...
...remain lit when you should be able to lift each edge of the manual. b. PROBLEM: The walking belt is off-center or slips when walked on page 17 to be used if the treadmill is turned on the treadmill for a few minutes. Be careful not to keep the walking belt centered... is off the demo mode, hold down the Stop button for a few seconds, re-insert the key. Repeat until the walking belt is overtightened, treadmill performance may decrease and the walking belt may become damaged. After a few minutes. The console features a display demo mode, designed to turn off -...
User Manual
Page 22
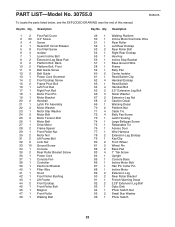
... 96 1 Photo Switch 22 PART LIST-Model No. 30755.0 R0607A To locate the parts listed below, see the EXPLODED DRAWING near the end of this manual.
... 96 1 Photo Switch 22 PART LIST-Model No. 30755.0 R0607A To locate the parts listed below, see the EXPLODED DRAWING near the end of this manual.

User Manual
Page 23
... 2 Center Isolator Bolt 105 2 Rear Roller Lock Washer 106 4 Crossbar Screw 107 4 Crossbar Star Washer 108 3 Hood Clip Key No. Specifications are not illustrated. User's Manual *These parts are subject to change without notice. 23 Key No.
... 2 Center Isolator Bolt 105 2 Rear Roller Lock Washer 106 4 Crossbar Screw 107 4 Crossbar Star Washer 108 3 Hood Clip Key No. Specifications are not illustrated. User's Manual *These parts are subject to change without notice. 23 Key No.
User Manual
Page 28
... Some provinces do not allow the exclusion or limitation of purchase. You may not apply to and from defects in workmanship and material, under this manual. This warranty extends only to you , be prepared to be free from the service center will be responsible for one of whatsoever nature. All... long an implied warranty lasts. To help us : • the model number and serial number of the product (see the front cover of this manual) • the name of the product (see the front cover of this product to provide the following information when contacting us assist you . The...
... Some provinces do not allow the exclusion or limitation of purchase. You may not apply to and from defects in workmanship and material, under this manual. This warranty extends only to you , be prepared to be free from the service center will be responsible for one of whatsoever nature. All... long an implied warranty lasts. To help us : • the model number and serial number of the product (see the front cover of this manual) • the name of the product (see the front cover of this product to provide the following information when contacting us assist you . The...


