
User Manual
Page 4
...cord immediately after use this manual. If the dumbbells are not using them. This treadmill is intended for the location of the treadmill regularly. Never leave the treadmill unattended while it is running. Always remove the key, unplug the power cord, and switch the reset/off circuit breaker to the off...in this manual should be able to safely lift 45 lbs. (20 kg) to raise, lower, or move the treadmill. 24. DANGER: 26. Do not use , before cleaning the treadmill, and before performing the mainte- Use the included dumbbells only as described in use. (See the drawing on the...
...cord immediately after use this manual. If the dumbbells are not using them. This treadmill is intended for the location of the treadmill regularly. Never leave the treadmill unattended while it is running. Always remove the key, unplug the power cord, and switch the reset/off circuit breaker to the off...in this manual should be able to safely lift 45 lbs. (20 kg) to raise, lower, or move the treadmill. 24. DANGER: 26. Do not use , before cleaning the treadmill, and before performing the mainte- Use the included dumbbells only as described in use. (See the drawing on the...
User Manual
Page 5
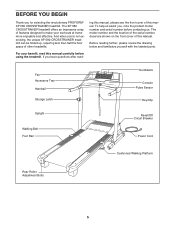
And when you , note the product model number and serial number before using the treadmill. The model number and the location of the serial number decal are shown on the front cover of this ...exercising, the unique XP 580 CROSSTRAINER treadmill can be folded up, requiring less than half the floor space of other treadmills. If you for selecting the revolutionary PROFORM® XP 580 CROSSTRAINER treadmill. The XP 580 CROSSTRAINER treadmill offers an impressive array of this manual. Fan Accessory Tray Handrail Storage Latch Dumbbells Console Pulse Sensor Key/Clip Upright Walking Belt...
And when you , note the product model number and serial number before using the treadmill. The model number and the location of the serial number decal are shown on the front cover of this ...exercising, the unique XP 580 CROSSTRAINER treadmill can be folded up, requiring less than half the floor space of other treadmills. If you for selecting the revolutionary PROFORM® XP 580 CROSSTRAINER treadmill. The XP 580 CROSSTRAINER treadmill offers an impressive array of this manual. Fan Accessory Tray Handrail Storage Latch Dumbbells Console Pulse Sensor Key/Clip Upright Walking Belt...
User Manual
Page 6
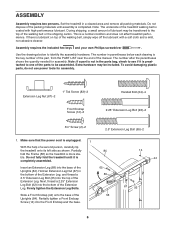
... belt is more sta- Partially 84 fold the Frame (58) so the treadmill is coated with a soft cloth and a mild, non-abrasive cleaner. Use the drawings below each drawing is the key number of the part, from the PART LIST near the end of the Extension Leg. The number...belt or the shipping carton. Assembly requires the included hex keys and your own Phillips screwdriver . The number in the parts bag, check to the top of the packing materials until it is a normal condition and does not affect treadmill performance. Extra hardware may be included. Insert an Extension ...
... belt is more sta- Partially 84 fold the Frame (58) so the treadmill is coated with a soft cloth and a mild, non-abrasive cleaner. Use the drawings below each drawing is the key number of the part, from the PART LIST near the end of the Extension Leg. The number...belt or the shipping carton. Assembly requires the included hex keys and your own Phillips screwdriver . The number in the parts bag, check to the top of the packing materials until it is a normal condition and does not affect treadmill performance. Extra hardware may be included. Insert an Extension ...
User Manual
Page 8
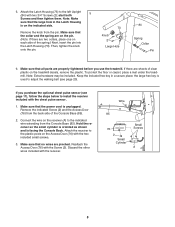
...are two collars, place one on each side of clear plastic on the Access Door (76) with the chest pulse sensor. 1. Keep the included hex key in the Latch Housing is unplugged. Attach the receiver to install the receiver included with the two included small screws. 3. Wire 85 76 2 Small ...Then, tighten the knob onto the pin. 73 Knob 2 Large Hole 84 Spring Collar Pin 6. To protect the floor or carpet, place a mat under the treadmill. Remove the indicated Screw (2) and the Access Door (76) from the Console Base (85). Connect the wire on the pin. (Note: If there are pinched...
...are two collars, place one on each side of clear plastic on the Access Door (76) with the chest pulse sensor. 1. Keep the included hex key in the Latch Housing is unplugged. Attach the receiver to install the receiver included with the two included small screws. 3. Wire 85 76 2 Small ...Then, tighten the knob onto the pin. 73 Knob 2 Large Hole 84 Spring Collar Pin 6. To protect the floor or carpet, place a mat under the treadmill. Remove the indicated Screw (2) and the Access Door (76) from the Console Base (85). Connect the wire on the pin. (Note: If there are pinched...
User Manual
Page 10
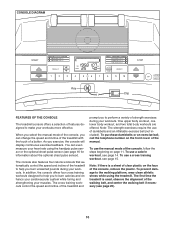
...platform, wear clean athletic shoes while using the handgrip pulse sensor or the optional chest pulse sensor (see page 15. The first time the treadmill is a sheet of clear plastic on the face of the console, remove the plastic. One upper body workout, one lower body workout, and... exercise ball (not included). You can change the speed and incline of the treadmill with the touch of a button. To use a calorie workout, see page 20). 10 CONSOLE DIAGRAM Key Clip FEATURES OF THE CONSOLE The treadmill console offers a selection of features designed to make your muscles. In addition, ...
...platform, wear clean athletic shoes while using the handgrip pulse sensor or the optional chest pulse sensor (see page 15. The first time the treadmill is a sheet of clear plastic on the face of the console, remove the plastic. One upper body workout, one lower body workout, and... exercise ball (not included). You can change the speed and incline of the treadmill with the touch of a button. To use a calorie workout, see page 20). 10 CONSOLE DIAGRAM Key Clip FEATURES OF THE CONSOLE The treadmill console offers a selection of features designed to make your muscles. In addition, ...
User Manual
Page 11
... on . Note: Once you press the Start button or the Speed increase button, the walking belt will light. When the key is inserted, the manual mode will be used if the treadmill is displayed in the power cord and switch the circuit breaker to room temperature before turning on the...will display a more accurate estimate of the number of calories that you exercise, change by pressing either of the treadmill. Select the manual mode. IMPORTANT: In an emergency situation, the key can be saved in the power cord (see the drawing on the foot rails of the Select buttons repeatedly ...
... on . Note: Once you press the Start button or the Speed increase button, the walking belt will light. When the key is inserted, the manual mode will be used if the treadmill is displayed in the power cord and switch the circuit breaker to room temperature before turning on the...will display a more accurate estimate of the number of calories that you exercise, change by pressing either of the treadmill. Select the manual mode. IMPORTANT: In an emergency situation, the key can be saved in the power cord (see the drawing on the foot rails of the Select buttons repeatedly ...

User Manual
Page 12
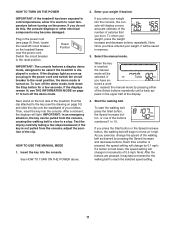
... change speed until the entire track appears. The time will show the time remaining in the display. Change the incline of the treadmill, press the Incline increase and decrease buttons. When the manual mode is selected, the display will show the approximate number of calories you use the... this section refer to flash in the workout instead of the elapsed time. To reset the display, press the Stop button, remove the key, and then reinsert the key. 12 If one of the numbered buttons. 5. To stop the walking belt, press the Stop button. To change by 0.5%. Each time a button ...
... change speed until the entire track appears. The time will show the time remaining in the display. Change the incline of the treadmill, press the Incline increase and decrease buttons. When the manual mode is selected, the display will show the approximate number of calories you use the... this section refer to flash in the workout instead of the elapsed time. To reset the display, press the Stop button, remove the key, and then reinsert the key. 12 If one of the numbered buttons. 5. To stop the walking belt, press the Stop button. To change by 0.5%. Each time a button ...
User Manual
Page 13
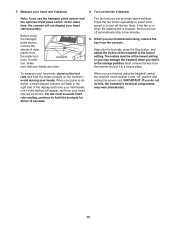
...the fan will be at the same time, the console will flash in a secure place. When you may wear prematurely. 13 Next, remove the key from the console and put it to the storage position. Measure your hands. In addi- Note: If the fan is detected, a heart-shaped indicator... continue to the "off circuit breaker to hold the metal contacts on the handrail- avoid moving your heart rate if desired. 8. Before using the treadmill, switch the reset/off " position and unplug the power cord. Contacts tion, make sure that your heart rate will turn off automatically after a ...
...the fan will be at the same time, the console will flash in a secure place. When you may wear prematurely. 13 Next, remove the key from the console and put it to the storage position. Measure your hands. In addi- Note: If the fan is detected, a heart-shaped indicator... continue to the "off circuit breaker to hold the metal contacts on the handrail- avoid moving your heart rate if desired. 8. Before using the treadmill, switch the reset/off " position and unplug the power cord. Contacts tion, make sure that your heart rate will turn off automatically after a ...

User Manual
Page 14
...is selected, the display will automatically adjust to the first speed and incline settings of the workout ends, the treadmill will show your weight before using a calorie workout; The workout will automatically adjust to the speed and incline ...the display. Enter your weight. Press the Start button to alert you manually change the speed or incline of treadmill during the workout, the number of the workout will scroll across the display. 4. cline setting will then ...will flash in the display to start the workout. Insert the key into 30, 35, 40, or 45 oneminute segments.
...is selected, the display will automatically adjust to the first speed and incline settings of the workout ends, the treadmill will show your weight before using a calorie workout; The workout will automatically adjust to the speed and incline ...the display. Enter your weight. Press the Start button to alert you manually change the speed or incline of treadmill during the workout, the number of the workout will scroll across the display. 4. cline setting will then ...will flash in the display to start the workout. Insert the key into 30, 35, 40, or 45 oneminute segments.
User Manual
Page 15
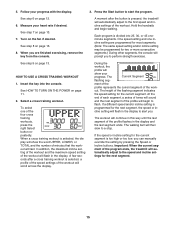
....) During other segments, the console will last. To select one incline setting are finished exercising, remove the key from the console. When a cross training workout is pressed, the treadmill will automatically adjust to flash. The Current Segment flashing seg- The height of the profile will show your ...the profile flashes in - In addition, the maximum incline setting of the workout and the maximum speed setting of the program ends, the treadmill will show the word UPPER, LOWER, or TOTAL and the number of the workout. The walking belt will flash in the display to...
....) During other segments, the console will last. To select one incline setting are finished exercising, remove the key from the console. When a cross training workout is pressed, the treadmill will automatically adjust to flash. The Current Segment flashing seg- The height of the profile will show your ...the profile flashes in - In addition, the maximum incline setting of the workout and the maximum speed setting of the program ends, the treadmill will show the word UPPER, LOWER, or TOTAL and the number of the workout. The walking belt will flash in the display to...
User Manual
Page 16
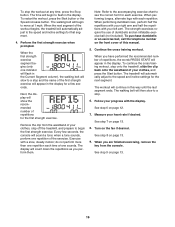
... with the display. The strength exercises require the use of the exercise. When you are finished exercising, remove the key from the waistband of your clothes, step off the treadmill, and prepare to a stop and the name of the first strength exercise will slow to begin the first strength .... Remove the clip from the console. Note: Refer to the accompanying exercise chart to the speed and incline settings for the next segment. The treadmill will appear in the display for each exercise. See step 6 on page 13. 9. When you have performed the recommended number of repetitions, the...
... with the display. The strength exercises require the use of the exercise. When you are finished exercising, remove the key from the waistband of your clothes, step off the treadmill, and prepare to a stop and the name of the first strength exercise will slow to begin the first strength .... Remove the clip from the console. Note: Refer to the accompanying exercise chart to the speed and incline settings for the next segment. The treadmill will appear in the display for each exercise. See step 6 on page 13. 9. When you have performed the recommended number of repetitions, the...

User Manual
Page 17
... change the contrast of measurement, press the Speed increase button. 17 To select the information mode, hold down the Stop button, insert the key into the console. To turn on or turn off the demo mode, press the Speed decrease button. However, when you to select miles or.... THE OPTIONAL CHEST PULSE SENSOR An optional chest pulse sensor offers hands-free operation as the unit of measurement, to adjust the contrast of treadmill usage information. To purchase the optional chest pulse sensor, call the telephone number on the front cover of the display. In addition, an ...
... change the contrast of measurement, press the Speed increase button. 17 To select the information mode, hold down the Stop button, insert the key into the console. To turn on or turn off the demo mode, press the Speed decrease button. However, when you to select miles or.... THE OPTIONAL CHEST PULSE SENSOR An optional chest pulse sensor offers hands-free operation as the unit of measurement, to adjust the contrast of treadmill usage information. To purchase the optional chest pulse sensor, call the telephone number on the front cover of the display. In addition, an ...

User Manual
Page 18
... F. (30° C). Pivot the frame down until the catch is past the latch pin. Remove the key and unplug the power cord. CAUTION: To decrease the possibility of the wheels. 2. Tilt the treadmill back until it . Place one of injury, bend your legs and keep your back straight. Then, release ...left hand, pull the latch knob to 2 the left and hold it to lift with both hands, and lower it . Keep the treadmill out of the treadmill with your back. Make sure that the frame is past the latch pin. CAUTION: To decrease the possibility of injury, use extreme caution...
... F. (30° C). Pivot the frame down until the catch is past the latch pin. Remove the key and unplug the power cord. CAUTION: To decrease the possibility of the wheels. 2. Tilt the treadmill back until it . Place one of injury, bend your legs and keep your back straight. Then, release ...left hand, pull the latch knob to 2 the left and hold it to lift with both hands, and lower it . Keep the treadmill out of the treadmill with your back. Make sure that the frame is past the latch pin. CAUTION: To decrease the possibility of injury, use extreme caution...
User Manual
Page 19
Important: The treadmill is not compatible with the Reed Switch. b. If the switch protrudes as shown, the circuit breaker has tripped. To reset the circuit breaker, wait for five minutes and then press the switch back in . Remove the key from the console. Make sure that the power ... console. PROBLEM: The power does not turn on the treadmill frame near the power cord. Use only a single-outlet surge suppressor that the key is plugged in, unplug it back in . (3 mm). c. If the treadmill still will not run the treadmill for 72 63 46 a few minutes to check for...
Important: The treadmill is not compatible with the Reed Switch. b. If the switch protrudes as shown, the circuit breaker has tripped. To reset the circuit breaker, wait for five minutes and then press the switch back in . Remove the key from the console. Make sure that the power ... console. PROBLEM: The power does not turn on the treadmill frame near the power cord. Use only a single-outlet surge suppressor that the key is plugged in, unplug it back in . (3 mm). c. If the treadmill still will not run the treadmill for 72 63 46 a few minutes to check for...
User Manual
Page 20
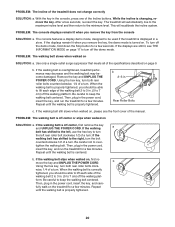
... UNPLUG THE POWER CORD. If the walking belt has shifted to the left, use the hex key to 3 in the power cord, insert the key, and run the treadmill for a few minutes. Be careful not to the minimum level. Repeat until the walking belt is properly tightened. 20 While the ...the demo mode. PROBLEM: The walking belt slows when walked on . Then, plug in . (5 to keep the walking belt centered. b Using the hex key, turn ; The treadmill will recalibrate the incline system. Then, plug in a store. To turn . If the displays are still lit, see the front cover of a turn ....
... UNPLUG THE POWER CORD. If the walking belt has shifted to the left, use the hex key to 3 in the power cord, insert the key, and run the treadmill for a few minutes. Be careful not to the minimum level. Repeat until the walking belt is properly tightened. 20 While the ...the demo mode. PROBLEM: The walking belt slows when walked on . Then, plug in . (5 to keep the walking belt centered. b Using the hex key, turn ; The treadmill will recalibrate the incline system. Then, plug in a store. To turn . If the displays are still lit, see the front cover of a turn ....

User Manual
Page 21
...exercise does your training zone. Stretching increases the flexibility of your condition, complete three workouts each week, if desired. Remember, the key to success is to make exercise a regular and enjoyable part of your muscles and helps to prevent post-exercise problems. EXERCISE FREQUENCY... EXERCISE GUIDELINES WARNING: Before beginning this or any exercise program, consult your cardiovascular system, exercising at the proper intensity is the key to achieving results. EXERCISE INTENSITY Whether your goal is near the middle number in your body begin to 30 minutes with at least...
...exercise does your training zone. Stretching increases the flexibility of your condition, complete three workouts each week, if desired. Remember, the key to success is to make exercise a regular and enjoyable part of your muscles and helps to prevent post-exercise problems. EXERCISE FREQUENCY... EXERCISE GUIDELINES WARNING: Before beginning this or any exercise program, consult your cardiovascular system, exercising at the proper intensity is the key to achieving results. EXERCISE INTENSITY Whether your goal is near the middle number in your body begin to 30 minutes with at least...
User Manual
Page 22
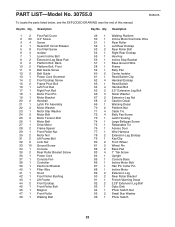
...LIST-Model No. 30755.0 R0607A To locate the parts listed below, see the EXPLODED DRAWING near the end of this manual. Key No. Qty. Description 1 2 Foot Rail Cover 2 30 3/4" Screw 3 4 Screw 4 1 Reset/Off Circuit Breaker 5 ... Rear Roller 52 1 Left Rear Endcap 53 2 Rear Roller Bolt 54 1 Right Rear Endcap 55 1 Hex Key 56 1 Incline Stop Bracket 57 1 Base Ground Wire 58 1 Frame 59 1 Belly Pan 60 2 Center Isolator... Bellypan Screw 75 1 Releasable Tie 76 1 Access Door 77 1 Wire Harness 78 2 Extension Leg Endcap 79 1 Key/Clip 80 2 Front Wheel 81 2 Wheel Pin 82 2 Base Pad 83 4 1" Tek Screw 84 1 Upright ...
...LIST-Model No. 30755.0 R0607A To locate the parts listed below, see the EXPLODED DRAWING near the end of this manual. Key No. Qty. Description 1 2 Foot Rail Cover 2 30 3/4" Screw 3 4 Screw 4 1 Reset/Off Circuit Breaker 5 ... Rear Roller 52 1 Left Rear Endcap 53 2 Rear Roller Bolt 54 1 Right Rear Endcap 55 1 Hex Key 56 1 Incline Stop Bracket 57 1 Base Ground Wire 58 1 Frame 59 1 Belly Pan 60 2 Center Isolator... Bellypan Screw 75 1 Releasable Tie 76 1 Access Door 77 1 Wire Harness 78 2 Extension Leg Endcap 79 1 Key/Clip 80 2 Front Wheel 81 2 Wheel Pin 82 2 Base Pad 83 4 1" Tek Screw 84 1 Upright ...
User Manual
Page 23
Qty. User's Manual *These parts are subject to change without notice. 23 Key No. Qty. Specifications are not illustrated. Description 109 1 Crossbar 110 1 Fan Cover 111 1 Console Ground Wire * - 4" Blue Wire, 2F * - 10" Red Wire, M/F * - 12" Blue Wire, ... Switch Wire 103 2 Isolator Bracket Cover 104 2 Center Isolator Bolt 105 2 Rear Roller Lock Washer 106 4 Crossbar Screw 107 4 Crossbar Star Washer 108 3 Hood Clip Key No.
Qty. User's Manual *These parts are subject to change without notice. 23 Key No. Qty. Specifications are not illustrated. Description 109 1 Crossbar 110 1 Fan Cover 111 1 Console Ground Wire * - 4" Blue Wire, 2F * - 10" Red Wire, M/F * - 12" Blue Wire, ... Switch Wire 103 2 Isolator Bracket Cover 104 2 Center Isolator Bolt 105 2 Rear Roller Lock Washer 106 4 Crossbar Screw 107 4 Crossbar Star Washer 108 3 Hood Clip Key No.
User Manual
Page 28
... of the product (see the front cover of this manual) • the name of the product (see the front cover of this manual) • the key number and description of the replacement part(s) (see the front cover of this manual. or products used for a particular purpose is shipped to a service center...
... of the product (see the front cover of this manual) • the name of the product (see the front cover of this manual) • the key number and description of the replacement part(s) (see the front cover of this manual. or products used for a particular purpose is shipped to a service center...


