

English Manual
Page 1
....proform.com new products, prizes, fitness tips, and much more! If you . Keep this equipment. Serial Number Decal QUESTIONS? MST CAUTION Read all precautions and instructions in this manual before using this manual for future reference. PFEX33110 Serial No. CUSTOMER HOT LINE: 1-800-999-3756 Mon.-Fri., 6 a.m.-6 p.m. TO AVOID UNNECESSARY DELAYS, PLEASE CALL DIRECT TO OUR TOLL-FREE CUSTOMER HOT LINE. Model...
....proform.com new products, prizes, fitness tips, and much more! If you . Keep this equipment. Serial Number Decal QUESTIONS? MST CAUTION Read all precautions and instructions in this manual before using this manual for future reference. PFEX33110 Serial No. CUSTOMER HOT LINE: 1-800-999-3756 Mon.-Fri., 6 a.m.-6 p.m. TO AVOID UNNECESSARY DELAYS, PLEASE CALL DIRECT TO OUR TOLL-FREE CUSTOMER HOT LINE. Model...
English Manual
Page 2
... YOU BEGIN 3 ASSEMBLY 4 HOW TO OPERATE THE EXERCISE CYCLE 8 MAINTENANCE AND TROUBLE-SHOOTING 12 EXERCISE GUIDELINES 13 PART LIST 14 EXPLODED DRAWING 15 HOW TO ORDER REPLACEMENT PARTS Back Cover LIMITED WARRANTY Back Cover IMPORTANT PRECAUTIONS WARNING: To reduce the risk of all precautions. Do not arch your back straight when using the PROFORM® VR 980 EKG exercise cycle. 1. cautions before using the exercise cycle. 8. The exercise cycle is...
... YOU BEGIN 3 ASSEMBLY 4 HOW TO OPERATE THE EXERCISE CYCLE 8 MAINTENANCE AND TROUBLE-SHOOTING 12 EXERCISE GUIDELINES 13 PART LIST 14 EXPLODED DRAWING 15 HOW TO ORDER REPLACEMENT PARTS Back Cover LIMITED WARRANTY Back Cover IMPORTANT PRECAUTIONS WARNING: To reduce the risk of all precautions. Do not arch your back straight when using the PROFORM® VR 980 EKG exercise cycle. 1. cautions before using the exercise cycle. 8. The exercise cycle is...

English Manual
Page 3
... EKG exercise cycle. Backrest Seat Seat Knob Seat Handle BACK Water Bottle Holder (Bottle not included) Pulse Sensor Handlebar Book Holder Console Handlebar Post FRONT Side Shield Pedal Strap Roller Leveling Pad RIGHT SIDE Pedal 3 For your home. To help us assist you have additional questions, please call our Customer Service Department toll-free at 1-800-999-3756, Monday through Friday, 6 a.m. Mountain Time (excluding holidays). The serial number...
... EKG exercise cycle. Backrest Seat Seat Knob Seat Handle BACK Water Bottle Holder (Bottle not included) Pulse Sensor Handlebar Book Holder Console Handlebar Post FRONT Side Shield Pedal Strap Roller Leveling Pad RIGHT SIDE Pedal 3 For your home. To help us assist you have additional questions, please call our Customer Service Department toll-free at 1-800-999-3756, Monday through Friday, 6 a.m. Mountain Time (excluding holidays). The serial number...
English Manual
Page 4
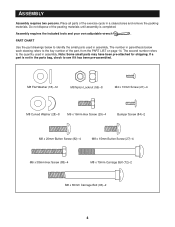
... (28)-8 M6 x 16mm Hex Screw (29)-4 Bumper Screw (84)-2 M8 x 20mm Button Screw (82)-4 M8 x 15mm Button Screw (27)-4 M6 x 38mm Hex Screw (88)-4 M8 x 70mm Carriage Bolt (72)-2 M8 x 80mm Carriage Bolt (63)-2 4 Note: Some small parts may have been pre-attached for shipping. The number in assembly. PART CHART Use the part drawings below each drawing refers to identify the small parts used in a cleared area and...
... (28)-8 M6 x 16mm Hex Screw (29)-4 Bumper Screw (84)-2 M8 x 20mm Button Screw (82)-4 M8 x 15mm Button Screw (27)-4 M6 x 38mm Hex Screw (88)-4 M8 x 70mm Carriage Bolt (72)-2 M8 x 80mm Carriage Bolt (63)-2 4 Note: Some small parts may have been pre-attached for shipping. The number in assembly. PART CHART Use the part drawings below each drawing refers to identify the small parts used in a cleared area and...
English Manual
Page 5
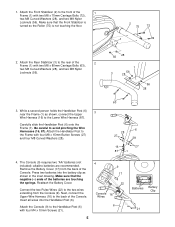
... (56). 56 28 1 3 56 28 56 28 3. Next, connect the Upper Wire Harness (16) to the rear of the Console. Attach the Rear Stabilizer (3) to the back of the 2 Frame (1) with two M8 x 70mm Carriage Bolts (72), two M8 Curved Washers (28), and two M8 Nylon Locknuts (56). 1. Press two batteries into the Handlebar Post (6). Remove the Battery Cover (17) from the...
... (56). 56 28 1 3 56 28 56 28 3. Next, connect the Upper Wire Harness (16) to the rear of the Console. Attach the Rear Stabilizer (3) to the back of the 2 Frame (1) with two M8 x 70mm Carriage Bolts (72), two M8 Curved Washers (28), and two M8 Nylon Locknuts (56). 1. Press two batteries into the Handlebar Post (6). Remove the Battery Cover (17) from the...
English Manual
Page 6
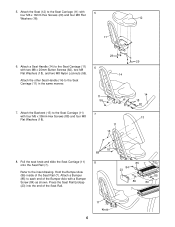
...Press the Seat Rail Endcap (23) into the end of the Seat Rail (7). Attach the other Seat Handle (14) to the inset drawing. Refer to the Seat Carriage (11) in the same manner. 29 18 14 11 56 7. Hold the Bumper Axle (86) inside of the Seat Rail. 18 88 8 84 23 85 7 85 86 84 7 11 Knob 6 Attach... the Seat (12) to each end of the Bumper Axle with 5 four M6 x 16mm Hex Screws (29) and four M8 Flat Washers (18). 12 11 6. Attach a Seat Handle (14) to the Seat Carriage (11) 7 with two M8 x 20mm Button Screws (82), two M8 Flat Washers (18...
...Press the Seat Rail Endcap (23) into the end of the Seat Rail (7). Attach the other Seat Handle (14) to the inset drawing. Refer to the Seat Carriage (11) in the same manner. 29 18 14 11 56 7. Hold the Bumper Axle (86) inside of the Seat Rail. 18 88 8 84 23 85 7 85 86 84 7 11 Knob 6 Attach... the Seat (12) to each end of the Bumper Axle with 5 four M6 x 16mm Hex Screws (29) and four M8 Flat Washers (18). 12 11 6. Attach a Seat Handle (14) to the Seat Carriage (11) 7 with two M8 x 20mm Button Screws (82), two M8 Flat Washers (18...

English Manual
Page 7
... that all parts are tightened before you use the exercise cycle. Using an adjustable wrench, tighten the Right Pedal clockwise into the right Crank Arm (34). Press the Pedal Strap onto the tab on the 10 Right Pedal for identification). Identify the Right Pedal (37) (there is an "R" on the Right Pedal. Firmly tighten the four 5/16" x 1" Button Screws (80) 9 in the same manner (not shown). 80 Knob 34 38...
... that all parts are tightened before you use the exercise cycle. Using an adjustable wrench, tighten the Right Pedal clockwise into the right Crank Arm (34). Press the Pedal Strap onto the tab on the 10 Right Pedal for identification). Identify the Right Pedal (37) (there is an "R" on the Right Pedal. Firmly tighten the four 5/16" x 1" Button Screws (80) 9 in the same manner (not shown). 80 Knob 34 38...

English Manual
Page 8
... workouts. The console also offers ten preset workout programs. Five programs automatically change the pedaling resistance as they guide you pedal, there should be installed. To adjust the seat, pull the seat knob and slide the Seat Carriage (11) to keep your heart rate near a preselected level during your workouts. You can be operated, two "AA" batteries must be in the proper position. Note: Before the console can even measure your heart rate using...
... workouts. The console also offers ten preset workout programs. Five programs automatically change the pedaling resistance as they guide you pedal, there should be installed. To adjust the seat, pull the seat knob and slide the Seat Carriage (11) to keep your heart rate near a preselected level during your workouts. You can be operated, two "AA" batteries must be in the proper position. Note: Before the console can even measure your heart rate using...

English Manual
Page 9
... displayed in general. Note: The console can display speed in the display to show your hands are finished exercising, turn off the power To turn off automatically. 9 Press the resistance + or - WARNING: The pulse sensor is turned on the console or simply begin to reset the pulse sensor. buttons to flash again. ing. The letters "MPH," "KMH," or "RPM" will begin to adjust the resistance of the pedals. button to move your pedaling speed, the number of heart rate...
... displayed in general. Note: The console can display speed in the display to show your hands are finished exercising, turn off the power To turn off automatically. 9 Press the resistance + or - WARNING: The pulse sensor is turned on the console or simply begin to reset the pulse sensor. buttons to flash again. ing. The letters "MPH," "KMH," or "RPM" will begin to adjust the resistance of the pedals. button to move your pedaling speed, the number of heart rate...

English Manual
Page 10
... the distance you exercise, follow your progress with the matrix on the left side of the heart rate programs Each time the power is used (see step 4). 4 Measure your heart rate when the pulse sensor is turned on, the manual program will already be . ually decrease during the first half of the display. After ten min- utes, the program will show your age. button to enter your pedaling speed, the number...
... the distance you exercise, follow your progress with the matrix on the left side of the heart rate programs Each time the power is used (see step 4). 4 Measure your heart rate when the pulse sensor is turned on, the manual program will already be . ually decrease during the first half of the display. After ten min- utes, the program will show your age. button to enter your pedaling speed, the number...

English Manual
Page 11
... maximum heart rate; After ten seconds, the column will move to the right. If your heart rate is used, the resistance buttons will turn off automatically. Note: When a heart rate program is not displayed, see PULSE SEN- If the pedals are not pressed for about three minutes. Each button press will continue to flash. Each button press will flash. Heart rate goal-Press the select button repeatedly to select the time mode. HOW TO SET A WORKOUT GOAL Program...
... maximum heart rate; After ten seconds, the column will move to the right. If your heart rate is used, the resistance buttons will turn off automatically. Note: When a heart rate program is not displayed, see PULSE SEN- If the pedals are not pressed for about three minutes. Each button press will continue to flash. Each button press will flash. Heart rate goal-Press the select button repeatedly to select the time mode. HOW TO SET A WORKOUT GOAL Program...

English Manual
Page 12
... Pads 12 MAINTENANCE AND TROUBLE-SHOOTING Inspect and tighten all parts of the leveling pads until the exercise cycle is used, press the resistance - To replace the batteries, refer to reset the pulse sensor. • Do not hold the metal contacts for about 15 seconds. • For optimal performance of direct sunlight. doing so may interfere with heart rate readings. • For the most accurate heart rate reading...
... Pads 12 MAINTENANCE AND TROUBLE-SHOOTING Inspect and tighten all parts of the leveling pads until the exercise cycle is used, press the resistance - To replace the batteries, refer to reset the pulse sensor. • Do not hold the metal contacts for about 15 seconds. • For optimal performance of direct sunlight. doing so may interfere with heart rate readings. • For the most accurate heart rate reading...

English Manual
Page 13
...% of exercising, it is used because your training zone in pulse sensor. Regular participation in a well-rounded exercise program results in general. This is make exercise a regular and enjoyable part of your muscles and will increase the flexibility of your wrist as an exercise aid in determining heart rate trends in a stronger and more efficient heart, improved respiratory function, increased stamina, better weight management...
...% of exercising, it is used because your training zone in pulse sensor. Regular participation in a well-rounded exercise program results in general. This is make exercise a regular and enjoyable part of your muscles and will increase the flexibility of your wrist as an exercise aid in determining heart rate trends in a stronger and more efficient heart, improved respiratory function, increased stamina, better weight management...

English Manual
Page 14
... Axle Spacer Reduction Axle Generator Axle Long Belt Short Belt Control Board Pulse Handle Assembly M8 x 70mm Carriage Bolt Generator Bushing Reduction Pulley Roller Roller Axle M10 Black Nylon Locknut Armature Bolt Seat Carriage Bushing 5/16" x 1" Button Screw Magnet M8 x 20mm Button Screw Spacer Plate Bumper Screw Bumper Bumper Axle Lower Wire Harness M6 x 38mm Hex Screw User's Manual Allen Wrench Note: "#" indicates a non-illustrated part. Qty. 33 1 34 2 35 2 36 2 37...
... Axle Spacer Reduction Axle Generator Axle Long Belt Short Belt Control Board Pulse Handle Assembly M8 x 70mm Carriage Bolt Generator Bushing Reduction Pulley Roller Roller Axle M10 Black Nylon Locknut Armature Bolt Seat Carriage Bushing 5/16" x 1" Button Screw Magnet M8 x 20mm Button Screw Spacer Plate Bumper Screw Bumper Bumper Axle Lower Wire Harness M6 x 38mm Hex Screw User's Manual Allen Wrench Note: "#" indicates a non-illustrated part. Qty. 33 1 34 2 35 2 36 2 37...

English Manual
Page 15
... 80 56 14 27 80 56 29 79 28 18 27 79 80 21 56 28 64 21 3 31 26 63 31 64 EXPLODED DRAWING-MODEL NO.
... 80 56 14 27 80 56 29 79 28 18 27 79 80 21 56 28 64 21 3 31 26 63 31 64 EXPLODED DRAWING-MODEL NO.

English Manual
Page 16
... implied warranty lasts. To help us assist you specific legal rights. ICON's obligation under normal use or performance of its scope and duration to the terms set forth above limitation may not apply to the original purchaser. ICON HEALTH & FITNESS, INC., 1500 S. 1000 W., LOGAN, UT 84321-9813 Part No. 177524 R0701A Printed in workmanship and material, under this manual) • The KEY NUMBER...
... implied warranty lasts. To help us assist you specific legal rights. ICON's obligation under normal use or performance of its scope and duration to the terms set forth above limitation may not apply to the original purchaser. ICON HEALTH & FITNESS, INC., 1500 S. 1000 W., LOGAN, UT 84321-9813 Part No. 177524 R0701A Printed in workmanship and material, under this manual) • The KEY NUMBER...


