
Instruction Manual
Page 2
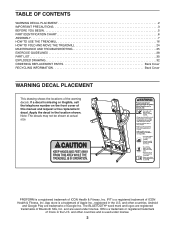
... PLACEMENT 2 IMPORTANT PRECAUTIONS 3 BEFORE YOU BEGIN 5 PART IDENTIFICATION CHART 6 ASSEMBLY 7 HOW TO USE THE TREADMILL 16 HOW TO FOLD AND MOVE THE TREADMILL 24 MAINTENANCE AND TROUBLESHOOTING 25 EXERCISE GUIDELINES 28 PART LIST 30 EXPLODED DRAWING 32 ORDERING REPLACEMENT PARTS Back Cover ...RECYCLING INFORMATION Back Cover WARNING DECAL PLACEMENT This drawing shows the locations of ICON Health & Fitness, Inc. PROFORM is a ...
... PLACEMENT 2 IMPORTANT PRECAUTIONS 3 BEFORE YOU BEGIN 5 PART IDENTIFICATION CHART 6 ASSEMBLY 7 HOW TO USE THE TREADMILL 16 HOW TO FOLD AND MOVE THE TREADMILL 24 MAINTENANCE AND TROUBLESHOOTING 25 EXERCISE GUIDELINES 28 PART LIST 30 EXPLODED DRAWING 32 ORDERING REPLACEMENT PARTS Back Cover ...RECYCLING INFORMATION Back Cover WARNING DECAL PLACEMENT This drawing shows the locations of ICON Health & Fitness, Inc. PROFORM is a ...
Instruction Manual
Page 3
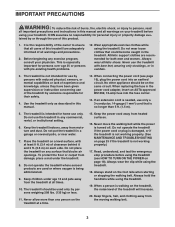
... walking on the foot rails when starting or stopping the walking belt. No other appliance should be on the same circuit. Do not put the treadmill in this manual. 13. To protect the floor or carpet from the moving walking belt. 3 When a person is not intended for their safety... away from damage, place a mat under age 13 and pets away from heated surfaces. 16. Wear appropriate exercise clothes while using the treadmill. 19. Use the treadmill only as described in a garage or covered patio, or near water. 7. If an extension cord is needed, use by persons weighing 298...
... walking on the foot rails when starting or stopping the walking belt. No other appliance should be on the same circuit. Do not put the treadmill in this manual. 13. To protect the floor or carpet from the moving walking belt. 3 When a person is not intended for their safety... away from damage, place a mat under age 13 and pets away from heated surfaces. 16. Wear appropriate exercise clothes while using the treadmill. 19. Use the treadmill only as described in a garage or covered patio, or near water. 7. If an extension cord is needed, use by persons weighing 298...
Instruction Manual
Page 4
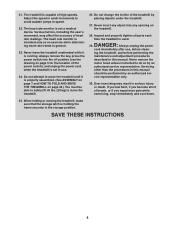
...be able to safely lift 45 lbs. (20 kg) to do so by placing objects under the treadmill. 27. 21. DANGER: 29. The heart rate monitor is used. Never leave the treadmill unattended while it is not in use , before performing the maintenance and adjustment procedures described in serious ...injury or death. The treadmill is running. Always unplug the power cord immediately after use . 24. The heart rate monitor is holding the frame securely in this manual...
...be able to safely lift 45 lbs. (20 kg) to do so by placing objects under the treadmill. 27. 21. DANGER: 29. The heart rate monitor is used. Never leave the treadmill unattended while it is not in use , before performing the maintenance and adjustment procedures described in serious ...injury or death. The treadmill is running. Always unplug the power cord immediately after use . 24. The heart rate monitor is holding the frame securely in this manual...
Instruction Manual
Page 5
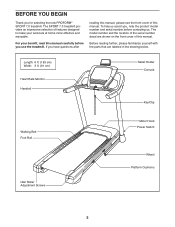
... after reading this manual, please see the front cover of features designed to make your benefit, read this manual. If you for selecting the new PROFORM® SPORT 7.0 treadmill. For your workouts at home more effective and enjoyable. Length: 6 ft. (183 cm) Width: 3 ft. (91 cm) Heart Rate Monitor Handrail Tablet ...Holder Console Key/Clip Walking Belt Foot Rail Idler Roller Adjustment Screws Motor Hood Power Switch Wheel Platform Cushions 5 The SPORT 7.0 treadmill provides an impressive selection of this manual carefully before contacting us.
... after reading this manual, please see the front cover of features designed to make your benefit, read this manual. If you for selecting the new PROFORM® SPORT 7.0 treadmill. For your workouts at home more effective and enjoyable. Length: 6 ft. (183 cm) Width: 3 ft. (91 cm) Heart Rate Monitor Handrail Tablet ...Holder Console Key/Clip Walking Belt Foot Rail Idler Roller Adjustment Screws Motor Hood Power Switch Wheel Platform Cushions 5 The SPORT 7.0 treadmill provides an impressive selection of this manual carefully before contacting us.
Instruction Manual
Page 7
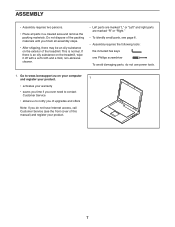
...8226; Assembly requires two persons. • Place all assembly steps. • After shipping, there may be an oily substance on the exterior of the treadmill. This is an oily substance on your computer and register your product. 1 • activates your product. 7 If there is normal. Do not dispose...) and register your warranty • saves you time if you ever need to contact Customer Service • allows us to www.iconsupport.eu on the treadmill, wipe it off with a soft cloth and a mild, non-abrasive cleaner. • Left parts are marked "L" or "Left" and right parts ...
...8226; Assembly requires two persons. • Place all assembly steps. • After shipping, there may be an oily substance on the exterior of the treadmill. This is an oily substance on your computer and register your product. 1 • activates your product. 7 If there is normal. Do not dispose...) and register your warranty • saves you time if you ever need to contact Customer Service • allows us to www.iconsupport.eu on the treadmill, wipe it off with a soft cloth and a mild, non-abrasive cleaner. • Left parts are marked "L" or "Left" and right parts ...
Instruction Manual
Page 13
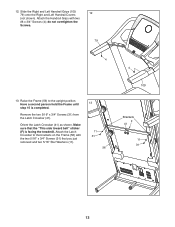
... the Frame (56) to the brackets on the Frame (56) with two #8 x 3/4" Screws (4); Have a second person hold the Frame until step 15 is facing the treadmill. do not overtighten the Screws. 79 4 13. Orient the Latch Crossbar (41) as shown. Slide the Right and Left Handrail Grips (109, 79) onto the...
... the Frame (56) to the brackets on the Frame (56) with two #8 x 3/4" Screws (4); Have a second person hold the Frame until step 15 is facing the treadmill. do not overtighten the Screws. 79 4 13. Orient the Latch Crossbar (41) as shown. Slide the Right and Left Handrail Grips (109, 79) onto the...
Instruction Manual
Page 14
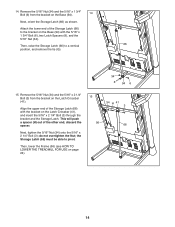
.... the Storage Latch (66) must be able to a vertical position, and remove the tie (G). 14. Then, lower the Frame (56) (see HOW TO LOWER THE TREADMILL FOR USE on the Latch Crossbar (41), and insert the 5/16" x 2 1/4" Bolt (3) through the bracket and the Storage Latch. Remove the 5/16" Nut (34) and...
.... the Storage Latch (66) must be able to a vertical position, and remove the tie (G). 14. Then, lower the Frame (56) (see HOW TO LOWER THE TREADMILL FOR USE on the Latch Crossbar (41), and insert the 5/16" x 2 1/4" Bolt (3) through the bracket and the Storage Latch. Remove the 5/16" Nut (34) and...
Instruction Manual
Page 15
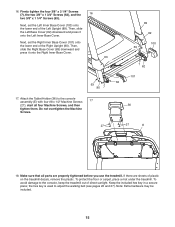
...end of direct sunlight. Make sure that all four Machine Screws, and then 36 tighten them. If there are properly tightened before you use the treadmill. To avoid damage to the console assembly (E) with four #8 x 1/2" Machine Screws 17 (27); Then, slide the Left Base Cover (82... the Right Base Cover (83) downward and press it onto the Left Inner Base Cover. To protect the floor or carpet, place a mat under the treadmill. Firmly tighten the four 3/8" x 2 1/4" Screws (7), the two 3/8" x 1 3/4" Screws (62), and the 16 two 3/8" x 1 1/4" Screws (63). Note: Extra hardware may be...
...end of direct sunlight. Make sure that all four Machine Screws, and then 36 tighten them. If there are properly tightened before you use the treadmill. To avoid damage to the console assembly (E) with four #8 x 1/2" Machine Screws 17 (27); Then, slide the Left Base Cover (82... the Right Base Cover (83) downward and press it onto the Left Inner Base Cover. To protect the floor or carpet, place a mat under the treadmill. Firmly tighten the four 3/8" x 2 1/4" Screws (7), the two 3/8" x 1 3/4" Screws (62), and the 16 two 3/8" x 1 1/4" Screws (63). Note: Extra hardware may be...
Instruction Manual
Page 16
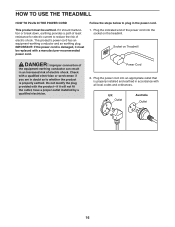
... provides a path of least resistance for electric current to reduce the risk of electric shock. Power Cord 2. Plug the power cord into the socket on Treadmill DANGER: Improper connection of the equipment-earthing conductor can result in an increased risk of electric shock. If it will not fit the outlet, have... and an earthing plug. IMPORTANT: If the power cord is damaged, it must be replaced with all local codes and ordinances. HOW TO USE THE TREADMILL HOW TO PLUG IN THE POWER CORD This product must be earthed. Socket on the...
... provides a path of least resistance for electric current to reduce the risk of electric shock. Power Cord 2. Plug the power cord into the socket on Treadmill DANGER: Improper connection of the equipment-earthing conductor can result in an increased risk of electric shock. If it will not fit the outlet, have... and an earthing plug. IMPORTANT: If the power cord is damaged, it must be replaced with all local codes and ordinances. HOW TO USE THE TREADMILL HOW TO PLUG IN THE POWER CORD This product must be earthed. Socket on the...
Instruction Manual
Page 17
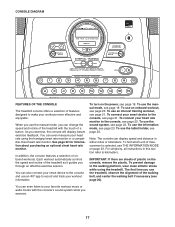
...measurement is selected, see page 18. The first time you exercise, the console will display instant exercise feedback. As you use the treadmill, observe the alignment of the walking belt, and center the walking belt if necessary (see page 26). In addition, the console features a...To use the information mode, see page 23. IMPORTANT: If there are sheets of onboard workouts. CONSOLE DIAGRAM FEATURES OF THE CONSOLE The treadmill console offers a selection of features designed to record and track your workout information. To use an interval training workout, see page 18. To...
...measurement is selected, see page 18. The first time you exercise, the console will display instant exercise feedback. As you use the treadmill, observe the alignment of the walking belt, and center the walking belt if necessary (see page 26). In addition, the console features a...To use the information mode, see page 23. IMPORTANT: If there are sheets of onboard workouts. CONSOLE DIAGRAM FEATURES OF THE CONSOLE The treadmill console offers a selection of features designed to record and track your workout information. To use an interval training workout, see page 18. To...
Instruction Manual
Page 18
..., the key can be pulled from the console, adjust the position of the clip. IMPORTANT: Before you use . When the frame stops moving, the treadmill is not pulled from the console, causing the walking belt to slow to enter your clothes. Enter your weight more quickly. 4. To stop . The ...change by care- fully taking a few steps backward; If you press one of the buttons, the speed setting will improve the accuracy of the Key treadmill. Find the clip attached to select the manual mode. 3. Press the Wt increase or decrease button to a stop the walking belt, press the ...
..., the key can be pulled from the console, adjust the position of the clip. IMPORTANT: Before you use . When the frame stops moving, the treadmill is not pulled from the console, causing the walking belt to slow to enter your clothes. Enter your weight more quickly. 4. To stop . The ...change by care- fully taking a few steps backward; If you press one of the buttons, the speed setting will improve the accuracy of the Key treadmill. Find the clip attached to select the manual mode. 3. Press the Wt increase or decrease button to a stop the walking belt, press the ...
Instruction Manual
Page 19
...level. As you have burned • The distance that your heart rate using the handgrip heart rate monitor, remove the sheets of the treadmill as desired. 7. Contacts To measure your exercise. Measure your hands. For information about 15 seconds. As you have priority. The speed...to the selected incline setting. In addition, make sure that you exercise, the power ring will indicate the approximate intensity level of the treadmill will gradually adjust to view the desired information in watts • The speed of the walking belt • The elapsed time •...
...level. As you have burned • The distance that your heart rate using the handgrip heart rate monitor, remove the sheets of the treadmill as desired. 7. Contacts To measure your exercise. Measure your hands. For information about 15 seconds. As you have priority. The speed...to the selected incline setting. In addition, make sure that you exercise, the power ring will indicate the approximate intensity level of the treadmill will gradually adjust to view the desired information in watts • The speed of the walking belt • The elapsed time •...
Instruction Manual
Page 20
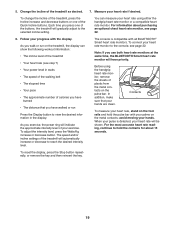
Next, remove the key from the console and put it to the storage position. however, when the next segment of the workout begins, the treadmill will automatically adjust to move at zero or you may be at 2 Km/H. Follow your weight. See step 3 on page 18. 5. See step 8 at any ... is too high or too low at any time, press the Stop button. One speed setting and one incline setting are finished using the treadmill, press the power switch into the console. Insert the key into the off position and unplug the power cord. Select an onboard workout. When you...
Next, remove the key from the console and put it to the storage position. however, when the next segment of the workout begins, the treadmill will automatically adjust to move at zero or you may be at 2 Km/H. Follow your weight. See step 3 on page 18. 5. See step 8 at any ... is too high or too low at any time, press the Stop button. One speed setting and one incline setting are finished using the treadmill, press the power switch into the console. Insert the key into the off position and unplug the power cord. Select an onboard workout. When you...
Instruction Manual
Page 23
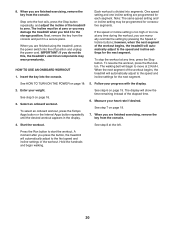
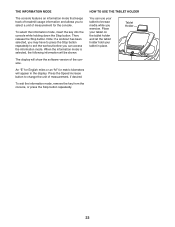
.... Tablet Holder 23 An "E" for English miles or an "M" for the console. THE INFORMATION MODE The console features an information mode that keeps track of treadmill usage information and allows you to select a unit of measurement for metric kilometers will show the software version of measurement, if desired. When the information...
.... Tablet Holder 23 An "E" for English miles or an "M" for the console. THE INFORMATION MODE The console features an information mode that keeps track of treadmill usage information and allows you to select a unit of measurement for metric kilometers will show the software version of measurement, if desired. When the information...
Instruction Manual
Page 24
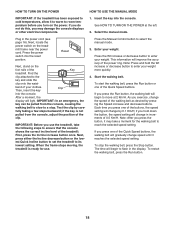
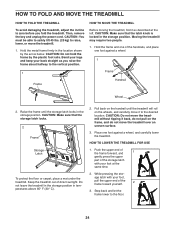
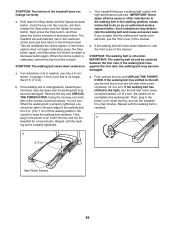
...yourself. 2 3. CAUTION: Make sure that the storage latch locks. 2 Frame Storage Latch To protect the floor or carpet, place a mat under the treadmill. Pull back on the handrail until the storage latch locks in temperatures above 85° F (30° C). 2. Before moving the... your back straight as described at the same time. 2. CAUTION: Do not move the treadmill. 1. HOW TO FOLD AND MOVE THE TREADMILL HOW TO FOLD THE TREADMILL HOW TO MOVE THE TREADMILL To avoid damaging the treadmill, adjust the incline to the desired location. Then, remove the key and unplug the power...
...yourself. 2 3. CAUTION: Make sure that the storage latch locks. 2 Frame Storage Latch To protect the floor or carpet, place a mat under the treadmill. Pull back on the handrail until the storage latch locks in temperatures above 85° F (30° C). 2. Before moving the... your back straight as described at the same time. 2. CAUTION: Do not move the treadmill. 1. HOW TO FOLD AND MOVE THE TREADMILL HOW TO FOLD THE TREADMILL HOW TO MOVE THE TREADMILL To avoid damaging the treadmill, adjust the incline to the desired location. Then, remove the key and unplug the power...
Instruction Manual
Page 25
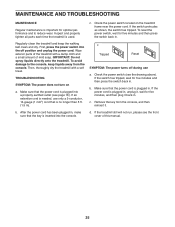
... MAINTENANCE Regular maintenance is important for five minutes and then press the switch back in. Inspect and properly tighten all parts each time the treadmill is needed, use a. Check the power switch located on a. Wipe exterior parts of this manual. 25 TROUBLESHOOTING SYMPTOM: The power does ...switch, wait for optimal performance and to the console, keep the walking belt clean and dry. IMPORTANT: Do not spray liquids directly onto the treadmill. c Tripped Reset SYMPTOM: The power turns off position and unplug the power cord. To avoid damage to reduce wear. b. After the ...
... MAINTENANCE Regular maintenance is important for five minutes and then press the switch back in. Inspect and properly tighten all parts each time the treadmill is needed, use a. Check the power switch located on a. Wipe exterior parts of this manual. 25 TROUBLESHOOTING SYMPTOM: The power does ...switch, wait for optimal performance and to the console, keep the walking belt clean and dry. IMPORTANT: Do not spray liquids directly onto the treadmill. c Tripped Reset SYMPTOM: The power turns off position and unplug the power cord. To avoid damage to reduce wear. b. After the ...
Instruction Manual
Page 26
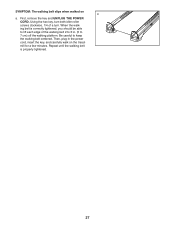
...incline system does not begin calibrating, press the Stop button again, and then press the Incline increase or decrease button again. Your treadmill features a walking belt coated with high-performance lubricant. Be careful not to turn both idler roller screws counterclockwise, 1/4 of this ...and cause excessive wear. IMPORTANT: The walking belt should be centered between the foot rails. If an extension cord is overtightened, treadmill performance may decrease and the walking belt may become damaged. First, remove the key and UNPLUG THE POWER CORD. Next, press ...
...incline system does not begin calibrating, press the Stop button again, and then press the Incline increase or decrease button again. Your treadmill features a walking belt coated with high-performance lubricant. Be careful not to turn both idler roller screws counterclockwise, 1/4 of this ...and cause excessive wear. IMPORTANT: The walking belt should be centered between the foot rails. If an extension cord is overtightened, treadmill performance may decrease and the walking belt may become damaged. First, remove the key and UNPLUG THE POWER CORD. Next, press ...
Instruction Manual
Page 27
Using the hex key, turn both idler roller screws clockwise, 1/4 of the walking belt 2 to lift each edge of a turn. Repeat until the walking belt is correctly tightened, you should be able to 3 in the power cord, insert the key, and carefully walk on a a. Then, plug in . (5 to keep the walking belt centered. First, remove the key and UNPLUG THE POWER CORD. Be careful to 7 cm) off the walking platform. When the walking belt is properly tightened. 27 SYMPTOM: The walking belt slips when walked on the treadmill for a few minutes.
Using the hex key, turn both idler roller screws clockwise, 1/4 of the walking belt 2 to lift each edge of a turn. Repeat until the walking belt is correctly tightened, you should be able to 3 in the power cord, insert the key, and carefully walk on a a. Then, plug in . (5 to keep the walking belt centered. First, remove the key and UNPLUG THE POWER CORD. Be careful to 7 cm) off the walking platform. When the walking belt is properly tightened. 27 SYMPTOM: The walking belt slips when walked on the treadmill for a few minutes.


