
Instruction Manual
Page 2
... are trademarks of ICON Health & Fitness, Inc. and other countries. TABLE OF CONTENTS WARNING DECAL PLACEMENT 2 IMPORTANT PRECAUTIONS 3 BEFORE YOU BEGIN 5 PART IDENTIFICATION CHART 6 ASSEMBLY 7 HOW TO USE THE TREADMILL 16 HOW TO FOLD AND MOVE THE TREADMILL 24 MAINTENANCE AND TROUBLESHOOTING 25 EXERCISE GUIDELINES 28 PART LIST 30 EXPLODED DRAWING 32 ORDERING REPLACEMENT PARTS Back Cover RECYCLING INFORMATION Back Cover WARNING DECAL PLACEMENT This drawing shows the locations of Bluetooth SIG...
... are trademarks of ICON Health & Fitness, Inc. and other countries. TABLE OF CONTENTS WARNING DECAL PLACEMENT 2 IMPORTANT PRECAUTIONS 3 BEFORE YOU BEGIN 5 PART IDENTIFICATION CHART 6 ASSEMBLY 7 HOW TO USE THE TREADMILL 16 HOW TO FOLD AND MOVE THE TREADMILL 24 MAINTENANCE AND TROUBLESHOOTING 25 EXERCISE GUIDELINES 28 PART LIST 30 EXPLODED DRAWING 32 ORDERING REPLACEMENT PARTS Back Cover RECYCLING INFORMATION Back Cover WARNING DECAL PLACEMENT This drawing shows the locations of Bluetooth SIG...
Instruction Manual
Page 3
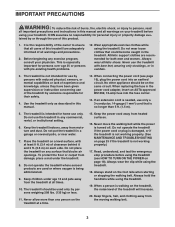
... home use only a 3-conductor, 14-gauge (1 mm2) cord that could become caught in a garage or covered patio, or near water. 7. Keep the treadmill indoors, away from the moving walking belt. 3 Keep fingers, hair, and clothing away from moisture and dust. Do not wear loose clothes that is not working properly. (See MAINTENANCE AND TROUBLESHOOTING on the treadmill at a time. 15. When connecting the power cord...
... home use only a 3-conductor, 14-gauge (1 mm2) cord that could become caught in a garage or covered patio, or near water. 7. Keep the treadmill indoors, away from the moving walking belt. 3 Keep fingers, hair, and clothing away from moisture and dust. Do not wear loose clothes that is not working properly. (See MAINTENANCE AND TROUBLESHOOTING on the treadmill at a time. 15. When connecting the power cord...
Instruction Manual
Page 4
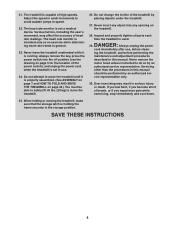
... the power cord when the treadmill is holding the frame securely in general. 23. SAVE THESE INSTRUCTIONS 4 DANGER: 29. vice representative only. 30. Always remove the key, press the power switch into any object into the off position (see the drawing on the treadmill. 28. When folding or moving the treadmill, make sure that the storage latch is not in use , before performing the maintenance and adjustment procedures...
... the power cord when the treadmill is holding the frame securely in general. 23. SAVE THESE INSTRUCTIONS 4 DANGER: 29. vice representative only. 30. Always remove the key, press the power switch into any object into the off position (see the drawing on the treadmill. 28. When folding or moving the treadmill, make sure that the storage latch is not in use , before performing the maintenance and adjustment procedures...
Instruction Manual
Page 5
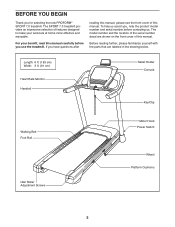
... shown on the front cover of this manual carefully before contacting us. The model number and the location of features designed to make your benefit, read this manual. Length: 6 ft. (183 cm) Width: 3 ft. (91 cm) Heart Rate Monitor Handrail Tablet Holder Console Key/Clip Walking Belt Foot Rail Idler Roller Adjustment Screws Motor Hood Power Switch Wheel Platform Cushions 5 The SPORT 7.0 treadmill provides an impressive selection of the serial number decal are labeled...
... shown on the front cover of this manual carefully before contacting us. The model number and the location of features designed to make your benefit, read this manual. Length: 6 ft. (183 cm) Width: 3 ft. (91 cm) Heart Rate Monitor Handrail Tablet Holder Console Key/Clip Walking Belt Foot Rail Idler Roller Adjustment Screws Motor Hood Power Switch Wheel Platform Cushions 5 The SPORT 7.0 treadmill provides an impressive selection of the serial number decal are labeled...

Instruction Manual
Page 10
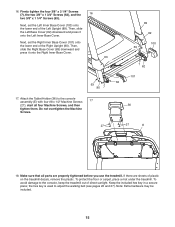
... pulse grips. Attach the Right Tray (106) in the same way. start both Screws, and then tighten them. Attach the Left Handrail (not shown) to avoid scratching the Console Base. Attach the Left Tray with two 5/16" x 2 1/4" Screws (28) and two 5/16" Star Washers (11); 6. Identify the Right Handrail (84). 6 Attach the Right Handrail (84) to pinch the Upright Wire (81). Set the Console...
... pulse grips. Attach the Right Tray (106) in the same way. start both Screws, and then tighten them. Attach the Left Handrail (not shown) to avoid scratching the Console Base. Attach the Left Tray with two 5/16" x 2 1/4" Screws (28) and two 5/16" Star Washers (11); 6. Identify the Right Handrail (84). 6 Attach the Right Handrail (84) to pinch the Upright Wire (81). Set the Console...
Instruction Manual
Page 11
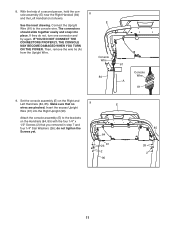
..., 85). Then, remove the wire tie (A) from the Upright Wire. Attach the console assembly (E) to the console wire. Console Wire 84 81 Console Wire A 81 9. IF YOU DO NOT CONNECT THE CONNECTORS PROPERLY, THE CONSOLE MAY BECOME DAMAGED WHEN YOU TURN ON THE POWER. Make sure that you removed in step 7 and four 1/4" Star Washers (26); Set the console assembly (E) on the Handrails (84, 85) with the four 1/4" x 1/2" Screws (2) that no 9 wires are pinched.
..., 85). Then, remove the wire tie (A) from the Upright Wire. Attach the console assembly (E) to the console wire. Console Wire 84 81 Console Wire A 81 9. IF YOU DO NOT CONNECT THE CONNECTORS PROPERLY, THE CONSOLE MAY BECOME DAMAGED WHEN YOU TURN ON THE POWER. Make sure that you removed in step 7 and four 1/4" Star Washers (26); Set the console assembly (E) on the Handrails (84, 85) with the four 1/4" x 1/2" Screws (2) that no 9 wires are pinched.
Instruction Manual
Page 15
... under the treadmill. the hex key is used to the console assembly (E) with four #8 x 1/2" Machine Screws 17 (27); 16. Attach the Tablet Holder (36) to adjust the walking belt (see pages 26 and 27). If there are properly tightened before you use the treadmill. start all parts are sheets of the Left Upright (89). Next, set the Right Inner Base Cover (101) onto the lower end of direct sunlight. Next, set the...
... under the treadmill. the hex key is used to the console assembly (E) with four #8 x 1/2" Machine Screws 17 (27); 16. Attach the Tablet Holder (36) to adjust the walking belt (see pages 26 and 27). If there are properly tightened before you use the treadmill. start all parts are sheets of the Left Upright (89). Next, set the Right Inner Base Cover (101) onto the lower end of direct sunlight. Next, set the...
Instruction Manual
Page 16
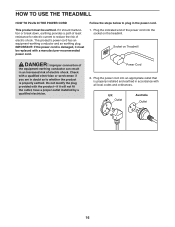
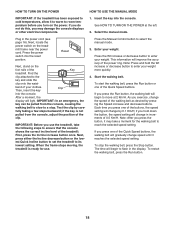
... the power cord is properly installed and earthed in an increased risk of the power cord into an appropriate outlet that is damaged, it must be replaced with all local codes and ordinances. Socket on the treadmill. Plug the power cord into the socket on Treadmill DANGER: Improper connection of the equipment-earthing conductor can result in accordance with a manufacturer-recommended power cord. Follow the steps...
... the power cord is properly installed and earthed in an increased risk of the power cord into an appropriate outlet that is damaged, it must be replaced with all local codes and ordinances. Socket on the treadmill. Plug the power cord into the socket on Treadmill DANGER: Improper connection of the equipment-earthing conductor can result in accordance with a manufacturer-recommended power cord. Follow the steps...
Instruction Manual
Page 17
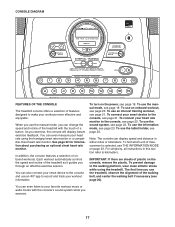
... optional chest heart rate monitor. To use the manual mode, see page 23. To use the information mode, see page 18. For simplicity, all instructions in either miles or kilometers. You can display speed and distance in this section refer to your favorite workout music or audio books with the touch of a button. To use the tablet holder, see page 26). To prevent damage to the console and use the treadmill, observe...
... optional chest heart rate monitor. To use the manual mode, see page 23. To use the information mode, see page 18. For simplicity, all instructions in either miles or kilometers. You can display speed and distance in this section refer to your favorite workout music or audio books with the touch of a button. To use the tablet holder, see page 26). To prevent damage to the console and use the treadmill, observe...
Instruction Manual
Page 18
... speed setting will change the speed of the Quick Speed buttons. Press the Manual Control button to ensure that the console shows the correct incline level of the Key treadmill. Plug in the display. To stop . To restart the walking belt, press the Run button. 18 Start the walking belt. As you exercise, change in increments of the Quick Speed buttons, the walking belt will begin to flash in the power cord (see page 16). HOW TO TURN ON THE POWER HOW TO USE...
... speed setting will change the speed of the Quick Speed buttons. Press the Manual Control button to ensure that the console shows the correct incline level of the Key treadmill. Plug in the display. To stop . To restart the walking belt, press the Run button. 18 Start the walking belt. As you exercise, change in increments of the Quick Speed buttons, the walking belt will begin to flash in the power cord (see page 16). HOW TO TURN ON THE POWER HOW TO USE...
Instruction Manual
Page 19
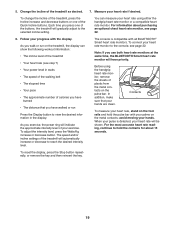
... you exercise, the power ring will gradually adjust to view the desired information in watts • The speed of the walking belt • The elapsed time • Your pace • The approximate number of calories you have burned • The distance that your palms on the pulse bar. avoid moving your heart rate if desired. For the most accurate heart rate reading, continue to the console, see...
... you exercise, the power ring will gradually adjust to view the desired information in watts • The speed of the walking belt • The elapsed time • Your pace • The approximate number of calories you have burned • The distance that your palms on the pulse bar. avoid moving your heart rate if desired. For the most accurate heart rate reading, continue to the console, see...
Instruction Manual
Page 20
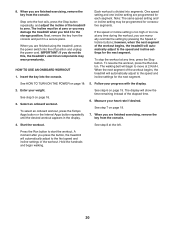
... automatically adjust to start the workout. Next, remove the key from the console and put it to the storage position. Note: The same speed setting and/ or incline setting may damage the treadmill when you are finished exercising, remove the key from the console. 4. To resume the workout, press the Run button. Follow your weight. Insert the key into segments. Enter your progress with the display. 2. See step 8 at any time, press the Stop button...
... automatically adjust to start the workout. Next, remove the key from the console and put it to the storage position. Note: The same speed setting and/ or incline setting may damage the treadmill when you are finished exercising, remove the key from the console. 4. To resume the workout, press the Run button. Follow your weight. Insert the key into segments. Enter your progress with the display. 2. See step 8 at any time, press the Stop button...
Instruction Manual
Page 21
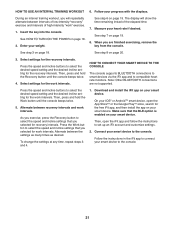
... intervals. Download and install the iFit app on page 18. 2. See HOW TO TURN ON THE POWER on your smart device to select the speed and incline settings that you exercise, press the Recovery button to the console. 21 Press the speed and incline buttons to connect your smart device. Insert the key into the console. Follow the instructions in the iFit app to select the desired speed setting and the desired incline setting for...
... intervals. Download and install the iFit app on page 18. 2. See HOW TO TURN ON THE POWER on your smart device to select the speed and incline settings that you exercise, press the Recovery button to the console. 21 Press the speed and incline buttons to connect your smart device. Insert the key into the console. Follow the instructions in the iFit app to select the desired speed setting and the desired incline setting for...
Instruction Manual
Page 22
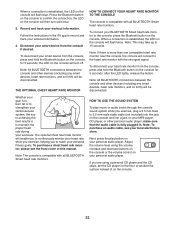
... devices (including any smart devices, heart rate monitors, and so forth) will be disconnected. When a connection is fully plugged in the iFit app to 3.5 mm male audio cable (not included) into the jack on the console and into a jack on the console will turn solid blue. 3. The optional chest heart rate monitor will enable you to continuously monitor your heart rate while you exercise, helping you to 15 seconds...
... devices (including any smart devices, heart rate monitors, and so forth) will be disconnected. When a connection is fully plugged in the iFit app to 3.5 mm male audio cable (not included) into the jack on the console and into a jack on the console will turn solid blue. 3. The optional chest heart rate monitor will enable you to continuously monitor your heart rate while you exercise, helping you to 15 seconds...
Instruction Manual
Page 24
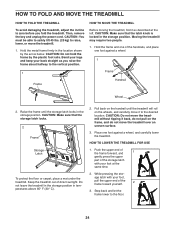
... upper part of the storage latch with your foot, pull the upper end of the frame toward yourself. 2 3. HOW TO FOLD AND MOVE THE TREADMILL HOW TO FOLD THE TREADMILL HOW TO MOVE THE TREADMILL To avoid damaging the treadmill, adjust the incline to zero before you raise the frame about halfway to the vertical position. Hold the frame and one of direct sunlight. Step...
... upper part of the storage latch with your foot, pull the upper end of the frame toward yourself. 2 3. HOW TO FOLD AND MOVE THE TREADMILL HOW TO FOLD THE TREADMILL HOW TO MOVE THE TREADMILL To avoid damaging the treadmill, adjust the incline to zero before you raise the frame about halfway to the vertical position. Hold the frame and one of direct sunlight. Step...
Instruction Manual
Page 25
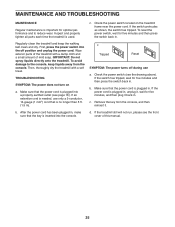
... (1 mm2) cord that the power cord is plugged in. If an extention cord is needed, use a. Remove the key from the console, and then reinsert it , wait for optimal performance and to the console, keep the walking belt clean and dry. b. d. Check the power switch located on a. Regularly clean the treadmill and keep liquids away from the console. First, press the power switch into the console. Check the power switch (see the front cover of...
... (1 mm2) cord that the power cord is plugged in. If an extention cord is needed, use a. Remove the key from the console, and then reinsert it , wait for optimal performance and to the console, keep the walking belt clean and dry. b. d. Check the power switch located on a. Regularly clean the treadmill and keep liquids away from the console. First, press the power switch into the console. Check the power switch (see the front cover of...
Instruction Manual
Page 26
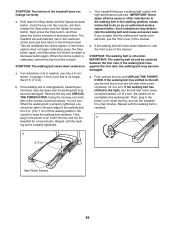
... rails, the walking belt may deteriorate the walking belt and cause excessive wear. Then, plug in the power cord, insert the key, and run the treadmill for a few minutes. Hold down the Stop button and the Speed increase button, insert the key into the console, and then release the Stop button and the Speed increase button. If the incline system does not begin calibrating, press the Stop button again, and then press the Incline increase or...
... rails, the walking belt may deteriorate the walking belt and cause excessive wear. Then, plug in the power cord, insert the key, and run the treadmill for a few minutes. Hold down the Stop button and the Speed increase button, insert the key into the console, and then release the Stop button and the Speed increase button. If the incline system does not begin calibrating, press the Stop button again, and then press the Incline increase or...
Instruction Manual
Page 28
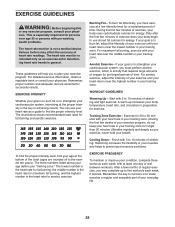
... the accuracy of exercise does your body begin to use your body temperature, heart rate, and circulation in your cardiovascular system, you must perform aerobic exercise, which is especially important for aerobic exercise. For aerobic exercise, adjust the intensity of your exercise program, do not keep your heart rate in your training zone for energy. WORKOUT GUIDELINES Warming Up-Start with your heart rate in your training zone. (During the...
... the accuracy of exercise does your body begin to use your body temperature, heart rate, and circulation in your cardiovascular system, you must perform aerobic exercise, which is especially important for aerobic exercise. For aerobic exercise, adjust the intensity of your exercise program, do not keep your heart rate in your training zone for energy. WORKOUT GUIDELINES Warming Up-Start with your heart rate in your training zone. (During the...
Instruction Manual
Page 30
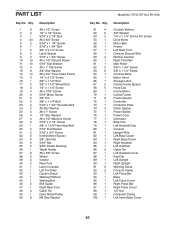
...Pin Screw Drive Motor Motor Belt Frame Left Rear Foot Console Ground Wire Rubber Cushion Right Foot Rail Idler Roller 3/8" x 1 3/4" Screw 3/8" x 1 1/4" Screw Console Base Motor Hood Storage Latch Incline Frame Spacer Hood Clip Incline Motor Incline Frame Frame Spacer Controller Controller Plate Roller Spacer Power Switch Power Cord Grommet Belly Pan Left Handrail Grip Console Upright Wire Left Base Cover Right Base Cover Right Handrail Left Handrail Cable Tie Left Handrail Cover Key/Clip Left Upright Right Upright Warning Decal Console Clamp Left Pulse Bar Base Left Pulse Cover Right Pulse Bar...
...Pin Screw Drive Motor Motor Belt Frame Left Rear Foot Console Ground Wire Rubber Cushion Right Foot Rail Idler Roller 3/8" x 1 3/4" Screw 3/8" x 1 1/4" Screw Console Base Motor Hood Storage Latch Incline Frame Spacer Hood Clip Incline Motor Incline Frame Frame Spacer Controller Controller Plate Roller Spacer Power Switch Power Cord Grommet Belly Pan Left Handrail Grip Console Upright Wire Left Base Cover Right Base Cover Right Handrail Left Handrail Cable Tie Left Handrail Cover Key/Clip Left Upright Right Upright Warning Decal Console Clamp Left Pulse Bar Base Left Pulse Cover Right Pulse Bar...

Instruction Manual
Page 36
...• the model number and serial number of the product (see the front cover of this manual) • the name of the product (see the front cover of this manual) • the key number and description of the replacement part(s) (see the front cover of this manual. In doing so... after its useful life as required by law. Part No. 378839 R1115A Printed in China © 2015 ICON Health & Fitness, Inc. ORDERING REPLACEMENT PARTS To order replacement parts, please see the PART LIST and the EXPLODED DRAWING near the end of this manual) RECYCLING INFORMATION This electronic product...
...• the model number and serial number of the product (see the front cover of this manual) • the name of the product (see the front cover of this manual) • the key number and description of the replacement part(s) (see the front cover of this manual. In doing so... after its useful life as required by law. Part No. 378839 R1115A Printed in China © 2015 ICON Health & Fitness, Inc. ORDERING REPLACEMENT PARTS To order replacement parts, please see the PART LIST and the EXPLODED DRAWING near the end of this manual) RECYCLING INFORMATION This electronic product...


