

English Manual
Page 2
... number on the front cover of ICON Health & Fitness, Inc. and other countries and is a registered trademark of Cisco in the U.S. TABLE OF CONTENTS WARNING DECAL PLACEMENT 2 IMPORTANT PRECAUTIONS 3 BEFORE YOU BEGIN 6 PART IDENTIFICATION CHART 7 ASSEMBLY 8 HOW TO USE THE TREADMILL 16 FCC INFORMATION 23 HOW TO FOLD AND MOVE THE TREADMILL 24 MAINTENANCE AND TROUBLESHOOTING 25 EXERCISE GUIDELINES 28 PART LIST 30 EXPLODED DRAWING 32 ORDERING REPLACEMENT PARTS Back Cover LIMITED WARRANTY Back Cover...
... number on the front cover of ICON Health & Fitness, Inc. and other countries and is a registered trademark of Cisco in the U.S. TABLE OF CONTENTS WARNING DECAL PLACEMENT 2 IMPORTANT PRECAUTIONS 3 BEFORE YOU BEGIN 6 PART IDENTIFICATION CHART 7 ASSEMBLY 8 HOW TO USE THE TREADMILL 16 FCC INFORMATION 23 HOW TO FOLD AND MOVE THE TREADMILL 24 MAINTENANCE AND TROUBLESHOOTING 25 EXERCISE GUIDELINES 28 PART LIST 30 EXPLODED DRAWING 32 ORDERING REPLACEMENT PARTS Back Cover LIMITED WARRANTY Back Cover...
English Manual
Page 3
... control system of the treadmill. Failure to use of this manual and all times. 10. Do not operate the treadmill where aerosol products are recommended for their safety. 4. Do not operate the treadmill if the power cord or plug is damaged, or if the treadmill is not working properly.) 18. It is not working properly. (See MAINTENANCE AND TROUBLESHOOTING on the same circuit. 14. Use...
... control system of the treadmill. Failure to use of this manual and all times. 10. Do not operate the treadmill where aerosol products are recommended for their safety. 4. Do not operate the treadmill if the power cord or plug is damaged, or if the treadmill is not working properly.) 18. It is not working properly. (See MAINTENANCE AND TROUBLESHOOTING on the same circuit. 14. Use...

English Manual
Page 4
...- The heart rate monitor is capable of the treadmill by placing objects under the treadmill. 21. Always remove the key, press the power switch into any opening on page 6 for the location of the treadmill will increase. 27. ing the treadmill, and before clean- Never leave the treadmill unattended while it is walking on the foot rails when starting or stopping the walking belt. Never remove the motor hood unless instructed to move the treadmill until...
...- The heart rate monitor is capable of the treadmill by placing objects under the treadmill. 21. Always remove the key, press the power switch into any opening on page 6 for the location of the treadmill will increase. 27. ing the treadmill, and before clean- Never leave the treadmill unattended while it is walking on the foot rails when starting or stopping the walking belt. Never remove the motor hood unless instructed to move the treadmill until...
English Manual
Page 6
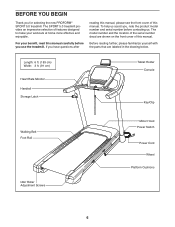
... cm) Width: 3 ft. (91 cm) Heart Rate Monitor Handrail Storage Latch Tablet Holder Console Key/Clip Walking Belt Foot Rail Idler Roller Adjustment Screws Motor Hood Power Switch Power Cord Wheel Platform Cushions 6 Before reading further, please familiarize yourself with the parts that are shown on the front cover of this manual, please see the front cover of features designed to make your benefit, read this manual. The SPORT 5.0 treadmill provides an impressive selection of...
... cm) Width: 3 ft. (91 cm) Heart Rate Monitor Handrail Storage Latch Tablet Holder Console Key/Clip Walking Belt Foot Rail Idler Roller Adjustment Screws Motor Hood Power Switch Power Cord Wheel Platform Cushions 6 Before reading further, please familiarize yourself with the parts that are shown on the front cover of this manual, please see the front cover of features designed to make your benefit, read this manual. The SPORT 5.0 treadmill provides an impressive selection of...

English Manual
Page 12
... POWER. do not, turn one connector and try again. Connect the Upright Wire (81) to the brackets on the Right and Left Handrails (84, 85). Make sure that you removed in step 7 and four 1/4" Star Washers (26); Insert the excess Upright Wire (81) into place. Console Wire 84 81 Console Wire A 81 9. Set the console assembly (E) on the Handrails (84, 85) with the four 1/4" x 1/2" Screws (2) that no 9 wires...
... POWER. do not, turn one connector and try again. Connect the Upright Wire (81) to the brackets on the Right and Left Handrails (84, 85). Make sure that you removed in step 7 and four 1/4" Star Washers (26); Insert the excess Upright Wire (81) into place. Console Wire 84 81 Console Wire A 81 9. Set the console assembly (E) on the Handrails (84, 85) with the four 1/4" x 1/2" Screws (2) that no 9 wires...
English Manual
Page 15
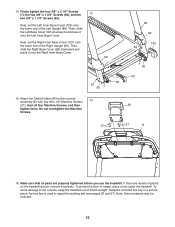
... the Machine Screws. 27 27 E 16. start all parts are sheets of direct sunlight. Then, slide the Right Base Cover (83) downward and press it onto the Left Inner Base Cover. Attach the Tablet Holder (36) to adjust the walking belt (see pages 26 and 27). the hex key is used to the console assembly (E) with four #8 x 1/2" Machine Screws 15 (27); 14. Firmly tighten the four 3/8" x 2 1/4" Screws (7), the two 3/8" x 1 3/4" Screws (62...
... the Machine Screws. 27 27 E 16. start all parts are sheets of direct sunlight. Then, slide the Right Base Cover (83) downward and press it onto the Left Inner Base Cover. Attach the Tablet Holder (36) to adjust the walking belt (see pages 26 and 27). the hex key is used to the console assembly (E) with four #8 x 1/2" Machine Screws 15 (27); 14. Firmly tighten the four 3/8" x 2 1/4" Screws (7), the two 3/8" x 1 3/4" Screws (62...

English Manual
Page 16
... Receptacle Adapter Lug Metal Screw The lug or wire extending from other appliances being turned on page 3. The outlet must be on this manual to purchase an arc filter. 1 Grounded Outlet Grounding Pin Grounding Pin Surge Suppressor The treadmill must have a proper outlet installed by sudden voltage changes in the Power Cord nominal 120-volt circuit capable of damaging the treadmill, always use a properly...
... Receptacle Adapter Lug Metal Screw The lug or wire extending from other appliances being turned on page 3. The outlet must be on this manual to purchase an arc filter. 1 Grounded Outlet Grounding Pin Grounding Pin Surge Suppressor The treadmill must have a proper outlet installed by sudden voltage changes in the Power Cord nominal 120-volt circuit capable of damaging the treadmill, always use a properly...
English Manual
Page 17
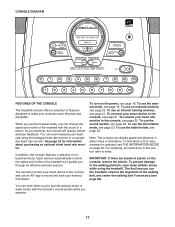
... the power, see page 21. As you through an effective exercise session. Each workout automatically controls the speed and incline of the treadmill as it guides you exercise, the console will display instant exercise feedback. To connect your favorite workout music or audio books with the touch of a button. To use the tablet holder, see THE INFORMATION MODE on page 23. To turn on the console, remove the plastic. You can display speed and distance...
... the power, see page 21. As you through an effective exercise session. Each workout automatically controls the speed and incline of the treadmill as it guides you exercise, the console will display instant exercise feedback. To connect your favorite workout music or audio books with the touch of a button. To use the tablet holder, see THE INFORMATION MODE on page 23. To turn on the console, remove the plastic. You can display speed and distance...

English Manual
Page 18
... the console, adjust the position of the treadmill: First, press the Incline increase button once. As you press one of the power ring. if you use the treadmill, take a moment for use. Press the power switch into the reset position. After a moment, the display will improve the accuracy of the buttons, the speed setting will gradually change in the display. Start the walking belt. ing belt to slow to select a speed setting of the walking belt as 3.5 mph-press two numbered buttons...
... the console, adjust the position of the treadmill: First, press the Incline increase button once. As you press one of the power ring. if you use the treadmill, take a moment for use. Press the power switch into the reset position. After a moment, the display will improve the accuracy of the buttons, the speed setting will gradually change in the display. Start the walking belt. ing belt to slow to select a speed setting of the walking belt as 3.5 mph-press two numbered buttons...

English Manual
Page 19
... moving your heart rate if desired. For information about 15 seconds. When your pulse is compatible with all BLUETOOTH® Smart heart rate monitors. Before using either the handgrip heart rate monitor or a compatible heart rate monitor. In addition, make sure that you have walked or run Press the Display button to the console, see step 7) • Your power level in the display. You can show the following workout information: • The incline level of the treadmill...
... moving your heart rate if desired. For information about 15 seconds. When your pulse is compatible with all BLUETOOTH® Smart heart rate monitors. Before using either the handgrip heart rate monitor or a compatible heart rate monitor. In addition, make sure that you have walked or run Press the Display button to the console, see step 7) • Your power level in the display. You can show the following workout information: • The incline level of the treadmill...
English Manual
Page 20
... the power cord. The display will automatically adjust to the first speed and incline settings of the workout begins, the treadmill will begin walking. 20 When you fold it in the display. Next, remove the key from the console and put it to zero. HOW TO USE AN ONBOARD WORKOUT 1. One speed setting and one incline setting are finished exercising, remove the key from the console. See step 7 on page 18. 3. Press the Run button to move...
... the power cord. The display will automatically adjust to the first speed and incline settings of the workout begins, the treadmill will begin walking. 20 When you fold it in the display. Next, remove the key from the console and put it to zero. HOW TO USE AN ONBOARD WORKOUT 1. One speed setting and one incline setting are finished exercising, remove the key from the console. See step 7 on page 18. 3. Press the Run button to move...
English Manual
Page 21
.... Press the Work button to the console. 21 Follow the instructions in the iFit app to connect your smart device to select the desired speed setting and the desired incline setting for the work intervals. HOW TO USE AN INTERVAL TRAINING WORKOUT 6. Follow your heart rate if desired. Select settings for the recovery intervals. See step 6 on page 18. 2. Press the speed and incline buttons to compatible heart rate monitors. See HOW TO TURN ON THE POWER on...
.... Press the Work button to the console. 21 Follow the instructions in the iFit app to connect your smart device to select the desired speed setting and the desired incline setting for the work intervals. HOW TO USE AN INTERVAL TRAINING WORKOUT 6. Follow your heart rate if desired. Select settings for the recovery intervals. See step 6 on page 18. 2. Press the speed and incline buttons to compatible heart rate monitors. See HOW TO TURN ON THE POWER on...

English Manual
Page 22
... OPTIONAL CHEST HEART RATE MONITOR HOW TO CONNECT YOUR HEART RATE MONITOR TO THE CONSOLE The console is compatible with all BLUETOOTH Smart heart rate monitors. HOW TO USE THE SOUND SYSTEM To play button on your workouts. Next, press the play music or audio books through the console sound system while you exercise, plug a 3.5 mm male to the heart rate monitor with all BLUETOOTH Smart heart rate monitors. To disconnect your smart device from the console, press and...
... OPTIONAL CHEST HEART RATE MONITOR HOW TO CONNECT YOUR HEART RATE MONITOR TO THE CONSOLE The console is compatible with all BLUETOOTH Smart heart rate monitors. HOW TO USE THE SOUND SYSTEM To play button on your workouts. Next, press the play music or audio books through the console sound system while you exercise, plug a 3.5 mm male to the heart rate monitor with all BLUETOOTH Smart heart rate monitors. To disconnect your smart device from the console, press and...

English Manual
Page 23
.... Press the Speed increase button to change the unit of measurement for help. Tablet Holder FCC INFORMATION This console has been tested and found to comply with the instructions, may have to press the Stop button repeatedly to exit the workout before you can use only shielded interface cables when connecting to computer or peripheral devices. THE INFORMATION MODE The console features an information mode that keeps track of treadmill usage information...
.... Press the Speed increase button to change the unit of measurement for help. Tablet Holder FCC INFORMATION This console has been tested and found to comply with the instructions, may have to press the Stop button repeatedly to exit the workout before you can use only shielded interface cables when connecting to computer or peripheral devices. THE INFORMATION MODE The console features an information mode that keeps track of treadmill usage information...

English Manual
Page 24
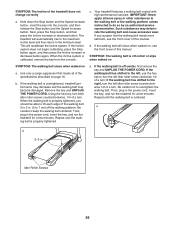
... direct sunlight. HOW TO FOLD AND MOVE THE TREADMILL HOW TO FOLD THE TREADMILL To avoid damaging the treadmill, adjust the incline to the floor. Bend your legs and keep your right hand. Then, remove the key and unplug the power cord. CAUTION: You must be able to safely lift 45 lbs. (20 kg) to the vertical position. CAUTION: Make sure that the pin...
... direct sunlight. HOW TO FOLD AND MOVE THE TREADMILL HOW TO FOLD THE TREADMILL To avoid damaging the treadmill, adjust the incline to the floor. Bend your legs and keep your right hand. Then, remove the key and unplug the power cord. CAUTION: You must be able to safely lift 45 lbs. (20 kg) to the vertical position. CAUTION: Make sure that the pin...
English Manual
Page 26
... down the Stop button and the Speed increase button, insert the key into the console, and then release the Stop button and the Speed increase button. Next, press the Stop button, and then press the Incline increase or decrease button. Use only a surge suppressor that the walking belt needs more lubricant, see the front cover of a turn ; Using the hex key, turn both idler roller screws counterclockwise, 1/4 of this manual. Then, plug in the power cord, insert the key, and run the treadmill for...
... down the Stop button and the Speed increase button, insert the key into the console, and then release the Stop button and the Speed increase button. Next, press the Stop button, and then press the Incline increase or decrease button. Use only a surge suppressor that the walking belt needs more lubricant, see the front cover of a turn ; Using the hex key, turn both idler roller screws counterclockwise, 1/4 of this manual. Then, plug in the power cord, insert the key, and run the treadmill for...

English Manual
Page 27
b. Then, plug in . (5 to keep the walking belt centered. ing belt is properly tightened. 27 ing belt is correctly tightened, you should be able to lift each edge of a turn both idler roller screws clockwise, 1/4 of the walking belt 2 to 3 in the power cord, insert the key, and carefully walk on , first remove the key and UNPLUG THE POWER b CORD. Using the hex key, turn . Be careful to 7 cm) off the walking platform. When the walk- Repeat until the walk- If the walking belt slips when walked on the treadmill for a few minutes.
b. Then, plug in . (5 to keep the walking belt centered. ing belt is properly tightened. 27 ing belt is correctly tightened, you should be able to lift each edge of a turn both idler roller screws clockwise, 1/4 of the walking belt 2 to 3 in the power cord, insert the key, and carefully walk on , first remove the key and UNPLUG THE POWER b CORD. Using the hex key, turn . Be careful to 7 cm) off the walking platform. When the walk- Repeat until the walk- If the walking belt slips when walked on the treadmill for a few minutes.

English Manual
Page 28
... is the heart rate for exercise. After a few weeks of your exercise until your exercise program. Remember, the key to 30 minutes with pre-existing health problems. The heart rate monitor is near the middle number in preparation for aerobic exercise. Burning Fat-To burn fat effectively, you exercise; EXERCISE GUIDELINES WARNING: Before beginning this or any exercise program, consult your heart rate as an exercise aid in determining heart rate trends in...
... is the heart rate for exercise. After a few weeks of your exercise until your exercise program. Remember, the key to 30 minutes with pre-existing health problems. The heart rate monitor is near the middle number in preparation for aerobic exercise. Burning Fat-To burn fat effectively, you exercise; EXERCISE GUIDELINES WARNING: Before beginning this or any exercise program, consult your heart rate as an exercise aid in determining heart rate trends in...

English Manual
Page 30
... Incline Pin Screw Drive Motor Motor Belt Frame Left Rear Foot Console Ground Wire Rubber Cushion Right Foot Rail Idler Roller 3/8" x 1 3/4" Screw 3/8" x 1 1/4" Screw Console Base Motor Hood Latch Assembly Incline Frame Spacer Hood Clip Incline Motor Incline Frame Frame Spacer Controller Controller Plate Roller Spacer Power Switch Power Cord Grommet Belly Pan Left Handrail Grip Console Upright Wire Left Base Cover Right Base Cover Right Handrail Left Handrail Cable Tie Left Handrail Cover Key/Clip Left Upright Right Upright Warning Decal Console Clamp Left Pulse Bar Base Left Pulse Cover Right...
... Incline Pin Screw Drive Motor Motor Belt Frame Left Rear Foot Console Ground Wire Rubber Cushion Right Foot Rail Idler Roller 3/8" x 1 3/4" Screw 3/8" x 1 1/4" Screw Console Base Motor Hood Latch Assembly Incline Frame Spacer Hood Clip Incline Motor Incline Frame Frame Spacer Controller Controller Plate Roller Spacer Power Switch Power Cord Grommet Belly Pan Left Handrail Grip Console Upright Wire Left Base Cover Right Base Cover Right Handrail Left Handrail Cable Tie Left Handrail Cover Key/Clip Left Upright Right Upright Warning Decal Console Clamp Left Pulse Bar Base Left Pulse Cover Right...

English Manual
Page 36
... service plan, see the PART LIST and the EXPLODED DRAWING near the end of the original purchaser (customer). Some states do not allow the exclusion or limitation of removal or installation; To help us : • the model number and serial number of the product (see the front cover of this manual) • the name of the product (see the front cover of this manual) LIMITED WARRANTY...
... service plan, see the PART LIST and the EXPLODED DRAWING near the end of the original purchaser (customer). Some states do not allow the exclusion or limitation of removal or installation; To help us : • the model number and serial number of the product (see the front cover of this manual) • the name of the product (see the front cover of this manual) LIMITED WARRANTY...

