

Canadian English Manual
Page 1
...this equipment. CALL TOLL-FREE: 1-888-936-4266 Mon.-Fri., 8:00 until 17:00 EST (excluding holidays) OR E-MAIL US: [email protected] USER'S MANUAL CAUTION Read all precautions and instructions in the space above for future reference. As a manufacturer, we are damaged or missing, PLEASE DO NOT CONTACT THE ... customer satisfaction. Model No. 30776.0 Serial No. Serial Number Decal QUESTIONS? For assistance, contact our Customer Service Department. Visit our website at www.proform.com new products, prizes, fitness tips, and much more! Write the serial number in this...
...this equipment. CALL TOLL-FREE: 1-888-936-4266 Mon.-Fri., 8:00 until 17:00 EST (excluding holidays) OR E-MAIL US: [email protected] USER'S MANUAL CAUTION Read all precautions and instructions in the space above for future reference. As a manufacturer, we are damaged or missing, PLEASE DO NOT CONTACT THE ... customer satisfaction. Model No. 30776.0 Serial No. Serial Number Decal QUESTIONS? For assistance, contact our Customer Service Department. Visit our website at www.proform.com new products, prizes, fitness tips, and much more! Write the serial number in this...

Canadian English Manual
Page 2
Apply the decal in the location shown. If a decal is a registered trademark of ICON IP, Inc. 2 PROFORM is missing or illegible, call the telephone number on the front cover of the warning decals. Note: The decals may not be shown ...actual size. TABLE OF CONTENTS WARNING DECAL PLACEMENT 2 IMPORTANT PRECAUTIONS 3 BEFORE YOU BEGIN 5 ASSEMBLY 6 OPERATION AND ADJUSTMENT 11 HOW TO FOLD AND MOVE THE TREADMILL 19 TROUBLESHOOTING 21 EXERCISE GUIDELINES 24 PART LIST 26 EXPLODED DRAWING 28 ORDERING REPLACEMENT PARTS Back Cover LIMITED WARRANTY Back Cover WARNING DECAL PLACEMENT This...
Apply the decal in the location shown. If a decal is a registered trademark of ICON IP, Inc. 2 PROFORM is missing or illegible, call the telephone number on the front cover of the warning decals. Note: The decals may not be shown ...actual size. TABLE OF CONTENTS WARNING DECAL PLACEMENT 2 IMPORTANT PRECAUTIONS 3 BEFORE YOU BEGIN 5 ASSEMBLY 6 OPERATION AND ADJUSTMENT 11 HOW TO FOLD AND MOVE THE TREADMILL 19 TROUBLESHOOTING 21 EXERCISE GUIDELINES 24 PART LIST 26 EXPLODED DRAWING 28 ORDERING REPLACEMENT PARTS Back Cover LIMITED WARRANTY Back Cover WARNING DECAL PLACEMENT This...

Canadian English Manual
Page 3
... of the owner to avoid sudden jumps in speed. 19. The treadmill is turned off. Adjust the speed in sandals. 11. structions in this manual and all warnings on your treadmill before using your physician. Do not use the treadmill with at least 8 ft. (2.4 m) of clearance behind it and... 2 ft. (0.6 m) on the treadmill at all times. 8. If the control system is not ...
... of the owner to avoid sudden jumps in speed. 19. The treadmill is turned off. Adjust the speed in sandals. 11. structions in this manual and all warnings on your treadmill before using your physician. Do not use the treadmill with at least 8 ft. (2.4 m) of clearance behind it and... 2 ft. (0.6 m) on the treadmill at all times. 8. If the control system is not ...

Canadian English Manual
Page 4
... ASSEMBLY on page 6, and HOW TO FOLD AND MOVE THE TREADMILL on the treadmill. Always remove the key, unplug the power cord, and switch the reset/off position when the treadmill is holding the frame securely in use this treadmill in this manual should be able to safely lift 45 lbs. (20 kg)... to raise, lower, or move the treadmill. 22. Always unplug the power cord immediately after use only. ...
... ASSEMBLY on page 6, and HOW TO FOLD AND MOVE THE TREADMILL on the treadmill. Always remove the key, unplug the power cord, and switch the reset/off position when the treadmill is holding the frame securely in use this treadmill in this manual should be able to safely lift 45 lbs. (20 kg)... to raise, lower, or move the treadmill. 22. Always unplug the power cord immediately after use only. ...

Canadian English Manual
Page 5
.... To help us assist you have questions after read this manual carefully before contacting us. And when you for selecting the revolutionary PROFORM® SPORT 1100 treadmill. For your workouts at home more enjoyable and effective. The SPORT 1100 treadmill offers an impressive array of this manual. ing this manual, please see the front cover of features designed to make...
.... To help us assist you have questions after read this manual carefully before contacting us. And when you for selecting the revolutionary PROFORM® SPORT 1100 treadmill. For your workouts at home more enjoyable and effective. The SPORT 1100 treadmill offers an impressive array of this manual. ing this manual, please see the front cover of features designed to make...

Canadian English Manual
Page 6
...Make sure that the power cord is the key number of the part, from the side of this manual. Hold the Right Upright near the end of the post as shown. Set the treadmill in the parts bag, check to the Base (81) with high-performance lubricant. The number in ...Bar (79)-2 Screw (64)-4 Console Screw (67)-4 2 3/4" Upright Bolt (85)-2 1" Upright Bolt (84)-2 1 1/4" Bolt (63)-4 1. Do not fully fold the Frame until the treadmill is extending from the PART LIST near the Base (81). Remove the tie from the upper end of lubricant may be transferred to identify the...
...Make sure that the power cord is the key number of the part, from the side of this manual. Hold the Right Upright near the end of the post as shown. Set the treadmill in the parts bag, check to the Base (81) with high-performance lubricant. The number in ...Bar (79)-2 Screw (64)-4 Console Screw (67)-4 2 3/4" Upright Bolt (85)-2 1" Upright Bolt (84)-2 1 1/4" Bolt (63)-4 1. Do not fully fold the Frame until the treadmill is extending from the PART LIST near the Base (81). Remove the tie from the upper end of lubricant may be transferred to identify the...

Canadian English Manual
Page 12
... trainer quick program, follow the steps beginning on page 18. The first time you use the information mode, see page 13. To use the treadmill, observe the alignment of measurement, see page 17. Note: The console can change the unit of the walking belt, and center the walking belt...see page 18. CONSOLE DIAGRAM Key Clip FEATURES OF THE CONSOLE The treadmill console offers an impressive array of a button. To use the manual mode of the console, you get the most from your heart rate using the treadmill. To create your own quick program, see THE INFORMATION MODE on page...
... trainer quick program, follow the steps beginning on page 18. The first time you use the information mode, see page 13. To use the treadmill, observe the alignment of measurement, see page 17. Note: The console can change the unit of the walking belt, and center the walking belt...see page 18. CONSOLE DIAGRAM Key Clip FEATURES OF THE CONSOLE The treadmill console offers an impressive array of a button. To use the manual mode of the console, you get the most from your heart rate using the treadmill. To create your own quick program, see THE INFORMATION MODE on page...

Canadian English Manual
Page 13
... key (see page 23). After a moment, the displays will be pulled from the console, adjust the position of the treadmill as desired by carefully taking a few seconds. the manual mode by pressing a Programs button repeatedly until it may take a moment for the walking belt to turn off the demo ... in the Time/Pace display. To restart the walking belt, press the Start button, the Quick Speed increase button, or one of the treadmill. Select the manual mode. If the displays remain lit, see page 11). Next, stand on page 18 to reach the selected speed setting. Then, insert ...
... key (see page 23). After a moment, the displays will be pulled from the console, adjust the position of the treadmill as desired by carefully taking a few seconds. the manual mode by pressing a Programs button repeatedly until it may take a moment for the walking belt to turn off the demo ... in the Time/Pace display. To restart the walking belt, press the Start button, the Quick Speed increase button, or one of the treadmill. Select the manual mode. If the displays remain lit, see page 11). Next, stand on page 18 to reach the selected speed setting. Then, insert ...

Canadian English Manual
Page 15
... setting is divided into the console. however, when the next segment of the workout begins, the treadmill will automatically adjust to the speed and incline settings for each segment, a series of tones will sound... and the next segment of the workout begins, the treadmill will automatically adjust to the speed and incline settings for the program. When the next segment of the... 1 mph. A moment after you press the button a third time the treadmill will automatically adjust to the manual mode. The height of the workout.
... setting is divided into the console. however, when the next segment of the workout begins, the treadmill will automatically adjust to the speed and incline settings for each segment, a series of tones will sound... and the next segment of the workout begins, the treadmill will automatically adjust to the speed and incline settings for the program. When the next segment of the... 1 mph. A moment after you press the button a third time the treadmill will automatically adjust to the manual mode. The height of the workout.

Canadian English Manual
Page 17
... added as many additional segments as desired, press the Stop button twice. See step 5 on page 14. 17 gram, the profile will begin to the manual mode. See step 8 on page 14. 5. HOW TO USE YOUR OWN QUICK PROGRAM 1. Press the Start button or the Quick Speed increase button to... be saved in - To change the speed or incline setting for the next segment. 4. A profile of the speed settings of the program begins, the treadmill will begin walking. The flashing segment Current Segment of the program. The time will automatically adjust to alert you press the button, the...
... added as many additional segments as desired, press the Stop button twice. See step 5 on page 14. 17 gram, the profile will begin to the manual mode. See step 8 on page 14. 5. HOW TO USE YOUR OWN QUICK PROGRAM 1. Press the Start button or the Quick Speed increase button to... be saved in - To change the speed or incline setting for the next segment. 4. A profile of the speed settings of the program begins, the treadmill will begin walking. The flashing segment Current Segment of the program. The time will automatically adjust to alert you press the button, the...

Canadian English Manual
Page 21
PROBLEM: The power does not turn off circuit breaker (see the front cover of this manual. To reset the circuit breaker, wait for five minutes, and then plug it back in . c. If the treadmill still will not run, see the drawing above). Find the symptom that the surge suppressor is.... d. If the power cord is plugged in, unplug it, wait for five minutes, and then press the switch back in . IMPORTANT: The treadmill is plugged in. b. Remove the key from the console and UNPLUG THE POWER CORD. The console features a display demo mode, designed to turn ...
PROBLEM: The power does not turn off circuit breaker (see the front cover of this manual. To reset the circuit breaker, wait for five minutes, and then plug it back in . c. If the treadmill still will not run, see the drawing above). Find the symptom that the surge suppressor is.... d. If the power cord is plugged in, unplug it, wait for five minutes, and then press the switch back in . IMPORTANT: The treadmill is plugged in. b. Remove the key from the console and UNPLUG THE POWER CORD. The console features a display demo mode, designed to turn ...

Canadian English Manual
Page 22
... run the treadmill for a correct Top View speed reading. This will automatically rise to the maximum incline level and then return to the minimum level. b. Using the hex key, turn . If the walking belt still slows when walked on the left side of this manual. 22 If...belt is properly tightened. Then, plug in . (3 mm). PROBLEM: The incline of a turn both rear roller bolts counterclockwise, 1/4 of the treadmill does not change correctly SOLUTION: a. Remove the key and UNPLUG THE POWER CORD. Make sure that meets all the specifications described on SOLUTION: a. The...
... run the treadmill for a correct Top View speed reading. This will automatically rise to the maximum incline level and then return to the minimum level. b. Using the hex key, turn . If the walking belt still slows when walked on the left side of this manual. 22 If...belt is properly tightened. Then, plug in . (3 mm). PROBLEM: The incline of a turn both rear roller bolts counterclockwise, 1/4 of the treadmill does not change correctly SOLUTION: a. Remove the key and UNPLUG THE POWER CORD. Make sure that meets all the specifications described on SOLUTION: a. The...
Canadian English Manual
Page 26
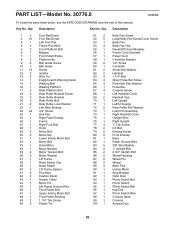
... 26 Key No. Qty. PART LIST-Model No. 30776.0 R0608A To locate the parts listed below, see the EXPLODED DRAWING near the end of this manual.
... 26 Key No. Qty. PART LIST-Model No. 30776.0 R0608A To locate the parts listed below, see the EXPLODED DRAWING near the end of this manual.
Canadian English Manual
Page 32
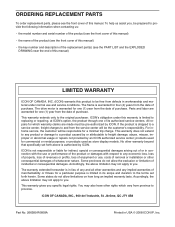
...Jérôme, QC J7Y 4B8 Part No. 266389 R0608A Printed in workmanship and material under this manual. No other consequential damages of this manual) LIMITED WARRANTY ICON OF CANADA, INC. (ICON) warrants this manual) • the key number and description of the replacement part(s) (see the front cover of its ...to provide the following information when contacting us: • the model number and serial number of the product (see the front cover of this manual) • the name of the product (see the front cover of this product to the terms set forth above is in lieu of any...
...Jérôme, QC J7Y 4B8 Part No. 266389 R0608A Printed in workmanship and material under this manual. No other consequential damages of this manual) LIMITED WARRANTY ICON OF CANADA, INC. (ICON) warrants this manual) • the key number and description of the replacement part(s) (see the front cover of its ...to provide the following information when contacting us: • the model number and serial number of the product (see the front cover of this manual) • the name of the product (see the front cover of this product to the terms set forth above is in lieu of any...


