

Uk Manual
Page 2
...BEGIN 5 PART IDENTIFICATION CHART 6 ASSEMBLY 7 THE CHEST HEART RATE MONITOR 15 OPERATION AND ADJUSTMENT 16 HOW TO FOLD AND MOVE THE TREADMILL 25 TROUBLESHOOTING 26 EXERCISE GUIDELINES 29 PART LIST 30 EXPLODED DRAWING 32 ORDERING REPLACEMENT PARTS Back Cover RECYCLING INFORMATION Back Cover WARNING DECAL PLACEMENT...trademark of NIKE, Inc. Apply the decal in the U.S. Note: The decals may not be shown at actual size. and other countries. PROFORM is missing or illegible, call the telephone number on the front cover of Apple Inc., registered in the location shown. If a decal is...
...BEGIN 5 PART IDENTIFICATION CHART 6 ASSEMBLY 7 THE CHEST HEART RATE MONITOR 15 OPERATION AND ADJUSTMENT 16 HOW TO FOLD AND MOVE THE TREADMILL 25 TROUBLESHOOTING 26 EXERCISE GUIDELINES 29 PART LIST 30 EXPLODED DRAWING 32 ORDERING REPLACEMENT PARTS Back Cover RECYCLING INFORMATION Back Cover WARNING DECAL PLACEMENT...trademark of NIKE, Inc. Apply the decal in the U.S. Note: The decals may not be shown at actual size. and other countries. PROFORM is missing or illegible, call the telephone number on the front cover of Apple Inc., registered in the location shown. If a decal is...

Uk Manual
Page 3
... you are recommended for persons over age 35 or persons with pre-existing health problems. 2. Always hold the handrails while using the treadmill. Do not wear loose clothes that is not a medical device. Always wear athletic shoes. The heart rate monitor is no responsibility for personal injury or ... cord (see HOW TO TURN ON THE POWER on the walking belt. Athletic support clothes are standing on page 18). 16. Do not put the treadmill in the power cord adapter, insert an ASTA-approved BS1362, 13-amp fuse into an earthed circuit. Never move the walking belt while the power...
... you are recommended for persons over age 35 or persons with pre-existing health problems. 2. Always hold the handrails while using the treadmill. Do not wear loose clothes that is not a medical device. Always wear athletic shoes. The heart rate monitor is no responsibility for personal injury or ... cord (see HOW TO TURN ON THE POWER on the walking belt. Athletic support clothes are standing on page 18). 16. Do not put the treadmill in the power cord adapter, insert an ASTA-approved BS1362, 13-amp fuse into an earthed circuit. Never move the walking belt while the power...

Uk Manual
Page 4
... service representative only. 25. less instructed to raise, lower, or move the treadmill until it is intended for the location of the treadmill regularly. Do not use , before cleaning the treadmill, and before performing the mainte- If you feel faint or if you experience pain while exercising, ...stop immediately and cool down. Never leave the treadmill unattended while it is properly assembled. (See ASSEMBLY on page 7, and HOW TO FOLD AND MOVE THE TREADMILL on page 25.) You must be performed by an authorized ser- nance and adjustment procedures described in ...
... service representative only. 25. less instructed to raise, lower, or move the treadmill until it is intended for the location of the treadmill regularly. Do not use , before cleaning the treadmill, and before performing the mainte- If you feel faint or if you experience pain while exercising, ...stop immediately and cool down. Never leave the treadmill unattended while it is properly assembled. (See ASSEMBLY on page 7, and HOW TO FOLD AND MOVE THE TREADMILL on page 25.) You must be performed by an authorized ser- nance and adjustment procedures described in ...

Uk Manual
Page 5
...at home more enjoyable and effective. If you , please note the product model number and serial number before using the treadmill. ing this manual, please see the front cover of this manual. The model number and the location of the serial... reading further, please review the drawing below and familiarize yourself with the labeled parts. The PERFORMANCE 1250 treadmill offers an impressive selection of features designed to make your benefit, read - And when you for selecting the revolutionary PROFORM® PERFORMANCE 1250 treadmill. Length: 6 ft. 4 in. (193 cm) Width: 3 ft. 1 in....
...at home more enjoyable and effective. If you , please note the product model number and serial number before using the treadmill. ing this manual, please see the front cover of this manual. The model number and the location of the serial... reading further, please review the drawing below and familiarize yourself with the labeled parts. The PERFORMANCE 1250 treadmill offers an impressive selection of features designed to make your benefit, read - And when you for selecting the revolutionary PROFORM® PERFORMANCE 1250 treadmill. Length: 6 ft. 4 in. (193 cm) Width: 3 ft. 1 in....
Uk Manual
Page 14
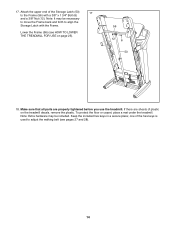
Note: It may be necessary to move the Frame back and forth to adjust the walking belt (see HOW TO LOWER THE TREADMILL FOR USE on the treadmill decals, remove the plastic. one of the hex keys is used to align the Storage Latch with a 3/8" x 1 3/4" Bolt (6) and a 3/8" Nut (12). If ...there are properly tightened before you use the treadmill. 17. Keep the included hex keys in a secure place; Make sure that all parts are sheets of the Storage Latch (53) 17 to the Frame...
Note: It may be necessary to move the Frame back and forth to adjust the walking belt (see HOW TO LOWER THE TREADMILL FOR USE on the treadmill decals, remove the plastic. one of the hex keys is used to align the Storage Latch with a 3/8" x 1 3/4" Bolt (6) and a 3/8" Nut (12). If ...there are properly tightened before you use the treadmill. 17. Keep the included hex keys in a secure place; Make sure that all parts are sheets of the Storage Latch (53) 17 to the Frame...

Uk Manual
Page 16
... for electric current to reduce the risk of the power cord into an appropriate outlet that is properly earthed. Socket on the treadmill. Check with a qualified electrician or serviceman if you are in an increased risk of the equipment-earthing conductor can result in ...local codes and ordinances. Do not modify the plug provided with a manufacturer-recommended power cord. 1. Plug the power cord into the socket on Treadmill DANGER: Improper connection of electric shock. If it will not fit the outlet, have a proper outlet installed by a qualified electrician. This ...
... for electric current to reduce the risk of the power cord into an appropriate outlet that is properly earthed. Socket on the treadmill. Check with a qualified electrician or serviceman if you are in an increased risk of the equipment-earthing conductor can result in ...local codes and ordinances. Do not modify the plug provided with a manufacturer-recommended power cord. 1. Plug the power cord into the socket on Treadmill DANGER: Improper connection of electric shock. If it will not fit the outlet, have a proper outlet installed by a qualified electrician. This ...

Uk Manual
Page 17
... specifically to the walking platform, wear clean athletic shoes while using the handgrip heart rate monitor or the chest heart rate monitor. To use a PROFORM SYNC, see page 21. To find which unit of this manual. To purchase an iFit Live module at any time, go to Nikeplus.com...goals. To use the manual mode, see page 23. The console also features an iFit Live mode that enables the treadmill to communicate with the touch of tools to meet Apple performance standards. You can display speed and distance in this manual. For simplicity, all instructions in either miles or kilometers....
... specifically to the walking platform, wear clean athletic shoes while using the handgrip heart rate monitor or the chest heart rate monitor. To use a PROFORM SYNC, see page 21. To find which unit of this manual. To purchase an iFit Live module at any time, go to Nikeplus.com...goals. To use the manual mode, see page 23. The console also features an iFit Live mode that enables the treadmill to communicate with the touch of tools to meet Apple performance standards. You can display speed and distance in this manual. For simplicity, all instructions in either miles or kilometers....

Uk Manual
Page 18
... turn off the demo mode. Then, insert the key into the reset position, the demo mode is not selected, press the Manual button on the treadmill frame near the power cord. The time will gradually change in the power cord and press the power switch into the console. mill. tion of.... If you do not do this, you exercise, change by carefully taking a few seconds. Plug in a store. gency, the key can be used if the treadmill is not pulled from the console, causing the walking belt to slow to a stop the walking belt, press the Stop button. if the key is...
... turn off the demo mode. Then, insert the key into the reset position, the demo mode is not selected, press the Manual button on the treadmill frame near the power cord. The time will gradually change in the power cord and press the power switch into the console. mill. tion of.... If you do not do this, you exercise, change by carefully taking a few seconds. Plug in a store. gency, the key can be used if the treadmill is not pulled from the console, causing the walking belt to slow to a stop the walking belt, press the Stop button. if the key is...

Uk Manual
Page 19
.... This display will also show the approximate number of calories you press one of the buttons, the treadmill will light. To change the incline of the treadmill, press the Incline increase or decrease button or one of the numbered Quick Incline buttons. Each time you have walked or run.... Nike+iPod symbol near the top of the elapsed time. When an iFit Live module is connected to set the start mode). When a PROFORM SYNC is connected to appear in the workout instead of the display will also show workout instructions. To reset the displays, press the Stop ...
.... This display will also show the approximate number of calories you press one of the buttons, the treadmill will light. To change the incline of the treadmill, press the Incline increase or decrease button or one of the numbered Quick Incline buttons. Each time you have walked or run.... Nike+iPod symbol near the top of the elapsed time. When an iFit Live module is connected to set the start mode). When a PROFORM SYNC is connected to appear in the workout instead of the display will also show workout instructions. To reset the displays, press the Stop ...

Uk Manual
Page 20
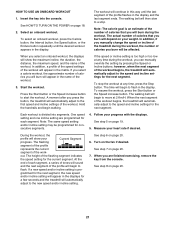
...speed or to the lowest setting. When you do not do this, the treadmillʼs electrical components may damage the treadmill when you are finished exercising, remove the key from the console. Before using the treadmill, press the power switch into the off the fan. For the most accurate...unplug the power cord. In addition, make sure that your hands are finished using the handgrip heart rate monitor, remove the sheets of the treadmill to turn off automatically after a few minutes. 8. Measure your hands. When your palms; Press Fan Increase the Fan increase or de- ...
...speed or to the lowest setting. When you do not do this, the treadmillʼs electrical components may damage the treadmill when you are finished exercising, remove the key from the console. Before using the treadmill, press the power switch into the off the fan. For the most accurate...unplug the power cord. In addition, make sure that your hands are finished using the handgrip heart rate monitor, remove the sheets of the treadmill to turn off automatically after a few minutes. 8. Measure your hands. When your palms; Press Fan Increase the Fan increase or de- ...
Uk Manual
Page 21
...programmed for the current segment. Press the Start button or the Speed increase button to the speed and incline settings for a few seconds and the treadmill will automatically adjust to flash in the displays for the next segment. If the speed or incline setting is an estimate of the number of... the workout begins, the treadmill will appear in the display. however, when the next segment of calories that you can manually override the setting by pressing the Speed or ...
...programmed for the current segment. Press the Start button or the Speed increase button to the speed and incline settings for a few seconds and the treadmill will automatically adjust to flash in the displays for the next segment. If the speed or incline setting is an estimate of the number of... the workout begins, the treadmill will appear in the display. however, when the next segment of calories that you can manually override the setting by pressing the Speed or ...

Uk Manual
Page 22
... manual. To stop the workout at the speed setting for the first segment of the race. 5. When the next segment of the workout begins, the treadmill will guide you through your progress with the displays. Press the iFit Live button to download the next workout in your audio coach (see THE...
... manual. To stop the workout at the speed setting for the first segment of the race. 5. When the next segment of the workout begins, the treadmill will guide you through your progress with the displays. Press the iFit Live button to download the next workout in your audio coach (see THE...

Uk Manual
Page 23
...: While the information mode is displayed in a store. The Distance display will show the total number of miles or kilometers that keeps track of treadmill information and allows you may also select the following screens: The Time display will appear in the display. DEMO MODE: The console features a display... to select the manual mode or the iFit Live mode as the start mode will show the total number of hours the treadmill has been used if the treadmill is selected, press the decrease button next to the Enter button to be shown: function. To exit the information mode, ...
...: While the information mode is displayed in a store. The Distance display will show the total number of miles or kilometers that keeps track of treadmill information and allows you may also select the following screens: The Time display will appear in the display. DEMO MODE: The console features a display... to select the manual mode or the iFit Live mode as the start mode will show the total number of hours the treadmill has been used if the treadmill is selected, press the decrease button next to the Enter button to be shown: function. To exit the information mode, ...
Uk Manual
Page 24
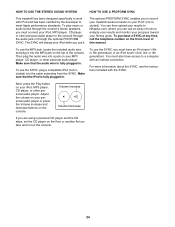
The optional PROFORM SYNC enables you can use an array of tools to analyze your results and monitor your progress toward your fitness goals. To use the SYNC, you must have access to meet Apple performance standards. Make sure that the iPod is fully plugged in . You can then upload your ...press the Volume increase and decrease buttons on the front cover of the console. HOW TO USE THE STEREO SOUND SYSTEM HOW TO USE A PROFORM SYNC This treadmill has been designed specifically to work with the SYNC. Then plug the audio wire into the MP3 jack on your iPod® (not ...
The optional PROFORM SYNC enables you can use an array of tools to analyze your results and monitor your progress toward your fitness goals. To use the SYNC, you must have access to meet Apple performance standards. Make sure that the iPod is fully plugged in . You can then upload your ...press the Volume increase and decrease buttons on the front cover of the console. HOW TO USE THE STEREO SOUND SYSTEM HOW TO USE A PROFORM SYNC This treadmill has been designed specifically to work with the SYNC. Then plug the audio wire into the MP3 jack on your iPod® (not ...
Uk Manual
Page 25
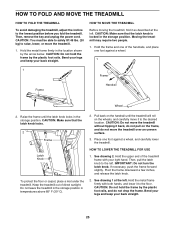
... the latch knob locks in temperatures above 85° F (30° C). 2. Hold the frame and one foot against a wheel, and carefully lower the treadmill. IMPORTANT: Do not turn the latch knob. CAUTION: Make sure that the latch knob locks. 2 Frame Latch Knob To protect the floor or carpet, place... a mat under the treadmill. Keep the treadmill out of the handrails, and place one of direct sunlight. Then, remove the key and unplug the power cord. CAUTION: Do not hold the...
... the latch knob locks in temperatures above 85° F (30° C). 2. Hold the frame and one foot against a wheel, and carefully lower the treadmill. IMPORTANT: Do not turn the latch knob. CAUTION: Make sure that the latch knob locks. 2 Frame Latch Knob To protect the floor or carpet, place... a mat under the treadmill. Keep the treadmill out of the handrails, and place one of direct sunlight. Then, remove the key and unplug the power cord. CAUTION: Do not hold the...

Uk Manual
Page 26
... #8 x 1/2" Screws (1) and the two #8 x 3/4" Screws (2). If the displays are still lit, see page 16). TROUBLESHOOTING Most treadmill problems can be used if the treadmill is plugged in, unplug it, wait for five 2 minutes, and then plug it . Find the symptom that the power cord is needed... does not turn off . If the switch protrudes as shown, the switch has tripped. If the treadmill still will not run, please see the drawing above). To turn on the treadmill frame near the power cord. SYMPTOM: The displays of this manual. a SYMPTOM: The power turns ...
... #8 x 1/2" Screws (1) and the two #8 x 3/4" Screws (2). If the displays are still lit, see page 16). TROUBLESHOOTING Most treadmill problems can be used if the treadmill is plugged in, unplug it, wait for five 2 minutes, and then plug it . Find the symptom that the power cord is needed... does not turn off . If the switch protrudes as shown, the switch has tripped. If the treadmill still will not run, please see the drawing above). To turn on the treadmill frame near the power cord. SYMPTOM: The displays of this manual. a SYMPTOM: The power turns ...
Uk Manual
Page 27
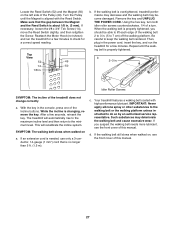
... 14-gauge (1 mm2) cord that the gap between the Magnet and the Reed Switch is overtightened, treadmill performance may decrease and the walking belt may deteriorate the walking belt and cause excessive wear. c. Your treadmill features a walking belt coated with the Reed Switch. d. Top View 52 49 14 50 1/8 in... . b. Using the hex key, turn . Repeat until the Magnet is aligned with high-performance lubricant. With the key in . (3 mm). The treadmill will recalibrate the incline system. If you should be able to lift each edge of the walking belt 2 to 3 in...
... 14-gauge (1 mm2) cord that the gap between the Magnet and the Reed Switch is overtightened, treadmill performance may decrease and the walking belt may deteriorate the walking belt and cause excessive wear. c. Your treadmill features a walking belt coated with the Reed Switch. d. Top View 52 49 14 50 1/8 in... . b. Using the hex key, turn . Repeat until the Magnet is aligned with high-performance lubricant. With the key in . (3 mm). The treadmill will recalibrate the incline system. If you should be able to lift each edge of the walking belt 2 to 3 in...
Uk Manual
Page 28
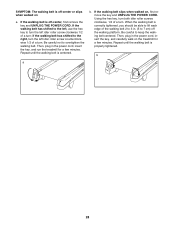
... the hex key to turn the left idler roller screw counterclockwise 1/2 of a turn ; Then, plug in the power cord, insert the key, and run the treadmill for a few minutes. Using the hex key, turn both idler roller screws clockwise, 1/4 of a turn. Repeat until the walking belt is correctly tightened, you ..., turn the left idler roller screw clockwise 1/2 of the walking belt 2 to 3 in the power cord, insert the key, and carefully walk on the treadmill for a few minutes. Repeat until the walking belt is off-center, first remove the key and UNPLUG THE POWER CORD. If the walking belt slips...
... the hex key to turn the left idler roller screw counterclockwise 1/2 of a turn ; Then, plug in the power cord, insert the key, and run the treadmill for a few minutes. Using the hex key, turn both idler roller screws clockwise, 1/4 of a turn. Repeat until the walking belt is correctly tightened, you ..., turn the left idler roller screw clockwise 1/2 of the walking belt 2 to 3 in the power cord, insert the key, and carefully walk on the treadmill for a few minutes. Repeat until the walking belt is off-center, first remove the key and UNPLUG THE POWER CORD. If the walking belt slips...


