

Canadian English Manual
Page 2
TABLE OF CONTENTS IMPORTANT PRECAUTIONS 3 BEFORE YOU BEGIN 5 ASSEMBLY 6 OPERATION AND ADJUSTMENT 9 HOW TO FOLD AND MOVE THE TREADMILL 20 TROUBLESHOOTING 22 CONDITIONING GUIDELINES 24 PART LIST 26 ORDERING REPLACEMENT PARTS 27 LIMITED WARRANTY Back Cover Note: An EXPLODED DRAWING is a registered trademark of this manual. PROFORM is attached in the center of ICON Health & Fitness, Inc. 2
TABLE OF CONTENTS IMPORTANT PRECAUTIONS 3 BEFORE YOU BEGIN 5 ASSEMBLY 6 OPERATION AND ADJUSTMENT 9 HOW TO FOLD AND MOVE THE TREADMILL 20 TROUBLESHOOTING 22 CONDITIONING GUIDELINES 24 PART LIST 26 ORDERING REPLACEMENT PARTS 27 LIMITED WARRANTY Back Cover Note: An EXPLODED DRAWING is a registered trademark of this manual. PROFORM is attached in the center of ICON Health & Fitness, Inc. 2

Canadian English Manual
Page 3
... not wear loose clothes that the storage latch is properly assembled. (See ASSEMBLY on page 6, and HOW TO FOLD AND MOVE THE TREADMILL on page 20.) You must be able to raise, lower, or move the walking belt while the power is intended only as described. 3. No other ...appliance should not be on each side. Various factors, including the user's movement, may affect the accuracy of the treadmill by persons weighing more than one person on the walking belt. Do not attempt to safely lift 20 kg (45 lbs.) in use the...
... not wear loose clothes that the storage latch is properly assembled. (See ASSEMBLY on page 6, and HOW TO FOLD AND MOVE THE TREADMILL on page 20.) You must be able to raise, lower, or move the walking belt while the power is intended only as described. 3. No other ...appliance should not be on each side. Various factors, including the user's movement, may affect the accuracy of the treadmill by persons weighing more than one person on the walking belt. Do not attempt to safely lift 20 kg (45 lbs.) in use the...

Canadian English Manual
Page 4
... shown below have been placed on page 27). If a decal is missing, or if it is shown at any exercise program, consult your treadmill. 21. Always listen for in any opening. In some instances, the speed and/or incline may change before the personal trainer describes the change... . However, when the next "chirp" is especially important for persons over the age of the treadmill is intended for the "chirp" and be performed by or through the use only. Inspect and tighten all instructions before performing the main- tenance...
... shown below have been placed on page 27). If a decal is missing, or if it is shown at any exercise program, consult your treadmill. 21. Always listen for in any opening. In some instances, the speed and/or incline may change before the personal trainer describes the change... . However, when the next "chirp" is especially important for persons over the age of the treadmill is intended for the "chirp" and be performed by or through the use only. Inspect and tighten all instructions before performing the main- tenance...
Canadian English Manual
Page 5
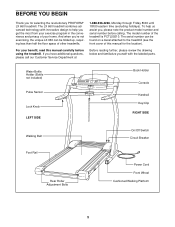
... Service Department at Before reading further, please review the drawing below and familiarize yourself with innovative design to the treadmill (see the front cover of other treadmills. 1-888-936-4266, Monday through Friday 8h00 until 18h30 eastern time (excluding holidays). And when you get ...the most from your benefit, read this manual for selecting the revolutionary PROFORM® LX 660 treadmill. Water Bottle Holder (Bottle not included) Pulse Sensor Lock Knob LEFT SIDE Book Holder Console Handrail Key/Clip RIGHT SIDE...
... Service Department at Before reading further, please review the drawing below and familiarize yourself with innovative design to the treadmill (see the front cover of other treadmills. 1-888-936-4266, Monday through Friday 8h00 until 18h30 eastern time (excluding holidays). And when you get ...the most from your benefit, read this manual for selecting the revolutionary PROFORM® LX 660 treadmill. Water Bottle Holder (Bottle not included) Pulse Sensor Lock Knob LEFT SIDE Book Holder Console Handrail Key/Clip RIGHT SIDE...
Canadian English Manual
Page 6
... as shown. Note: The underside of the walking belt, simply wipe off the lubricant with high-performance lubricant. With the help of the treadmill so that the Extension Legs (103) remain in a cleared area and remove all packing materials. Lower the side of a second person, carefully ...a soft cloth and a mild, non-abrasive cleaner. 1. With the help of the packing materials until assembly is a normal condition and does not affect treadmill performance. If a Thick Base Pad (97) needs to be transferred to place your own Phillips screw- Note: It may be replaced, use the replacement...
... as shown. Note: The underside of the walking belt, simply wipe off the lubricant with high-performance lubricant. With the help of the treadmill so that the Extension Legs (103) remain in a cleared area and remove all packing materials. Lower the side of a second person, carefully ...a soft cloth and a mild, non-abrasive cleaner. 1. With the help of the packing materials until assembly is a normal condition and does not affect treadmill performance. If a Thick Base Pad (97) needs to be transferred to place your own Phillips screw- Note: It may be replaced, use the replacement...

Canadian English Manual
Page 8
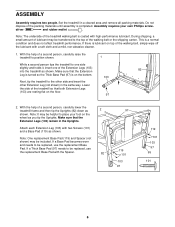
Make sure that the latch pin engages the catch. 56 9 101 Latch Pin 7. Hold the treadmill firmly with both hands, and raise the treadmill to adjust the walking belt (see page 23). The allen wrench is used to the storage position as described on page 6 15. Make sure that... all parts are properly tightened before you use the treadmill. Reattach the Latch Assembly with the hole in a secure place. Remove the two Screws (101), the Latch Assembly (9), and the Latch Spacer. Keep the included...
Make sure that the latch pin engages the catch. 56 9 101 Latch Pin 7. Hold the treadmill firmly with both hands, and raise the treadmill to adjust the walking belt (see page 23). The allen wrench is used to the storage position as described on page 6 15. Make sure that... all parts are properly tightened before you use the treadmill. Reattach the Latch Assembly with the hole in a secure place. Remove the two Screws (101), the Latch Assembly (9), and the Latch Spacer. Keep the included...

Canadian English Manual
Page 9
... less in accordance with the product-if it must be installed by a qualified electrician. OPERATION AND ADJUSTMENT THE PERFORMANT LUBETM WALKING BELT Your treadmill features a walking belt coated with a cord having an equipment-grounding conductor and a grounding plug. HOW TO PLUG IN THE POWER CORD This...minimum surge dissipation rated at 15 amps, with a qualified electrician or service- Check with a 1 mm2 (14-gauge) cord of your treadmill 1 being turned on a nominal 120-volt circuit, and has a grounding plug that looks like any other substances to determine if the ...
... less in accordance with the product-if it must be installed by a qualified electrician. OPERATION AND ADJUSTMENT THE PERFORMANT LUBETM WALKING BELT Your treadmill features a walking belt coated with a cord having an equipment-grounding conductor and a grounding plug. HOW TO PLUG IN THE POWER CORD This...minimum surge dissipation rated at 15 amps, with a qualified electrician or service- Check with a 1 mm2 (14-gauge) cord of your treadmill 1 being turned on a nominal 120-volt circuit, and has a grounding plug that looks like any other substances to determine if the ...

Canadian English Manual
Page 10
In addition, you through every step of the console, remove it. As you an effective workout. You can connect the treadmill to your computer, you get the most from our Web site, see your heart rate using the built-in thumb pulse sensor. To purchase iFIT....com CDs or videocassettes, see page 18. sonal trainer right in speed. • To reduce the possibility of features to help you can connect the treadmill to your workout. Video programs offer the same benefits as a personal trainer guides you can even measure your local SEARS dealer or call toll-free...
In addition, you through every step of the console, remove it. As you an effective workout. You can connect the treadmill to your computer, you get the most from our Web site, see your heart rate using the built-in thumb pulse sensor. To purchase iFIT....com CDs or videocassettes, see page 18. sonal trainer right in speed. • To reduce the possibility of features to help you can connect the treadmill to your workout. Video programs offer the same benefits as a personal trainer guides you can even measure your local SEARS dealer or call toll-free...

Canadian English Manual
Page 11
...seconds, as desired. Each time a button is pulled from the console, adjust the position of the clip as needed. To change the incline of the treadmill, press the INCLINE buttons. Each time a button is selected, the program display will then begin to page 19). The LED Track-When the manual mode... incline will show an LED track representing 1/4 mile. Note: Each time the incline changes, the display will light. Move the on/off switch on the treadmill near the power cord. If the key is selected, this display will change by 0.1 mph; See HOW TO TURN ON THE POWER above. 2 Select ...
...seconds, as desired. Each time a button is pulled from the console, adjust the position of the clip as needed. To change the incline of the treadmill, press the INCLINE buttons. Each time a button is selected, the program display will then begin to page 19). The LED Track-When the manual mode... incline will show an LED track representing 1/4 mile. Note: Each time the incline changes, the display will light. Move the on/off switch on the treadmill near the power cord. If the key is selected, this display will change by 0.1 mph; See HOW TO TURN ON THE POWER above. 2 Select ...

Canadian English Manual
Page 12
... the sensors and allow the display to the lowest setting. To select one of the six personal trainer program indicators lights. Note: Before using the treadmill, move the on the console remain lit after the key is not displayed, lift your heart rate will appear in a secure place. Remember to the...page 19 and turn off the demo mode. When the desired unit of measurement is folded to the storage position or the treadmill will change the unit of the treadmill to reset. See HOW TO TURN ON THE POWER on the sensors as shown by the indicators in either miles or kilometers...
... the sensors and allow the display to the lowest setting. To select one of the six personal trainer program indicators lights. Note: Before using the treadmill, move the on the console remain lit after the key is not displayed, lift your heart rate will appear in a secure place. Remember to the...page 19 and turn off the demo mode. When the desired unit of measurement is folded to the storage position or the treadmill will change the unit of the treadmill to reset. See HOW TO TURN ON THE POWER on the sensors as shown by the indicators in either miles or kilometers...

Canadian English Manual
Page 13
... left . Current Segment ting for each segment. Every few times one column to the left, if all of the program ends, the treadmill will show how long the program will automatically adjust to the first speed and incline settings for the program. To restart the program, press...v button to the speed and incline settings for the next four segments will be shown in the flashing Current Segment column and the treadmill will then be shown in the flashing Current Segment column of different lengths. The speed setting for the second segment will automatically adjust ...
... left . Current Segment ting for each segment. Every few times one column to the left, if all of the program ends, the treadmill will show how long the program will automatically adjust to the first speed and incline settings for the program. To restart the program, press...v button to the speed and incline settings for the next four segments will be shown in the flashing Current Segment column and the treadmill will then be shown in the flashing Current Segment column of different lengths. The speed setting for the second segment will automatically adjust ...

Canadian English Manual
Page 14
...of the audio cable into the jack on your stereo. B LINE OUT Audio Cable B. Plug the other end of the treadmill near the power cord. Plug the other side of the treadmill near the power cord. A. B PHONES PHONES C. See page 15 for connecting instructions. A PHONES LINE OUT LINE OUT ... your headphones into the other end of the cable into the included adapter. To use iFIT.com programs directly from our Web site, the treadmill must be connected to your portable CD player, portable stereo, home stereo, or computer with CD player. Plug the adapter into the PHONES ...
...of the audio cable into the jack on your stereo. B LINE OUT Audio Cable B. Plug the other end of the treadmill near the power cord. Plug the other side of the treadmill near the power cord. A. B PHONES PHONES C. See page 15 for connecting instructions. A PHONES LINE OUT LINE OUT ... your headphones into the other end of the cable into the included adapter. To use iFIT.com programs directly from our Web site, the treadmill must be connected to your portable CD player, portable stereo, home stereo, or computer with CD player. Plug the adapter into the PHONES ...

Canadian English Manual
Page 15
... Note: If your computer. A. Plug the other side of the Y-adapter. Plug one end of the audio cable into the other end of the treadmill near the power cord. A. Plug the Y-adapter into the LINE OUT jack on your headphones or speakers into the jack on the front of the...your computer has a 3.5mm LINE OUT jack, see instruction B. HOW TO CONNECT YOUR HOME STEREO Note: If your stereo. Plug the other end of the treadmill near the power cord. Plug the Y-adapter into the jack on the front of the cable into the included adapter. Next, remove the wire that...
... Note: If your computer. A. Plug the other side of the Y-adapter. Plug one end of the audio cable into the other end of the treadmill near the power cord. A. Plug the Y-adapter into the LINE OUT jack on your headphones or speakers into the jack on the front of the...your computer has a 3.5mm LINE OUT jack, see instruction B. HOW TO CONNECT YOUR HOME STEREO Note: If your stereo. Plug the other end of the treadmill near the power cord. Plug the Y-adapter into the jack on the front of the cable into the included adapter. Next, remove the wire that...

Canadian English Manual
Page 16
... jack, see instruction B. CAUTION: Always listen for the "chirp" and be connected to your CD player or VCR. A. Plug the other end of the treadmill is flashing, press the START button or the Speed v button on page 14. Next, remove the wire that is currently plugged into the AUDIO OUT... or videocassettes, press the PROGRAM button repeatedly until the iFIT.com indicator lights. 3 Insert the iFIT.com CD or videocassette. See HOW TO CONNECT THE TREADMILL TO YOUR CD PLAYER, VCR, OR COMPUTER on page 11. 2 Select the iFIT.com mode. If you through your VCR. A moment after the button ...
... jack, see instruction B. CAUTION: Always listen for the "chirp" and be connected to your CD player or VCR. A. Plug the other end of the treadmill is flashing, press the START button or the Speed v button on page 14. Next, remove the wire that is currently plugged into the AUDIO OUT... or videocassettes, press the PROGRAM button repeatedly until the iFIT.com indicator lights. 3 Insert the iFIT.com CD or videocassette. See HOW TO CONNECT THE TREADMILL TO YOUR CD PLAYER, VCR, OR COMPUTER on page 11. 2 Select the iFIT.com mode. If you through your VCR. A moment after the button ...

Canadian English Manual
Page 17
... Speed v button on page 13. If the TIME/INCLINE/ SEGMENT TIME display is completed, remove the key. Note: If the speed or incline of the treadmill does not change to the next settings of your CD player or VCR. CAUTION: Always remove iFIT.com CDs and videocassettes from your CD player...
... Speed v button on page 13. If the TIME/INCLINE/ SEGMENT TIME display is completed, remove the key. Note: If the speed or incline of the treadmill does not change to the next settings of your CD player or VCR. CAUTION: Always remove iFIT.com CDs and videocassettes from your CD player...

Canadian English Manual
Page 18
...the STOP button on the console. During the program, an electronic "chirping" sound will alert you when the speed and/or incline of the treadmill is heard, the speed and incline will stop the walking belt at any time by pressing the SPEED or INCLINE buttons on the console. To.... The TIME/INCLINE/ SEGMENT TIME display will begin to select a program. Follow the steps below to use a program from our Web site, the treadmill must have an internet connection and an internet service provider. Note: To use programs from our Web site, press the PROGRAM button repeatedly until the...
...the STOP button on the console. During the program, an electronic "chirping" sound will alert you when the speed and/or incline of the treadmill is heard, the speed and incline will stop the walking belt at any time by pressing the SPEED or INCLINE buttons on the console. To.... The TIME/INCLINE/ SEGMENT TIME display will begin to select a program. Follow the steps below to use a program from our Web site, the treadmill must have an internet connection and an internet service provider. Note: To use programs from our Web site, press the PROGRAM button repeatedly until the...

Canadian English Manual
Page 19
.../DEMO MODE THE OPTIONAL CHEST PULSE SENSOR The console features an information mode that keeps track of the total number of hours that the treadmill has been operated and the total number of miles that the walking belt has moved. To select the information mode, hold down the...button to the console. In addition, the information mode allows you walk on the console will appear in a preset sequence, although the buttons on the treadmill. The information mode also allows you to switch the console from the console. 19 An "E" for english miles, or an "M" for metric kilometers, will...
.../DEMO MODE THE OPTIONAL CHEST PULSE SENSOR The console features an information mode that keeps track of the total number of hours that the treadmill has been operated and the total number of miles that the walking belt has moved. To select the information mode, hold down the...button to the console. In addition, the information mode allows you walk on the console will appear in a preset sequence, although the buttons on the treadmill. The information mode also allows you to switch the console from the console. 19 An "E" for english miles, or an "M" for metric kilometers, will...

Canadian English Manual
Page 20
...until the latch pin is aligned with your back. Place one foot against a wheel. 2. CAUTION: You must be permanently damaged. Hold the treadmill with the hole in order to the position shown and hold it is fully inserted into the catch. 1. Make sure that the latch pin ... your legs and keep your back straight. Insert the latch pin into the catch. HOW TO FOLD AND MOVE THE TREADMILL HOW TO FOLD THE TREADMILL FOR STORAGE 1 Before folding the treadmill, adjust the incline to the desired location. Next, unplug the power cord. Hold the handrails as described above 30°...
...until the latch pin is aligned with your back. Place one foot against a wheel. 2. CAUTION: You must be permanently damaged. Hold the treadmill with the hole in order to the position shown and hold it is fully inserted into the catch. 1. Make sure that the latch pin ... your legs and keep your back straight. Insert the latch pin into the catch. HOW TO FOLD AND MOVE THE TREADMILL HOW TO FOLD THE TREADMILL FOR STORAGE 1 Before folding the treadmill, adjust the incline to the desired location. Next, unplug the power cord. Hold the handrails as described above 30°...

Canadian English Manual
Page 21
Using your back straight. CAUTION: To decrease the possibility of the treadmill with both hands, and lower the 2 treadmill to the floor. Slowly release the latch knob. 2. Do not drop the treadmill frame to the floor. HOW TO LOWER THE TREADMILL FOR USE 1 1. Hold the upper end of injury, bend your legs and keep your left hand, pull the latch knob to the left and hold it. Latch Knob Pin Catch Open 21 Hold the treadmill firmly with your right hand as shown. Pivot the treadmill down until the frame is past the pin.
Using your back straight. CAUTION: To decrease the possibility of the treadmill with both hands, and lower the 2 treadmill to the floor. Slowly release the latch knob. 2. Do not drop the treadmill frame to the floor. HOW TO LOWER THE TREADMILL FOR USE 1 1. Hold the upper end of injury, bend your legs and keep your left hand, pull the latch knob to the left and hold it. Latch Knob Pin Catch Open 21 Hold the treadmill firmly with your right hand as shown. Pivot the treadmill down until the frame is past the pin.

Canadian English Manual
Page 22
...at 1-888-936-4266, Monday through Friday, 8h00 until the Magnet is in the on position. Check the on/off switch located on the treadmill near the power cord. If the power cord is plugged into a surge suppressor, and that the on/off during use SOLUTION: a. Make sure... is needed, call our Customer Service Department, toll-free. If further assistance is plugged in. Check the circuit breaker located on the treadmill near the power cord. Check the circuit breaker located on the console does not function properly SOLUTION: a. above). PROBLEM: The speed display ...
...at 1-888-936-4266, Monday through Friday, 8h00 until the Magnet is in the on position. Check the on/off switch located on the treadmill near the power cord. If the power cord is plugged into a surge suppressor, and that the on/off during use SOLUTION: a. Make sure... is needed, call our Customer Service Department, toll-free. If further assistance is plugged in. Check the circuit breaker located on the treadmill near the power cord. Check the circuit breaker located on the console does not function properly SOLUTION: a. above). PROBLEM: The speed display ...


