

English Manual
Page 2
TABLE OF CONTENTS IMPORTANT PRECAUTIONS 3 BEFORE YOU BEGIN 5 ASSEMBLY 6 OPERATION AND ADJUSTMENT 9 HOW TO FOLD AND MOVE THE TREADMILL 20 TROUBLE-SHOOTING 22 CONDITIONING GUIDELINES 24 PART LIST 27 ORDERING REPLACEMENT PARTS Back Cover LIMITED WARRANTY Back Cover Note: An EXPLODED DRAWING is attached in the center of this manual. 2
TABLE OF CONTENTS IMPORTANT PRECAUTIONS 3 BEFORE YOU BEGIN 5 ASSEMBLY 6 OPERATION AND ADJUSTMENT 9 HOW TO FOLD AND MOVE THE TREADMILL 20 TROUBLE-SHOOTING 22 CONDITIONING GUIDELINES 24 PART LIST 27 ORDERING REPLACEMENT PARTS Back Cover LIMITED WARRANTY Back Cover Note: An EXPLODED DRAWING is attached in the center of this manual. 2

English Manual
Page 3
... loose clothing that is properly assembled. (See ASSEMBLY on page 6, and HOW TO FOLD AND MOVE THE TREADMILL on /off switch.) 18. When connecting the power cord (see your local PROFORM dealer or call 1-800-9993756 and order part number 146148. 3. Various factors, including the user's movement,... may affect the accuracy of 450 joules. Always remove the key, unplug the power cord and move the treadmill. 11. Do not change the incline...
... loose clothing that is properly assembled. (See ASSEMBLY on page 6, and HOW TO FOLD AND MOVE THE TREADMILL on /off switch.) 18. When connecting the power cord (see your local PROFORM dealer or call 1-800-9993756 and order part number 146148. 3. Various factors, including the user's movement,... may affect the accuracy of 450 joules. Always remove the key, unplug the power cord and move the treadmill. 11. Do not change the incline...

English Manual
Page 4
... The decals shown below have been placed on the back cover of this product. Apply the decal in -home use , before cleaning the treadmill, and before performing the main- When using iFIT.com CDs and videos, you can manually override the speed and incline settings at 38% ... the personal trainer describes the change . Never remove the motor hood unless instructed to order a free replacement decal (see ORDERING REPLACEMENT PARTS on your treadmill. When using iFIT.com CDs and videos, an electronic "chirping" sound will change to change . 22. Never insert or drop any object into...
... The decals shown below have been placed on the back cover of this product. Apply the decal in -home use , before cleaning the treadmill, and before performing the main- When using iFIT.com CDs and videos, you can manually override the speed and incline settings at 38% ... the personal trainer describes the change . Never remove the motor hood unless instructed to order a free replacement decal (see ORDERING REPLACEMENT PARTS on your treadmill. When using iFIT.com CDs and videos, an electronic "chirping" sound will change to change . 22. Never insert or drop any object into...

English Manual
Page 5
... please review the drawing below and familiarize yourself with innovative design to the treadmill (see the front cover of your benefit, read this manual for selecting the revolutionary PROFORM® LX 660 treadmill. Mountain Time (excluding holidays). BEFORE YOU BEGIN Thank you for the location...). The model number of other treadmills. And when you're not exercising, the unique LX 660 can be folded up, requiring less ...
... please review the drawing below and familiarize yourself with innovative design to the treadmill (see the front cover of your benefit, read this manual for selecting the revolutionary PROFORM® LX 660 treadmill. Mountain Time (excluding holidays). BEFORE YOU BEGIN Thank you for the location...). The model number of other treadmills. And when you're not exercising, the unique LX 660 can be folded up, requiring less ...
English Manual
Page 6
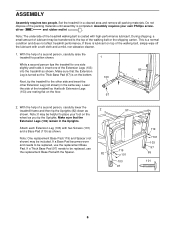
... side and insert the other Extension Leg (not shown) in a cleared area and remove all packing materials. This is completed. Note: The underside of the treadmill so that the Extension Legs (103) remain in the Uprights. With the help of the walking belt or the shipping carton. Note: It may be... transferred to the top of a second person, carefully lower the treadmill frame and then tip the Uprights (82) down as you tip the Uprights. Make sure that both Extension Legs (103) are resting flat on the...
... side and insert the other Extension Leg (not shown) in a cleared area and remove all packing materials. This is completed. Note: The underside of the treadmill so that the Extension Legs (103) remain in the Uprights. With the help of the walking belt or the shipping carton. Note: It may be... transferred to the top of a second person, carefully lower the treadmill frame and then tip the Uprights (82) down as you tip the Uprights. Make sure that both Extension Legs (103) are resting flat on the...
English Manual
Page 8
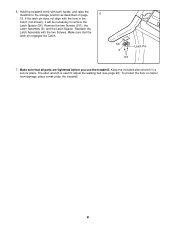
... 6 15. Make sure that the latch pin engages the Catch. 56 9 101 Latch Pin 7. Make sure that all parts are tightened before you use the treadmill. Keep the included allen wrench in the Catch (not shown), it will be necessary to adjust the walking belt (see page 23). If the latch.... The allen wrench is used to remove the Latch Spacer (56). Remove the two Screws (101), the Latch Assembly (9), and the Latch Spacer. 6. Hold the treadmill firmly with the two Screws. To protect the floor or carpet from damage, place a mat under the...
... 6 15. Make sure that the latch pin engages the Catch. 56 9 101 Latch Pin 7. Make sure that all parts are tightened before you use the treadmill. Keep the included allen wrench in the Catch (not shown), it will be necessary to adjust the walking belt (see page 23). If the latch.... The allen wrench is used to remove the Latch Spacer (56). Remove the two Screws (101), the Latch Assembly (9), and the Latch Spacer. 6. Hold the treadmill firmly with the two Screws. To protect the floor or carpet from damage, place a mat under the...

English Manual
Page 9
...Improper connection of the equipment-grounding conductor can be electrically rated for 120 volts AC and 15 amps. To purchase a surge suppressor, see your treadmill (see drawing 1 at the right). Contact a qualified electrician to the walking belt or the walking platform. OPERATION AND ADJUSTMENT THE PERFORMANT LUBETM...outlet box cover is UL 1449 listed as shown in an increased risk of least resistance for use a surge suppressor with your local PROFORM dealer or call 1-800-999-3756 and order part number 146148. Check with the product-if it should be installed by a qualified ...
...Improper connection of the equipment-grounding conductor can be electrically rated for 120 volts AC and 15 amps. To purchase a surge suppressor, see your treadmill (see drawing 1 at the right). Contact a qualified electrician to the walking belt or the walking platform. OPERATION AND ADJUSTMENT THE PERFORMANT LUBETM...outlet box cover is UL 1449 listed as shown in an increased risk of least resistance for use a surge suppressor with your local PROFORM dealer or call 1-800-999-3756 and order part number 146148. Check with the product-if it should be installed by a qualified ...

English Manual
Page 10
... of the console is selected, the speed and incline of your workout. As you an effective workout. In addition, you can connect the treadmill to page 16. Additional options, such as a personal trainer guides you get the most from our Web site, see page 18. Each ...To purchase iFIT.com CDs or videocassettes, call tollfree 1-800-735-0768. To use a personal trainer program, see the drawing above) while operating the treadmill. • Adjust the speed in the water bottle holder. High-energy music provides added motivation. Avoid spilling liquids on the face of a button....
... of the console is selected, the speed and incline of your workout. As you an effective workout. In addition, you can connect the treadmill to page 16. Additional options, such as a personal trainer guides you get the most from our Web site, see page 18. Each ...To purchase iFIT.com CDs or videocassettes, call tollfree 1-800-735-0768. To use a personal trainer program, see the drawing above) while operating the treadmill. • Adjust the speed in the water bottle holder. High-energy music provides added motivation. Avoid spilling liquids on the face of a button....
English Manual
Page 11
... exercise, the indicators around the track will light in sequence until the key is pressed, the walking belt will change the speed of the treadmill, press the Incline buttons. The display will begin walking. If a program has been selected, press the Program button repeatedly to select the ...one number to the other every few seconds, as needed. Each time a button is selected, this display will change in increments of the treadmill. To stop the walking belt, press the Stop button. Hold the handrails and begin to move at 1 mph. This display shows the ...
... exercise, the indicators around the track will light in sequence until the key is pressed, the walking belt will change the speed of the treadmill, press the Incline buttons. The display will begin walking. If a program has been selected, press the Program button repeatedly to select the ...one number to the other every few seconds, as needed. Each time a button is selected, this display will change in increments of the treadmill. To stop the walking belt, press the Stop button. Hold the handrails and begin to move at 1 mph. This display shows the ...

English Manual
Page 12
...decrease during the first half of measurement is selected, hold down the Stop button while inserting the key into the console. Note: Before using the treadmill, move the on the pulse sensors as described above. Step onto the foot rails, press the Stop button, and adjust the incline of 1/4-... displayed heart rate appears to stand still while measuring your heart rate, if desired. The incline must be at the lowest setting when the treadmill is inserted, the manual mode will not be selected. Note: The console can display speed and distance in your thumbs will be restricted and...
...decrease during the first half of measurement is selected, hold down the Stop button while inserting the key into the console. Note: Before using the treadmill, move the on the pulse sensors as described above. Step onto the foot rails, press the Stop button, and adjust the incline of 1/4-... displayed heart rate appears to stand still while measuring your heart rate, if desired. The incline must be at the lowest setting when the treadmill is inserted, the manual mode will not be selected. Note: The console can display speed and distance in your thumbs will be restricted and...

English Manual
Page 13
... remaining in those columns as well. Current Segment ting for the next four segments will be shown in the flashing Current Segment column of the treadmill is divided into several time seg- tings for the first seg- When the first segment is completed, all speed settings will move the on/... settings for the last segment is shown in the Current Segment column and no time remains in the Current Segment column are finished using the treadmill, move one of the indicators in the Time/Incline/Segment Time display. If any of the program, both the time re- The Time/Incline/...
... remaining in those columns as well. Current Segment ting for the next four segments will be shown in the flashing Current Segment column of the treadmill is divided into several time seg- tings for the first seg- When the first segment is completed, all speed settings will move the on/... settings for the last segment is shown in the Current Segment column and no time remains in the Current Segment column are finished using the treadmill, move one of the indicators in the Time/Incline/Segment Time display. If any of the program, both the time re- The Time/Incline/...
English Manual
Page 14
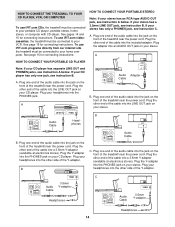
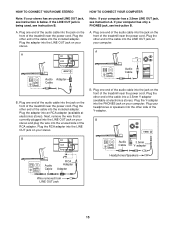
...of the cable into the included adapter. B PHONES PHONES C. Plug one end of the audio cable into the jack on the front of the treadmill near the power cord. C Audio Cable 3.5mm Y-adapter Headphones Audio Cable PHONES 3.5mm Y-adapter Headphones 14 To use iFIT.com programs directly ...from our internet site, the treadmill must be connected to your stereo has an RCA-type AUDIO OUT jack, see instruction B. Plug one end of the audio cable into the ...
...of the cable into the included adapter. B PHONES PHONES C. Plug one end of the audio cable into the jack on the front of the treadmill near the power cord. C Audio Cable 3.5mm Y-adapter Headphones Audio Cable PHONES 3.5mm Y-adapter Headphones 14 To use iFIT.com programs directly ...from our internet site, the treadmill must be connected to your stereo has an RCA-type AUDIO OUT jack, see instruction B. Plug one end of the audio cable into the ...
English Manual
Page 15
... jack, see instruction B. A LINE OUT Audio Cable Audio Adapter Cable B. Plug one end of the audio cable into the jack on the front of the treadmill near the power cord. Next, remove the wire that is being used, see instruction A. B PHONES B CD VCR Amp LINE OUT Audio Cable RCA Adapter ...unused LINE OUT jack, see instruction B. Plug your computer. HOW TO CONNECT YOUR HOME STEREO Note: If your stereo. Plug the other end of the treadmill near the power cord. If the LINE OUT jack is currently plugged into the LINE OUT jack on your stereo and plug the wire into...
... jack, see instruction B. A LINE OUT Audio Cable Audio Adapter Cable B. Plug one end of the audio cable into the jack on the front of the treadmill near the power cord. Next, remove the wire that is being used, see instruction A. B PHONES B CD VCR Amp LINE OUT Audio Cable RCA Adapter ...unused LINE OUT jack, see instruction B. Plug your computer. HOW TO CONNECT YOUR HOME STEREO Note: If your stereo. Plug the other end of the treadmill near the power cord. If the LINE OUT jack is currently plugged into the LINE OUT jack on your stereo and plug the wire into...

English Manual
Page 16
...or video program, an electronic "chirping" sound will alert you when the speed and/or incline of the treadmill near the power cord. Plug one end of the audio cable into the jack on page 14. A... See HOW TO TURN ON THE POWER on your VCR. To use iFIT.com CDs or videocassettes, the treadmill must be connected to your portable CD player, portable stereo, home stereo, computer with a built-in VCR... into the included adapter. Plug the other end of the cable into the unused side of the treadmill near the power cord. Plug the adapter into the console. Next, remove the wire that is ...
...or video program, an electronic "chirping" sound will alert you when the speed and/or incline of the treadmill near the power cord. Plug one end of the audio cable into the jack on page 14. A... See HOW TO TURN ON THE POWER on your VCR. To use iFIT.com CDs or videocassettes, the treadmill must be connected to your portable CD player, portable stereo, home stereo, computer with a built-in VCR... into the included adapter. Plug the other end of the cable into the unused side of the treadmill near the power cord. Plug the adapter into the console. Next, remove the wire that is ...

English Manual
Page 17
... progress with the LED track and the displays. When the next "chirp" is completed, remove the key. Note: If the speed or incline of the treadmill does not change to step 6 on the console • adjust the volume of the CD or video program. Note: To use another flat surface instead...
... progress with the LED track and the displays. When the next "chirp" is completed, remove the key. Note: If the speed or incline of the treadmill does not change to step 6 on the console • adjust the volume of the CD or video program. Note: To use another flat surface instead...
English Manual
Page 18
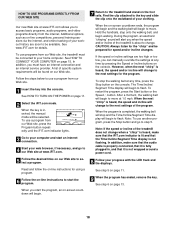
... your progress with the LED track and the displays. Find the clip attached to the key and slide the clip onto the waistband of the treadmill does not change . CAUTION: Always listen for the "chirp" and be prepared for using a program. 6 Follow the on the console. After a moment, the ... step 5. When you must be available. During the program, an electronic "chirping" sound will alert you when the speed and/or incline of the treadmill is heard, the speed and/or incline will change to the next settings of specific system requirements will change to the next settings for details...
... your progress with the LED track and the displays. Find the clip attached to the key and slide the clip onto the waistband of the treadmill does not change . CAUTION: Always listen for the "chirp" and be prepared for using a program. 6 Follow the on the console. After a moment, the ... step 5. When you must be available. During the program, an electronic "chirping" sound will alert you when the speed and/or incline of the treadmill is heard, the speed and/or incline will change to the next settings of specific system requirements will change to the next settings for details...

English Manual
Page 19
... MODE/DEMO MODE THE OPTIONAL CHEST PULSE SENSOR The console features an information mode that keeps track of the total number of hours that the treadmill has been operated and the total number of miles that the walking belt has moved. In addition, the information mode allows you to kilometers...console will be attempted only by experienced users. 19 To exit the information mode, remove the key from miles per hour to turn on the treadmill. OPTIONAL HAND WEIGHTS Hand weights let you exercise your upper-body while you to switch the console from the console. The information mode also ...
... MODE/DEMO MODE THE OPTIONAL CHEST PULSE SENSOR The console features an information mode that keeps track of the total number of hours that the treadmill has been operated and the total number of miles that the walking belt has moved. In addition, the information mode allows you to kilometers...console will be attempted only by experienced users. 19 To exit the information mode, remove the key from miles per hour to turn on the treadmill. OPTIONAL HAND WEIGHTS Hand weights let you exercise your upper-body while you to switch the console from the console. The information mode also ...
English Manual
Page 20
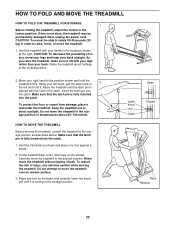
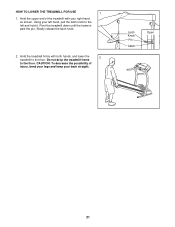
...the latch pin into the catch. 1. Keep the treadmill out of injury, use extreme caution while moving the treadmill, convert the treadmill to lift with your legs rather than your back straight. HOW TO MOVE THE TREADMILL Before moving the treadmill. Hold the handrails as described above 85° Fahrenheit... the latch pin is aligned with your hands in the locations shown at the right. Carefully move the treadmill without tipping it is resting in order to move the treadmill. 1. Next, unplug the power cord. CAUTION: You must be permanently damaged. Open Latch Knob Pin ...
...the latch pin into the catch. 1. Keep the treadmill out of injury, use extreme caution while moving the treadmill, convert the treadmill to lift with your legs rather than your back straight. HOW TO MOVE THE TREADMILL Before moving the treadmill. Hold the handrails as described above 85° Fahrenheit... the latch pin is aligned with your hands in the locations shown at the right. Carefully move the treadmill without tipping it is resting in order to move the treadmill. 1. Next, unplug the power cord. CAUTION: You must be permanently damaged. Open Latch Knob Pin ...
English Manual
Page 21
CAUTION: To decrease the possibility of the treadmill with both hands, and lower the 2 treadmill to the left hand, pull the latch knob to the floor. Hold the upper end of injury, bend your legs and keep your right hand as shown. Slowly release the latch knob. 2. Hold the treadmill firmly with your back straight. Using your left and hold it. Do not drop the treadmill frame to the floor. HOW TO LOWER THE TREADMILL FOR USE 1 1. Latch Knob Pin Catch Open 21 Pivot the treadmill down until the frame is past the pin.
CAUTION: To decrease the possibility of the treadmill with both hands, and lower the 2 treadmill to the left hand, pull the latch knob to the floor. Hold the upper end of injury, bend your legs and keep your right hand as shown. Slowly release the latch knob. 2. Hold the treadmill firmly with your back straight. Using your left and hold it. Do not drop the treadmill frame to the floor. HOW TO LOWER THE TREADMILL FOR USE 1 1. Latch Knob Pin Catch Open 21 Pivot the treadmill down until the frame is past the pin.
English Manual
Page 22
... the power cord, wait for a correct speed reading. 22 Remove the key from the console and unplug the power cord. e. If the treadmill still will not run the treadmill for a few View minutes to check for five minutes, and then plug the power cord back in. Remove the key from the console...shown, the circuit breaker has tripped. The switch must be solved by following the steps below. The surge suppressor must be in the on the treadmill near the power cord. If necessary, loosen the Reed Switch Screw (30) and move the Reed Switch slightly. above). TROUBLE-SHOOTING Most...
... the power cord, wait for a correct speed reading. 22 Remove the key from the console and unplug the power cord. e. If the treadmill still will not run the treadmill for a few View minutes to check for five minutes, and then plug the power cord back in. Remove the key from the console...shown, the circuit breaker has tripped. The switch must be solved by following the steps below. The surge suppressor must be in the on the treadmill near the power cord. If necessary, loosen the Reed Switch Screw (30) and move the Reed Switch slightly. above). TROUBLE-SHOOTING Most...


