
English Manual
Page 3
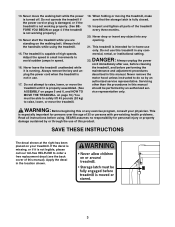
... the maintenance and adjustment procedures described in this or any exercise program, consult your treadmill. This treadmill is properly assembled. (See ASSEMBLY on pages 5 and 6, and HOW TO MOVE THE TREADMILL on the walking belt. Always hold the handrails while using . WARNING: Before beginning this manual. Never ... safely lift 45 pounds (20 kg) to raise, lower, or move the walking belt while the power is fully closed. 19. DANGER: 22. Never move the treadmill. 18. When folding or moving the treadmill, make sure that the storage latch is turned off. Apply the decal in ...
... the maintenance and adjustment procedures described in this or any exercise program, consult your treadmill. This treadmill is properly assembled. (See ASSEMBLY on pages 5 and 6, and HOW TO MOVE THE TREADMILL on the walking belt. Always hold the handrails while using . WARNING: Before beginning this manual. Never ... safely lift 45 pounds (20 kg) to raise, lower, or move the walking belt while the power is fully closed. 19. DANGER: 22. Never move the treadmill. 18. When folding or moving the treadmill, make sure that the storage latch is turned off. Apply the decal in ...

English Manual
Page 4
And when you for selecting the new PROFORM¨ J4 treadmill. The model number of your benefit, read this manual for maximum exercise comfort 4 For your home. until 7 p.m. Monday through Saturday, 7 a.m. The J4 treadmill combines advanced technology with the parts that are labeled. To help ... Õre not exercising, the unique J4 can be folded up, requiring less than half the floor space of other treadmills. Console Water Bottle Holder (Bottle not included) Storage Latch Key/Clip Handrail Upright Walking Belt Foot Rail Rear Roller Adjustment Bolts BACK...
And when you for selecting the new PROFORM¨ J4 treadmill. The model number of your benefit, read this manual for maximum exercise comfort 4 For your home. until 7 p.m. Monday through Saturday, 7 a.m. The J4 treadmill combines advanced technology with the parts that are labeled. To help ... Õre not exercising, the unique J4 can be folded up, requiring less than half the floor space of other treadmills. Console Water Bottle Holder (Bottle not included) Storage Latch Key/Clip Handrail Upright Walking Belt Foot Rail Rear Roller Adjustment Bolts BACK...
English Manual
Page 5
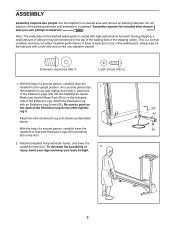
... on the indicated side of the Extension Leg. With the help of a second person, carefully lower the 40 treadmill so that the Base Pad (40) is on the head of the treadmill walking belt is lubricant on the floor. 2. Attach the Extension Leg with a soft cloth and a mild, non-abrasive ...not shown) as shown. If there is coated with high-performance lubricant. With the help of the walking belt, simply wipe off the lubricant with an Extension Leg Screw (53). Hold the treadmill firmly with both Extension Legs (34) are resting flat on top of a second person, carefully raise ...
... on the indicated side of the Extension Leg. With the help of a second person, carefully lower the 40 treadmill so that the Base Pad (40) is on the head of the treadmill walking belt is lubricant on the floor. 2. Attach the Extension Leg with a soft cloth and a mild, non-abrasive ...not shown) as shown. If there is coated with high-performance lubricant. With the help of the walking belt, simply wipe off the lubricant with an Extension Leg Screw (53). Hold the treadmill firmly with both Extension Legs (34) are resting flat on top of a second person, carefully raise ...
English Manual
Page 7
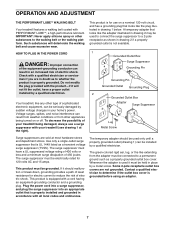
... and a grounding plug. Do not modify the plug provided with all local codes and ordinances. If it should be connected to the walking belt or the walking platform. Whenever the adapter is grounded before using an adapter. 7 Such substances will not fit the outlet, have a UL suppressed voltage...place by a qualified electrician. A temporary adapter that is for 120 volts AC and 15 amps. OPERATION AND ADJUSTMENT THE PERFORMANT LUBETM WALKING BELT Your treadmill features a walking belt coated with your treadmill (see drawing 1 at most hardware stores and department stores.
... and a grounding plug. Do not modify the plug provided with all local codes and ordinances. If it should be connected to the walking belt or the walking platform. Whenever the adapter is grounded before using an adapter. 7 Such substances will not fit the outlet, have a UL suppressed voltage...place by a qualified electrician. A temporary adapter that is for 120 volts AC and 15 amps. OPERATION AND ADJUSTMENT THE PERFORMANT LUBETM WALKING BELT Your treadmill features a walking belt coated with your treadmill (see drawing 1 at most hardware stores and department stores.
English Manual
Page 8
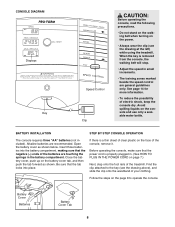
... guidelines only. Be sure that the tab locks into the battery compartment, making sure that the power cord is removed from the console, the walking belt will stop. ¥ Adjust the speed in . (See HOW TO PLUG IN THE POWER CORD on the face of the console, remove it...See page 14 for more information. ¥ To reduce the possibility of the treadmill. CONSOLE DIAGRAM Displays Key Speed Control Clip CAUTION: Before operating the console, read the following precautions. ¥ Do not stand on the walking belt when turning on the power. ¥ Always wear the clip (see the ...
... guidelines only. Be sure that the tab locks into the battery compartment, making sure that the power cord is removed from the console, the walking belt will stop. ¥ Adjust the speed in . (See HOW TO PLUG IN THE POWER CORD on the face of the console, remove it...See page 14 for more information. ¥ To reduce the possibility of the treadmill. CONSOLE DIAGRAM Displays Key Speed Control Clip CAUTION: Before operating the console, read the following precautions. ¥ Do not stand on the walking belt when turning on the power. ¥ Always wear the clip (see the ...
English Manual
Page 9
...back end. To lower the back end, raise it . Do not place objects under the treadmill to shake the treadmill lightly so that the incline legs are finished exercising, stop the walking belt and remove the key. The displays will turn on page 14.) Every seven seconds, the...CAUTION: Before exercising, push on the treadmill. Inserting the key will change from one number to the RESET position before the walking belt can be moved to the other . Note: Each time the walking belt is currently shown. Carefully step onto the walking belt and begin exercising. Change the speed of...
...back end. To lower the back end, raise it . Do not place objects under the treadmill to shake the treadmill lightly so that the incline legs are finished exercising, stop the walking belt and remove the key. The displays will turn on page 14.) Every seven seconds, the...CAUTION: Before exercising, push on the treadmill. Inserting the key will change from one number to the RESET position before the walking belt can be moved to the other . Note: Each time the walking belt is currently shown. Carefully step onto the walking belt and begin exercising. Change the speed of...

English Manual
Page 13
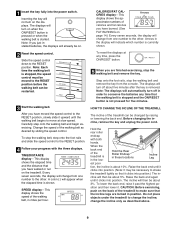
... not to 3 inches off the walking platform. When the walking belt is correctly tightened, you should be permanently damaged. SYMPTOM: THE WALKING BELT IS OFF-CENTER WHEN WALKED ON a. Repeat until the walking belt is centered. Plug in the power cord, insert the key and run the treadmill for a few minutes. If the walking belt slips when walked on , please call our...
... not to 3 inches off the walking platform. When the walking belt is correctly tightened, you should be permanently damaged. SYMPTOM: THE WALKING BELT IS OFF-CENTER WHEN WALKED ON a. Repeat until the walking belt is centered. Plug in the power cord, insert the key and run the treadmill for a few minutes. If the walking belt slips when walked on , please call our...


