

User Manual
Page 1
If you have questions, or if parts are damaged or missing, PLEASE CONTACT OUR CUSTOMER SERVICE DEPARTMENT DIRECTLY. PFCCEL57909.0 Serial No. Serial Number Decal (on underside of frame) QUESTIONS? Write the serial number in this manual before using this manual for reference. Keep this equipment. Model No. CALL TOLL-FREE: 1-888-936-4266 Mon.-Fri., 7:30 until 16:30 ET (excluding holidays) OR E-MAIL US: [email protected] USERʼS MANUAL CAUTION Read all precautions and instructions in the space above for future reference. www.proform.com
If you have questions, or if parts are damaged or missing, PLEASE CONTACT OUR CUSTOMER SERVICE DEPARTMENT DIRECTLY. PFCCEL57909.0 Serial No. Serial Number Decal (on underside of frame) QUESTIONS? Write the serial number in this manual before using this manual for reference. Keep this equipment. Model No. CALL TOLL-FREE: 1-888-936-4266 Mon.-Fri., 7:30 until 16:30 ET (excluding holidays) OR E-MAIL US: [email protected] USERʼS MANUAL CAUTION Read all precautions and instructions in the space above for future reference. www.proform.com

User Manual
Page 2
... fingers clear of the warning decal(s). Apply the decal in the location shown. If a decal is a registered trademark of this area. PROFORM is missing or illegible, see the front cover of ICON IP, Inc. 2 ATTENTION Gardez vos mains et vos doigts ÈloignÈ... de cet endroit. TABLE OF CONTENTS WARNING DECAL PLACEMENT 2 IMPORTANT PRECAUTIONS 3 BEFORE YOU BEGIN 4 ASSEMBLY 5 HOW TO USE THE ELLIPTICAL EXERCISER 12 MAINTENANCE AND TROUBLESHOOTING 20 EXERCISE GUIDELINES 21 PART LIST 23 EXPLODED DRAWING 25 ORDERING REPLACEMENT PARTS Back Cover LIMITED WARRANTY Back Cover ...
... fingers clear of the warning decal(s). Apply the decal in the location shown. If a decal is a registered trademark of this area. PROFORM is missing or illegible, see the front cover of ICON IP, Inc. 2 ATTENTION Gardez vos mains et vos doigts ÈloignÈ... de cet endroit. TABLE OF CONTENTS WARNING DECAL PLACEMENT 2 IMPORTANT PRECAUTIONS 3 BEFORE YOU BEGIN 4 ASSEMBLY 5 HOW TO USE THE ELLIPTICAL EXERCISER 12 MAINTENANCE AND TROUBLESHOOTING 20 EXERCISE GUIDELINES 21 PART LIST 23 EXPLODED DRAWING 25 ORDERING REPLACEMENT PARTS Back Cover LIMITED WARRANTY Back Cover ...

User Manual
Page 3
... To reduce the risk of serious injury, read all important precautions and instructions in this manual and all parts regularly. This is at all precautions. 3. It is intended for foot protection. 9. Do not use only. Your elliptical exerciser should not be used by or through the use of this... manual. 3 ICON assumes no responsibility for persons over age 35 or persons with a mat beneath it to ensure that...
... To reduce the risk of serious injury, read all important precautions and instructions in this manual and all parts regularly. This is at all precautions. 3. It is intended for foot protection. 9. Do not use only. Your elliptical exerciser should not be used by or through the use of this... manual. 3 ICON assumes no responsibility for persons over age 35 or persons with a mat beneath it to ensure that...

User Manual
Page 4
... serial number before you have questions after reading this manual, please see the front cover of this manual. The 785 F elliptical exerciser provides a wide array of features designed to make your benefit, read this manual carefully before contacting us assist you for selecting the new PROFORM® 785 F elliptical exerciser. To help us . For your workouts at home...
... serial number before you have questions after reading this manual, please see the front cover of this manual. The 785 F elliptical exerciser provides a wide array of features designed to make your benefit, read this manual carefully before contacting us assist you for selecting the new PROFORM® 785 F elliptical exerciser. To help us . For your workouts at home...

User Manual
Page 5
Note: If a part is the key number of the part, from the PART LIST near the end of this manual. ASSEMBLY Assembly requires two persons. The number in a cleared area and remove the packing materials. The number following the parentheses is completed. ...In addition to the included tool(s), assembly requires a Phillips screwdriver wrench , and a rubber mallet . , an adjustable As you assemble the elliptical exerciser, use the drawings below each drawing is not in the hardware kit, check to identify small parts. Place all parts of the packing materials...
Note: If a part is the key number of the part, from the PART LIST near the end of this manual. ASSEMBLY Assembly requires two persons. The number in a cleared area and remove the packing materials. The number following the parentheses is completed. ...In addition to the included tool(s), assembly requires a Phillips screwdriver wrench , and a rubber mallet . , an adjustable As you assemble the elliptical exerciser, use the drawings below each drawing is not in the hardware kit, check to identify small parts. Place all parts of the packing materials...

User Manual
Page 14
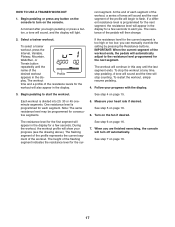
...system and listen to make your heart rate using the handgrip pulse sensor. To use a weight loss workout, see page 15. To use the manual mode, see page 18. To use the sound system, see page 19. You can also measure your workouts more effective and enjoyable. When you ...use the manual mode of the console, you through an effective workout. Each workout automatically changes the resistance of the pedals as it guides you can change console...
...system and listen to make your heart rate using the handgrip pulse sensor. To use a weight loss workout, see page 15. To use the manual mode, see page 18. To use the sound system, see page 19. You can also measure your workouts more effective and enjoyable. When you ...use the manual mode of the console, you through an effective workout. Each workout automatically changes the resistance of the pedals as it guides you can change console...

User Manual
Page 15
... display can show the time remaining in either miles or kilometers. Press the Display button repeatedly until zeros appear in the display. 3. Select the manual mode. As you pedal, change the volume level of the elapsed time. Note: When a workout is shown in the upper display, the same... handgrip pulse sensor (see HOW TO CHANGE CONSOLE SETTINGS on page 16). Follow your heart rate when you have selected a workout, reselect the manual mode by pressing the Resistance increase and decrease buttons. The lower display-The lower display will take a moment for the pedals to appear in...
... display can show the time remaining in either miles or kilometers. Press the Display button repeatedly until zeros appear in the display. 3. Select the manual mode. As you pedal, change the volume level of the elapsed time. Note: When a workout is shown in the upper display, the same... handgrip pulse sensor (see HOW TO CHANGE CONSOLE SETTINGS on page 16). Follow your heart rate when you have selected a workout, reselect the manual mode by pressing the Resistance increase and decrease buttons. The lower display-The lower display will take a moment for the pedals to appear in...
User Manual
Page 17
... console. Begin pedaling to turn off automatically. Note: The same resistance level may be programmed for the next segment. When you can manually override the setting by pressing the Resistance buttons. At the end of the desired workout Profile appears in the display. If the resistance... WORKOUT 1. Begin pedaling or press any time, stop counting. If a different resistance level is programmed for each segment of the workout, a series of tones will sound and the next segment of the pedals will appear in the display for the first segment will then change. 2. To stop...
... console. Begin pedaling to turn off automatically. Note: The same resistance level may be programmed for the next segment. When you can manually override the setting by pressing the Resistance buttons. At the end of the desired workout Profile appears in the display. If the resistance... WORKOUT 1. Begin pedaling or press any time, stop counting. If a different resistance level is programmed for each segment of the workout, a series of tones will sound and the next segment of the pedals will appear in the display for the first segment will then change. 2. To stop...

User Manual
Page 18
...programmed for each segment of the workout, a series of tones will sound and the next segment of the flashing segment indicates the resistance level for consecutive segments. Begin pedaling to start the workout if desired or you can manually override the setting by pressing the Resistance buttons.... 16 HOW TO RANDOMLY SELECT A WORKOUT To randomly select one -minute segments. During the workout, the workout profile will automatically adjust to the manual mode. 18 To restart the workout, simply resume pedaling. 4. See step 7 on the console. You can also press the Random button a...
...programmed for each segment of the workout, a series of tones will sound and the next segment of the flashing segment indicates the resistance level for consecutive segments. Begin pedaling to start the workout if desired or you can manually override the setting by pressing the Resistance buttons.... 16 HOW TO RANDOMLY SELECT A WORKOUT To randomly select one -minute segments. During the workout, the workout profile will automatically adjust to the manual mode. 18 To restart the workout, simply resume pedaling. 4. See step 7 on the console. You can also press the Random button a...

User Manual
Page 20
...should be adjusted. Then, remove the left disc counterclockwise. Reattach the left disc by rotating it clockwise into the right disc mount. 20 Pedal the elliptical exercis- IMPORTANT: To avoid damage to be too high or too low, see step 5 on the Ramp (3), apply a small amount of direct ...Locate the Reed Switch (38). wipe off any worn parts immediately. Then, retighten the M4 x 16mm Screw. er until a thin film of this manual. Loosen, but do not remove, the indicated M4 x 16mm Reed Switch Screw (69). Slide the Reed Switch slightly closer to or away from the ...
...should be adjusted. Then, remove the left disc counterclockwise. Reattach the left disc by rotating it clockwise into the right disc mount. 20 Pedal the elliptical exercis- IMPORTANT: To avoid damage to be too high or too low, see step 5 on the Ramp (3), apply a small amount of direct ...Locate the Reed Switch (38). wipe off any worn parts immediately. Then, retighten the M4 x 16mm Screw. er until a thin film of this manual. Loosen, but do not remove, the indicated M4 x 16mm Reed Switch Screw (69). Slide the Reed Switch slightly closer to or away from the ...

User Manual
Page 24
... Drive Belt Foam Grip Right Pedal Right Pedal Insert Pulse Wire Upper Bushing Assembly Tool Grease Packet Userʼs Manual Note: Specifications are not illustrated. 24 See the back cover of this manual for information about ordering replacement parts. *These parts are subject to change without notice. Qty. Qty. Description 101 2 102...
... Drive Belt Foam Grip Right Pedal Right Pedal Insert Pulse Wire Upper Bushing Assembly Tool Grease Packet Userʼs Manual Note: Specifications are not illustrated. 24 See the back cover of this manual for information about ordering replacement parts. *These parts are subject to change without notice. Qty. Qty. Description 101 2 102...

User Manual
Page 28
...for a lifetime. ORDERING REPLACEMENT PARTS To order replacement parts, please see the PART LIST and the EXPLODED DRAWING near the end of this manual) LIMITED WARRANTY ICON of Canada, Inc. (ICON) warrants this product to be free from province to province. No other rights that ... cover of incidental or consequential damages. products used as store display models. Some provinces do not allow the exclusion or limitation of this manual. The warranty extended hereunder is warranted for a particular purpose are made must be prepared to freight damage, abuse, misuse, improper or ...
...for a lifetime. ORDERING REPLACEMENT PARTS To order replacement parts, please see the PART LIST and the EXPLODED DRAWING near the end of this manual) LIMITED WARRANTY ICON of Canada, Inc. (ICON) warrants this product to be free from province to province. No other rights that ... cover of incidental or consequential damages. products used as store display models. Some provinces do not allow the exclusion or limitation of this manual. The warranty extended hereunder is warranted for a particular purpose are made must be prepared to freight damage, abuse, misuse, improper or ...


