
English Manual
Page 1
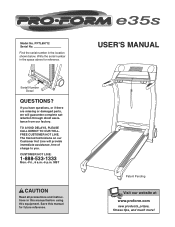
.... MST CAUTION Read all precautions and instructions in the location shown below. If you . PFTL69712 Serial No. Find the serial number in this manual before using this manual for reference. TO AVOID DELAYS, PLEASE CALL DIRECT TO OUR TOLLFREE CUSTOMER HOT LINE. USER'S MANUAL Patent Pending Visit our website at www...
.... MST CAUTION Read all precautions and instructions in the location shown below. If you . PFTL69712 Serial No. Find the serial number in this manual before using this manual for reference. TO AVOID DELAYS, PLEASE CALL DIRECT TO OUR TOLLFREE CUSTOMER HOT LINE. USER'S MANUAL Patent Pending Visit our website at www...

English Manual
Page 3
...assembled. (See ASSEMBLY on page 6, and HOW TO FOLD AND MOVE THE TREADMILL on page 23.) You must be used or where oxygen is intended only as described. 3. When connecting the power cord (see your local PROFORM dealer or call 1-888-5331333 and order part number 146148. 16. The ...pulse sensor is being administered. 15. Place the treadmill on a level surface, with bare feet, wearing only stockings, or in use an extension cord. 11. Do not wear loose...
...assembled. (See ASSEMBLY on page 6, and HOW TO FOLD AND MOVE THE TREADMILL on page 23.) You must be used or where oxygen is intended only as described. 3. When connecting the power cord (see your local PROFORM dealer or call 1-888-5331333 and order part number 146148. 16. The ...pulse sensor is being administered. 15. Place the treadmill on a level surface, with bare feet, wearing only stockings, or in use an extension cord. 11. Do not wear loose...

English Manual
Page 4
...is intended for in any opening. Never insert or drop any object into storage position 4 scribed in this treadmill in -home use of the treadmill regularly. 26. This treadmill is not legible, please call our Customer Service Department, toll-free, to order a free replacement decal ... CD or video program. 25. Do not use , before cleaning the treadmill, and before folding treadmill into any commercial, rental, or institutional setting. WARNING: Before beginning this product. Always unplug the power cord immediately after use this manual. Servicing other than the procedures in...
...is intended for in any opening. Never insert or drop any object into storage position 4 scribed in this treadmill in -home use of the treadmill regularly. 26. This treadmill is not legible, please call our Customer Service Department, toll-free, to order a free replacement decal ... CD or video program. 25. Do not use , before cleaning the treadmill, and before folding treadmill into any commercial, rental, or institutional setting. WARNING: Before beginning this product. Always unplug the power cord immediately after use this manual. Servicing other than the procedures in...
English Manual
Page 5
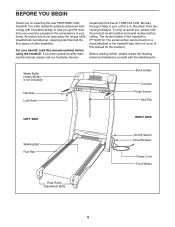
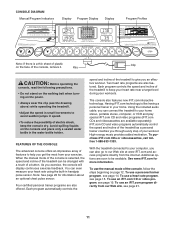
...e35s treadmill combines advanced technology with the labeled parts. until 6 p.m. The model number of your benefit, read this manual carefully before calling. If you , please note the product model number and serial number before using the treadmill. To help you get the most from your exercise program in the convenience of the treadmill... manual for selecting the new PROFORM® e35s treadmill. Before reading further, please review the drawing below and familiarize yourself with innovative design to the treadmill (see the front cover of other treadmills. Water Bottle Holder (Bottle ...
...e35s treadmill combines advanced technology with the labeled parts. until 6 p.m. The model number of your benefit, read this manual carefully before calling. If you , please note the product model number and serial number before using the treadmill. To help you get the most from your exercise program in the convenience of the treadmill... manual for selecting the new PROFORM® e35s treadmill. Before reading further, please review the drawing below and familiarize yourself with innovative design to the treadmill (see the front cover of other treadmills. Water Bottle Holder (Bottle ...
English Manual
Page 6
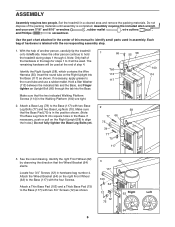
...two indicated Walking Platform Screws (114) in the Base. Locate four 3/4" Screws (12) in a cleared area and remove the packing materials. Set the treadmill in hardware bag number 4. Make sure that the Base Pad (75) is completed. Hold a Star Washer (113) between the indicated tab and the Base... an Upright Bolt (66) through 4. Note: Only half of another person, carefully tip the treadmill onto its left side. Insert the round tube on the Right Upright [58] to identify small parts used . Make sure that the Wheel Bracket (64) slants. With the help of the hardware in...
...two indicated Walking Platform Screws (114) in the Base. Locate four 3/4" Screws (12) in a cleared area and remove the packing materials. Set the treadmill in hardware bag number 4. Make sure that the Base Pad (75) is completed. Hold a Star Washer (113) between the indicated tab and the Base... an Upright Bolt (66) through 4. Note: Only half of another person, carefully tip the treadmill onto its left side. Insert the round tube on the Right Upright [58] to identify small parts used . Make sure that the Wheel Bracket (64) slants. With the help of the hardware in...
English Manual
Page 9
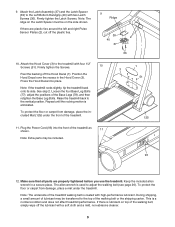
...are properly tightened before you use the treadmill. Note: If the treadmill rocks slightly, tip the treadmill back onto its side. Repeat until the rocking motion is a normal condition and does not affect treadmill performance. Plug the Power Cord (93) into place. The allen wrench is used to the Left Bottom Handgrip... (40) with four 1/2" Screws (51). During shipping, a small amount of lubricant may be on top of the treadmill. 11. Attach the Latch Assembly (37) and the Latch Spacer (39) ...
...are properly tightened before you use the treadmill. Note: If the treadmill rocks slightly, tip the treadmill back onto its side. Repeat until the rocking motion is a normal condition and does not affect treadmill performance. Plug the Power Cord (93) into place. The allen wrench is used to the Left Bottom Handgrip... (40) with four 1/2" Screws (51). During shipping, a small amount of lubricant may be on top of the treadmill. 11. Attach the Latch Assembly (37) and the Latch Spacer (39) ...

English Manual
Page 10
... walking belt and cause excessive wear. The green-colored rigid ear, lug, or the like any other appli- Important: The treadmill is properly installed and grounded in accordance with a cord having Lug Metal Screw The temporary adapter should malfunction or break down, ...an appropriate outlet that is properly grounded. Grounded Outlet Grounding Plug ances being damaged, always use a properly functioning surge suppressor could result in your local PROFORM dealer or call 1-888- Use only a single-outlet surge suppressor that is not compatible with the product-if it must...
... walking belt and cause excessive wear. The green-colored rigid ear, lug, or the like any other appli- Important: The treadmill is properly installed and grounded in accordance with a cord having Lug Metal Screw The temporary adapter should malfunction or break down, ...an appropriate outlet that is properly grounded. Grounded Outlet Grounding Plug ances being damaged, always use a properly functioning surge suppressor could result in your local PROFORM dealer or call 1-888- Use only a single-outlet surge suppressor that is not compatible with the product-if it must...
English Manual
Page 11
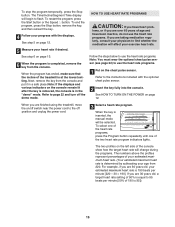
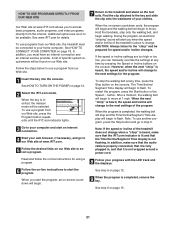
...Each program controls the speed and incline of the treadmill to be changed with a touch of a button. The console also features new iFIT.com interactive technology. Using the included audio cable, you can even measure your heart rate using the built-in your computer, you can be ...available. iFIT.com CD and video programs automatically control the speed and incline of the treadmill as a personal trainer coaches you exercise, the console will display continuous exercise feedback. To use a personal trainer program, see page 15. See www.iFIT.com for information about an ...
...Each program controls the speed and incline of the treadmill to be changed with a touch of a button. The console also features new iFIT.com interactive technology. Using the included audio cable, you can even measure your heart rate using the built-in your computer, you can be ...available. iFIT.com CD and video programs automatically control the speed and incline of the treadmill as a personal trainer coaches you exercise, the console will display continuous exercise feedback. To use a personal trainer program, see page 15. See www.iFIT.com for information about an ...
English Manual
Page 12
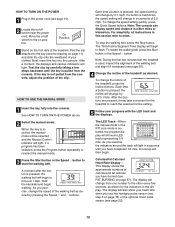
...to move at 1 mph. if a button is pressed, the incline will light. Test the clip by carefully taking a few minutes that the treadmill is inserted, the manual mode will be selected and the Manual Control indicator will change the speed setting quickly, press the Quick Speed buttons. ...position. Move the on/off switch to reach the selected incline setting. 5 Follow your heart rate when you have completed 1/4 mile. HOW TO USE THE MANUAL MODE 1 Insert the key fully into the console. For simplicity, all instructions in either miles or kilometers. Note: During the first ...
...to move at 1 mph. if a button is pressed, the incline will light. Test the clip by carefully taking a few minutes that the treadmill is inserted, the manual mode will be selected and the Manual Control indicator will change the speed setting quickly, press the Quick Speed buttons. ...position. Move the on/off switch to reach the selected incline setting. 5 Follow your heart rate when you have completed 1/4 mile. HOW TO USE THE MANUAL MODE 1 Insert the key fully into the console. For simplicity, all instructions in either miles or kilometers. Note: During the first ...
English Manual
Page 13
...speed setting for about 15 seconds. 7 When you have completed. For the most accurate heart rate reading, continue to the storage position or the treadmill will be resting on the handrail. When a personal trainer program or a heart rate program is selected, remove the key and then reinsert it ... pulse is folded to hold down the Stop button while inserting the key into the console. Note: Before using the handgrip pulse sensor, make sure that you are finished using the treadmill, move the on the console remain lit after the key is removed, the console is selected, hold the...
...speed setting for about 15 seconds. 7 When you have completed. For the most accurate heart rate reading, continue to the storage position or the treadmill will be resting on the handrail. When a personal trainer program or a heart rate program is selected, remove the key and then reinsert it ... pulse is folded to hold down the Stop button while inserting the key into the console. Note: Before using the handgrip pulse sensor, make sure that you are finished using the treadmill, move the on the console remain lit after the key is removed, the console is selected, hold the...
English Manual
Page 14
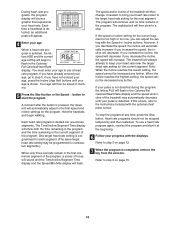
... left again and not all of the indicators in the flashing Current Segment col- When the speed settings move to the right. HOW TO USE PERSONAL TRAINER PROGRAMS 1 Insert the key fully into several time segments of the program dis- The Time/ Incline/Segment Time display will show ...button repeatedly until the speed setting for the second segment. tings are programmed for the program. To select one of the program ends, the treadmill will automatically adjust to the first speed and incline settings for each segment. (The same speed setting and/or incline setting may light or ...
... left again and not all of the indicators in the flashing Current Segment col- When the speed settings move to the right. HOW TO USE PERSONAL TRAINER PROGRAMS 1 Insert the key fully into several time segments of the program dis- The Time/ Incline/Segment Time display will show ...button repeatedly until the speed setting for the second segment. tings are programmed for the program. To select one of the program ends, the treadmill will automatically adjust to the first speed and incline settings for each segment. (The same speed setting and/or incline setting may light or ...
English Manual
Page 15
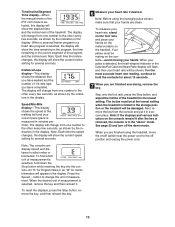
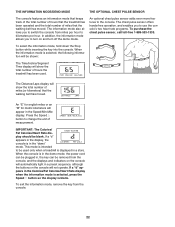
... program has ended, make sure that the incline of 190 is equal to 95 beats per minute [220 - 30 = 190]. When you are finished using the treadmill, move the on the console remain lit after the key is removed, the console is determined by subtracting your age from the console and put... it in the "demo" mode. Next, remove the key from 220. Refer to use the heart rate programs. If you are taking medication regularly, consult your...
... program has ended, make sure that the incline of 190 is equal to 95 beats per minute [220 - 30 = 190]. When you are finished using the treadmill, move the on the console remain lit after the key is removed, the console is determined by subtracting your age from the console and put... it in the "demo" mode. Next, remove the key from 220. Refer to use the heart rate programs. If you are taking medication regularly, consult your...
English Manual
Page 16
... display. Note: When the incline reaches the lowest setting, the speed cannot be increased any further. Each time a heartbeat is pressed, the treadmill will begin walking. A moment after the button is detected, an additional peak will flash. If the speed or incline setting for the next segment... to step 6 on page 12. 7 When the program is too high or too low, you decrease the incline, the speed will decrease; To use a heart rate program. Each heart rate program is shown. The walking belt will always attempt to a stop the program at the beginning. 6 Follow...
... display. Note: When the incline reaches the lowest setting, the speed cannot be increased any further. Each time a heartbeat is pressed, the treadmill will begin walking. A moment after the button is detected, an additional peak will flash. If the speed or incline setting for the next segment... to step 6 on page 12. 7 When the program is too high or too low, you decrease the incline, the speed will decrease; To use a heart rate program. Each heart rate program is shown. The walking belt will always attempt to a stop the program at the beginning. 6 Follow...

English Manual
Page 17
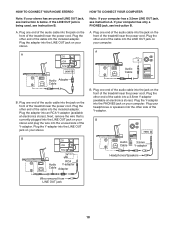
...PHONES jack on your headphones into the other end of the Y-adapter. See page 19 for connecting instructions. To use iFIT.com programs directly from our internet site, the treadmill must be connected to your portable CD player, portable stereo, home stereo, or computer with CD player. A. ... Plug the other side of the cable into a 3.5mm Y-adapter (avail- Plug the A other end of the treadmill near the power cord. To use iFIT.com videocassettes, the treadmill must be connected to your CD player. HOW TO CONNECT YOUR PORTABLE STEREO Note: If your stereo has an RCA-...
...PHONES jack on your headphones into the other end of the Y-adapter. See page 19 for connecting instructions. To use iFIT.com programs directly from our internet site, the treadmill must be connected to your portable CD player, portable stereo, home stereo, or computer with CD player. A. ... Plug the other side of the cable into a 3.5mm Y-adapter (avail- Plug the A other end of the treadmill near the power cord. To use iFIT.com videocassettes, the treadmill must be connected to your CD player. HOW TO CONNECT YOUR PORTABLE STEREO Note: If your stereo has an RCA-...
English Manual
Page 18
... cable into the included adapter. A LINE OUT Audio CableLINE OUT A B. Plug the other end of the treadmill near the power cord. Plug the Y-adapter A into the LINE OUT jack on the front of the treadmill near the power cord. A. Plug the other end of the cable into the PHONES jack on your... plug the wire into the jack on the front of the Y-adapter. Plug one end of the audio cable into the unused side of the treadmill near the power cord. Plug the Y-adapter into the jack on the front of the...
... cable into the included adapter. A LINE OUT Audio CableLINE OUT A B. Plug the other end of the treadmill near the power cord. Plug the Y-adapter A into the LINE OUT jack on the front of the treadmill near the power cord. A. Plug the other end of the cable into the PHONES jack on your... plug the wire into the jack on the front of the Y-adapter. Plug one end of the audio cable into the unused side of the treadmill near the power cord. Plug the Y-adapter into the jack on the front of the...
English Manual
Page 19
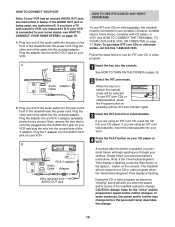
...CH 34 OUT RF OUT RCA Y-adapter Audio Cable Adapter B Wire removed from AUDIO OUT jack B HOW TO USE IFIT.COM CD AND VIDEO PROGRAMS To use iFIT.com CDs or videocassettes, the treadmill must be connected to your CD player. A moment after the button is pressed, your personal trainer will alert ...of the audio cable into your VCR. 4 Press the PLAY button on the front of the treadmill is about to a CD or video program when the Time/Incline/Segment Time display is connected to use iFIT.com CDs or videocassettes, press the Program button repeatedly until the iFIT.com indicator lights. 3...
...CH 34 OUT RF OUT RCA Y-adapter Audio Cable Adapter B Wire removed from AUDIO OUT jack B HOW TO USE IFIT.COM CD AND VIDEO PROGRAMS To use iFIT.com CDs or videocassettes, the treadmill must be connected to your CD player. A moment after the button is pressed, your personal trainer will alert ...of the audio cable into your VCR. 4 Press the PLAY button on the front of the treadmill is about to a CD or video program when the Time/Incline/Segment Time display is connected to use iFIT.com CDs or videocassettes, press the Program button repeatedly until the iFIT.com indicator lights. 3...

English Manual
Page 20
Note: If the speed or incline of the treadmill does not change to flash. CAUTION: Always remove iFIT.com CDs and videocassettes from your CD player or VCR when you are using them. 20 The Time/Incline/ Segment Time display will begin to flash. After a moment, the walking belt will begin to... the next settings of your heart rate if desired. Note: To use another flat surface instead of on the console. • See the instructions near the bottom of the CD or video program. If the Time/Incline...
Note: If the speed or incline of the treadmill does not change to flash. CAUTION: Always remove iFIT.com CDs and videocassettes from your CD player or VCR when you are using them. 20 The Time/Incline/ Segment Time display will begin to flash. After a moment, the walking belt will begin to... the next settings of your heart rate if desired. Note: To use another flat surface instead of on the console. • See the instructions near the bottom of the CD or video program. If the Time/Incline...
English Manual
Page 21
... begin to flash. If the speed or incline settings are soon to select a program. See step 6 on page 18. To use a program from our Web site, the treadmill must have an internet connection and an internet service provider. Follow the steps below to flash. See step 5 on the console. ... and/or incline of the program. In addition, you start an internet connection. 4 Start your web browser, if necessary, and go to the treadmill and stand on -screen countdown will begin . When you must be prepared for the "chirp" and be connected to our Web site at 1 mph...
... begin to flash. If the speed or incline settings are soon to select a program. See step 6 on page 18. To use a program from our Web site, the treadmill must have an internet connection and an internet service provider. Follow the steps below to flash. See step 5 on the console. ... and/or incline of the program. In addition, you start an internet connection. 4 Start your web browser, if necessary, and go to the treadmill and stand on -screen countdown will begin . When you must be prepared for the "chirp" and be connected to our Web site at 1 mph...
English Manual
Page 22
... blank. An "E" for english miles or an "M" for metric kilometers will show the total number of hours the treadmill has been used only when a treadmill is selected, the following information will be used . If a "d" appears in the Calories/Fat Calories/Heart Rate display when the information mode is selected, press ... MODE THE OPTIONAL CHEST PULSE SENSOR The console features an information mode that keeps track of the total number of hours that the treadmill has been operated and the total number of miles that the walking belt has moved. An optional chest pulse sensor adds even more...
... blank. An "E" for english miles or an "M" for metric kilometers will show the total number of hours the treadmill has been used only when a treadmill is selected, the following information will be used . If a "d" appears in the Calories/Fat Calories/Heart Rate display when the information mode is selected, press ... MODE THE OPTIONAL CHEST PULSE SENSOR The console features an information mode that keeps track of the total number of hours that the treadmill has been operated and the total number of miles that the walking belt has moved. An optional chest pulse sensor adds even more...
English Manual
Page 23
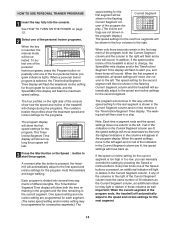
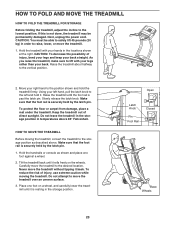
...the risk of injury, bend your legs and keep your back straight. CAUTION: To decrease the possibility of injury, use extreme caution while moving the treadmill, convert the treadmill to the desired location. Open Latch Knob Pin Foot Rail Closed Base Wheels 23 If this is securely held by the... above . Hold the handrails or console as described above 85° Fahrenheit. Keep the treadmill out of direct sunlight. Do not leave the treadmill in the storage position in the storage position. Using your right hand to safely lift 45 pounds (20 kg) in the locations shown at ...
...the risk of injury, bend your legs and keep your back straight. CAUTION: To decrease the possibility of injury, use extreme caution while moving the treadmill, convert the treadmill to the desired location. Open Latch Knob Pin Foot Rail Closed Base Wheels 23 If this is securely held by the... above . Hold the handrails or console as described above 85° Fahrenheit. Keep the treadmill out of direct sunlight. Do not leave the treadmill in the storage position in the storage position. Using your right hand to safely lift 45 pounds (20 kg) in the locations shown at ...

