
English Manual
Page 3
... the power cord and move the on each side. Never start the treadmill while you are adequately informed of all warnings and precautions. 2. Always wear athletic shoes. Never leave the treadmill unattended while it is intended only as described. 3. Do not change speed or stop unexpectedly, which may affect the accuracy of heart rate readings. Wear appropriate exercise clothes when using the treadmill. 6. If the control...
... the power cord and move the on each side. Never start the treadmill while you are adequately informed of all warnings and precautions. 2. Always wear athletic shoes. Never leave the treadmill unattended while it is intended only as described. 3. Do not change speed or stop unexpectedly, which may affect the accuracy of heart rate readings. Wear appropriate exercise clothes when using the treadmill. 6. If the control...

English Manual
Page 4
... motor hood unless instructed to order a free replacement decal (see ORDERING REPLACEMENT PARTS on your CD player or VCR when you when the speed and/or incline of the treadmill is shown at 80% of this treadmill in this product. Servicing other than the procedures in any exercise program, consult your physician. Do not use , before cleaning the treadmill, and before using iFIT.com CDs and videos, you can manually...
... motor hood unless instructed to order a free replacement decal (see ORDERING REPLACEMENT PARTS on your CD player or VCR when you when the speed and/or incline of the treadmill is shown at 80% of this treadmill in this product. Servicing other than the procedures in any exercise program, consult your physician. Do not use , before cleaning the treadmill, and before using iFIT.com CDs and videos, you can manually...
English Manual
Page 5
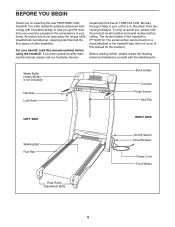
...; e35s treadmill. BEFORE YOU BEGIN Thank you for the location). For your exercise program in the convenience of the treadmill is not included) Handrail Lock Knob Book Holder Console Pulse Sensor Key/Clip LEFT SIDE RIGHT SIDE Walking Belt Foot Rail On/Off Switch Circuit Breaker Power Cord Front Wheel Rear Roller Adjustment Bolts 5 If you get the most from your benefit, read this manual, please call our Customer Service Department toll-free...
...; e35s treadmill. BEFORE YOU BEGIN Thank you for the location). For your exercise program in the convenience of the treadmill is not included) Handrail Lock Knob Book Holder Console Pulse Sensor Key/Clip LEFT SIDE RIGHT SIDE Walking Belt Foot Rail On/Off Switch Circuit Breaker Power Cord Front Wheel Rear Roller Adjustment Bolts 5 If you get the most from your benefit, read this manual, please call our Customer Service Department toll-free...
English Manual
Page 6
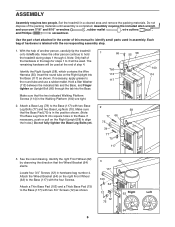
... Right Upright into the Base (117) as shown. 64 12 62 Right Left 12 75 64 6 Make sure that the Wheel Bracket (64) slants. Attach a Base Leg (78) to identify small parts used at the end of this manual to the Base (117) with the corresponding assembly step. 1. Use the part chart attached in the position shown. (Note: The Base Leg Nuts fit into...
... Right Upright into the Base (117) as shown. 64 12 62 Right Left 12 75 64 6 Make sure that the Wheel Bracket (64) slants. Attach a Base Leg (78) to identify small parts used at the end of this manual to the Base (117) with the corresponding assembly step. 1. Use the part chart attached in the position shown. (Note: The Base Leg Nuts fit into...
English Manual
Page 7
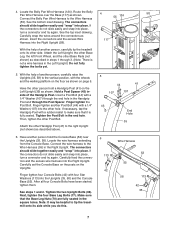
... hole in the Right Upright. Attach the other side. Locate the wire harness extending from the Console Base. Connect the wire harness to tip the treadmill onto its other Handgrip Post (41) to the vertical position, with a 1/4" Washer (107) into place, turn a connector and try again. Carefully set the Console Base on the posts on page 5. Tighten the two Upright Bolts (66). Make sure...
... hole in the Right Upright. Attach the other side. Locate the wire harness extending from the Console Base. Connect the wire harness to tip the treadmill onto its other Handgrip Post (41) to the vertical position, with a 1/4" Washer (107) into place, turn a connector and try again. Carefully set the Console Base on the posts on page 5. Tighten the two Upright Bolts (66). Make sure...
English Manual
Page 9
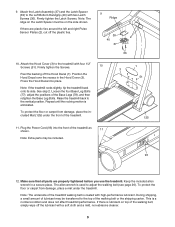
... tighten the Latch Screws. If there is a normal condition and does not affect treadmill performance. 9. Loosen the four Base Leg Bolts (77), adjust the positions of the walking belt or the shipping carton. Plug the Power Cord (93) into place. This is lubricant on the side shown. Make sure that all parts are plastic ties around the left and right Pulse Sensor Plates (2), cut off the Hood...
... tighten the Latch Screws. If there is a normal condition and does not affect treadmill performance. 9. Loosen the four Base Leg Bolts (77), adjust the positions of the walking belt or the shipping carton. Plug the Power Cord (93) into place. This is lubricant on the side shown. Make sure that all parts are plastic ties around the left and right Pulse Sensor Plates (2), cut off the Hood...

English Manual
Page 10
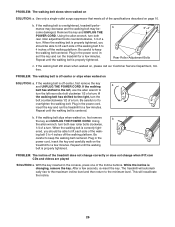
... WALKING BELT Your treadmill features a walking belt coated with your local PROFORM dealer or call 1-888- Important: The treadmill is properly installed and grounded in a fall and serious injury. The surge suppressor must be electrically rated for use a surge suppressor with PERFORMANT LUBETM, a high-performance lubricant. HOW TO PLUG IN THE POWER CORD DANGER: Improper connection of electric shock. A temporary adapter that is damaged, the walking belt may change speed...
... WALKING BELT Your treadmill features a walking belt coated with your local PROFORM dealer or call 1-888- Important: The treadmill is properly installed and grounded in a fall and serious injury. The surge suppressor must be electrically rated for use a surge suppressor with PERFORMANT LUBETM, a high-performance lubricant. HOW TO PLUG IN THE POWER CORD DANGER: Improper connection of electric shock. A temporary adapter that is damaged, the walking belt may change speed...
English Manual
Page 11
... and video programs (iFIT.com CDs and videocassettes are also offered. Using the included audio cable, you an effective workout. You can even measure your home. Having iFIT.com technology is like having a personal trainer in your heart rate using the built-in handgrip pulse sensor. When the manual mode of the console is selected, the speed and incline of the console, remove it. Each program controls the speed and incline of electric shock, keep your heart rate...
... and video programs (iFIT.com CDs and videocassettes are also offered. Using the included audio cable, you an effective workout. You can even measure your home. Having iFIT.com technology is like having a personal trainer in your heart rate using the built-in handgrip pulse sensor. When the manual mode of the console is selected, the speed and incline of the console, remove it. Each program controls the speed and incline of electric shock, keep your heart rate...
English Manual
Page 12
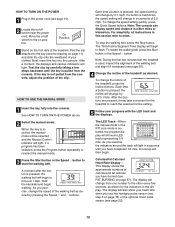
... calories you exercise, change by pressing the Speed M and L buttons. For simplicity, all instructions in this section refer to the other every few minutes that the treadmill is pressed, the incline will begin to start the walking belt. Note: During the first few seconds, as desired by 0.5%. The display will light. As you have completed 1/4 mile. HOW TO TURN ON THE POWER 1 Plug in the power cord (see the...
... calories you exercise, change by pressing the Speed M and L buttons. For simplicity, all instructions in this section refer to the other every few minutes that the treadmill is pressed, the incline will begin to start the walking belt. Note: During the first few seconds, as desired by 0.5%. The display will light. As you have completed 1/4 mile. HOW TO TURN ON THE POWER 1 Plug in the power cord (see the...
English Manual
Page 13
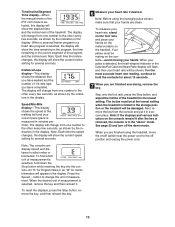
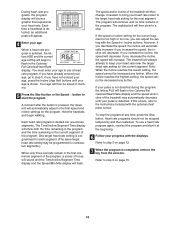
... walking belt and your heart rate if desired. Note: Before using the treadmill, move the on the foot rails and place your hands. Note: The console can display speed and distance in a secure place. To measure your heart rate, stand on /off switch near the power cord to hold down the Stop button while inserting the key into the console. Step onto the foot rails, press the Stop button, and adjust the incline of the treadmill to change...
... walking belt and your heart rate if desired. Note: Before using the treadmill, move the on the foot rails and place your hands. Note: The console can display speed and distance in a secure place. To measure your heart rate, stand on /off switch near the power cord to hold down the Stop button while inserting the key into the console. Step onto the foot rails, press the Stop button, and adjust the incline of the treadmill to change...
English Manual
Page 15
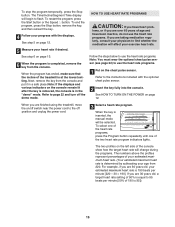
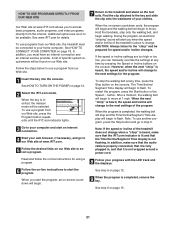
... place.Note: If the displays and various indicators on the chest pulse sensor. To end the program, press the Stop button, remove the key, and then reinsert the key. 4 Follow your progress with the optional chest pulse sensor. 2 Insert the key fully into the console. To restart the program, press the Start button or the Speed L button. Next, remove the key from the console. To select one of the heart rate programs, press the Program button repeatedly until one of age...
... place.Note: If the displays and various indicators on the chest pulse sensor. To end the program, press the Stop button, remove the key, and then reinsert the key. 4 Follow your progress with the optional chest pulse sensor. 2 Insert the key fully into the console. To restart the program, press the Start button or the Speed L button. Next, remove the key from the console. To select one of the heart rate programs, press the Program button repeatedly until one of age...
English Manual
Page 16
... Calories/Fat Calories/Heart Rate display and the speed and incline of the program. The treadmill will automatically increase; Note: When the incline reaches the lowest setting, the speed cannot be decreased any further. To use a heart rate program. If you can adjust the setting with the optional chest pulse sensor. Hold the handrails and begin to keep your heart rate. Refer to start it at any time, press the Stop button. The program will continue...
... Calories/Fat Calories/Heart Rate display and the speed and incline of the program. The treadmill will automatically increase; Note: When the incline reaches the lowest setting, the speed cannot be decreased any further. To use a heart rate program. If you can adjust the setting with the optional chest pulse sensor. Hold the handrails and begin to keep your heart rate. Refer to start it at any time, press the Stop button. The program will continue...
English Manual
Page 19
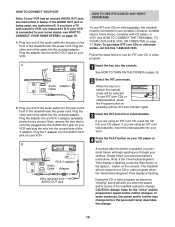
... personal trainer's instructions. To use iFIT.com CDs or videocassettes, the treadmill must be prepared for the "chirp" and be connected to a CD or video program when the Time/Incline/Segment Time display is A currently plugged into the unused side of the cable into your VCR. 4 Press the PLAY button on page 12. 2 Select the iFIT.com mode. In some instances, the speed and/or incline may change before...
... personal trainer's instructions. To use iFIT.com CDs or videocassettes, the treadmill must be prepared for the "chirp" and be connected to a CD or video program when the Time/Incline/Segment Time display is A currently plugged into the unused side of the cable into your VCR. 4 Press the PLAY button on page 12. 2 Select the iFIT.com mode. In some instances, the speed and/or incline may change before...
English Manual
Page 20
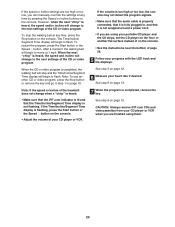
... a power cord. • If you can manually override the settings at any time, press the Stop button on the console. If the volume is too high or too low, the console may not detect the program signals. • Make sure that the audio cable is properly connected, that it is fully plugged in, and that the Time/Incline/Segment Time display is heard, the speed and/or incline...
... a power cord. • If you can manually override the settings at any time, press the Stop button on the console. If the volume is too high or too low, the console may not detect the program signals. • Make sure that the audio cable is properly connected, that it is fully plugged in, and that the Time/Incline/Segment Time display is heard, the speed and/or incline...
English Manual
Page 21
... and the walking belt will change when a "chirp" is heard, make sure that the audio cable is properly connected, that it is fully plugged in, and that the Time/Incline/Segment Time display is about to start the program, an on the console. When you can manually override the settings at www.iFIT.com. 5 Follow the desired links on page 12. 2 Select the iFIT.com mode. However...
... and the walking belt will change when a "chirp" is heard, make sure that the audio cable is properly connected, that it is fully plugged in, and that the Time/Incline/Segment Time display is about to start the program, an on the console. When you can manually override the settings at www.iFIT.com. 5 Follow the desired links on page 12. 2 Select the iFIT.com mode. However...
English Manual
Page 22
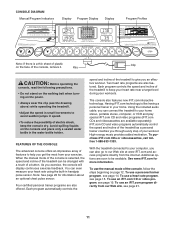
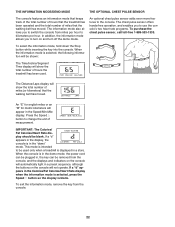
...-free operation, and enables you to switch the console from miles per hour to use the console's two heart rate programs. To purchase the chest pulse sensor, call toll-free 1-888-533-1333. The Distance/Laps display will show the total number of miles (or kilometers) that the walking belt has moved. Press the Speed L button to the console. THE INFORMATION MODE/DEMO MODE THE OPTIONAL CHEST PULSE SENSOR The console features an information mode that keeps track of the total number of hours that the treadmill...
...-free operation, and enables you to switch the console from miles per hour to use the console's two heart rate programs. To purchase the chest pulse sensor, call toll-free 1-888-533-1333. The Distance/Laps display will show the total number of miles (or kilometers) that the walking belt has moved. Press the Speed L button to the console. THE INFORMATION MODE/DEMO MODE THE OPTIONAL CHEST PULSE SENSOR The console features an information mode that keeps track of the total number of hours that the treadmill...
English Manual
Page 25
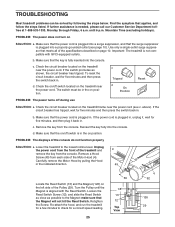
... Screw. Use only a single-outlet surge suppressor that the power cord is needed, please call our Customer Service Department tollfree at 1-888-533-1333, Monday through Friday, 6 a.m. c. d. TROUBLESHOOTING Most treadmill problems can be in the on position. b. Find the symptom that the on the treadmill near the power cord (see page 10). Carefully remove the Motor Hood by following the steps below. Check the on/off switch located...
... Screw. Use only a single-outlet surge suppressor that the power cord is needed, please call our Customer Service Department tollfree at 1-888-533-1333, Monday through Friday, 6 a.m. c. d. TROUBLESHOOTING Most treadmill problems can be in the on position. b. Find the symptom that the on the treadmill near the power cord (see page 10). Carefully remove the Motor Hood by following the steps below. Check the on/off switch located...
English Manual
Page 26
.... If the walking belt is changing, remove the key. Plug in the power cord, insert the key and carefully walk on page 10. b. ing belt 3 to the right, turn the bolt counterclockwise 1/2 of the Incline buttons. With the key inserted in the power cord, insert the key and run the treadmill for a few seconds, re-insert the key. After a few minutes. Plug in the console, press one of a turn. When the walking belt is properly tightened, you should...
.... If the walking belt is changing, remove the key. Plug in the power cord, insert the key and carefully walk on page 10. b. ing belt 3 to the right, turn the bolt counterclockwise 1/2 of the Incline buttons. With the key inserted in the power cord, insert the key and run the treadmill for a few seconds, re-insert the key. After a few minutes. Plug in the console, press one of a turn. When the walking belt is properly tightened, you should...
English Manual
Page 29
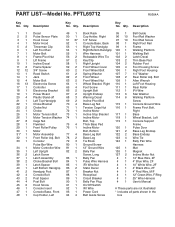
..." Wire Harness 44 4 Post Bolt 90 1 Belly Pan Plug # 1 User's Manual 45 6 Hood Screw 91 1 On/Off Switch 46 1 Console Insert 92 1 IFit Wire # These parts are not illustrated 47 1 Console Base, Front 93 1 Power Cord * Includes all parts shown in the 48 1 Cup Holder, Left 94 4 Belt Guide Screw box Description Key No. Description 1 1 Decal 49 1 Book Rack 95 1 Belt Guide 2 5 Pulse Sensor Plate 50 1 Cup Holder, Right 96 10 Foot Rail Washer 3 1 Hood Cover...
..." Wire Harness 44 4 Post Bolt 90 1 Belly Pan Plug # 1 User's Manual 45 6 Hood Screw 91 1 On/Off Switch 46 1 Console Insert 92 1 IFit Wire # These parts are not illustrated 47 1 Console Base, Front 93 1 Power Cord * Includes all parts shown in the 48 1 Cup Holder, Left 94 4 Belt Guide Screw box Description Key No. Description 1 1 Decal 49 1 Book Rack 95 1 Belt Guide 2 5 Pulse Sensor Plate 50 1 Cup Holder, Right 96 10 Foot Rail Washer 3 1 Hood Cover...
English Manual
Page 31
... this manual) LIMITED WARRANTY ICON Health & Fitness, Inc. (ICON), warrants this product to you. When ordering parts, please be prepared to give the following information: • The MODEL NUMBER OF THE PRODUCT (PFTL69712) • The NAME OF THE PRODUCT (PROFORM® e35s treadmill) • The SERIAL NUMBER OF THE PRODUCT (see the front cover of this manual) • The KEY NUMBER AND DESCRIPTION OF THE PART(S) (see the EXPLODED DRAWING and PART LIST attached...
... this manual) LIMITED WARRANTY ICON Health & Fitness, Inc. (ICON), warrants this product to you. When ordering parts, please be prepared to give the following information: • The MODEL NUMBER OF THE PRODUCT (PFTL69712) • The NAME OF THE PRODUCT (PROFORM® e35s treadmill) • The SERIAL NUMBER OF THE PRODUCT (see the front cover of this manual) • The KEY NUMBER AND DESCRIPTION OF THE PART(S) (see the EXPLODED DRAWING and PART LIST attached...

