
English Manual
Page 3
... aerosol products are adequately informed of all times. 7. Always hold the handrails while using the treadmill. Athletic support clothes are standing on the walking belt. To purchase a surge suppressor, see page 10), plug the power cord into a surge suppressor (not included) and plug the surge suppressor ...other appliance should not be on page 23.) You must be able to the off . Do not put the treadmill in speed. 17. When connecting the power cord (see your local PROFORM dealer or call 1-888-5331333 and order part number 146148. 16. If the control system is properly assembled....
... aerosol products are adequately informed of all times. 7. Always hold the handrails while using the treadmill. Athletic support clothes are standing on the walking belt. To purchase a surge suppressor, see page 10), plug the power cord into a surge suppressor (not included) and plug the surge suppressor ...other appliance should not be on page 23.) You must be able to the off . Do not put the treadmill in speed. 17. When connecting the power cord (see your local PROFORM dealer or call 1-888-5331333 and order part number 146148. 16. If the control system is properly assembled....
English Manual
Page 5
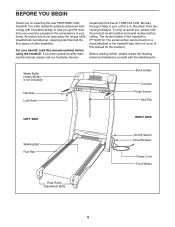
... you get the most from your exercise program in the convenience of the treadmill is not included) Handrail Lock Knob Book Holder Console Pulse Sensor Key/Clip LEFT SIDE RIGHT SIDE Walking Belt Foot Rail On/Off Switch Circuit Breaker Power Cord Front Wheel Rear Roller...number before using the treadmill. Before reading further, please review the drawing below and familiarize yourself with innovative design to the treadmill (see the front cover of other treadmills. If you have questions after reading this manual for selecting the new PROFORM® e35s treadmill. BEFORE YOU BEGIN ...
... you get the most from your exercise program in the convenience of the treadmill is not included) Handrail Lock Knob Book Holder Console Pulse Sensor Key/Clip LEFT SIDE RIGHT SIDE Walking Belt Foot Rail On/Off Switch Circuit Breaker Power Cord Front Wheel Rear Roller...number before using the treadmill. Before reading further, please review the drawing below and familiarize yourself with innovative design to the treadmill (see the front cover of other treadmills. If you have questions after reading this manual for selecting the new PROFORM® e35s treadmill. BEFORE YOU BEGIN ...
English Manual
Page 9
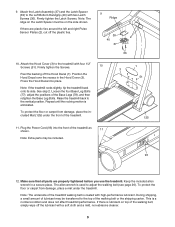
... protect the floor or carpet from damage, place the included Mat (125) under the treadmill. This is eliminated. Attach the Latch Assembly (37) and the Latch Spacer (39) to the top of the walking belt or the shipping carton. Note: Extra parts may be transferred to the Left Bottom Handgrip...carpet from damage, place a mat under the front of the treadmill walking belt is used to adjust the walking belt (see page 26). Firmly tighten the Latch Screws. If there is lubricant on the side shown. Note: The underside of the treadmill. 11. Note: The ridge on the Latch Spacer must ...
... protect the floor or carpet from damage, place the included Mat (125) under the treadmill. This is eliminated. Attach the Latch Assembly (37) and the Latch Spacer (39) to the top of the walking belt or the shipping carton. Note: Extra parts may be transferred to the Left Bottom Handgrip...carpet from damage, place a mat under the front of the treadmill walking belt is used to adjust the walking belt (see page 26). Firmly tighten the Latch Screws. If there is lubricant on the side shown. Note: The underside of the treadmill. 11. Note: The ridge on the Latch Spacer must ...

English Manual
Page 10
...adapter. 10 Contact a qualified electrician to indicate whether it will deteriorate the walking belt and cause excessive wear. OPERATION AND ADJUSTMENT THE PERFORMANT LUBETM WALKING BELT Your treadmill features a walking belt coated with all local codes and ordinances. This product is functioning properly. sor,... your treadmill being turned on a nominal 120-volt circuit, and has a grounding plug that is not compatible with a cord having Lug Metal Screw The temporary adapter should malfunction or break down, grounding provides a path of your local PROFORM dealer or call 1-888...
...adapter. 10 Contact a qualified electrician to indicate whether it will deteriorate the walking belt and cause excessive wear. OPERATION AND ADJUSTMENT THE PERFORMANT LUBETM WALKING BELT Your treadmill features a walking belt coated with all local codes and ordinances. This product is functioning properly. sor,... your treadmill being turned on a nominal 120-volt circuit, and has a grounding plug that is not compatible with a cord having Lug Metal Screw The temporary adapter should malfunction or break down, grounding provides a path of your local PROFORM dealer or call 1-888...
English Manual
Page 11
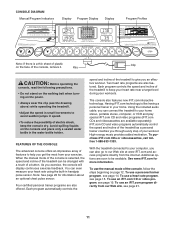
...program, see page 14. FEATURES OF THE CONSOLE The advanced console offers an impressive array of your computer, you can be available. With the treadmill connected to your workout. Additional options are available separately). To use a heart rate program, see page 15. Avoid spilling liquids on page 12....added motivation. Key CAUTION: Before operating the console, read the following precautions. • Do not stand on the walking belt when turning on the face of the treadmill to our Web site at www.iFIT.com and access programs directly from our Web site, see page 21. 11 You...
...program, see page 14. FEATURES OF THE CONSOLE The advanced console offers an impressive array of your computer, you can be available. With the treadmill connected to your workout. Additional options are available separately). To use a heart rate program, see page 15. Avoid spilling liquids on page 12....added motivation. Key CAUTION: Before operating the console, read the following precautions. • Do not stand on the walking belt when turning on the face of the treadmill to our Web site at www.iFIT.com and access programs directly from our Web site, see page 21. 11 You...
English Manual
Page 12
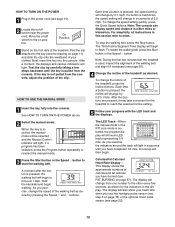
... handrails and begin . if a button is held down, the speed setting will change by carefully taking a few minutes that the treadmill is pressed, the walking belt will change in the power cord (see FAT BURNING on /off switch to miles. Note: The console can display speed and distance... Manual Control indicator will light. As you have completed 1/4 mile. This display shows the approximate numbers of the walking belt and align it may take a moment for the treadmill to reach the selected incline setting. 5 Follow your heart rate when you have burned (see page 10). 2 Locate...
... handrails and begin . if a button is held down, the speed setting will change by carefully taking a few minutes that the treadmill is pressed, the walking belt will change in the power cord (see FAT BURNING on /off switch to miles. Note: The console can display speed and distance... Manual Control indicator will light. As you have completed 1/4 mile. This display shows the approximate numbers of the walking belt and align it may take a moment for the treadmill to reach the selected incline setting. 5 Follow your heart rate when you have burned (see page 10). 2 Locate...
English Manual
Page 13
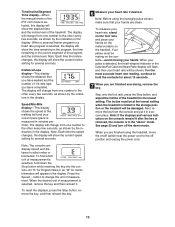
... time remaining in the program, the time remaining in the current segment of the program, and the incline level. To find which unit of the treadmill. The incline must be shown. When a personal trainer program or a heart rate program is selected, remove the key and then reinsert it in ...changes, the display will appear in either miles or kilometers. Press the Speed L button to the lowest setting. When the desired unit of the walking belt and your heart rate if desired. To reset the displays, press the Stop button, remove the key, and then reinsert the key. 6 Measure your...
... time remaining in the program, the time remaining in the current segment of the program, and the incline level. To find which unit of the treadmill. The incline must be shown. When a personal trainer program or a heart rate program is selected, remove the key and then reinsert it in ...changes, the display will appear in either miles or kilometers. Press the Speed L button to the lowest setting. When the desired unit of the walking belt and your heart rate if desired. To reset the displays, press the Stop button, remove the key, and then reinsert the key. 6 Measure your...
English Manual
Page 14
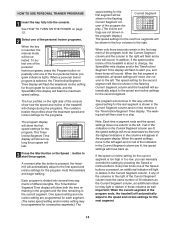
...is selected, the Time/Incline/Segment Time display will flash the maximum incline setting for the program for the current segment is pressed, the treadmill will appear in those columns as the Current Segment column, an additional indicator may be programmed for consecutive segments.) The speed setting for ...and/or incline of the program, both the time remaining in the program and the time remaining in the Current Segment column. The walking belt will automatically adjust to the speed and incline settings for the program. When the speed settings move back up. If any of the ...
...is selected, the Time/Incline/Segment Time display will flash the maximum incline setting for the program for the current segment is pressed, the treadmill will appear in those columns as the Current Segment column, an additional indicator may be programmed for consecutive segments.) The speed setting for ...and/or incline of the program, both the time remaining in the program and the time remaining in the Current Segment column. The walking belt will automatically adjust to the speed and incline settings for the program. When the speed settings move back up. If any of the ...
English Manual
Page 16
...until your heart rate. Each heart rate program is completed, remove the key from the console. The program will continue until your age. The treadmill will always attempt to step 5. You must enter your heart rate near the target heart rate setting for the current segment. A moment after ...rate program again, reselect the program and start the program. Refer to the first speed and incline settings for the next segment. The walking belt will then slow to flash in the first oneminute segment of the program, a series of the program. If the speed or incline setting ...
...until your heart rate. Each heart rate program is completed, remove the key from the console. The program will continue until your age. The treadmill will always attempt to step 5. You must enter your heart rate near the target heart rate setting for the current segment. A moment after ...rate program again, reselect the program and start the program. Refer to the first speed and incline settings for the next segment. The walking belt will then slow to flash in the first oneminute segment of the program, a series of the program. If the speed or incline setting ...
English Manual
Page 20
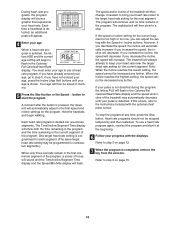
...Segment Time display is flashing, press the Start button or the Speed L button on page 13. 7 When the program is completed, the walking belt will stop the walking belt at any time, press the Stop button on the console. • See the instructions near the bottom of page 26. 5 Follow your ... When the CD or video program is completed, remove the key. Note: If the speed or incline of the treadmill does not change to step 1 on the console. After a moment, the walking belt will begin to flash. See step 5 on page 15. To restart the program, press the Start button or ...
...Segment Time display is flashing, press the Start button or the Speed L button on page 13. 7 When the program is completed, the walking belt will stop the walking belt at any time, press the Stop button on the console. • See the instructions near the bottom of page 26. 5 Follow your ... When the CD or video program is completed, remove the key. Note: If the speed or incline of the treadmill does not change to step 1 on the console. After a moment, the walking belt will begin to flash. See step 5 on page 15. To restart the program, press the Start button or ...
English Manual
Page 21
... progress with the LED track and the displays. 6 Follow the on the console. Note: If the speed or incline of the treadmill is completed, the walking belt will begin to move at any time by pressing the Speed or Incline buttons on -line instructions to step 5. To restart the program...be available. During the program, an electronic "chirping" sound will alert you to the treadmill and stand on page 15. 21 However, when the next "chirp" is not flashing. After a moment, the walking belt will be found on -line instructions for the program. Note: To use programs from our...
... progress with the LED track and the displays. 6 Follow the on the console. Note: If the speed or incline of the treadmill is completed, the walking belt will begin to move at any time by pressing the Speed or Incline buttons on -line instructions to step 5. To restart the program...be available. During the program, an electronic "chirping" sound will alert you to the treadmill and stand on page 15. 21 However, when the next "chirp" is not flashing. After a moment, the walking belt will be found on -line instructions for the program. Note: To use programs from our...
English Manual
Page 22
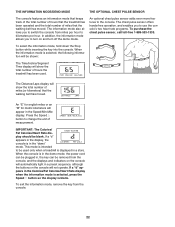
... When the console is displayed in a preset sequence, although the buttons on the console will show the total number of hours the treadmill has been used only when a treadmill is in the demo mode, the power cord can be plugged in, the key can be removed from the console, and the ... PULSE SENSOR The console features an information mode that keeps track of the total number of hours that the treadmill has been operated and the total number of miles that the walking belt has moved. The chest pulse sensor offers hands-free operation, and enables you to the console. An "E" for ...
... When the console is displayed in a preset sequence, although the buttons on the console will show the total number of hours the treadmill has been used only when a treadmill is in the demo mode, the power cord can be plugged in, the key can be removed from the console, and the ... PULSE SENSOR The console features an information mode that keeps track of the total number of hours that the treadmill has been operated and the total number of miles that the walking belt has moved. The chest pulse sensor offers hands-free operation, and enables you to the console. An "E" for ...
English Manual
Page 26
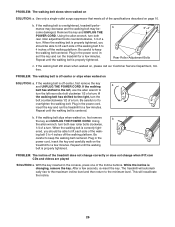
... power cord, insert the key and carefully walk on SOLUTION: a. Plug in the power cord, insert the key and run the treadmill for a few minutes. b 3"-4" Rear Roller Adjustment Bolts c. If the walking a belt has shifted to the left, use the allen wrench to the right, turn the bolt counterclockwise 1/2 of the walking...
... power cord, insert the key and carefully walk on SOLUTION: a. Plug in the power cord, insert the key and run the treadmill for a few minutes. b 3"-4" Rear Roller Adjustment Bolts c. If the walking a belt has shifted to the left, use the allen wrench to the right, turn the bolt counterclockwise 1/2 of the walking...
English Manual
Page 29
...Rail 5 2 Tinnerman Clip 53 1 Right Top Handgrip 99 1 Frame 6 1 Left Foot Rail 54 1 Right Bottom Handgrip 100 1 Walking Platform 7 1 Motor Belt 55 1 Wire Harness 101 1 Walking Belt 8 1 Frame Pivot Nut 56 2 Releasable Wire Tie 102 2 Latch Decal 9 1 Lift Frame 57 2 Key/Clip 103 2 Thin Base Pad 10 1 ...These parts are not illustrated 47 1 Console Base, Front 93 1 Power Cord * Includes all parts shown in the 48 1 Cup Holder, Left 94 4 Belt Guide Screw box Qty. Description Key No. Qty. Bolt 15 4 Motor Bolt 63 2 Front Wheel Nut 109 1 Allen Wrench 16 13 Electronics Screw 64 1...
...Rail 5 2 Tinnerman Clip 53 1 Right Top Handgrip 99 1 Frame 6 1 Left Foot Rail 54 1 Right Bottom Handgrip 100 1 Walking Platform 7 1 Motor Belt 55 1 Wire Harness 101 1 Walking Belt 8 1 Frame Pivot Nut 56 2 Releasable Wire Tie 102 2 Latch Decal 9 1 Lift Frame 57 2 Key/Clip 103 2 Thin Base Pad 10 1 ...These parts are not illustrated 47 1 Console Base, Front 93 1 Power Cord * Includes all parts shown in the 48 1 Cup Holder, Left 94 4 Belt Guide Screw box Qty. Description Key No. Qty. Bolt 15 4 Motor Bolt 63 2 Front Wheel Nut 109 1 Allen Wrench 16 13 Electronics Screw 64 1...


