
English Manual
Page 1
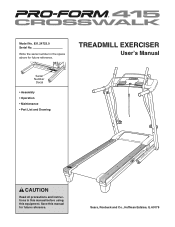
TREADMILL EXERCISER User's Manual Serial Number Decal • Assembly • Operation • Maintenance • Part List and Drawing CAUTION Read all precautions and instructions in the space above for future reference. Write the serial number in this manual before using this manual for future reference. Model No. 831.24723.0 Serial No. Sears, Roebuck and Co., Hoffman Estates, IL 60179 Save this equipment.
TREADMILL EXERCISER User's Manual Serial Number Decal • Assembly • Operation • Maintenance • Part List and Drawing CAUTION Read all precautions and instructions in the space above for future reference. Write the serial number in this manual before using this manual for future reference. Model No. 831.24723.0 Serial No. Sears, Roebuck and Co., Hoffman Estates, IL 60179 Save this equipment.
English Manual
Page 2
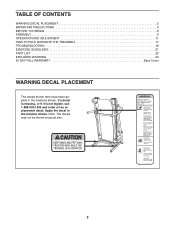
TABLE OF CONTENTS WARNING DECAL PLACEMENT 2 IMPORTANT PRECAUTIONS 3 BEFORE YOU BEGIN 5 ASSEMBLY 6 OPERATION AND ADJUSTMENT 11 HOW TO FOLD AND MOVE THE TREADMILL 17 TROUBLESHOOTING 18 EXERCISE GUIDELINES 21 PART LIST 22 EXPLODED DRAWING 24 90 DAY FULL WARRANTY Back Cover WARNING DECAL PLACEMENT The decals shown here have been applied in the location shown. Note: The decals may not be shown at actual size. 2 Apply the decal in the locations shown. If a decal is missing, or if it is not legible, call 1-888-533-1333 and order a free replacement decal.
TABLE OF CONTENTS WARNING DECAL PLACEMENT 2 IMPORTANT PRECAUTIONS 3 BEFORE YOU BEGIN 5 ASSEMBLY 6 OPERATION AND ADJUSTMENT 11 HOW TO FOLD AND MOVE THE TREADMILL 17 TROUBLESHOOTING 18 EXERCISE GUIDELINES 21 PART LIST 22 EXPLODED DRAWING 24 90 DAY FULL WARRANTY Back Cover WARNING DECAL PLACEMENT The decals shown here have been applied in the location shown. Note: The decals may not be shown at actual size. 2 Apply the decal in the locations shown. If a decal is missing, or if it is not legible, call 1-888-533-1333 and order a free replacement decal.
English Manual
Page 3
... persons over the age of the specifications described on a level surface, with pre-existing health problems. 2. Keep children under the treadmill. 13. Always hold the handrails or crosswalk arms while using the treadmill. It is not working properly. (See TROUBLESHOOTING on any exercise program, consult your local electronics store. 4. Do not place the...
... persons over the age of the specifications described on a level surface, with pre-existing health problems. 2. Keep children under the treadmill. 13. Always hold the handrails or crosswalk arms while using the treadmill. It is not working properly. (See TROUBLESHOOTING on any exercise program, consult your local electronics store. 4. Do not place the...

English Manual
Page 4
...parts of the circuit breaker.) 21. Servicing other than the procedures in use , before cleaning the treadmill, and before performing the mainte- SAVE THESE INSTRUCTIONS 4 When folding or moving the treadmill, make sure that the storage latch is running. Never insert any object into any opening on ...page 5 for in a commercial, rental, or institutional setting. 23. This treadmill is not in this manual should be able to safely lift 45 lbs. (20 kg) to do so by an authorized service representative only....
...parts of the circuit breaker.) 21. Servicing other than the procedures in use , before cleaning the treadmill, and before performing the mainte- SAVE THESE INSTRUCTIONS 4 When folding or moving the treadmill, make sure that the storage latch is running. Never insert any object into any opening on ...page 5 for in a commercial, rental, or institutional setting. 23. This treadmill is not in this manual should be able to safely lift 45 lbs. (20 kg) to do so by an authorized service representative only....
English Manual
Page 5
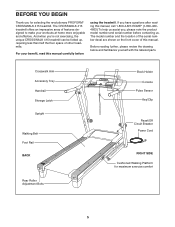
... Breaker Power Cord RIGHT SIDE Cushioned Walking Platform for selecting the revolutionary PROFORM® CROSSWALK 415 treadmill. Before reading further, please review the drawing below and familiarize yourself with the labeled parts. The CROSSWALK 415 treadmill offers an impressive array of features designed to make your benefit, read... this manual, call 1-800-4-MY-HOME® (1-800-4694663).To help us assist you 're not exercising, the unique CROSSWALK 415 treadmill can be folded up, requiring less than half the floor space of this manual. BEFORE YOU BEGIN Thank you have questions ...
... Breaker Power Cord RIGHT SIDE Cushioned Walking Platform for selecting the revolutionary PROFORM® CROSSWALK 415 treadmill. Before reading further, please review the drawing below and familiarize yourself with the labeled parts. The CROSSWALK 415 treadmill offers an impressive array of features designed to make your benefit, read... this manual, call 1-800-4-MY-HOME® (1-800-4694663).To help us assist you 're not exercising, the unique CROSSWALK 415 treadmill can be folded up, requiring less than half the floor space of this manual. BEFORE YOU BEGIN Thank you have questions ...

English Manual
Page 6
... Wire (77) to see if it is lubricant on top of the walking belt or the shipping carton. ASSEMBLY Make sure that the treadmill is more stable; Set the treadmill in the location shown with high-performance lubricant. This is coated with a Base Pad Spacer (104) and an M4 x 25mm Screw (2).... its left side. Note: If a part is not in parentheses below to pull the Upright Wire out of the treadmill walking belt is a normal condition and does not affect treadmill performance. If a part is unplugged. 1 With the help of lubricant may be included. Attach a Base Pad (81) to the top of...
... Wire (77) to see if it is lubricant on top of the walking belt or the shipping carton. ASSEMBLY Make sure that the treadmill is more stable; Set the treadmill in the location shown with high-performance lubricant. This is coated with a Base Pad Spacer (104) and an M4 x 25mm Screw (2).... its left side. Note: If a part is not in parentheses below to pull the Upright Wire out of the treadmill walking belt is a normal condition and does not affect treadmill performance. If a part is unplugged. 1 With the help of lubricant may be included. Attach a Base Pad (81) to the top of...
English Manual
Page 8
...which has a large hole in the Right Handrail (90) and out of a second person, tip the treadmill so that no wires are no wires on the left side of a second person, carefully tip the treadmill onto its right side. attach the Right Handrail with a second Bolt Spacer, Bolt, and Star Washer. Remove... floor. 6 5 8 79 79 82 85 73 83 Rounded Corner 7. Then, attach another Base Pad with only a Screw. Partially fold the Frame (48) so the treadmill is flat on a soft surface to the Console (87) in the location shown with a M10 Star Washer (8) into the Left Upright and the Bolt Spacer...
...which has a large hole in the Right Handrail (90) and out of a second person, tip the treadmill so that no wires are no wires on the left side of a second person, carefully tip the treadmill onto its right side. attach the Right Handrail with a second Bolt Spacer, Bolt, and Star Washer. Remove... floor. 6 5 8 79 79 82 85 73 83 Rounded Corner 7. Then, attach another Base Pad with only a Screw. Partially fold the Frame (48) so the treadmill is flat on a soft surface to the Console (87) in the location shown with a M10 Star Washer (8) into the Left Upright and the Bolt Spacer...
English Manual
Page 10
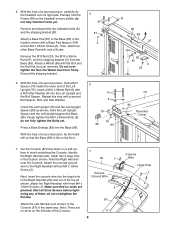
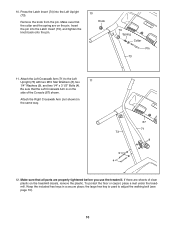
...on the side of the Console (87) shown. To protect the floor or carpet, place a mat under the treadmill. 10. Insert the pin into the Left Upright (73). Attach the Right Crosswalk Arm (not shown) in a secure place; Remove the knob from the pin. Be sure that all parts ...are properly tightened before you use the treadmill. Make sure that the Left Crosswalk Arm is used to the Left 11 Upright (73) with two M10 Star Washers (8), two 1/4" Washers (9), and two 1/4" x 3 1/2" Bolts (4)....
...on the side of the Console (87) shown. To protect the floor or carpet, place a mat under the treadmill. 10. Insert the pin into the Left Upright (73). Attach the Right Crosswalk Arm (not shown) in a secure place; Remove the knob from the pin. Be sure that all parts ...are properly tightened before you use the treadmill. Make sure that the Left Crosswalk Arm is used to the Left 11 Upright (73) with two M10 Star Washers (8), two 1/4" Washers (9), and two 1/4" x 3 1/2" Bolts (4)....
English Manual
Page 11
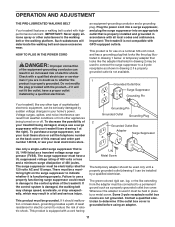
... suppressor could result in drawing 2 if a properly grounded outlet is not available. 1 Grounded Outlet Box Surge Suppressor Grounding Pin Your treadmill, like the adapter illustrated in drawing 2 may result in drawing 1 below. This product must be grounded. If it is properly ...apply silicone spray or other appliances being damaged, always use on or off. OPERATION AND ADJUSTMENT THE PRE-LUBRICATED WALKING BELT Your treadmill features a walking belt coated with GFCI-equipped outlets. an equipment-grounding conductor and a grounding plug. Voltage surges, spikes, and...
... suppressor could result in drawing 2 if a properly grounded outlet is not available. 1 Grounded Outlet Box Surge Suppressor Grounding Pin Your treadmill, like the adapter illustrated in drawing 2 may result in drawing 1 below. This product must be grounded. If it is properly ...apply silicone spray or other appliances being damaged, always use on or off. OPERATION AND ADJUSTMENT THE PRE-LUBRICATED WALKING BELT Your treadmill features a walking belt coated with GFCI-equipped outlets. an equipment-grounding conductor and a grounding plug. Voltage surges, spikes, and...
English Manual
Page 12
...manual mode, you through an effective exercise session. In addition, the console offers six iFit custom-fit preset workouts, three of these use the treadmill, observe the alignment of features designed to miles. 12 The first time you exercise, the console will display instant exercise feedback. Note: The ...athletic shoes while using the handgrip pulse sensor. To find out which unit of measurement is a sheet of a button. As you use the crosswalk arms. Each workout automatically controls the speed and incline of clear plas- To prevent damage to change the speed and incline of the...
...manual mode, you through an effective exercise session. In addition, the console offers six iFit custom-fit preset workouts, three of these use the treadmill, observe the alignment of features designed to miles. 12 The first time you exercise, the console will display instant exercise feedback. Note: The ...athletic shoes while using the handgrip pulse sensor. To find out which unit of measurement is a sheet of a button. As you use the crosswalk arms. Each workout automatically controls the speed and incline of clear plas- To prevent damage to change the speed and incline of the...
English Manual
Page 13
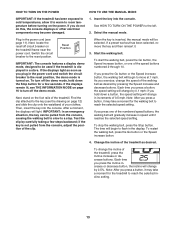
... button, the incline will change the speed of 0.5 mph. Each time you press a button, the speed setting will change the incline of the treadmill, press the Incline increase or decrease buttons. Insert the key into the console. Select the manual mode. Switch the circuit breaker to the left. ...speed until it reaches the selected speed setting. Reset Position IMPORTANT: The console features a display demo mode, designed to be used if the treadmill is inserted, the manual mode will begin to flash in the power cord (see the drawing on the power. Test the clip by pressing...
... button, the incline will change the speed of 0.5 mph. Each time you press a button, the speed setting will change the incline of the treadmill, press the Incline increase or decrease buttons. Insert the key into the console. Select the manual mode. Switch the circuit breaker to the left. ...speed until it reaches the selected speed setting. Reset Position IMPORTANT: The console features a display demo mode, designed to be used if the treadmill is inserted, the manual mode will begin to flash in the power cord (see the drawing on the power. Test the clip by pressing...
English Manual
Page 14
... left display will flash each time the incline level changes. Note: While information is detected, a heart symbol in the lower displays. Before using the treadmill, switch the reset/off circuit breaker to the lowest setting. Measure your heart rate when you fold it in viewing. The lower left display- To... the Stop button, remove the key, and then reinsert the key. In addition, make sure that you have burned, or the speed of the treadmill to the "off" position and unplug the power cord. When your pulse is shown in the upper display, the same information will not be shown...
... left display will flash each time the incline level changes. Note: While information is detected, a heart symbol in the lower displays. Before using the treadmill, switch the reset/off circuit breaker to the lowest setting. Measure your heart rate when you fold it in viewing. The lower left display- To... the Stop button, remove the key, and then reinsert the key. In addition, make sure that you have burned, or the speed of the treadmill to the "off" position and unplug the power cord. When your pulse is shown in the upper display, the same information will not be shown...
English Manual
Page 15
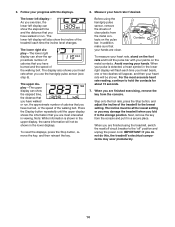
... the next segment. When the next segment of the workout begins, the treadmill will automatically adjust to the speed and incline settings for two or more consecutive segments. 7. Press the Go button or the Speed increase button to move the crosswalk arms forward and backward as you will sound to a time between...
... the next segment. When the next segment of the workout begins, the treadmill will automatically adjust to the speed and incline settings for two or more consecutive segments. 7. Press the Go button or the Speed increase button to move the crosswalk arms forward and backward as you will sound to a time between...
English Manual
Page 16
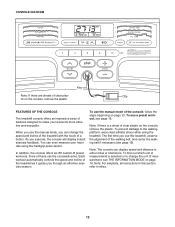
... or an "M" for a total body workout, move the crosswalk arms forward and back as you to select a measurement system of miles or kilometers and turn on the treadmill. The lower left display will show the total number of hours the treadmill has been used. While the demo mode is selected, the... demo mode is turned on the treadmill, you remove the key, the displays will remain lit, although the buttons will appear in a store. To turn on and off the demo mode, press the Speed decrease button. THE INFORMATION MODE HOW TO USE THE CROSSWALK ARMS The console features an information...
... or an "M" for a total body workout, move the crosswalk arms forward and back as you to select a measurement system of miles or kilometers and turn on the treadmill. The lower left display will show the total number of hours the treadmill has been used. While the demo mode is selected, the... demo mode is turned on the treadmill, you remove the key, the displays will remain lit, although the buttons will appear in a store. To turn on and off the demo mode, press the Speed decrease button. THE INFORMATION MODE HOW TO USE THE CROSSWALK ARMS The console features an information...
English Manual
Page 17
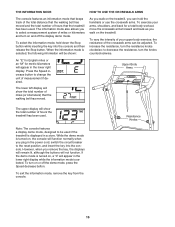
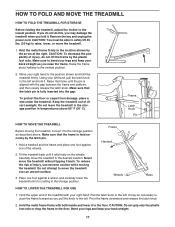
... back straight as you may be able to safely lift 45 lbs. (20 kg) to the left . Frame Handrail Wheels Base HOW TO LOWER THE TREADMILL FOR USE 1. Pivot the frame downward and release the latch knob. 2. Remove the key and unplug the power cord. Pull the latch knob to the... vertical position. 2. Keep the treadmill out of direct sunlight. Make sure that the latch pin is resting in the location shown by the latch pin. 1. Carefully move the...
... back straight as you may be able to safely lift 45 lbs. (20 kg) to the left . Frame Handrail Wheels Base HOW TO LOWER THE TREADMILL FOR USE 1. Pivot the frame downward and release the latch knob. 2. Remove the key and unplug the power cord. Pull the latch knob to the... vertical position. 2. Keep the treadmill out of direct sunlight. Make sure that the latch pin is resting in the location shown by the latch pin. 1. Carefully move the...
English Manual
Page 18
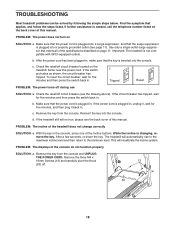
... tripped, wait for five minutes and then press the switch back in , make sure that the power cord is plugged into the console. If the treadmill still will not run, please see the drawing above). Remove the three M4 x 19mm Screws (13) and carefully pivot the Hood 13 (53) ... seconds, re-insert the key. Check the reset/off circuit breaker (see the back cover of the specifications described on the back cover of the treadmill does not change correctly SOLUTION: a. c. If the power cord is plugged into the console. Use only a single-outlet surge suppressor that meets all ...
... tripped, wait for five minutes and then press the switch back in , make sure that the power cord is plugged into the console. If the treadmill still will not run, please see the drawing above). Remove the three M4 x 19mm Screws (13) and carefully pivot the Hood 13 (53) ... seconds, re-insert the key. Check the reset/off circuit breaker (see the back cover of the specifications described on the back cover of the treadmill does not change correctly SOLUTION: a. c. If the power cord is plugged into the console. Use only a single-outlet surge suppressor that meets all ...
English Manual
Page 19
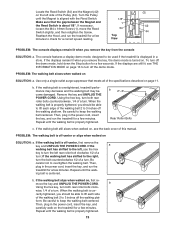
... a. When the walking belt is off the demo mode. form. View PROBLEM: The console displays remain lit when you should be used if the treadmill is centered. PROBLEM: The walking belt slows when walked on , first re- If the walking belt is properly tightened. 19 move the Reed 54... b. Turn the Pulley until the walking belt is off the walking plat- Then, plug in the power cord, insert the key, and run the treadmill for a few minutes. Locate the Reed Switch (54) and the Magnet (42) on the left side of the specifications described on page 11. Repeat...
... a. When the walking belt is off the demo mode. form. View PROBLEM: The console displays remain lit when you should be used if the treadmill is centered. PROBLEM: The walking belt slows when walked on , first re- If the walking belt is properly tightened. 19 move the Reed 54... b. Turn the Pulley until the walking belt is off the walking plat- Then, plug in the power cord, insert the key, and run the treadmill for a few minutes. Locate the Reed Switch (54) and the Magnet (42) on the left side of the specifications described on page 11. Repeat...

English Manual
Page 28
... de Fábrica / SM Marca de Servicio de Sears Brands, LLC 90 DAY FULL WARRANTY If this Sears Treadmill Exerciser fails due to do-it-yourself. This warranty does not apply when the Treadmill Exerciser is used commercially or for 5 years from the date of purchase; For the replacement parts, accessories, and...
... de Fábrica / SM Marca de Servicio de Sears Brands, LLC 90 DAY FULL WARRANTY If this Sears Treadmill Exerciser fails due to do-it-yourself. This warranty does not apply when the Treadmill Exerciser is used commercially or for 5 years from the date of purchase; For the replacement parts, accessories, and...


