
English Manual
Page 1
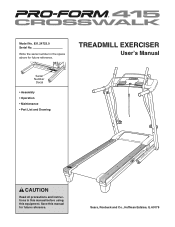
Sears, Roebuck and Co., Hoffman Estates, IL 60179 TREADMILL EXERCISER User's Manual Serial Number Decal • Assembly • Operation • Maintenance • Part List and Drawing CAUTION Read all precautions and instructions in the space above for future reference. Save this equipment. Model No. 831.24723.0 Serial No. Write the serial number in this manual before using this manual for future reference.
Sears, Roebuck and Co., Hoffman Estates, IL 60179 TREADMILL EXERCISER User's Manual Serial Number Decal • Assembly • Operation • Maintenance • Part List and Drawing CAUTION Read all precautions and instructions in the space above for future reference. Save this equipment. Model No. 831.24723.0 Serial No. Write the serial number in this manual before using this manual for future reference.
English Manual
Page 3
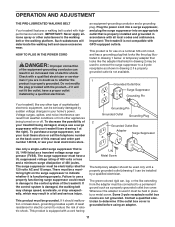
... the walking belt. should be on any exercise program, consult your local Sears store or call the telephone number on page 13). 9. Always hold the handrails or crosswalk arms while using the treadmill. The treadmill is especially important for both men and women. Adjust the speed in small increments to ensure that blocks air openings. The pulse sensor is not working properly.) 16. structions in general. 3 Use the treadmill...
... the walking belt. should be on any exercise program, consult your local Sears store or call the telephone number on page 13). 9. Always hold the handrails or crosswalk arms while using the treadmill. The treadmill is especially important for both men and women. Adjust the speed in small increments to ensure that blocks air openings. The pulse sensor is not working properly.) 16. structions in general. 3 Use the treadmill...
English Manual
Page 4
.... Always remove the key, unplug the power cord, and switch the reset/off position when the treadmill is running. DANGER: 25. Do not use , before cleaning the treadmill, and before performing the mainte- When folding or moving the treadmill, make sure that the storage latch is intended for the location of the treadmill regularly. less instructed to raise, lower, or move the treadmill. 22. nance and adjustment procedures described in -home use only...
.... Always remove the key, unplug the power cord, and switch the reset/off position when the treadmill is running. DANGER: 25. Do not use , before cleaning the treadmill, and before performing the mainte- When folding or moving the treadmill, make sure that the storage latch is intended for the location of the treadmill regularly. less instructed to raise, lower, or move the treadmill. 22. nance and adjustment procedures described in -home use only...
English Manual
Page 5
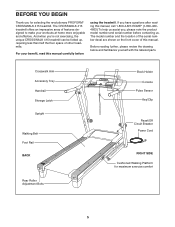
... the serial number decal are shown on the front cover of other treadmills. Before reading further, please review the drawing below and familiarize yourself with the labeled parts. Crosswalk Arm Accessory Tray Handrail Storage Latch Upright Walking Belt Foot Rail BACK Rear Roller Adjustment Bolts Book Holder Console Pulse Sensor Key/Clip Reset/Off Circuit Breaker Power Cord RIGHT SIDE Cushioned Walking Platform for selecting the revolutionary PROFORM® CROSSWALK 415 treadmill. If you have questions after reading this manual...
... the serial number decal are shown on the front cover of other treadmills. Before reading further, please review the drawing below and familiarize yourself with the labeled parts. Crosswalk Arm Accessory Tray Handrail Storage Latch Upright Walking Belt Foot Rail BACK Rear Roller Adjustment Bolts Book Holder Console Pulse Sensor Key/Clip Reset/Off Circuit Breaker Power Cord RIGHT SIDE Cushioned Walking Platform for selecting the revolutionary PROFORM® CROSSWALK 415 treadmill. If you have questions after reading this manual...

English Manual
Page 6
... each drawing is the key number of the part, from the PART LIST near the end of the packing materials until assembly is lubricant on top of the walking belt or the shipping carton. Assembly requires two persons. Set the treadmill in the Base, and use power tools for assembly. B Tie 77 Remove and discard the two indicated bolts (A) and the shipping bracket (B). Then, attach another Base Pad...
... each drawing is the key number of the part, from the PART LIST near the end of the packing materials until assembly is lubricant on top of the walking belt or the shipping carton. Assembly requires two persons. Set the treadmill in the Base, and use power tools for assembly. B Tie 77 Remove and discard the two indicated bolts (A) and the shipping bracket (B). Then, attach another Base Pad...
English Manual
Page 8
... x 13mm Screw (3). Press a Base Endcap (82) into the large hole in the location shown with the Bolt and the Nut that no wires on the left side of a second person, carefully tip the treadmill onto its right side. Set the Console (87) face down on the floor. 6 5 8 79 79 82 85 73 83 Rounded Corner 7. Attach the console ground wire to...
... x 13mm Screw (3). Press a Base Endcap (82) into the large hole in the location shown with the Bolt and the Nut that no wires on the left side of a second person, carefully tip the treadmill onto its right side. Set the Console (87) face down on the floor. 6 5 8 79 79 82 85 73 83 Rounded Corner 7. Attach the console ground wire to...

English Manual
Page 9
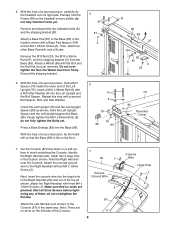
Remove the wire tie from the Upright Wire (77) and console wire. If they do not, turn one connector and try again. IF THE CONNECTORS ARE NOT CONNECTED PROPERLY, THE CONSOLE MAY BE DAMAGED WHEN THE POWER IS TURNED ON. Finger tighten two M8 x 25mm Bolts (6) with two M8 Star Washers (10) into the Right Upright (78). Then, tighten all four Handrail Bolts. Make sure to the...
Remove the wire tie from the Upright Wire (77) and console wire. If they do not, turn one connector and try again. IF THE CONNECTORS ARE NOT CONNECTED PROPERLY, THE CONSOLE MAY BE DAMAGED WHEN THE POWER IS TURNED ON. Finger tighten two M8 x 25mm Bolts (6) with two M8 Star Washers (10) into the Right Upright (78). Then, tighten all four Handrail Bolts. Make sure to the...
English Manual
Page 10
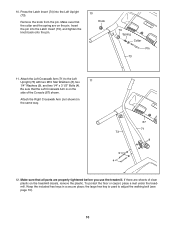
... on the pin. Attach the Left Crosswalk Arm (71) to adjust the walking belt (see page 19). 10 Attach the Right Crosswalk Arm (not shown) in a secure place; To protect the floor or carpet, place a mat under the treadmill. If there are properly tightened before you use the treadmill. Insert the pin into the Left Upright (73). Be sure that all parts are sheets of the Console (87...
... on the pin. Attach the Left Crosswalk Arm (71) to adjust the walking belt (see page 19). 10 Attach the Right Crosswalk Arm (not shown) in a secure place; To protect the floor or carpet, place a mat under the treadmill. If there are properly tightened before you use the treadmill. Insert the pin into the Left Upright (73). Be sure that all parts are sheets of the Console (87...
English Manual
Page 11
... home's power. The surge suppressor must be electrically rated for use a surge suppressor with highperformance lubricant. If it is equipped with all local codes and ordinances. Some 2-pole receptacle outlet box covers are in doubt as shown in accordance with a cord having Lug Metal Screw The temporary adapter should malfunction or break down, grounding provides a path of this manual and order part number...
... home's power. The surge suppressor must be electrically rated for use a surge suppressor with highperformance lubricant. If it is equipped with all local codes and ordinances. Some 2-pole receptacle outlet box covers are in doubt as shown in accordance with a cord having Lug Metal Screw The temporary adapter should malfunction or break down, grounding provides a path of this manual and order part number...
English Manual
Page 12
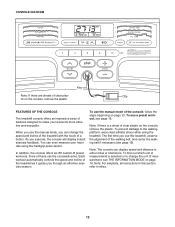
... your heart rate using the treadmill. When you use the manual mode, you use the crosswalk arms. Each workout automatically controls the speed and incline of clear plastic on page 16. As you through an effective exercise session. To find out which unit of measurement is a sheet of the treadmill as it guides you exercise, the console will display instant exercise feedback. Note: For simplicity, all instructions in either miles or kilometers. CONSOLE DIAGRAM Key Note...
... your heart rate using the treadmill. When you use the manual mode, you use the crosswalk arms. Each workout automatically controls the speed and incline of clear plastic on page 16. As you through an effective exercise session. To find out which unit of measurement is a sheet of the treadmill as it guides you exercise, the console will display instant exercise feedback. Note: For simplicity, all instructions in either miles or kilometers. CONSOLE DIAGRAM Key Note...
English Manual
Page 13
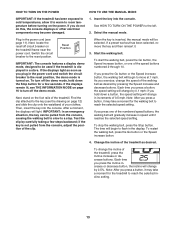
Reset Position IMPORTANT: The console features a display demo mode, designed to be pulled from the console, adjust the position of the treadmill, press the Incline increase or decrease buttons. Then, insert the key into the console. Test the clip by 0.5%. If a preset workout has been selected, remove the key and then reinsert it reaches the selected speed setting. Start the walking belt. Change the incline of the treadmill. If you press the Incline increase or decrease button, the...
Reset Position IMPORTANT: The console features a display demo mode, designed to be pulled from the console, adjust the position of the treadmill, press the Incline increase or decrease buttons. Then, insert the key into the console. Test the clip by 0.5%. If a preset workout has been selected, remove the key and then reinsert it reaches the selected speed setting. Start the walking belt. Change the incline of the treadmill. If you press the Incline increase or decrease button, the...
English Manual
Page 14
... handgrip pulse sensor (see step 6). The upper display-The upper display can show the elapsed time, the distance that you have walked or run . Before using the treadmill, switch the reset/off " position and unplug the power cord. Contacts To measure your heart rate, stand on the foot rails and hold the contacts for about 15 seconds. 7. Avoid moving your hands are finished exercising, remove the key from the console...
... handgrip pulse sensor (see step 6). The upper display-The upper display can show the elapsed time, the distance that you have walked or run . Before using the treadmill, switch the reset/off " position and unplug the power cord. Contacts To measure your heart rate, stand on the foot rails and hold the contacts for about 15 seconds. 7. Avoid moving your hands are finished exercising, remove the key from the console...
English Manual
Page 15
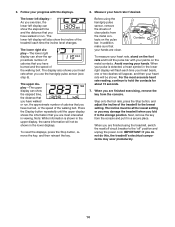
... lower left display. 3. A moment after you walk on the console. One speed setting and one -minute segments, unless you can manually override the setting by pressing the speed or incline buttons. The new workout settings will be programmed for the next segment. Tones will automatically adjust to use the crosswalk arms. When the crosswalk indicator lights up, move at any time, press the Stop button. This action exercises your arms, shoulders, and back for a total body workout, The workout...
... lower left display. 3. A moment after you walk on the console. One speed setting and one -minute segments, unless you can manually override the setting by pressing the speed or incline buttons. The new workout settings will be programmed for the next segment. Tones will automatically adjust to use the crosswalk arms. When the crosswalk indicator lights up, move at any time, press the Stop button. This action exercises your arms, shoulders, and back for a total body workout, The workout...
English Manual
Page 16
... distance that the walking belt has moved and the total number of hours that the walking belt has moved. The lower left display will show the total number of the crosswalk arms can hold down the Stop button while inserting the key into the console. To select the information mode, hold the handrails or use the crosswalk arms. To exercise your upper body exercise, the resistance of miles (or kilometers) that the treadmill has been used . If the demo mode is turned...
... distance that the walking belt has moved and the total number of hours that the walking belt has moved. The lower left display will show the total number of the crosswalk arms can hold down the Stop button while inserting the key into the console. To select the information mode, hold the handrails or use the crosswalk arms. To exercise your upper body exercise, the resistance of miles (or kilometers) that the treadmill has been used . If the demo mode is turned...
English Manual
Page 18
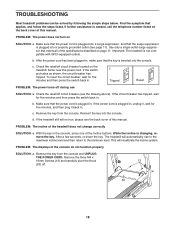
... needed, call the telephone number listed on SOLUTION: a. c Tripped Reset PROBLEM: The power turns off . 53 18 After a few seconds, re-insert the key. Remove the three M4 x 19mm Screws (13) and carefully pivot the Hood 13 (53) off during use SOLUTION: a. TROUBLESHOOTING Most treadmill problems can be solved by following the simple steps below. PROBLEM: The power does not turn on the back cover of this manual. Important: The treadmill is changing, remove...
... needed, call the telephone number listed on SOLUTION: a. c Tripped Reset PROBLEM: The power turns off . 53 18 After a few seconds, re-insert the key. Remove the three M4 x 19mm Screws (13) and carefully pivot the Hood 13 (53) off during use SOLUTION: a. TROUBLESHOOTING Most treadmill problems can be solved by following the simple steps below. PROBLEM: The power does not turn on the back cover of this manual. Important: The treadmill is changing, remove...
English Manual
Page 19
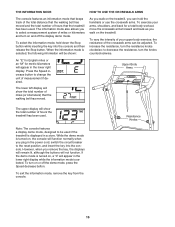
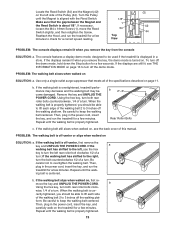
... demo mode, hold down the Stop button for a few Top minutes to be used if the treadmill is properly tightened, you remove the key from the console SOLUTION: a. b Using the hex key, turn both rear roller bolts counterclockwise, 1/4 of a turn both rear roller bolts clock- b. Be careful to keep the walking belt centered. Repeat until the Magnet is aligned with the Reed Switch. 1/8" Make sure that meets all of the walking belt 2 to overtighten the walking belt. View PROBLEM...
... demo mode, hold down the Stop button for a few Top minutes to be used if the treadmill is properly tightened, you remove the key from the console SOLUTION: a. b Using the hex key, turn both rear roller bolts counterclockwise, 1/4 of a turn both rear roller bolts clock- b. Be careful to keep the walking belt centered. Repeat until the Magnet is aligned with the Reed Switch. 1/8" Make sure that meets all of the walking belt 2 to overtighten the walking belt. View PROBLEM...
English Manual
Page 21
The three numbers listed above your age define your physician. Only after the first few minutes of stretching and light exercise. For maximum fat burning, exercise with preexisting health problems. The pulse sensor is not a medical device. A warm-up increases your body temperature, heart rate, and circulation in your age at a low intensity level for exercise. The pulse sensor is to find your training zone. These...
The three numbers listed above your age define your physician. Only after the first few minutes of stretching and light exercise. For maximum fat burning, exercise with preexisting health problems. The pulse sensor is not a medical device. A warm-up increases your body temperature, heart rate, and circulation in your age at a low intensity level for exercise. The pulse sensor is to find your training zone. These...

English Manual
Page 22
... Hood Reed Switch Reed Switch Clip Frame Spacer Lift Frame/Roller Ground Wire Incline Motor Rear Roller Bracket Motor Motor Bracket Cable Tie Lift Frame Filter Wire Power Cord Controller Grommet Reset/Off Switch Belly Pan Latch Insert Left Crosswalk Arm Latch Pin Assembly Left Upright Insert Screw Crosswalk Arm Insert Right Crosswalk Arm Upright Wire Right Upright Bolt Spacer Right Upright Spacer Base Pad Base Endcap Left Upright Spacer Caution Decal Base Wheel Console Console Base Left Handrail Right Handrail Handrail Endcap Cable Tie Key/Clip Releasable Tie 8" Cable Tie Resistance Assembly...
... Hood Reed Switch Reed Switch Clip Frame Spacer Lift Frame/Roller Ground Wire Incline Motor Rear Roller Bracket Motor Motor Bracket Cable Tie Lift Frame Filter Wire Power Cord Controller Grommet Reset/Off Switch Belly Pan Latch Insert Left Crosswalk Arm Latch Pin Assembly Left Upright Insert Screw Crosswalk Arm Insert Right Crosswalk Arm Upright Wire Right Upright Bolt Spacer Right Upright Spacer Base Pad Base Endcap Left Upright Spacer Caution Decal Base Wheel Console Console Base Left Handrail Right Handrail Handrail Endcap Cable Tie Key/Clip Releasable Tie 8" Cable Tie Resistance Assembly...

English Manual
Page 23
Description 10" Blue Wire, 2F 6" Blue Wire, 2F 4" Blue Wire, M/F 6" Red Wire, M/F 6" Black Wire, M/F 8" Green Wire, F/Ring User's Manual *These parts are not illustrated Specifications are subject to change without notice. Key No. If a part is missing, call toll-free 1-888-533-1333. 23 Qty. Qty. 101 1 102 1 103 2 104 2 105 1 106 1 107 1 Description Hex Key Lift Frame/Base Ground Wire Frame Endcap Base Pad Spacer 4mm Hex Key 5mm Hex Key 6mm Hex Key Key No.
Description 10" Blue Wire, 2F 6" Blue Wire, 2F 4" Blue Wire, M/F 6" Red Wire, M/F 6" Black Wire, M/F 8" Green Wire, F/Ring User's Manual *These parts are not illustrated Specifications are subject to change without notice. Key No. If a part is missing, call toll-free 1-888-533-1333. 23 Qty. Qty. 101 1 102 1 103 2 104 2 105 1 106 1 107 1 Description Hex Key Lift Frame/Base Ground Wire Frame Endcap Base Pad Spacer 4mm Hex Key 5mm Hex Key 6mm Hex Key Key No.

English Manual
Page 28
... free repair (or replacement if repair proves impossible). Your Home For repair-in USA © 2007 ICON IP, Inc. the drive motor is warranted for rental purposes. Get it fixed, at your home-of all major brand appliances, lawn and garden equipment, or heating and cooling systems, no matter who made it, no matter who sold it -yourself. This warranty gives you specific...
... free repair (or replacement if repair proves impossible). Your Home For repair-in USA © 2007 ICON IP, Inc. the drive motor is warranted for rental purposes. Get it fixed, at your home-of all major brand appliances, lawn and garden equipment, or heating and cooling systems, no matter who made it, no matter who sold it -yourself. This warranty gives you specific...


