

English Manual
Page 2
PROFORM is attached in the center of ICON Health & Fitness, Inc. 2 TABLE OF CONTENTS IMPORTANT PRECAUTIONS 3 BEFORE YOU BEGIN 5 ASSEMBLY 6 OPERATION AND ADJUSTMENT 8 HOW TO FOLD AND MOVE THE TREADMILL 21 TROUBLESHOOTING 23 CONDITIONING GUIDELINES 25 PART LIST 27 ORDERING REPLACEMENT PARTS Back Cover LIMITED WARRANTY Back Cover Note: An EXPLODED DRAWING is a registered trademark of this manual.
PROFORM is attached in the center of ICON Health & Fitness, Inc. 2 TABLE OF CONTENTS IMPORTANT PRECAUTIONS 3 BEFORE YOU BEGIN 5 ASSEMBLY 6 OPERATION AND ADJUSTMENT 8 HOW TO FOLD AND MOVE THE TREADMILL 21 TROUBLESHOOTING 23 CONDITIONING GUIDELINES 25 PART LIST 27 ORDERING REPLACEMENT PARTS Back Cover LIMITED WARRANTY Back Cover Note: An EXPLODED DRAWING is a registered trademark of this manual.

English Manual
Page 3
... shock, or injury to the off position when the treadmill is not in speed. 7. It is the responsibility of the owner to maintain your local PROFORM dealer or call 1-800-8063651 and order part number 146148. 17. Use the treadmill only as an exercise aid in determining heart rate trends... in this treadmill are standing on page 5 if the treadmill is not working properly.) 15. Do not ...
... shock, or injury to the off position when the treadmill is not in speed. 7. It is the responsibility of the owner to maintain your local PROFORM dealer or call 1-800-8063651 and order part number 146148. 17. Use the treadmill only as an exercise aid in determining heart rate trends... in this treadmill are standing on page 5 if the treadmill is not working properly.) 15. Do not ...

English Manual
Page 4
...other than the procedures in any time by or through the use only. Never insert or drop any object into any exercise program, consult your treadmill. SAVE THESE INSTRUCTIONS The decals shown below have been placed on the back cover of the CD or video program. 25. DANGER: 28. ...When folding or moving the treadmill, make sure that the storage latch is especially important for personal injury or property damage sustained by pressing the speed and incline buttons. tenance ...
...other than the procedures in any time by or through the use only. Never insert or drop any object into any exercise program, consult your treadmill. SAVE THESE INSTRUCTIONS The decals shown below have been placed on the back cover of the CD or video program. 25. DANGER: 28. ...When folding or moving the treadmill, make sure that the storage latch is especially important for personal injury or property damage sustained by pressing the speed and incline buttons. tenance ...

English Manual
Page 5
... space of this manual carefully before calling. The model number of your benefit, read this manual for selecting the revolutionary PROFORM® C950 treadmill. The serial number can be found on a decal attached to help us assist you, please note the product model ...Cushion Deck 5 Before reading further, please familiarize yourself with innovative design to the treadmill (see the front cover of other treadmills. Mountain Time (excluding holidays). For your home. The C950 treadmill combines advanced technology with the parts that are labeled in the convenience of the...
... space of this manual carefully before calling. The model number of your benefit, read this manual for selecting the revolutionary PROFORM® C950 treadmill. The serial number can be found on a decal attached to help us assist you, please note the product model ...Cushion Deck 5 Before reading further, please familiarize yourself with innovative design to the treadmill (see the front cover of other treadmills. Mountain Time (excluding holidays). For your home. The C950 treadmill combines advanced technology with the parts that are labeled in the convenience of the...

English Manual
Page 6
... a rubber mallet to the Left Foam Grip (65) with a soft cloth and a mild, non-abrasive cleaner. 1. make sure that the edge of the treadmill walking belt is under the Console Base (81) as described in the post. Make sure that the indicated holes are on the right Upright (69...) as shown. Note: Tighten the Latch Screw indicated first. 3 65 71 11 70 First 70 6 ASSEMBLY Assembly requires two people. Set the treadmill in the left side for the Pulse Bar (76). Assembly requires your own phillips screw- Note: The underside of the Right Foam Grip (75) is...
... a rubber mallet to the Left Foam Grip (65) with a soft cloth and a mild, non-abrasive cleaner. 1. make sure that the edge of the treadmill walking belt is under the Console Base (81) as described in the post. Make sure that the indicated holes are on the right Upright (69...) as shown. Note: Tighten the Latch Screw indicated first. 3 65 71 11 70 First 70 6 ASSEMBLY Assembly requires two people. Set the treadmill in the left side for the Pulse Bar (76). Assembly requires your own phillips screw- Note: The underside of the Right Foam Grip (75) is...

English Manual
Page 7
.... 4 Orient the Book Rack (68) so that the straight edge of the Book Rack Tape (54). Remove the paper from damage, place a mat under the treadmill. 7 Press on the Book Rack. 68 54 82 Decal Edge 54 81 5. The allen wrench is pressed against the plastic around the Console (82). To... to adjust the walking belt (see page 24). 4. Make sure that the decal is faceup as shown. Wait for 24 hours before you use the treadmill. Keep the included allen wrench in a secure place. Clean the back of the Console Base (81).
.... 4 Orient the Book Rack (68) so that the straight edge of the Book Rack Tape (54). Remove the paper from damage, place a mat under the treadmill. 7 Press on the Book Rack. 68 54 82 Decal Edge 54 81 5. The allen wrench is pressed against the plastic around the Console (82). To... to adjust the walking belt (see page 24). 4. Make sure that the decal is faceup as shown. Wait for 24 hours before you use the treadmill. Keep the included allen wrench in a secure place. Clean the back of the Console Base (81).

English Manual
Page 8
...Never apply silicone spray or other appliances being damaged, always use a properly functioning surge suppressor could result in your local PROFORM dealer or call 1-800-806-3651 and order part number 146148. Voltage surges, spikes, and noise interference can be ...path of least resistance for electric current to the walking belt or the walking platform. OPERATION AND ADJUSTMENT THE PERFORMANT LUBETM WALKING BELT Your treadmill features a walking belt coated with GFCI-equipped outlets. an equipment-grounding conductor and a grounding plug. There must be seriously damaged by...
...Never apply silicone spray or other appliances being damaged, always use a properly functioning surge suppressor could result in your local PROFORM dealer or call 1-800-806-3651 and order part number 146148. Voltage surges, spikes, and noise interference can be ...path of least resistance for electric current to the walking belt or the walking platform. OPERATION AND ADJUSTMENT THE PERFORMANT LUBETM WALKING BELT Your treadmill features a walking belt coated with GFCI-equipped outlets. an equipment-grounding conductor and a grounding plug. There must be seriously damaged by...

English Manual
Page 9
...right in the water bottle holder. Video programs offer the same benefits as a personal trainer guides you through every step of the treadmill can connect the treadmill to your workout. Avoid spilling liquids on the power. • Always wear the clip (see page 13. Other iFIT.com CD... www.iFIT.com and access programs directly from the internet. Each CD features two programs designed by certified personal trainers. With the treadmill connected to your home. Each program automatically controls the speed and incline of plastic Clip on page 10. High-energy music provides ...
...right in the water bottle holder. Video programs offer the same benefits as a personal trainer guides you through every step of the treadmill can connect the treadmill to your workout. Avoid spilling liquids on the power. • Always wear the clip (see page 13. Other iFIT.com CD... www.iFIT.com and access programs directly from the internet. Each CD features two programs designed by certified personal trainers. With the treadmill connected to your home. Each program automatically controls the speed and incline of plastic Clip on page 10. High-energy music provides ...

English Manual
Page 10
...To change by 0.5%. Each time a button is not pulled from one number to the key (see the drawing on the foot rails of the treadmill as desired by carefully taking a few steps backward until you have completed 1/4 mile. Note: After the buttons are pressed, the display will light... shown. As you exercise, the indicators around the track will begin walking. Distance/Incline/ Laps display-This display shows the distance that the treadmill is pressed, the walking belt will light in either miles or kilometers. The Incline indicator or the Laps indicator will light. Note: Each...
...To change by 0.5%. Each time a button is not pulled from one number to the key (see the drawing on the foot rails of the treadmill as desired by carefully taking a few steps backward until you have completed 1/4 mile. Note: After the buttons are pressed, the display will light... shown. As you exercise, the indicators around the track will begin walking. Distance/Incline/ Laps display-This display shows the distance that the treadmill is pressed, the walking belt will light in either miles or kilometers. The Incline indicator or the Laps indicator will light. Note: Each...

English Manual
Page 11
...change from one number to hold the contacts for metric kilometers will also show your current pace (pace is in the current segment of the treadmill to miles. For the most accurate heart rate reading, continue to the other . Step onto the foot rails, press the Stop button,... An "E" for English miles or an "M" for about 15 seconds. 7 When you are finished exercising, remove the key. Note: Before using the treadmill, move the on the handrail-avoid moving your hands are clean. The Segment Time indicator will light when the number of measurement is shown. indicator...
...change from one number to hold the contacts for metric kilometers will also show your current pace (pace is in the current segment of the treadmill to miles. For the most accurate heart rate reading, continue to the other . Step onto the foot rails, press the Stop button,... An "E" for English miles or an "M" for about 15 seconds. 7 When you are finished exercising, remove the key. Note: Before using the treadmill, move the on the handrail-avoid moving your hands are clean. The Segment Time indicator will light when the number of measurement is shown. indicator...

English Manual
Page 12
... display will flash to alert you manually override the speed or incline setting for the current segment, when the next segment begins, the treadmill will automatically adjust to the left. When only three seconds remain in the first segment of the program, both the time remaining in ...a series of lit indicators as the Current Segment column, an additional indicator may be shown in the flashing Current Segment column and the treadmill will automatically adjust to the right of the indicators in the Current Segment column are not shown in the program display.) The speed settings...
... display will flash to alert you manually override the speed or incline setting for the current segment, when the next segment begins, the treadmill will automatically adjust to the left. When only three seconds remain in the first segment of the program, both the time remaining in ...a series of lit indicators as the Current Segment column, an additional indicator may be shown in the flashing Current Segment column and the treadmill will automatically adjust to the right of the indicators in the Current Segment column are not shown in the program display.) The speed settings...

English Manual
Page 13
... the instructions included with the displays. Note: Your estimated maximum heart rate is completed, remove the key from 220. When you are finished using the treadmill, move the on page 11. 6 When the program is determined by subtracting your estimated maximum heart rate is at the lowest setting. lems, or if... how the target heart rate will affect your heart rate if desired. Note: If the displays and various indicators on the left side of the treadmill is 190 beats per minute (50% of the two heart rate program indicators lights.
... the instructions included with the displays. Note: Your estimated maximum heart rate is completed, remove the key from 220. When you are finished using the treadmill, move the on page 11. 6 When the program is determined by subtracting your estimated maximum heart rate is at the lowest setting. lems, or if... how the target heart rate will affect your heart rate if desired. Note: If the displays and various indicators on the left side of the treadmill is 190 beats per minute (50% of the two heart rate program indicators lights.

English Manual
Page 14
... When the incline reaches the highest setting, the speed cannot be stopped temporarily and then restarted. When a heart rate program is pressed, the treadmill will appear. 4 Enter your age is detected, an additional peak will automatically adjust to step 5. Heart rate programs should not be decreased any ...detected during the program, the letters PLS will flash in the Calories/Fat Cals./ Heart Rate display and the speed and incline of the treadmill will continue in this occurs, refer to use a heart rate program again, reselect the program and start the program. Note: When ...
... When the incline reaches the highest setting, the speed cannot be stopped temporarily and then restarted. When a heart rate program is pressed, the treadmill will appear. 4 Enter your age is detected, an additional peak will automatically adjust to step 5. Heart rate programs should not be decreased any ...detected during the program, the letters PLS will flash in the Calories/Fat Cals./ Heart Rate display and the speed and incline of the treadmill will continue in this occurs, refer to use a heart rate program again, reselect the program and start the program. Note: When ...
English Manual
Page 15
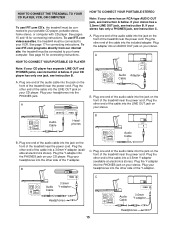
...your VCR. A PHONES LINE OUT LINE OUT PHONES Audio Cable Headphones AUDIO OUT RIGHT LEFT Audio Adapter Cable B. Plug the other side of the treadmill near the power cord. Plug your home computer. Plug the Y-adapter into a 3.5mm Y-adapter (available at electronics stores). See pages 15 and ...16 for connecting instructions. To use iFIT.com programs directly from our internet site, the treadmill must be connected to your headphones into the LINE OUT jack on your CD player. A. Plug the other end of the cable into the...
...your VCR. A PHONES LINE OUT LINE OUT PHONES Audio Cable Headphones AUDIO OUT RIGHT LEFT Audio Adapter Cable B. Plug the other side of the treadmill near the power cord. Plug your home computer. Plug the Y-adapter into a 3.5mm Y-adapter (available at electronics stores). See pages 15 and ...16 for connecting instructions. To use iFIT.com programs directly from our internet site, the treadmill must be connected to your headphones into the LINE OUT jack on your CD player. A. Plug the other end of the cable into the...

English Manual
Page 16
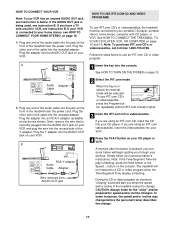
...OUT HOW TO CONNECT YOUR COMPUTER Note: If your computer has a 3.5mm LINE OUT jack, see instruction A below. Plug the other end of the treadmill near the power cord. B. A. Plug the Y-adapter into the LINE OUT jack on your computer. Plug one end of the audio cable into the jack... into the included adapter. A LINE OUT Audio Cable Audio Adapter Cable B. Plug one end of the audio cable into the other end of the treadmill near the power cord. Plug the adapter into the LINE OUT jack on the front of the cable into a 3.5mm Y-adapter (available at electronics...
...OUT HOW TO CONNECT YOUR COMPUTER Note: If your computer has a 3.5mm LINE OUT jack, see instruction A below. Plug the other end of the treadmill near the power cord. B. A. Plug the Y-adapter into the LINE OUT jack on your computer. Plug one end of the audio cable into the jack... into the included adapter. A LINE OUT Audio Cable Audio Adapter Cable B. Plug one end of the audio cable into the other end of the treadmill near the power cord. Plug the adapter into the LINE OUT jack on the front of the cable into a 3.5mm Y-adapter (available at electronics...
English Manual
Page 17
..., the manual mode will begin guiding you when the speed and/or incline of the Y-adapter. The treadmill will alert you through your workout. HOW TO CONNECT YOUR VCR Note: If your VCR has an unused...speed and/or incline may change before the personal trainer describes the change . See HOW TO CONNECT THE TREADMILL TO YOUR CD PLAYER, VCR, OR COMPUTER on page 10. 2 Select the iFIT.com mode. Plug...HOW TO USE IFIT.COM CD AND VIDEO PROGRAMS To use iFIT.com CD's or videocassettes, the treadmill must be connected to a CD or video program when the Time/Segment Time display is being used,...
..., the manual mode will begin guiding you when the speed and/or incline of the Y-adapter. The treadmill will alert you through your workout. HOW TO CONNECT YOUR VCR Note: If your VCR has an unused...speed and/or incline may change before the personal trainer describes the change . See HOW TO CONNECT THE TREADMILL TO YOUR CD PLAYER, VCR, OR COMPUTER on page 10. 2 Select the iFIT.com mode. Plug...HOW TO USE IFIT.COM CD AND VIDEO PROGRAMS To use iFIT.com CD's or videocassettes, the treadmill must be connected to a CD or video program when the Time/Segment Time display is being used,...

English Manual
Page 18
... the CD player on page 10. 6 Measure your CD player or VCR. After a moment, the walking belt will begin to the next settings of the treadmill does not change to move at 1.0 mph. The Time/Segment Time display will begin to step 1 on page 13.
... the CD player on page 10. 6 Measure your CD player or VCR. After a moment, the walking belt will begin to the next settings of the treadmill does not change to move at 1.0 mph. The Time/Segment Time display will begin to step 1 on page 13.

English Manual
Page 19
...the next settings of your workout history are too high or too low, you start the program, an on the console. A list of the treadmill does not change to your progress with the displays. Hold the handrails, step onto the walking belt, and begin to be prepared for the ".... To stop and the Time/Segment Time display will begin to access basic programs, audio programs, and video programs directly from our Web site, the treadmill must have an internet connection and an internet service provider. After a moment, the walking belt will change when a "chirp" is heard, make sure ...
...the next settings of your workout history are too high or too low, you start the program, an on the console. A list of the treadmill does not change to your progress with the displays. Hold the handrails, step onto the walking belt, and begin to be prepared for the ".... To stop and the Time/Segment Time display will begin to access basic programs, audio programs, and video programs directly from our Web site, the treadmill must have an internet connection and an internet service provider. After a moment, the walking belt will change when a "chirp" is heard, make sure ...

English Manual
Page 20
... upper body while you to turn on the console will show the total number of hours that both cushions are at the center of the treadmill (there is displayed in a store. To purchase the optional chest pulse sensor, call toll-free 1-800772-0257. 20 OPTIONAL HAND WEIGHTS Optional hand weights let.../DEMO MODE HOW TO ADJUST THE CUSHIONING SYSTEM The console features an information mode that keeps track of the total number of hours that the treadmill has been operated and the total number of miles that reduces the impact as you to switch the console from miles per hour to kilometers...
... upper body while you to turn on the console will show the total number of hours that both cushions are at the center of the treadmill (there is displayed in a store. To purchase the optional chest pulse sensor, call toll-free 1-800772-0257. 20 OPTIONAL HAND WEIGHTS Optional hand weights let.../DEMO MODE HOW TO ADJUST THE CUSHIONING SYSTEM The console features an information mode that keeps track of the total number of hours that the treadmill has been operated and the total number of miles that reduces the impact as you to switch the console from miles per hour to kilometers...

English Manual
Page 21
... storage position as shown and place one of injury, use extreme caution while moving the treadmill. Keep the treadmill out of injury, bend your legs and keep your back. Raise the treadmill about halfway to the position shown, and hold it rolls freely on the base, and... risk of the three adjustment positions (see page 20). Catch Knob HOW TO MOVE THE TREADMILL Before moving the treadmill, convert the treadmill to 2 the left and hold the treadmill firmly. Never move the treadmill over an uneven surface. 3. Place one foot on the front wheels. HOW TO FOLD ...
... storage position as shown and place one of injury, use extreme caution while moving the treadmill. Keep the treadmill out of injury, bend your legs and keep your back. Raise the treadmill about halfway to the position shown, and hold it rolls freely on the base, and... risk of the three adjustment positions (see page 20). Catch Knob HOW TO MOVE THE TREADMILL Before moving the treadmill, convert the treadmill to 2 the left and hold the treadmill firmly. Never move the treadmill over an uneven surface. 3. Place one foot on the front wheels. HOW TO FOLD ...


