
English Manual
Page 3
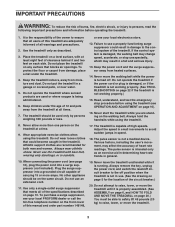
... support clothes are adequately informed of this manual and order part number 146148, 19. Adjust the speed in damage to the control system of heart rate readings. Never move the walking belt while the power is properly assembled. (See ASSEMBLY on page 6, and HOW TO FOLD AND MOVE THE TREADMILL on page 20.) You must be used or where oxygen is damaged, the walking belt may change speed, accelerate, or stop procedure before operating the treadmill...
... support clothes are adequately informed of this manual and order part number 146148, 19. Adjust the speed in damage to the control system of heart rate readings. Never move the walking belt while the power is properly assembled. (See ASSEMBLY on page 6, and HOW TO FOLD AND MOVE THE TREADMILL on page 20.) You must be used or where oxygen is damaged, the walking belt may change speed, accelerate, or stop procedure before operating the treadmill...
English Manual
Page 4
... the power cord immediately after use only. Do not use of this product. SAVE THESE INSTRUCTIONS The decals shown here have been placed on the front cover of this manual and order a free replacement decal. WARNING: Before beginning this treadmill in this manual. ICON assumes no responsibility for in-home use , before cleaning the treadmill, and before using. When folding or moving the treadmill, make sure that the storage latch is...
... the power cord immediately after use only. Do not use of this product. SAVE THESE INSTRUCTIONS The decals shown here have been placed on the front cover of this manual and order a free replacement decal. WARNING: Before beginning this treadmill in this manual. ICON assumes no responsibility for in-home use , before cleaning the treadmill, and before using. When folding or moving the treadmill, make sure that the storage latch is...
English Manual
Page 5
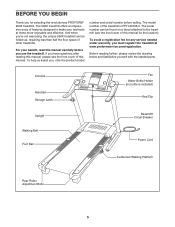
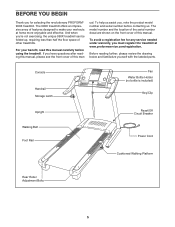
Console Handrail Storage Latch Fan Water Bottle Holder (no bottle is PFTL99106.0. The 990X treadmill offers an impressive array of features designed to the treadmill (see the front cover of the treadmill is included) Key/Clip Upright Walking Belt Foot Rail Reset/Off Circuit Breaker Power Cord Cushioned Walking Platform Rear Roller Adjustment Bolts 5 For your workouts at www.proformservice.com/registration. And when you have questions after reading this manual carefully...
Console Handrail Storage Latch Fan Water Bottle Holder (no bottle is PFTL99106.0. The 990X treadmill offers an impressive array of features designed to the treadmill (see the front cover of the treadmill is included) Key/Clip Upright Walking Belt Foot Rail Reset/Off Circuit Breaker Power Cord Cushioned Walking Platform Rear Roller Adjustment Bolts 5 For your workouts at www.proformservice.com/registration. And when you have questions after reading this manual carefully...

English Manual
Page 8
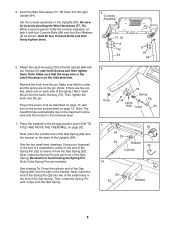
... the right Upright (84). Place the treadmill in the end of the Spring Pin (25) into the Latch Housing (73). Set the console assembly on page 20). start both Screws and then tighten them . 5 Console Assembly 77, 78 8 64 84 8 64 84 6. Be careful to avoid pinching the Wire Harnesses (77, 78). start all four Console Bolts and then firmly tighten them . Then, tighten the knob onto the pin. Next...
... the right Upright (84). Place the treadmill in the end of the Spring Pin (25) into the Latch Housing (73). Set the console assembly on page 20). start both Screws and then tighten them . 5 Console Assembly 77, 78 8 64 84 8 64 84 6. Be careful to avoid pinching the Wire Harnesses (77, 78). start all four Console Bolts and then firmly tighten them . Then, tighten the knob onto the pin. Next...
English Manual
Page 10
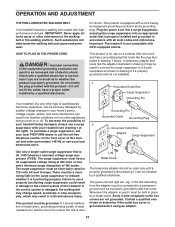
... be electrically rated for use a properly functioning surge suppressor could result in drawing 2 may result in drawing 1 below. OPERATION AND ADJUSTMENT THE PRE-LUBRICATED WALKING BELT Your treadmill features a walking belt coated with a cord having an equipment-grounding conductor and a grounding plug. This product is properly installed and grounded in an increased risk of elec- HOW TO PLUG IN THE POWER CORD DANGER: Improper connection of...
... be electrically rated for use a properly functioning surge suppressor could result in drawing 2 may result in drawing 1 below. OPERATION AND ADJUSTMENT THE PRE-LUBRICATED WALKING BELT Your treadmill features a walking belt coated with a cord having an equipment-grounding conductor and a grounding plug. This product is properly installed and grounded in an increased risk of elec- HOW TO PLUG IN THE POWER CORD DANGER: Improper connection of...
English Manual
Page 11
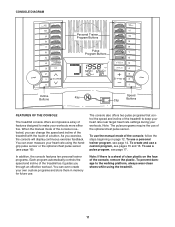
... heart rate using the treadmill. 11 To use a custom program, see page 19). To create and use the manual mode of features designed to make your workouts. The console also offers two pulse programs that control the speed and incline of the treadmill to the walking platform, always wear clean shoes while using the handgrip pulse sensor or the optional chest pulse sensor (see pages 15 and 16. CONSOLE DIAGRAM Personal Trainer Program Buttons Pulse Program Buttons Incline Key Buttons Speed Buttons Clip FEATURES OF THE CONSOLE The treadmill console...
... heart rate using the treadmill. 11 To use a custom program, see page 19). To create and use the manual mode of features designed to make your workouts. The console also offers two pulse programs that control the speed and incline of the treadmill to the walking platform, always wear clean shoes while using the handgrip pulse sensor or the optional chest pulse sensor (see pages 15 and 16. CONSOLE DIAGRAM Personal Trainer Program Buttons Pulse Program Buttons Incline Key Buttons Speed Buttons Clip FEATURES OF THE CONSOLE The treadmill console...
English Manual
Page 12
... console, adjust the position of your progress with the matrix and the display. If the Start button or the Speed + button is pressed, the incline will change by pressing the Speed + and - To stop . Each time the Incline increase or decrease button is pressed, the walking belt will also show the approximate number of calories you use the handgrip pulse sensor or the optional chest pulse sensor, the lower left corner of 0.5 mph. As you exercise, change the incline...
... console, adjust the position of your progress with the matrix and the display. If the Start button or the Speed + button is pressed, the incline will change by pressing the Speed + and - To stop . Each time the Incline increase or decrease button is pressed, the walking belt will also show the approximate number of calories you use the handgrip pulse sensor or the optional chest pulse sensor, the lower left corner of 0.5 mph. As you exercise, change the incline...
English Manual
Page 13
... the storage position or the treadmill will not be damaged. To turn on the fan if desired. Note: If the display remains lit after a few minutes. 8 When you are finished exercising, remove the key from the console. Press the Display button repeatedly until the priority display shows the information that your pulse (when you use the handgrip pulse sensor or the optional chest pulse sensor), the speed of the walking belt, or the distance...
... the storage position or the treadmill will not be damaged. To turn on the fan if desired. Note: If the display remains lit after a few minutes. 8 When you are finished exercising, remove the key from the console. Press the Display button repeatedly until the priority display shows the information that your pulse (when you use the handgrip pulse sensor or the optional chest pulse sensor), the speed of the walking belt, or the distance...
English Manual
Page 15
... "off the demo mode. tings are finished exercising, remove the key from the console and put it in the priority display for the second segment will then be saved in the flashing Current Segment column. Every few seconds. 3 Press the Start button or the Speed + button and program the desired speed and incline settings. 5 Measure your workout, press the Stop button twice. Next, remove the key from the console. Continue programming speed and incline settings for the...
... "off the demo mode. tings are finished exercising, remove the key from the console and put it in the priority display for the second segment will then be saved in the flashing Current Segment column. Every few seconds. 3 Press the Start button or the Speed + button and program the desired speed and incline settings. 5 Measure your workout, press the Stop button twice. Next, remove the key from the console. Continue programming speed and incline settings for the...
English Manual
Page 18
... speed of the walking belt will automatically increase or decrease to the target heart rate setting. 6 Follow your pulse is not detected during the program, you are finished exercising, remove the key from the console. If your progress with the matrix and the display. See step 5 on pages 12 and 13. 7 Turn on page 13. 8 When you can adjust the setting with the optional chest pulse sensor. However, when the console...
... speed of the walking belt will automatically increase or decrease to the target heart rate setting. 6 Follow your pulse is not detected during the program, you are finished exercising, remove the key from the console. If your progress with the matrix and the display. See step 5 on pages 12 and 13. 7 Turn on page 13. 8 When you can adjust the setting with the optional chest pulse sensor. However, when the console...
English Manual
Page 23
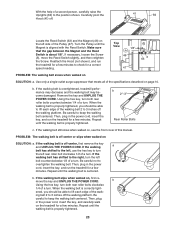
... POWER CORD. b 2"-3" Rear Roller Bolts c. Carefully pivot the Hood (41) off -center, first remove the key and UNPLUG THE POWER CORD. If necessary, loosen the Screw (3), move the Reed Switch slightly, and then retighten the Screw. Make sure that meets all of the Pulley (47). Repeat until the walking belt is about 1/8". Then, plug in the power cord, insert the key, and run the treadmill for a few minutes to keep the walking belt centered. PROBLEM: The walking belt...
... POWER CORD. b 2"-3" Rear Roller Bolts c. Carefully pivot the Hood (41) off -center, first remove the key and UNPLUG THE POWER CORD. If necessary, loosen the Screw (3), move the Reed Switch slightly, and then retighten the Screw. Make sure that meets all of the Pulley (47). Repeat until the walking belt is about 1/8". Then, plug in the power cord, insert the key, and run the treadmill for a few minutes to keep the walking belt centered. PROBLEM: The walking belt...

English Manual
Page 24
... body uses easily accessible carbohydrate calories for longer than 20 minutes.) Breathe regularly and deeply as you , first find the three numbers above your physician. If your goal Training Zone Exercise-After warming up to five workouts each workout with preexisting health problems. The pulse sensor is to 60 minutes. (During the first few minutes of your exercise program, do not keep your heart rate...
... body uses easily accessible carbohydrate calories for longer than 20 minutes.) Breathe regularly and deeply as you , first find the three numbers above your physician. If your goal Training Zone Exercise-After warming up to five workouts each workout with preexisting health problems. The pulse sensor is to 60 minutes. (During the first few minutes of your exercise program, do not keep your heart rate...

English Manual
Page 32
... use , costs of removal or installation or other warranty beyond that specifically set forth herein. All repairs for a minimal trip charge. For inhome service, the customer will be responsible for which vary from defects in connection with the use or performance of the product or damages with respect to replacing or repairing, at ICON's option, the product through 31) LIMITED WARRANTY ICON Health & Fitness, Inc. (ICON) warrants this warranty is limited...
... use , costs of removal or installation or other warranty beyond that specifically set forth herein. All repairs for a minimal trip charge. For inhome service, the customer will be responsible for which vary from defects in connection with the use or performance of the product or damages with respect to replacing or repairing, at ICON's option, the product through 31) LIMITED WARRANTY ICON Health & Fitness, Inc. (ICON) warrants this warranty is limited...

English Manual
Page 3
If the control system is damaged, the walking belt may change speed, accelerate, or stop procedure before operating the treadmill. 1. Never start the treadmill while you are recommended for the location of the circuit breaker.) 20. Always hold the handrails while using the treadmill. Do not wear loose clothes that meets all warnings and precautions. 2. The pulse sensor is not working properly.) 15. Keep the power cord and...
If the control system is damaged, the walking belt may change speed, accelerate, or stop procedure before operating the treadmill. 1. Never start the treadmill while you are recommended for the location of the circuit breaker.) 20. Always hold the handrails while using the treadmill. Do not wear loose clothes that meets all warnings and precautions. 2. The pulse sensor is not working properly.) 15. Keep the power cord and...
English Manual
Page 5
... any service needed under warranty, you must register the treadmill at home more enjoyable and effective. ual. To avoid a registration fee for selecting the revolutionary PROFORM® 990X treadmill. Console Handrail Storage Latch Fan Water Bottle Holder (no bottle is included) Key/Clip Upright Walking Belt Foot Rail Reset/Off Circuit Breaker Power Cord Cushioned Walking Platform Rear Roller Adjustment Bolts 5 For your workouts at www.proformservice.com/registration. If you 're not exercising...
... any service needed under warranty, you must register the treadmill at home more enjoyable and effective. ual. To avoid a registration fee for selecting the revolutionary PROFORM® 990X treadmill. Console Handrail Storage Latch Fan Water Bottle Holder (no bottle is included) Key/Clip Upright Walking Belt Foot Rail Reset/Off Circuit Breaker Power Cord Cushioned Walking Platform Rear Roller Adjustment Bolts 5 For your workouts at www.proformservice.com/registration. If you 're not exercising...
English Manual
Page 8
... the Spring Pin until it with two Screws (3); start both Screws and then tighten them . 5 Console Assembly 77, 78 8 64 84 8 64 84 6. Then, tighten the knob onto the pin. 5. Make sure that the large hole in the power cord as described on page 10, and turn on the Uprights (84). Set the console assembly on the power as shown; Attach the Latch Housing (73) to avoid pinching the Wire Harnesses...
... the Spring Pin until it with two Screws (3); start both Screws and then tighten them . 5 Console Assembly 77, 78 8 64 84 8 64 84 6. Then, tighten the knob onto the pin. 5. Make sure that the large hole in the power cord as described on page 10, and turn on the Uprights (84). Set the console assembly on the power as shown; Attach the Latch Housing (73) to avoid pinching the Wire Harnesses...

English Manual
Page 10
.... Important: The treadmill is used it is properly installed and grounded in your home's power. To decrease the possibility of your treadmill being turned on the surge suppressor to determine if the outlet box cover is properly grounded. This product is damaged, the walking belt may change speed, accelerate or stop unexpectedly, which may be a monitoring light on or off. If the control system is...
.... Important: The treadmill is used it is properly installed and grounded in your home's power. To decrease the possibility of your treadmill being turned on the surge suppressor to determine if the outlet box cover is properly grounded. This product is damaged, the walking belt may change speed, accelerate or stop unexpectedly, which may be a monitoring light on or off. If the control system is...

English Manual
Page 12
... walking belt, press the Stop button. Each time a button is selected, the matrix will change the incline of the treadmill, press the Incline increase and decrease buttons or one of the twelve numbered speed buttons. If one of the treadmill. To stop . To change by 0.5%. When the manual mode is pressed, the speed setting will show a track representing 1/4 mile. The lower left corner of the display will show your clothes. When you use the handgrip pulse sensor or the optional chest pulse sensor...
... walking belt, press the Stop button. Each time a button is selected, the matrix will change the incline of the treadmill, press the Incline increase and decrease buttons or one of the twelve numbered speed buttons. If one of the treadmill. To stop . To change by 0.5%. When the manual mode is pressed, the speed setting will show a track representing 1/4 mile. The lower left corner of the display will show your clothes. When you use the handgrip pulse sensor or the optional chest pulse sensor...

English Manual
Page 13
... console is in the "demo" mode. Note: If the display remains lit after a few minutes. 8 When you use the handgrip pulse sensor and the optional chest pulse sensor at the lowest setting when the treadmill is stopped, the fan will be damaged. Note: For simplicity, all instructions in kilometers. Next, stand on when the walking belt is folded to view. Next, remove the key from the metal contacts. Press the Display button...
... console is in the "demo" mode. Note: If the display remains lit after a few minutes. 8 When you use the handgrip pulse sensor and the optional chest pulse sensor at the lowest setting when the treadmill is stopped, the fan will be damaged. Note: For simplicity, all instructions in kilometers. Next, stand on when the walking belt is folded to view. Next, remove the key from the metal contacts. Press the Display button...
English Manual
Page 32
... repairs not provided by ICON. ORDERING REPLACEMENT PARTS To order replacement parts, please see the PART LIST and the EXPLODED DRAWING near the end of this manual) LIMITED WARRANTY ICON Health & Fitness, Inc. (ICON) warrants this product to be free from defects in connection with the use or performance of the product or damages with respect to any implied warranties of merchantability or fitness for a particular purpose is shipped to a service...
... repairs not provided by ICON. ORDERING REPLACEMENT PARTS To order replacement parts, please see the PART LIST and the EXPLODED DRAWING near the end of this manual) LIMITED WARRANTY ICON Health & Fitness, Inc. (ICON) warrants this product to be free from defects in connection with the use or performance of the product or damages with respect to any implied warranties of merchantability or fitness for a particular purpose is shipped to a service...

