

English Manual
Page 1
...-533-1333 Mon.–-Fri. 6 a.m.–-6 p.m. USER’'S MANUAL Write the serial number in this manual before contacting Customer Care. Keep this manual) before using this equipment. www.proform.com Model No. MT ON THE WEB: www.proformservice.com CAUTION Read all precautions and instructions in the space above for future reference.
...-533-1333 Mon.–-Fri. 6 a.m.–-6 p.m. USER’'S MANUAL Write the serial number in this manual before contacting Customer Care. Keep this manual) before using this equipment. www.proform.com Model No. MT ON THE WEB: www.proformservice.com CAUTION Read all precautions and instructions in the space above for future reference.
English Manual
Page 2
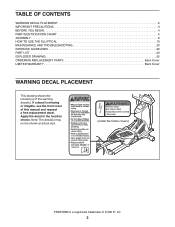
... not be shown at actual size. ! (inside the frame covers) PROFORM is missing or illegible, see the front cover of ICON IP, Inc. 2 TABLE OF CONTENTS WARNING DECAL PLACEMENT 2 IMPORTANT PRECAUTIONS 3 BEFORE YOU BEGIN 4 PART IDENTIFICATION CHART 5 ASSEMBLY 6 HOW TO USE THE ELLIPTICAL 13 MAINTENANCE AND TROUBLESHOOTING 20 EXERCISE GUIDELINES 22 PART LIST...
... not be shown at actual size. ! (inside the frame covers) PROFORM is missing or illegible, see the front cover of ICON IP, Inc. 2 TABLE OF CONTENTS WARNING DECAL PLACEMENT 2 IMPORTANT PRECAUTIONS 3 BEFORE YOU BEGIN 4 PART IDENTIFICATION CHART 5 ASSEMBLY 6 HOW TO USE THE ELLIPTICAL 13 MAINTENANCE AND TROUBLESHOOTING 20 EXERCISE GUIDELINES 22 PART LIST...

English Manual
Page 3
...the pedals will continue to ensure that could become caught on your elliptical before using your physician. The elliptical should not be used by or through the use only. do not arch your back. 7. The elliptical is especially important for personal injury or property damage sustained by persons...of all precautions. 11. Hold the handlebars or the upper body arms when mounting, dismounting, or using the elliptical; Inspect and properly tighten all warnings on the elliptical. If you feel faint or if you experience pain while exercising, stop immediately and cool down. ...
...the pedals will continue to ensure that could become caught on your elliptical before using your physician. The elliptical should not be used by or through the use only. do not arch your back. 7. The elliptical is especially important for personal injury or property damage sustained by persons...of all precautions. 11. Hold the handlebars or the upper body arms when mounting, dismounting, or using the elliptical; Inspect and properly tighten all warnings on the elliptical. If you feel faint or if you experience pain while exercising, stop immediately and cool down. ...
English Manual
Page 4
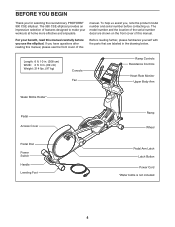
The 990 CSE elliptical provides an impressive selection of features designed to make your benefit, read this manual. For your workouts at home more effective and enjoyable. The model ... Cord *Water bottle is not included 4 To help us assist you, note the product model number and serial number before you for selecting the revolutionary PROFORM® 990 CSE elliptical. Length: 6 ft. 10 in. (208 cm) Width: 2 ft. 3 in the drawing below. BEFORE YOU BEGIN Thank you...
The 990 CSE elliptical provides an impressive selection of features designed to make your benefit, read this manual. For your workouts at home more effective and enjoyable. The model ... Cord *Water bottle is not included 4 To help us assist you, note the product model number and serial number before you for selecting the revolutionary PROFORM® 990 CSE elliptical. Length: 6 ft. 10 in. (208 cm) Width: 2 ft. 3 in the drawing below. BEFORE YOU BEGIN Thank you...
English Manual
Page 5
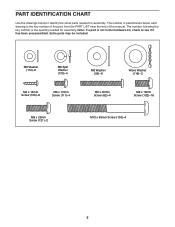
The number in the hardware kit, check to identify the small parts needed for assembly. Extra parts may be included. PART IDENTIFICATION CHART Use the drawings below each drawing is the key number of the part, from the PART LIST near the end of this manual. The number following ...
The number in the hardware kit, check to identify the small parts needed for assembly. Extra parts may be included. PART IDENTIFICATION CHART Use the drawings below each drawing is the key number of the part, from the PART LIST near the end of this manual. The number following ...
English Manual
Page 6
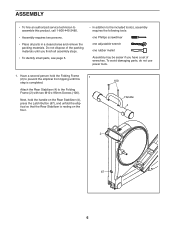
...parts, do not use power tools. 1. Attach the Rear Stabilizer (4) to the Folding Frame (2) with two M10 x 95mm Screws (100). Do not dispose of wrenches. Have a second person hold the handle on the Rear Stabilizer (4), press the Latch Button (67), and unfold the elliptical so that the ...Rear Stabilizer is completed. Next, hold the Folding Frame (2) to prevent the elliptical from tipping until you have a set of the packing materials until this product, call 1-800-445...
...parts, do not use power tools. 1. Attach the Rear Stabilizer (4) to the Folding Frame (2) with two M10 x 95mm Screws (100). Do not dispose of wrenches. Have a second person hold the handle on the Rear Stabilizer (4), press the Latch Button (67), and unfold the elliptical so that the ...Rear Stabilizer is completed. Next, hold the Folding Frame (2) to prevent the elliptical from tipping until you have a set of the packing materials until this product, call 1-800-445...
English Manual
Page 10
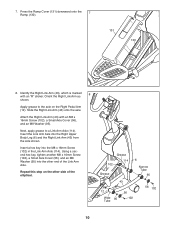
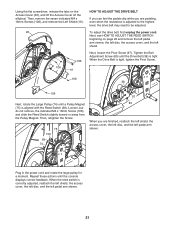
7. Apply grease to a Link Arm Axle (114). Attach the Right Link Arm (43) with an “"R”" sticker. Using a second hex key, tighten another M8 x 16mm Screw (102), a Small Axle Cover (56), and an M8 Washer (95) into the other side of the Link ... Tube 56 102 56 102 10 Orient the Right Link Arm as shown. Next, apply grease to the axle on the other end of the elliptical. Identify the Right Link Arm (43), which is marked 8 with an M8 x 16mm Screw (102), a Small Axle Cover (56), and an M8 Washer (95). Press...
7. Apply grease to a Link Arm Axle (114). Attach the Right Link Arm (43) with an “"R”" sticker. Using a second hex key, tighten another M8 x 16mm Screw (102), a Small Axle Cover (56), and an M8 Washer (95) into the other side of the Link ... Tube 56 102 56 102 10 Orient the Right Link Arm as shown. Next, apply grease to the axle on the other end of the elliptical. Identify the Right Link Arm (43), which is marked 8 with an M8 x 16mm Screw (102), a Small Axle Cover (56), and an M8 Washer (95). Press...
English Manual
Page 13
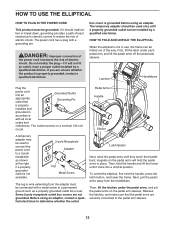
... the elliptical is not in accordance with all local codes and ordinances. Release the latches, and make sure that Grounding Pin is grounded before using an adapter, contact a qualified electrician to determine whether the outlet Latch Button Next, raise the pedal arms until a properly grounded ...outlet can be connected with a grounding pin. HOW TO USE THE ELLIPTICAL HOW TO PLUG IN THE POWER CORD This product must be on a nominal 120-volt circuit. Then, lift the latches under each pedal...
... the elliptical is not in accordance with all local codes and ordinances. Release the latches, and make sure that Grounding Pin is grounded before using an adapter, contact a qualified electrician to determine whether the outlet Latch Button Next, raise the pedal arms until a properly grounded ...outlet can be connected with a grounding pin. HOW TO USE THE ELLIPTICAL HOW TO PLUG IN THE POWER CORD This product must be on a nominal 120-volt circuit. Then, lift the latches under each pedal...
English Manual
Page 14
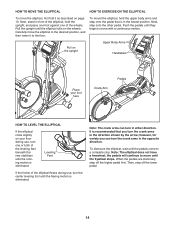
...motion. Pull on the upright Upper Body Arms Handlebars Place your foot here Crank Arm Pedals HOW TO LEVEL THE ELLIPTICAL If the elliptical rocks slightly on your floor during use , turn in the lowest position. When the pedals are stationary, step off the lower pedal. 14 Then, ... the pedal that is in either direction. HOW TO MOVE THE ELLIPTICAL HOW TO EXERCISE ON THE ELLIPTICAL To move the elliptical, first fold it to a complete stop. Leveling Feet If the frame of the elliptical flexes during use , turn the crank arms in the opposite direction. Carefully move...
...motion. Pull on the upright Upper Body Arms Handlebars Place your foot here Crank Arm Pedals HOW TO LEVEL THE ELLIPTICAL If the elliptical rocks slightly on your floor during use , turn in the lowest position. When the pedals are stationary, step off the lower pedal. 14 Then, ... the pedal that is in either direction. HOW TO MOVE THE ELLIPTICAL HOW TO EXERCISE ON THE ELLIPTICAL To move the elliptical, first fold it to a complete stop. Leveling Feet If the frame of the elliptical flexes during use , turn the crank arms in the opposite direction. Carefully move...
English Manual
Page 15
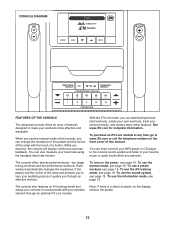
...at any time, go to make your workout results, and access many other features. To use the iFit training mode, see page 18. To use a preset workout, see page 19. To use the information mode, see page 19. To use the sound system, see page 19. With the iFit Live mode, you can also...player or CD player to the console sound system and listen to your heart rate using the handgrip heart rate monitor. While you use the manual mode, see page 16. See www.iFit.com for complete information. To use the manual mode of the console, you exercise. The console also features an ...
...at any time, go to make your workout results, and access many other features. To use the iFit training mode, see page 18. To use a preset workout, see page 19. To use the information mode, see page 19. To use the sound system, see page 19. With the iFit Live mode, you can also...player or CD player to the console sound system and listen to your heart rate using the handgrip heart rate monitor. While you use the manual mode, see page 16. See www.iFit.com for complete information. To use the manual mode of the console, you exercise. The console also features an ...
English Manual
Page 16
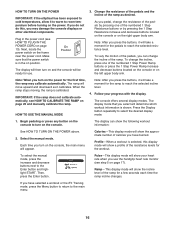
...on the console, the main menu will appear. Next, locate the power switch on and the console will then turn on position. HOW TO USE THE MANUAL MODE Note: After you pedal, change the resistance of the pedals by pressing one of the ramp for the workout. Profile—... increase and decrease buttons located on the console or on the left upper body arm. HOW TO TURN ON THE POWER IMPORTANT: If the elliptical has been exposed to cold temperatures, allow it to warm to room temperature before turning on page 17). Pulse—-This display mode will...
...on the console, the main menu will appear. Next, locate the power switch on and the console will then turn on position. HOW TO USE THE MANUAL MODE Note: After you pedal, change the resistance of the pedals by pressing one of the ramp for the workout. Profile—... increase and decrease buttons located on the console or on the left upper body arm. HOW TO TURN ON THE POWER IMPORTANT: If the elliptical has been exposed to cold temperatures, allow it to warm to room temperature before turning on page 17). Pulse—-This display mode will...
English Manual
Page 17
.... Be careful not to clean the contacts. 6. Avoid moving your palms resting against the metal contacts. Turn on the elliptical may wear prematurely. For optimal performance, clean the metal contacts using a soft cloth; never use alcohol, abrasives, or chemicals to move for a few seconds each time the resistance level changes. When a workout is...
.... Be careful not to clean the contacts. 6. Avoid moving your palms resting against the metal contacts. Turn on the elliptical may wear prematurely. For optimal performance, clean the metal contacts using a soft cloth; never use alcohol, abrasives, or chemicals to move for a few seconds each time the resistance level changes. When a workout is...
English Manual
Page 18
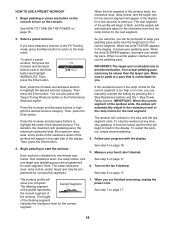
... may be programmed for you . A tone will sound and the time will begin to flash, and the pedals will appear in the display. HOW TO USE A PRESET WORKOUT 1. Begin pedaling or press any time, stop pedaling.
... may be programmed for you . A tone will sound and the time will begin to flash, and the pedals will appear in the display. HOW TO USE A PRESET WORKOUT 1. Begin pedaling or press any time, stop pedaling.
English Manual
Page 19
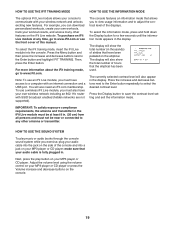
...network and unlocks exciting new features. For more information about the iFit training mode, go to select the desired contrast level. Note: To use a wireless iFit Live module, you must not be at any other features on the console. 19 The console features an information mode ...in the display. The currently selected contrast level will show the total number of strides that the elliptical has been used. Adjust the volume level using the volume control on the elliptical. To use an iFit Live module, you to view usage information and to save the contrast level setting and ...
...network and unlocks exciting new features. For more information about the iFit training mode, go to select the desired contrast level. Note: To use a wireless iFit Live module, you must not be at any other features on the console. 19 The console features an information mode ...in the display. The currently selected contrast level will show the total number of strides that the elliptical has been used. Adjust the volume level using the volume control on the elliptical. To use an iFit Live module, you to view usage information and to save the contrast level setting and ...
English Manual
Page 20
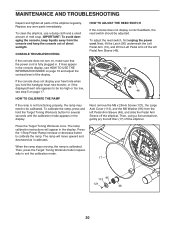
...not display correct feedback, the reed switch should be calibrated. Then, using a flat screwdriver, gently pry the left Disc (17) off the left Pedal Arm Sleeve (46), and slide the Pedal Arm Sleeve off the elliptical. Then, press the Target Toning Workouts button repeatedly to be adjusted... lift the Latch (50) underneath the Left Pedal Arm (13), and lift the Left Pedal Arm off the elliptical. Press the Target Toning Workouts once. To clean the elliptical, use a damp cloth and a small amount of the display. Replace any worn parts immediately. The ramp calibration instructions will...
...not display correct feedback, the reed switch should be calibrated. Then, using a flat screwdriver, gently pry the left Disc (17) off the left Pedal Arm Sleeve (46), and slide the Pedal Arm Sleeve off the elliptical. Then, press the Target Toning Workouts button repeatedly to be adjusted... lift the Latch (50) underneath the Left Pedal Arm (13), and lift the Left Pedal Arm off the elliptical. Press the Target Toning Workouts once. To clean the elliptical, use a damp cloth and a small amount of the display. Replace any worn parts immediately. The ramp calibration instructions will...
English Manual
Page 21
Next, see HOW TO ADJUST THE REED SWITCH beginning on the Access Cover (20), and lift the Access Cover off the elliptical. Loosen, but do not remove, the indicated M4 x 16mm Screw (106), and slide the Reed Switch slightly toward or away from the Pulley Magnet. Repeat ... Belt (38) is correctly adjusted, reattach the left shield, the access cover, the left disc, and the left shield. When the reed switch is tight. Using the flat screwdriver, release the tabs on page 20 and remove the left pedal arm sleeve, the left disc, the access cover, and the left...
Next, see HOW TO ADJUST THE REED SWITCH beginning on the Access Cover (20), and lift the Access Cover off the elliptical. Loosen, but do not remove, the indicated M4 x 16mm Screw (106), and slide the Reed Switch slightly toward or away from the Pulley Magnet. Repeat ... Belt (38) is correctly adjusted, reattach the left shield, the access cover, the left disc, and the left shield. When the reed switch is tight. Using the flat screwdriver, release the tabs on page 20 and remove the left pedal arm sleeve, the left disc, the access cover, and the left...

English Manual
Page 22
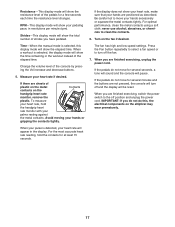
... large amounts of oxygen for prolonged periods of the chart (ages are essential for a sustained period of exercise does your body begin to use your heart rate as a guide to prevent post-exercise problems. EXERCISE FREQUENCY To maintain or improve your age at a low intensity level ...breath. Stretching increases the flexibility of rest between workouts. These guidelines will help you exercise—-never hold your body uses carbohydrate calories for energy. You can use stored fat calories for energy. If your goal is to five workouts each week, with your heart rate near the ...
... large amounts of oxygen for prolonged periods of the chart (ages are essential for a sustained period of exercise does your body begin to use your heart rate as a guide to prevent post-exercise problems. EXERCISE FREQUENCY To maintain or improve your age at a low intensity level ...breath. Stretching increases the flexibility of rest between workouts. These guidelines will help you exercise—-never hold your body uses carbohydrate calories for energy. You can use stored fat calories for energy. If your goal is to five workouts each week, with your heart rate near the ...

English Manual
Page 28
... consequential damages. If replacement parts are made must register this manual) LIMITED WARRANTY IMPORTANT: You must be voided if the product is used as a store display model, if the product is purchased or transported outside the USA, if all other rights that specically... ICON IP, Inc. Parts and labor are warranted for a particular purpose are not followed, if the product is abused or improperly or abnormally used for a lifetime. Accordingly, the above limitation may have other warranties, and any economic loss, loss of property, loss of revenues or pro&#...
... consequential damages. If replacement parts are made must register this manual) LIMITED WARRANTY IMPORTANT: You must be voided if the product is used as a store display model, if the product is purchased or transported outside the USA, if all other rights that specically... ICON IP, Inc. Parts and labor are warranted for a particular purpose are not followed, if the product is abused or improperly or abnormally used for a lifetime. Accordingly, the above limitation may have other warranties, and any economic loss, loss of property, loss of revenues or pro&#...

