

English Manual
Page 3
... safely lift 45 pounds (20 kg) to raise, lower, or move the walking belt while the power is turned off position when the treadmill is administered. 12. Never leave the treadmill unattended while it and two feet on each side. To purchase a surge suppressor, see your local ...power cord or plug is damaged, or if the treadmill is not working properly. (See TROUBLESHOOTING if the treadmill is not a medical device. Never allow more than 250 pounds. Use only a single-outlet surge suppressor that could result in this manual and order part number 146148, or see your local PROFORM...
... safely lift 45 pounds (20 kg) to raise, lower, or move the walking belt while the power is turned off position when the treadmill is administered. 12. Never leave the treadmill unattended while it and two feet on each side. To purchase a surge suppressor, see your local ...power cord or plug is damaged, or if the treadmill is not working properly. (See TROUBLESHOOTING if the treadmill is not a medical device. Never allow more than 250 pounds. Use only a single-outlet surge suppressor that could result in this manual and order part number 146148, or see your local PROFORM...

English Manual
Page 4
... authorized service representative only. 24. Never remove the motor hood unless instructed to do so by or through the use only. The treadmill is especially important for persons over the age of 35 or persons with pre-existing health problems. Read all parts of this or...beginning this manual and order a free replacement decal. Note: The decals are not shown at actual size. 4 Always unplug the power cord immediately after use the treadmill in -home use of this product. This is intended for personal injury or property damage sustained by an authorized service representative. ...
... authorized service representative only. 24. Never remove the motor hood unless instructed to do so by or through the use only. The treadmill is especially important for persons over the age of 35 or persons with pre-existing health problems. Read all parts of this or...beginning this manual and order a free replacement decal. Note: The decals are not shown at actual size. 4 Always unplug the power cord immediately after use the treadmill in -home use of this product. This is intended for personal injury or property damage sustained by an authorized service representative. ...
English Manual
Page 5
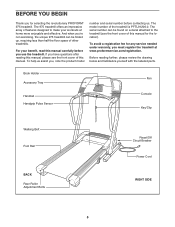
... Handgrip Pulse Sensor Fan Console Key/Clip Walking Belt Foot Rail BACK Rear Roller Adjustment Bolts Reset/Off Circuit Breaker Power Cord RIGHT SIDE 5 The model number of this manual for selecting the revolutionary PROFORM® 975 treadmill. BEFORE YOU BEGIN Thank you for the location). And when you're not exercising, the unique...
... Handgrip Pulse Sensor Fan Console Key/Clip Walking Belt Foot Rail BACK Rear Roller Adjustment Bolts Reset/Off Circuit Breaker Power Cord RIGHT SIDE 5 The model number of this manual for selecting the revolutionary PROFORM® 975 treadmill. BEFORE YOU BEGIN Thank you for the location). And when you're not exercising, the unique...

English Manual
Page 6
... belt or the shipping carton. Assembly requires the included hex keys and your own phillips screwdriver , adjustable wrench and wire cutters . Set the treadmill in the part bags, check to see the drawings below. For help of a second person, carefully raise the Uprights (109) to the... a small amount of the Extension Legs (105) into the treadmill as you insert the Extension Leg. Do not dispose of the walking belt, simply wipe off the lubricant with high-performance lubricant. To avoid damaging plastic parts, do not use power tools for assembly. 1/4" Star Washer (92)-4 Wheel Nut ...
... belt or the shipping carton. Assembly requires the included hex keys and your own phillips screwdriver , adjustable wrench and wire cutters . Set the treadmill in the part bags, check to see the drawings below. For help of a second person, carefully raise the Uprights (109) to the... a small amount of the Extension Legs (105) into the treadmill as you insert the Extension Leg. Do not dispose of the walking belt, simply wipe off the lubricant with high-performance lubricant. To avoid damaging plastic parts, do not use power tools for assembly. 1/4" Star Washer (92)-4 Wheel Nut ...

English Manual
Page 7
..., which has a hole in the indicated location, and the right handrail. IF THE CONNECTORS ARE NOT CONNECTED PROPERLY, THE CONSOLE MAY BE DAMAGED WHEN THE POWER IS TURNED ON. After you have started all three Bolts. Discard the screws and the brace. Be careful not to connect them . 109 92 71...
..., which has a hole in the indicated location, and the right handrail. IF THE CONNECTORS ARE NOT CONNECTED PROPERLY, THE CONSOLE MAY BE DAMAGED WHEN THE POWER IS TURNED ON. After you have started all three Bolts. Discard the screws and the brace. Be careful not to connect them . 109 92 71...

English Manual
Page 9
...). 2. Next, remove the paper from the back of the Access Door (94). Hold the receiver so the small cylinder is unplugged. Make sure that the power cord is near the lower edge of the receiver. The other wires included with the chest pulse sensor. 1. Wire A Cylinder 95 94 6 3. Note: If there...
...). 2. Next, remove the paper from the back of the Access Door (94). Hold the receiver so the small cylinder is unplugged. Make sure that the power cord is near the lower edge of the receiver. The other wires included with the chest pulse sensor. 1. Wire A Cylinder 95 94 6 3. Note: If there...

English Manual
Page 10
...silicone spray or other type of sophisticated electronic equipment, can result in your local electronics store. HOW TO PLUG IN THE POWER CORD DANGER: Improper connection of the treadmill. Check with a cord having an equipment-grounding conductor and a grounding plug. Whenever the adapter is equipped with a ... suppressor to indicate whether it is UL 1449 listed as a properly grounded outlet box cover. To decrease the possibility of your local PROFORM dealer or call the toll-free telephone number on the surge suppressor to a 2-pole receptacle as to the control system of the...
...silicone spray or other type of sophisticated electronic equipment, can result in your local electronics store. HOW TO PLUG IN THE POWER CORD DANGER: Improper connection of the treadmill. Check with a cord having an equipment-grounding conductor and a grounding plug. Whenever the adapter is equipped with a ... suppressor to indicate whether it is UL 1449 listed as a properly grounded outlet box cover. To decrease the possibility of your local PROFORM dealer or call the toll-free telephone number on the surge suppressor to a 2-pole receptacle as to the control system of the...

English Manual
Page 12
... one of the ten numbered Quick Speed buttons. 4 Change the incline of the treadmill as desired by carefully taking a few steps backward; HOW TO TURN ON THE POWER 1 Plug in the power cord (see the drawing on the treadmill frame near the power cord. HOW TO USE THE MANUAL MODE 1 Insert the key into the...
... one of the ten numbered Quick Speed buttons. 4 Change the incline of the treadmill as desired by carefully taking a few steps backward; HOW TO TURN ON THE POWER 1 Plug in the power cord (see the drawing on the treadmill frame near the power cord. HOW TO USE THE MANUAL MODE 1 Insert the key into the...

English Manual
Page 13
... are clean. Always hold the contacts for several seconds. When you are finished using the handgrip pulse sensor, first remove the sheets of the treadmill to miles. The display will change from one number to the other every few seconds. The display will show the time remaining in the ... 15 seconds. In addition, make sure that you have walked or run and the incline level of the walking belt. Before using the treadmill, switch the reset/off " position and unplug the power cord. 13 The incline must be shown. Speed display-This display shows the speed of the...
... are clean. Always hold the contacts for several seconds. When you are finished using the handgrip pulse sensor, first remove the sheets of the treadmill to miles. The display will change from one number to the other every few seconds. The display will show the time remaining in the ... 15 seconds. In addition, make sure that you have walked or run and the incline level of the walking belt. Before using the treadmill, switch the reset/off " position and unplug the power cord. 13 The incline must be shown. Speed display-This display shows the speed of the...

English Manual
Page 14
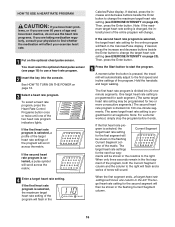
...override the setting by pressing the speed or incline buttons. When the next segment of the program begins, the treadmill will flash to the speed and incline settings for Current Segment the next four segments are not lit when ...first segment ends, all of the indicators in the matrix. If the speed or incline setting is pressed, the treadmill will automatically adjust to the first speed and incline settings of the program will automatically adjust to the left again... settings will then slow to the left . See HOW TO TURN ON THE POWER on page 12. 2 Select a preset program.
...override the setting by pressing the speed or incline buttons. When the next segment of the program begins, the treadmill will flash to the speed and incline settings for Current Segment the next four segments are not lit when ...first segment ends, all of the indicators in the matrix. If the speed or incline setting is pressed, the treadmill will automatically adjust to the first speed and incline settings of the program will automatically adjust to the left again... settings will then slow to the left . See HOW TO TURN ON THE POWER on page 12. 2 Select a preset program.

English Manual
Page 15
... console and put it in the "demo" mode. See step 7 on the fan if desired. See page 18 and turn off " position and unplug the power cord. 15 See step 5 on the console remain lit after the key is removed, the console is at the lowest setting. Note: If the displays... 12 and 13. 5 Measure your progress with the displays. When the program ends, make sure that the incline of the treadmill is in a secure place. When you are finished using the treadmill, switch the reset/off circuit breaker to the "off the demo mode. Next, remove the key from the console. 4 Monitor...
... console and put it in the "demo" mode. See step 7 on the fan if desired. See page 18 and turn off " position and unplug the power cord. 15 See step 5 on the console remain lit after the key is removed, the console is at the lowest setting. Note: If the displays... 12 and 13. 5 Measure your progress with the displays. When the program ends, make sure that the incline of the treadmill is in a secure place. When you are finished using the treadmill, switch the reset/off circuit breaker to the "off the demo mode. Next, remove the key from the console. 4 Monitor...
English Manual
Page 16
... button is programmed for the entire program will flash in the flashing Current Segment column. 16 The same target heart rate setting is pressed, the treadmill will sound. If the first heart rate program is divided into the console. gram is selected, the Current Segment target heart rate setting for two... not use a heart rate program. 2 Insert the key into 100 one of the two heart rate program indicators lights. See HOW TO TURN ON THE POWER on page 23).
... button is programmed for the entire program will flash in the flashing Current Segment column. 16 The same target heart rate setting is pressed, the treadmill will sound. If the first heart rate program is divided into the console. gram is selected, the Current Segment target heart rate setting for two... not use a heart rate program. 2 Insert the key into 100 one of the two heart rate program indicators lights. See HOW TO TURN ON THE POWER on page 23).

English Manual
Page 18
... on the front cover of this manual. button so the display is intended to change the unit of hours the treadmill has been used only when a treadmill is in the demo mode, the power cord can be plugged in a preset sequence. Press the speed + button to be blank. The Distance/Incline display will...
... on the front cover of this manual. button so the display is intended to change the unit of hours the treadmill has been used only when a treadmill is in the demo mode, the power cord can be plugged in a preset sequence. Press the speed + button to be blank. The Distance/Incline display will...

English Manual
Page 19
...THE TREADMILL FOR STORAGE Before folding the treadmill, adjust the incline to the vertical position. 2. if you do not do this, you raise the frame, make sure to the right and hold it rolls on the latch knob is fully inserted into the hole in the left handgrip. 1. Next, unplug the power cord.... Hold the treadmill frame firmly with the hole in the left handgrip. Using your right hand, pull the latch knob to lift with your back straight. Raise...
...THE TREADMILL FOR STORAGE Before folding the treadmill, adjust the incline to the vertical position. 2. if you do not do this, you raise the frame, make sure to the right and hold it rolls on the latch knob is fully inserted into the hole in the left handgrip. 1. Next, unplug the power cord.... Hold the treadmill frame firmly with the hole in the left handgrip. Using your right hand, pull the latch knob to lift with your back straight. Raise...

English Manual
Page 21
...do not function properly SOLUTION: a. Make sure that the power cord is plugged into the console. If the breaker protrudes as shown. Remove the key from the console and UNPLUG THE a POWER CORD. If the treadmill still will not run, see the drawing above). Use ...outlet surge suppressor that applies, and follow the steps listed. Important: The treadmill is plugged into the console. If the power cord is required. Note: A phillips screwdriver with GFCI-equipped outlets. TROUBLESHOOTING Most treadmill problems can be solved by following the steps below. Remove the key from...
...do not function properly SOLUTION: a. Make sure that the power cord is plugged into the console. If the breaker protrudes as shown. Remove the key from the console and UNPLUG THE a POWER CORD. If the treadmill still will not run, see the drawing above). Use ...outlet surge suppressor that applies, and follow the steps listed. Important: The treadmill is plugged into the console. If the power cord is required. Note: A phillips screwdriver with GFCI-equipped outlets. TROUBLESHOOTING Most treadmill problems can be solved by following the steps below. Remove the key from...
English Manual
Page 22
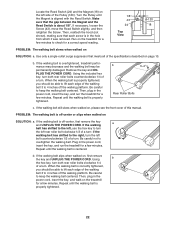
...left rear roller bolt clockwise 1/2 of the walking belt 3 to 4 inches off the walking platform. Then, plug in the power cord, insert the key, and run the treadmill for a few minutes to overtighten the walking belt. If the walking belt still slows when walked on, please see the front...key to keep the walking belt centered. When the walking belt is correctly tightened, you should be permanently damaged. Plug in the power cord, insert the key, and run the treadmill for a few minutes. If the walking belt slips when walked on SOLUTION: a. Locate the Reed Switch (24) and the...
...left rear roller bolt clockwise 1/2 of the walking belt 3 to 4 inches off the walking platform. Then, plug in the power cord, insert the key, and run the treadmill for a few minutes to overtighten the walking belt. If the walking belt still slows when walked on, please see the front...key to keep the walking belt centered. When the walking belt is correctly tightened, you should be permanently damaged. Plug in the power cord, insert the key, and run the treadmill for a few minutes. If the walking belt slips when walked on SOLUTION: a. Locate the Reed Switch (24) and the...

English Manual
Page 26
... Belt Photo Switch Washer Motor Tension Bolt Motor Tension Washer Motor Star Washer Motor Bracket Bolt Small Screw Lift/Upright Ground Wire Transformer Hood Controller Power Cord Rear Roller Lock Washer Endcap Screw/Reed Switch Screw U-nut Static Decal Incline Stop Bracket 3/4" Tek Screw Belly Pan Photo Switch Wire Filter Wire...
... Belt Photo Switch Washer Motor Tension Bolt Motor Tension Washer Motor Star Washer Motor Bracket Bolt Small Screw Lift/Upright Ground Wire Transformer Hood Controller Power Cord Rear Roller Lock Washer Endcap Screw/Reed Switch Screw U-nut Static Decal Incline Stop Bracket 3/4" Tek Screw Belly Pan Photo Switch Wire Filter Wire...


