

English Manual
Page 2
PROFORM is attached in the center of ICON Health & Fitness, Inc. 2 TABLE OF CONTENTS IMPORTANT PRECAUTIONS 3 BEFORE YOU BEGIN 5 ASSEMBLY 6 TREADMILL OPERATION 8 HOW TO FOLD AND MOVE THE TREADMILL 22 TROUBLESHOOTING 23 EXERCISE GUIDELINES 25 PART LIST 26 HOW TO ORDER REPLACEMENT PARTS Back Cover LIMITED WARRANTY Back Cover Note: An EXPLODED DRAWING is a registered trademark of this manual.
PROFORM is attached in the center of ICON Health & Fitness, Inc. 2 TABLE OF CONTENTS IMPORTANT PRECAUTIONS 3 BEFORE YOU BEGIN 5 ASSEMBLY 6 TREADMILL OPERATION 8 HOW TO FOLD AND MOVE THE TREADMILL 22 TROUBLESHOOTING 23 EXERCISE GUIDELINES 25 PART LIST 26 HOW TO ORDER REPLACEMENT PARTS Back Cover LIMITED WARRANTY Back Cover Note: An EXPLODED DRAWING is a registered trademark of this manual.
English Manual
Page 7
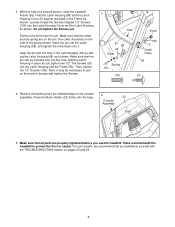
... spring shown. Do not tighten the Screws yet. Remove the backing from the pin. Place a mat beneath the treadmill to pull on the console assembly. Align the pin with the TROUBLESHOOTING section on the pin. Press the Book Holder (23) firmly onto the tape. 4 Console Assembly 23 Tape 5.... on pages 23 and 24. 7 Hold the Latch Housing (68) and the Latch Housing Cover (5) against the sides of a second person, raise the treadmill Frame (55). 3. Then, tighten the 1/2" Screws (105). The collar should be necessary to protect the floor or carpet. Make sure that the pin...
... spring shown. Do not tighten the Screws yet. Remove the backing from the pin. Place a mat beneath the treadmill to pull on the console assembly. Align the pin with the TROUBLESHOOTING section on the pin. Press the Book Holder (23) firmly onto the tape. 4 Console Assembly 23 Tape 5.... on pages 23 and 24. 7 Hold the Latch Housing (68) and the Latch Housing Cover (5) against the sides of a second person, raise the treadmill Frame (55). 3. Then, tighten the 1/2" Screws (105). The collar should be necessary to protect the floor or carpet. Make sure that the pin...

English Manual
Page 23
...Make sure that meets all of the specifications described on the left side of the console do not function properly SOLUTION: a. TROUBLESHOOTING Most treadmill problems can be solved by following the steps below. If further assistance is aligned with GFCI-equipped outlets. until the Magnet ... cord. Use only a single-outlet surge suppressor that the power cord is not compatible with the Reed 17 12 Switch. Important: The treadmill is plugged in . To reset the circuit breaker, wait for a correct speed reading. 23 PROBLEM: The power turns off circuit breaker located...
...Make sure that meets all of the specifications described on the left side of the console do not function properly SOLUTION: a. TROUBLESHOOTING Most treadmill problems can be solved by following the steps below. If further assistance is aligned with GFCI-equipped outlets. until the Magnet ... cord. Use only a single-outlet surge suppressor that the power cord is not compatible with the Reed 17 12 Switch. Important: The treadmill is plugged in . To reset the circuit breaker, wait for a correct speed reading. 23 PROBLEM: The power turns off circuit breaker located...

