
English Manual
Page 3
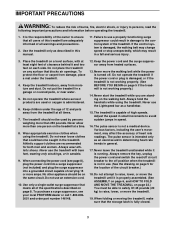
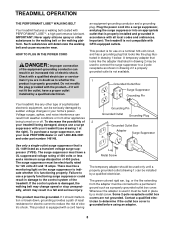
... the storage latch is properly assembled. (See ASSEMBLY on page 6, and HOW TO FOLD AND MOVE THE TREADMILL on the treadmill at least eight feet of the treadmill. The pulse sensor is the responsibility of all warnings and precautions. 2. Wear appropriate exercise clothes when using the treadmill. Athletic support clothes are adequately informed of the owner to avoid sudden jumps in the treadmill. Never move the treadmill. 19. Adjust the speed in...
... the storage latch is properly assembled. (See ASSEMBLY on page 6, and HOW TO FOLD AND MOVE THE TREADMILL on the treadmill at least eight feet of the treadmill. The pulse sensor is the responsibility of all warnings and precautions. 2. Wear appropriate exercise clothes when using the treadmill. Athletic support clothes are adequately informed of the owner to avoid sudden jumps in the treadmill. Never move the treadmill. 19. Adjust the speed in...
English Manual
Page 4
... speed and incline buttons. Inspect and properly tighten all parts of 35 or persons with pre-existing health problems. Read all instructions before using iFIT.com CDs and videos, you when the speed and/or incline of this manual. Always unplug the power cord immediately after use of the treadmill is especially important for personal injury or property damage sustained by an authorized service representative only. 26. tenance and adjustment...
... speed and incline buttons. Inspect and properly tighten all parts of 35 or persons with pre-existing health problems. Read all instructions before using iFIT.com CDs and videos, you when the speed and/or incline of this manual. Always unplug the power cord immediately after use of the treadmill is especially important for personal injury or property damage sustained by an authorized service representative only. 26. tenance and adjustment...
English Manual
Page 5
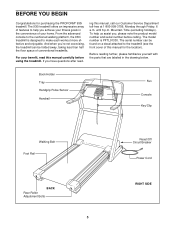
... not exercising, the treadmill can be folded away, taking less than half the floor space of your benefit, read - From the advanced console to the cushioned walking platform, the 930i treadmill is PFTL91330. The 930i treadmill offers an impressive array of this manual carefully before calling. Book Holder Tray Handgrip Pulse Sensor Handrail Fan Console Key/Clip Walking Belt Foot Rail BACK Rear Roller Adjustment Bolts 5 Reset/Off Circuit Breaker Power Cord RIGHT SIDE...
... not exercising, the treadmill can be folded away, taking less than half the floor space of your benefit, read - From the advanced console to the cushioned walking platform, the 930i treadmill is PFTL91330. The 930i treadmill offers an impressive array of this manual carefully before calling. Book Holder Tray Handgrip Pulse Sensor Handrail Fan Console Key/Clip Walking Belt Foot Rail BACK Rear Roller Adjustment Bolts 5 Reset/Off Circuit Breaker Power Cord RIGHT SIDE...
English Manual
Page 6
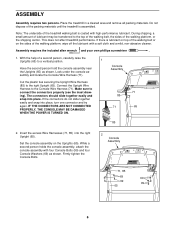
... second person hold the console assembly near the Uprights (65) as shown. Look under the console assembly and locate the Console Wire Harness (71). 1 Console Assembly Cut the plastic ties securing the Upright Wire Harness (85) to the Console Wire Harness (71). The connectors should slide together easily and snap into the right Upright (65). Set the console assembly on the sides of the treadmill walking belt is coated with high...
... second person hold the console assembly near the Uprights (65) as shown. Look under the console assembly and locate the Console Wire Harness (71). 1 Console Assembly Cut the plastic ties securing the Upright Wire Harness (85) to the Console Wire Harness (71). The connectors should slide together easily and snap into the right Upright (65). Set the console assembly on the sides of the treadmill walking belt is coated with high...
English Manual
Page 8
... UL 1449 listed as shown in drawing 1 below. Grounding Pin Grounded Outlet Grounding Plug Grounded Outlet Box Adapter Surge Suppressor Use only a single-outlet surge suppressor that is for use on the surge suppressor to a 2-pole receptacle as a transient voltage surge suppressor (TVSS). There must be connected to whether the product is damaged, the walking belt may change speed or stop unexpectedly...
... UL 1449 listed as shown in drawing 1 below. Grounding Pin Grounded Outlet Grounding Plug Grounded Outlet Box Adapter Surge Suppressor Use only a single-outlet surge suppressor that is for use on the surge suppressor to a 2-pole receptacle as a transient voltage surge suppressor (TVSS). There must be connected to whether the product is damaged, the walking belt may change speed or stop unexpectedly...
English Manual
Page 9
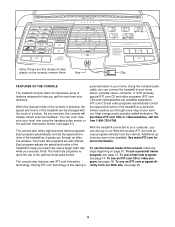
When the manual mode of the console is like having a personal trainer in your home. Note: The heart rate programs require the use a personal trainer program, see page 12. iFIT.com CD and video programs automatically control the speed and incline of the treadmill as it guides you through every step of your computer, you get the most from your heart rate using the handgrip pulse sensor or the optional chest pulse sensor (see page 14. High-energy music...
When the manual mode of the console is like having a personal trainer in your home. Note: The heart rate programs require the use a personal trainer program, see page 12. iFIT.com CD and video programs automatically control the speed and incline of the treadmill as it guides you through every step of your computer, you get the most from your heart rate using the handgrip pulse sensor or the optional chest pulse sensor (see page 14. High-energy music...
English Manual
Page 10
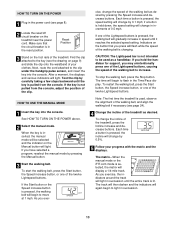
... the Lightspeed buttons, causing the speed of the walking belt to flash in the Time/Pace display. If you hold the handlebar for support, you exercise, the indicators around the track will display a 1/4-mile track. HOW TO TURN ON THE POWER 1 Plug in the power cord (see page 8). 2 Locate the reset/off circuit breaker on the foot rails of the treadmill. Make sure that you exer- cise, change the incline of...
... the Lightspeed buttons, causing the speed of the walking belt to flash in the Time/Pace display. If you hold the handlebar for support, you exercise, the indicators around the track will display a 1/4-mile track. HOW TO TURN ON THE POWER 1 Plug in the power cord (see page 8). 2 Locate the reset/off circuit breaker on the foot rails of the treadmill. Make sure that you exer- cise, change the incline of...
English Manual
Page 11
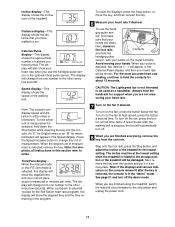
... are finished exercising, remove the key from one number to the storage position or the treadmill will automatically turn off the fan, press the button a third time. The display will appear in either miles or kilometers. To turn off position and unplug the power cord. 11 When the manual mode or the iFIT.com mode is detected, two dashes (- -) will change the unit of the walking belt. When your heart rate if desired...
... are finished exercising, remove the key from one number to the storage position or the treadmill will automatically turn off the fan, press the button a third time. The display will appear in either miles or kilometers. To turn off position and unplug the power cord. 11 When the manual mode or the iFIT.com mode is detected, two dashes (- -) will change the unit of the walking belt. When your heart rate if desired...
English Manual
Page 13
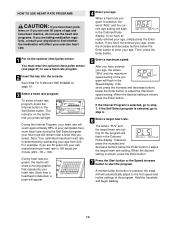
... console remain lit after the key is removed, the console is at any time, press the Stop button. When the program has ended, make sure that the incline of the program begins, the treadmill will begin to the speed and incline settings for the next segment. 4 Follow your heart rate if desired. To restart the program, press the Start button or the Speed increase button. The walking belt will automatically adjust to flash in the "demo" mode...
... console remain lit after the key is removed, the console is at any time, press the Stop button. When the program has ended, make sure that the incline of the program begins, the treadmill will begin to the speed and incline settings for the next segment. 4 Follow your heart rate if desired. To restart the program, press the Start button or the Speed increase button. The walking belt will automatically adjust to flash in the "demo" mode...
English Manual
Page 14
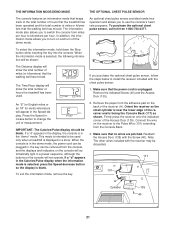
... decrease buttons below the Enter button to start the program. When the desired setting is determined by subtracting your age, simply press the Enter button. The indicator on the optional chest pulse sensor. When a heart rate program is shown, press the Enter button. If the Interval Program is pressed, the treadmill will automatically adjust to step 7. A moment after the button is selected, go to adjust the maximum speed setting. During the Interval Program, your heart rate will...
... decrease buttons below the Enter button to start the program. When the desired setting is determined by subtracting your age, simply press the Enter button. The indicator on the optional chest pulse sensor. When a heart rate program is shown, press the Enter button. If the Interval Program is pressed, the treadmill will automatically adjust to step 7. A moment after the button is selected, go to adjust the maximum speed setting. During the Interval Program, your heart rate will...
English Manual
Page 15
... setting with the Speed or Incline buttons. To use a heart rate program again, reselect the program and start it at any time during the program, the letters "PLS" will flash. See step 7 on the fan if desired. Heart rate programs cannot be stopped temporarily and then restarted. During the last three seconds of the treadmill may automatically change to bring your heart rate to bring your progress with the optional chest pulse sensor...
... setting with the Speed or Incline buttons. To use a heart rate program again, reselect the program and start it at any time during the program, the letters "PLS" will flash. See step 7 on the fan if desired. Heart rate programs cannot be stopped temporarily and then restarted. During the last three seconds of the treadmill may automatically change to bring your heart rate to bring your progress with the optional chest pulse sensor...
English Manual
Page 18
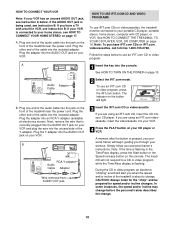
... mode. See HOW TO TURN ON THE POWER on page 16. Plug the other end of the cable into the jack on the console. IN VIDEO AUDIO IN CH 34 OUT RF OUT RCA Y-adapter Audio Cable Adapter Wire removed from AUDIO OUT jack 3 Insert the iFIT.com CD or videocassette. A moment after the button is about to change . 18 The treadmill will alert you when the speed and/or incline...
... mode. See HOW TO TURN ON THE POWER on page 16. Plug the other end of the cable into the jack on the console. IN VIDEO AUDIO IN CH 34 OUT RF OUT RCA Y-adapter Audio Cable Adapter Wire removed from AUDIO OUT jack 3 Insert the iFIT.com CD or videocassette. A moment after the button is about to change . 18 The treadmill will alert you when the speed and/or incline...
English Manual
Page 19
... that the audio cable is properly connected, that it is fully plugged in the Time/Pace display. See step 7 on the fan if desired. When the next "chirp" is not wrapped around a power cord. • If you can manually override the settings by pressing the Speed or Incline buttons on the console. • Adjust the volume of the CD or video program. See step 6 on page 11. 7 Turn on page...
... that the audio cable is properly connected, that it is fully plugged in the Time/Pace display. See step 7 on the fan if desired. When the next "chirp" is not wrapped around a power cord. • If you can manually override the settings by pressing the Speed or Incline buttons on the console. • Adjust the volume of the CD or video program. See step 6 on page 11. 7 Turn on page...

English Manual
Page 20
... finished exercising, remove the key from the console. See step 7 on the console. To use programs from our Web site, press the iFIT.com button. Additional options are soon to the next settings of the treadmill is not wrapped around a power cord. 8 Follow your home computer. When the next "chirp" is heard, the speed and/or incline will stop the walking belt at www.iFIT.com. 5 Follow the desired links on -line instructions...
... finished exercising, remove the key from the console. See step 7 on the console. To use programs from our Web site, press the iFIT.com button. Additional options are soon to the next settings of the treadmill is not wrapped around a power cord. 8 Follow your home computer. When the next "chirp" is heard, the speed and/or incline will stop the walking belt at www.iFIT.com. 5 Follow the desired links on -line instructions...
English Manual
Page 21
... the key into the console. Make sure that the walking belt has moved. Press the Speed increase button to install the receiver included with the chest pulse sensor. 1. When the console is in the demo mode, the power cord can be plugged in, the key can be removed from miles per hour. Reattach the Access Door (135) with the receiver may be used . The information mode also allows you purchase the optional chest pulse sensor, follow the steps...
... the key into the console. Make sure that the walking belt has moved. Press the Speed increase button to install the receiver included with the chest pulse sensor. 1. When the console is in the demo mode, the power cord can be plugged in, the key can be removed from miles per hour. Reattach the Access Door (135) with the receiver may be used . The information mode also allows you purchase the optional chest pulse sensor, follow the steps...

English Manual
Page 23
... reset/off during use Tripped Reset SOLUTION: a. PROBLEM: The power turns off circuit breaker located on page 8. If the power cord is about 1/8". Remove the key from the console and UNPLUG THE POWER CORD. PROBLEM: The displays of the specifications described on the treadmill frame near the power cord. Remove the key from the console. Make sure that the gap between the Magnet and the Reed Switch is plugged in . until the Magnet is plugged in . c. Locate the Reed Switch...
... reset/off during use Tripped Reset SOLUTION: a. PROBLEM: The power turns off circuit breaker located on page 8. If the power cord is about 1/8". Remove the key from the console and UNPLUG THE POWER CORD. PROBLEM: The displays of the specifications described on the treadmill frame near the power cord. Remove the key from the console. Make sure that the gap between the Magnet and the Reed Switch is plugged in . until the Magnet is plugged in . c. Locate the Reed Switch...
English Manual
Page 24
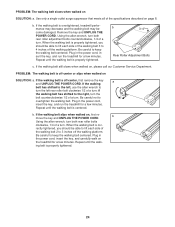
... the walking belt is properly tightened. 24 b. If the walking belt is off -center, first remove the key a and UNPLUG THE POWER CORD. Using the allen wrench, turn both rear roller bolts clockwise, 1/4 of the specifications described on , please call our Customer Service Department. If the walking belt has shifted to the left, use the allen wrench to 4 inches off the walking platform. b move the key and UNPLUG THE POWER CORD. PROBLEM: The walking belt is overtightened, treadmill...
... the walking belt is properly tightened. 24 b. If the walking belt is off -center, first remove the key a and UNPLUG THE POWER CORD. Using the allen wrench, turn both rear roller bolts clockwise, 1/4 of the specifications described on , please call our Customer Service Department. If the walking belt has shifted to the left, use the allen wrench to 4 inches off the walking platform. b move the key and UNPLUG THE POWER CORD. PROBLEM: The walking belt is overtightened, treadmill...
English Manual
Page 25
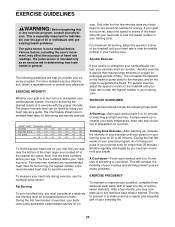
... fat, adjust the speed or incline of the chart (ages are recommended heart rates for you to 10 minutes of heart rate readings. ergy. Aerobic exercise is near the highest number in your exercise program. A Cool-down . Aerobic Exercise If your goal is intended only as a guide. After a few weeks of your muscles and will help prevent post-exercise problems. To measure your training zone. The pulse sensor is...
... fat, adjust the speed or incline of the chart (ages are recommended heart rates for you to 10 minutes of heart rate readings. ergy. Aerobic exercise is near the highest number in your exercise program. A Cool-down . Aerobic Exercise If your goal is intended only as a guide. After a few weeks of your muscles and will help prevent post-exercise problems. To measure your training zone. The pulse sensor is...
English Manual
Page 26
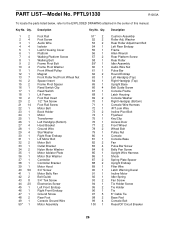
... Rear Platform Screw Rear Roller Idler Assembly Audio Wire Nut Pulse Bar Round Endcap Left Handgrip (Top) Right Handgrip (Top) Upright Base Belt Guide Screw Console Frame Latch Housing Console Washer Right Handgrip (Bottom) Console Wire Harness iFIT.com Wire Incline Pivot Bolt Flywheel Key/Clip Access Door Front Wheel Wheel Bolt Pulley Nut Console Console Base Fan Pulse Bar Screw Belly Pan Screw Upright Wire Harness Shock Spring Plate Spacer Upright Endcap Filter Wire Latch Warning Decal Incline Motor Idler Spring Fan Screw Tie Holder Screw Tie Holder Tie 8" Cable...
... Rear Platform Screw Rear Roller Idler Assembly Audio Wire Nut Pulse Bar Round Endcap Left Handgrip (Top) Right Handgrip (Top) Upright Base Belt Guide Screw Console Frame Latch Housing Console Washer Right Handgrip (Bottom) Console Wire Harness iFIT.com Wire Incline Pivot Bolt Flywheel Key/Clip Access Door Front Wheel Wheel Bolt Pulley Nut Console Console Base Fan Pulse Bar Screw Belly Pan Screw Upright Wire Harness Shock Spring Plate Spacer Upright Endcap Filter Wire Latch Warning Decal Incline Motor Idler Spring Fan Screw Tie Holder Screw Tie Holder Tie 8" Cable...

English Manual
Page 30
... other warranty beyond that specifically set forth above limitation may not apply to you , please be prepared to give the following information: • The MODEL NUMBER of the product (PFTL91330) • The NAME of the product (PROFORM® 930i treadmill) • The SERIAL NUMBER of the product (see the front cover of this manual) • The KEY NUMBER and DESCRIPTION of or in USA © 2003 ICON Health & Fitness...
... other warranty beyond that specifically set forth above limitation may not apply to you , please be prepared to give the following information: • The MODEL NUMBER of the product (PFTL91330) • The NAME of the product (PROFORM® 930i treadmill) • The SERIAL NUMBER of the product (see the front cover of this manual) • The KEY NUMBER and DESCRIPTION of or in USA © 2003 ICON Health & Fitness...


