
English Manual
Page 2
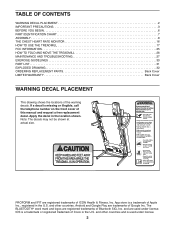
Android and Google Play are used under license. and are trademarks of Google Inc. PROFORM and IFIT are registered trademarks of Cisco in the U.S. App store is used under license. 2 If a decal is a trademark or registered ... CONTENTS WARNING DECAL PLACEMENT 2 IMPORTANT PRECAUTIONS 3 BEFORE YOU BEGIN 6 PART IDENTIFICATION CHART 7 ASSEMBLY 8 THE CHEST HEART RATE MONITOR 16 HOW TO USE THE TREADMILL 17 FCC INFORMATION 25 HOW TO FOLD AND MOVE THE TREADMILL 26 MAINTENANCE AND TROUBLESHOOTING 27 EXERCISE GUIDELINES 30 PART LIST 31 EXPLODED DRAWING 32 ORDERING...
Android and Google Play are used under license. and are trademarks of Google Inc. PROFORM and IFIT are registered trademarks of Cisco in the U.S. App store is used under license. 2 If a decal is a trademark or registered ... CONTENTS WARNING DECAL PLACEMENT 2 IMPORTANT PRECAUTIONS 3 BEFORE YOU BEGIN 6 PART IDENTIFICATION CHART 7 ASSEMBLY 8 THE CHEST HEART RATE MONITOR 16 HOW TO USE THE TREADMILL 17 FCC INFORMATION 25 HOW TO FOLD AND MOVE THE TREADMILL 26 MAINTENANCE AND TROUBLESHOOTING 27 EXERCISE GUIDELINES 30 PART LIST 31 EXPLODED DRAWING 32 ORDERING...
English Manual
Page 4
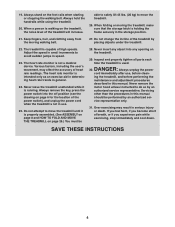
... and unplug the power cord when the treadmill is capable of breath, or if you become short of high speeds. The treadmill is not in the storage position. 21. Inspect and properly tighten all parts each time the treadmill is properly assembled. (See ASSEMBLY on page 8 and HOW TO FOLD ...AND MOVE THE TREADMILL on the foot rails when starting or stopping the walking belt. Always stand on page 26.) You must ...
... and unplug the power cord when the treadmill is capable of breath, or if you become short of high speeds. The treadmill is not in the storage position. 21. Inspect and properly tighten all parts each time the treadmill is properly assembled. (See ASSEMBLY on page 8 and HOW TO FOLD ...AND MOVE THE TREADMILL on the foot rails when starting or stopping the walking belt. Always stand on page 26.) You must ...

English Manual
Page 7
The number following the key number is the quantity used for assembly. Extra parts may be included. 1/4" Star Washer (26)-10 5/16" Star Washer (11)-4 3/8" Star Washer (13)-8 #8 x 1/2" Ground Screw (18)-1 #8 x 1/2" Screw (1)-8 #8 x 1/2" Machine Screw (99)-4 #8 x 3/4" Screw (4)-8 #10 x 3/4" ... a part is not in parentheses below to see whether it is preattached. The number in the hardware kit, check to identify small parts used for assembly. PART IDENTIFICATION CHART Use the drawings below each drawing is the key number of the part, from the PART LIST near the end of this...
The number following the key number is the quantity used for assembly. Extra parts may be included. 1/4" Star Washer (26)-10 5/16" Star Washer (11)-4 3/8" Star Washer (13)-8 #8 x 1/2" Ground Screw (18)-1 #8 x 1/2" Screw (1)-8 #8 x 1/2" Machine Screw (99)-4 #8 x 3/4" Screw (4)-8 #10 x 3/4" ... a part is not in parentheses below to see whether it is preattached. The number in the hardware kit, check to identify small parts used for assembly. PART IDENTIFICATION CHART Use the drawings below each drawing is the key number of the part, from the PART LIST near the end of this...
English Manual
Page 8
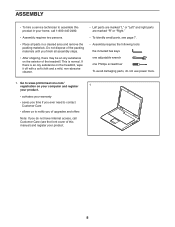
Go to notify you of upgrades and offers Note: If you finish all assembly steps. • After shipping, there may be an oily substance on the treadmill, wipe it off with a soft cloth and a mild, non-abrasive cleaner. • Left parts are marked "L" or "Left" and right parts are ...marked "R" or "Right." • To identify small parts, see page 7. • Assembly requires the following tools: the included hex...
Go to notify you of upgrades and offers Note: If you finish all assembly steps. • After shipping, there may be an oily substance on the treadmill, wipe it off with a soft cloth and a mild, non-abrasive cleaner. • Left parts are marked "L" or "Left" and right parts are ...marked "R" or "Right." • To identify small parts, see page 7. • Assembly requires the following tools: the included hex...

English Manual
Page 11
...(E) from both Screws, and then tighten them . Identify the Left Tray (36). Discard the screws. 11 E 84 81 90 7. Set the console assembly (F) face down on the left side. start both Handrails (84) (only one side is not 6 28 pinched. Be careful not to avoid scratching the... console 7 assembly. start all four Screws, and then tighten them . Remove and save the four 1/4" x 1/2" Screws (2). Set a Handrail (84) on the Right Upright (90)....
...(E) from both Screws, and then tighten them . Identify the Left Tray (36). Discard the screws. 11 E 84 81 90 7. Set the console assembly (F) face down on the left side. start both Handrails (84) (only one side is not 6 28 pinched. Be careful not to avoid scratching the... console 7 assembly. start all four Screws, and then tighten them . Remove and save the four 1/4" x 1/2" Screws (2). Set a Handrail (84) on the Right Upright (90)....

English Manual
Page 12
...again. Be careful not to the console wire (G). Insert 9 F the excess Upright Wire (81) into place. Set the console assembly (F) on the Handrails (84). Attach the console assembly (F) with the four 1/4" x 1/2" Screws (2) that you removed in step 7 and four 1/4" Star Washers (26); The ...connectors should slide together easily and snap into the Right Upright (90). With the help of a second person, hold the console assembly (F) near the Right Handrail (84) 8 and the Left Handrail (not shown). Then, remove the wire tie (A) from the Upright Wire. 8. G...
...again. Be careful not to the console wire (G). Insert 9 F the excess Upright Wire (81) into place. Set the console assembly (F) on the Handrails (84). Attach the console assembly (F) with the four 1/4" x 1/2" Screws (2) that you removed in step 7 and four 1/4" Star Washers (26); The ...connectors should slide together easily and snap into the Right Upright (90). With the help of a second person, hold the console assembly (F) near the Right Handrail (84) 8 and the Left Handrail (not shown). Then, remove the wire tie (A) from the Upright Wire. 8. G...

English Manual
Page 13
... left and right Handrails (84); See step 9. start all four Screws, and then tighten them. Note: Slide the Left Handrail Insert up against the console assembly (F) before you tighten the Screws. 79 F Attach the Right Handrail Insert (31) in the same way. 84 4 31 84 4 13
... left and right Handrails (84); See step 9. start all four Screws, and then tighten them. Note: Slide the Left Handrail Insert up against the console assembly (F) before you tighten the Screws. 79 F Attach the Right Handrail Insert (31) in the same way. 84 4 31 84 4 13

English Manual
Page 14
Be careful not to the Left Upright (89) with 13 two 1/4" x 4 1/2" Screws (6) and two 1/4" Star Washers (26); Attach the Storage Latch to overtighten the Screw. Attach the Right Handrail Cover (8) in the 87 same way. 4 8 4 13. start both Screws, and then tighten them. 6 26 98 89 14 12. Identify the Left and Right Handrail Covers (87, 8). 12 Slide the Left Handrail Cover (87) up against the console assembly (F) and tighten a #8 x 3/4" Screw (4) into the bottom of the Left Handrail F Cover. Orient the Storage Latch (98) as shown.
Be careful not to the Left Upright (89) with 13 two 1/4" x 4 1/2" Screws (6) and two 1/4" Star Washers (26); Attach the Storage Latch to overtighten the Screw. Attach the Right Handrail Cover (8) in the 87 same way. 4 8 4 13. start both Screws, and then tighten them. 6 26 98 89 14 12. Identify the Left and Right Handrail Covers (87, 8). 12 Slide the Left Handrail Cover (87) up against the console assembly (F) and tighten a #8 x 3/4" Screw (4) into the bottom of the Left Handrail F Cover. Orient the Storage Latch (98) as shown.

English Manual
Page 15
.... start all parts are sheets of the Right Upright (90). If there are properly tightened before you use the treadmill. the hex key is used to the console assembly (F) with four #8 x 1/2" Machine Screws 15 (99); To protect the floor or carpet, place a mat under ...the treadmill. Firmly tighten the four 3/8" x 2 3/8" Screws (7), the two 3/8" x 1 3/4" Screws (62), and the 14 two 3/8" x 1 1/4" Screws (51). Do not overtighten the Machine ...
.... start all parts are sheets of the Right Upright (90). If there are properly tightened before you use the treadmill. the hex key is used to the console assembly (F) with four #8 x 1/2" Machine Screws 15 (99); To protect the floor or carpet, place a mat under ...the treadmill. Firmly tighten the four 3/8" x 2 3/8" Screws (7), the two 3/8" x 1 3/4" Screws (62), and the 14 two 3/8" x 1 1/4" Screws (51). Do not overtighten the Machine ...


