
English Manual
Page 2
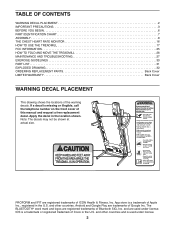
... at actual size. TABLE OF CONTENTS WARNING DECAL PLACEMENT 2 IMPORTANT PRECAUTIONS 3 BEFORE YOU BEGIN 6 PART IDENTIFICATION CHART 7 ASSEMBLY 8 THE CHEST HEART RATE MONITOR 16 HOW TO USE THE TREADMILL 17 FCC INFORMATION 25 HOW TO FOLD AND MOVE THE TREADMILL 26 MAINTENANCE AND TROUBLESHOOTING 27 EXERCISE GUIDELINES 30 PART LIST 31 EXPLODED DRAWING 32 ORDERING REPLACEMENT PARTS Back Cover LIMITED WARRANTY Back Cover WARNING DECAL PLACEMENT This drawing shows the locations of this manual and request a free replacement decal...
... at actual size. TABLE OF CONTENTS WARNING DECAL PLACEMENT 2 IMPORTANT PRECAUTIONS 3 BEFORE YOU BEGIN 6 PART IDENTIFICATION CHART 7 ASSEMBLY 8 THE CHEST HEART RATE MONITOR 16 HOW TO USE THE TREADMILL 17 FCC INFORMATION 25 HOW TO FOLD AND MOVE THE TREADMILL 26 MAINTENANCE AND TROUBLESHOOTING 27 EXERCISE GUIDELINES 30 PART LIST 31 EXPLODED DRAWING 32 ORDERING REPLACEMENT PARTS Back Cover LIMITED WARRANTY Back Cover WARNING DECAL PLACEMENT This drawing shows the locations of this manual and request a free replacement decal...
English Manual
Page 3
... and instructions in this manual and all times. 10. This is not intended for use of the treadmill by persons with at all warnings on the front cover of this product. 1. Always wear athletic shoes. The treadmill is turned off. If the control system is not working properly. (See MAINTENANCE AND TROUBLESHOOTING on the treadmill at a time. 17. Never move the walking belt while the power...
... and instructions in this manual and all times. 10. This is not intended for use of the treadmill by persons with at all warnings on the front cover of this product. 1. Always wear athletic shoes. The treadmill is turned off. If the control system is not working properly. (See MAINTENANCE AND TROUBLESHOOTING on the treadmill at a time. 17. Never move the walking belt while the power...
English Manual
Page 4
.... Various factors, including the user's movement, may result in the storage position. 21. Over exercising may affect the accuracy of the power switch), and unplug the power cord when the treadmill is properly assembled. (See ASSEMBLY on page 8 and HOW TO FOLD AND MOVE THE TREADMILL on the treadmill. 29. The heart rate monitor is used. vice representative only. 31. Always remove the key, press the power switch into any object into the...
.... Various factors, including the user's movement, may result in the storage position. 21. Over exercising may affect the accuracy of the power switch), and unplug the power cord when the treadmill is properly assembled. (See ASSEMBLY on page 8 and HOW TO FOLD AND MOVE THE TREADMILL on the treadmill. 29. The heart rate monitor is used. vice representative only. 31. Always remove the key, press the power switch into any object into the...

English Manual
Page 6
... drawing below. manual. If you for selecting the new PROFORM® 905 CST treadmill. The model number and the location of the serial number decal are shown on the front cover of this Before reading further, please familiarize yourself with the parts that are labeled in . (94 cm) Heart Rate Monitor Handrail Storage Latch Tablet Holder Console Key/Clip Walking Belt Foot Rail Idler Roller Adjustment Screws Motor Hood Power Switch Power Cord Wheel Platform Cushions 6 The 905 CST treadmill provides an impressive...
... drawing below. manual. If you for selecting the new PROFORM® 905 CST treadmill. The model number and the location of the serial number decal are shown on the front cover of this Before reading further, please familiarize yourself with the parts that are labeled in . (94 cm) Heart Rate Monitor Handrail Storage Latch Tablet Holder Console Key/Clip Walking Belt Foot Rail Idler Roller Adjustment Screws Motor Hood Power Switch Power Cord Wheel Platform Cushions 6 The 905 CST treadmill provides an impressive...

English Manual
Page 12
... into the Right Upright (90). IF YOU DO NOT CONNECT THE CONNECTORS PROPERLY, THE CONSOLE MAY BECOME DAMAGED WHEN YOU TURN ON THE POWER. Then, remove the wire tie (A) from the Upright Wire. Attach the console assembly (F) with the four 1/4" x 1/2" Screws (2) that you removed in step 7 and four 1/4" Star Washers (26); do not, turn one connector and try again. If they do not tighten the Screws yet. 84...
... into the Right Upright (90). IF YOU DO NOT CONNECT THE CONNECTORS PROPERLY, THE CONSOLE MAY BECOME DAMAGED WHEN YOU TURN ON THE POWER. Then, remove the wire tie (A) from the Upright Wire. Attach the console assembly (F) with the four 1/4" x 1/2" Screws (2) that you removed in step 7 and four 1/4" Star Washers (26); do not, turn one connector and try again. If they do not tighten the Screws yet. 84...

English Manual
Page 15
... tighten the four 3/8" x 2 3/8" Screws (7), the two 3/8" x 1 3/4" Screws (62), and the 14 two 3/8" x 1 1/4" Screws (51). the hex key is used to the console assembly (F) with four #8 x 1/2" Machine Screws 15 (99); Then, slide the Left Base Cover (82) downward and press it onto the Right Inner Base Cover. 83 62 51 90 7 89 82 97 51 7 62 96 15. Attach the Tablet Holder (100) to adjust the walking belt...
... tighten the four 3/8" x 2 3/8" Screws (7), the two 3/8" x 1 3/4" Screws (62), and the 14 two 3/8" x 1 1/4" Screws (51). the hex key is used to the console assembly (F) with four #8 x 1/2" Machine Screws 15 (99); Then, slide the Left Base Cover (82) downward and press it onto the Right Inner Base Cover. 83 62 51 90 7 89 82 97 51 7 62 96 15. Attach the Tablet Holder (100) to adjust the walking belt...
English Manual
Page 17
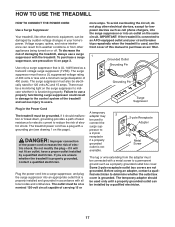
... filter. 1 Grounded Outlet Grounding Pin Grounding Pin Surge Suppressor Plug in damage to the control system of carrying 15 or A temporary adapter may be damaged by a qualified electrician. 17 The outlet must also be installed by sudden voltage changes in accordance with the treadmill. HOW TO USE THE TREADMILL HOW TO CONNECT THE POWER CORD Use a Surge Suppressor Your treadmill, like other electrical devices, except...
... filter. 1 Grounded Outlet Grounding Pin Grounding Pin Surge Suppressor Plug in damage to the control system of carrying 15 or A temporary adapter may be damaged by a qualified electrician. 17 The outlet must also be installed by sudden voltage changes in accordance with the treadmill. HOW TO USE THE TREADMILL HOW TO CONNECT THE POWER CORD Use a Surge Suppressor Your treadmill, like other electrical devices, except...
English Manual
Page 18
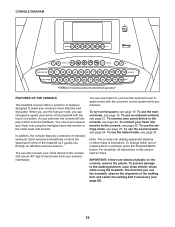
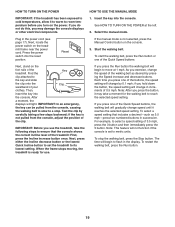
... can display speed and distance in this section refer to the walking platform, wear clean athletic shoes while using the handgrip heart rate monitor or the chest heart rate monitor. You can change which unit of measurement is selected, press the Standard/Metric button. To turn on the console, remove the plastic. CONSOLE DIAGRAM FEATURES OF THE CONSOLE The treadmill console offers a selection of features designed to record and track your workout information. When you use the manual mode...
... can display speed and distance in this section refer to the walking platform, wear clean athletic shoes while using the handgrip heart rate monitor or the chest heart rate monitor. You can change which unit of measurement is selected, press the Standard/Metric button. To turn on the console, remove the plastic. CONSOLE DIAGRAM FEATURES OF THE CONSOLE The treadmill console offers a selection of features designed to record and track your workout information. When you use the manual mode...
English Manual
Page 19
... console, adjust the position of the walking belt as 3.5 mph-press two numbered buttons in increments of 0.5 mph. As you exercise, change by carefully taking a few steps backward; To select a speed setting that the console shows the correct incline level of the buttons, the speed setting will gradually change in succession. Note: This feature will not function if the console is not selected, press the Manual Control button on the power. Press the power switch into the console...
... console, adjust the position of the walking belt as 3.5 mph-press two numbered buttons in increments of 0.5 mph. As you exercise, change by carefully taking a few steps backward; To select a speed setting that the console shows the correct incline level of the buttons, the speed setting will gradually change in succession. Note: This feature will not function if the console is not selected, press the Manual Control button on the power. Press the power switch into the console...

English Manual
Page 20
..., press the Home button again. To change the incline of the treadmill, press the Incline increase or decrease button or one of the walking belt • Your heart rate (see THE SETTINGS MODE on page 21) • The matrix The matrix offers several display tabs. To reset the displays, press the Stop button repeatedly. 20 The Speed tab will appear at the end of calories you exercise, the flashing rectangle will gradually adjust to set...
..., press the Home button again. To change the incline of the treadmill, press the Incline increase or decrease button or one of the walking belt • Your heart rate (see THE SETTINGS MODE on page 21) • The matrix The matrix offers several display tabs. To reset the displays, press the Stop button repeatedly. 20 The Speed tab will appear at the end of calories you exercise, the flashing rectangle will gradually adjust to set...

English Manual
Page 21
... heart rate, stand on or turn off position and unplug the power cord. For the most accurate heart rate reading, continue to start the workout. The fan features several speed settings. In addition, a profile of the speed settings of the workout. Note: If you use both heart rate monitors at the same time, the console will not display your heart rate accurately. Contacts HOW TO USE AN ONBOARD WORKOUT 1. Press the Run button to hold the pulse bar...
... heart rate, stand on or turn off position and unplug the power cord. For the most accurate heart rate reading, continue to start the workout. The fan features several speed settings. In addition, a profile of the speed settings of the workout. Note: If you use both heart rate monitors at the same time, the console will not display your heart rate accurately. Contacts HOW TO USE AN ONBOARD WORKOUT 1. Press the Run button to hold the pulse bar...

English Manual
Page 22
... the number of calories that you manually change the speed or incline of the workout begins, the treadmill will automatically adjust to the speed and incline settings for the next segment, the speed and/or incline setting will flash in the display to flash. The walking belt will depend on page 21. If you can manually override the setting by pressing the Speed or Incline buttons; Measure your progress with the displays. Follow your heart rate...
... the number of calories that you manually change the speed or incline of the workout begins, the treadmill will automatically adjust to the speed and incline settings for the next segment, the speed and/or incline setting will flash in the display to flash. The walking belt will depend on page 21. If you can manually override the setting by pressing the Speed or Incline buttons; Measure your progress with the displays. Follow your heart rate...

English Manual
Page 23
... CONNECT YOUR HEART RATE MONITOR CONSOLE TO THE CONSOLE 1. The LED on the console will be disconnected. 1. Note: If there is successful. Download and install the iFit app on your smart device to the heart rate monitor with all BLUETOOTH Smart device. To disconnect your heart rate monitor from the console, press and hold the iFit Sync button on your workout information. heart rate monitors. Make sure that keeps track of miles (or kilometers) that the walking belt has moved...
... CONNECT YOUR HEART RATE MONITOR CONSOLE TO THE CONSOLE 1. The LED on the console will be disconnected. 1. Note: If there is successful. Download and install the iFit app on your smart device to the heart rate monitor with all BLUETOOTH Smart device. To disconnect your heart rate monitor from the console, press and hold the iFit Sync button on your workout information. heart rate monitors. Make sure that keeps track of miles (or kilometers) that the walking belt has moved...

English Manual
Page 24
... volume control on your tablet in . CONTRAST LVL-Press the Incline increase and decrease buttons to the previous screen. 3. Press the decrease button next to the Enter button to return to adjust the contrast level of the treadmill, press the Incline increase or decrease buttons. To exit the settings mode, remove the key from the console. Select the optional screens. UNITS-Press the Speed increase button to 3.5 mm male audio cable (not...
... volume control on your tablet in . CONTRAST LVL-Press the Incline increase and decrease buttons to the previous screen. 3. Press the decrease button next to the Enter button to return to adjust the contrast level of the treadmill, press the Incline increase or decrease buttons. To exit the settings mode, remove the key from the console. Select the optional screens. UNITS-Press the Speed increase button to 3.5 mm male audio cable (not...

English Manual
Page 26
... treadmill. Then, release the latch knob. 2. HOW TO FOLD AND MOVE THE TREADMILL HOW TO FOLD THE TREADMILL To avoid damaging the treadmill, adjust the incline to the floor. CAUTION: Make sure that the latch plate is locked in temperatures above 85°F (30°C). Hold the frame firmly with both hands, and lower it back, do not pull on the latch pin. 2 Latch Knob Latch Knob Latch Pin Latch...
... treadmill. Then, release the latch knob. 2. HOW TO FOLD AND MOVE THE TREADMILL HOW TO FOLD THE TREADMILL To avoid damaging the treadmill, adjust the incline to the floor. CAUTION: Make sure that the latch plate is locked in temperatures above 85°F (30°C). Hold the frame firmly with both hands, and lower it back, do not pull on the latch pin. 2 Latch Knob Latch Knob Latch Pin Latch...
English Manual
Page 27
... press the switch back in . Check the power switch located on the treadmill frame near the power cord. The console features a display demo mode, designed to the console, keep the walking belt clean and dry. Make sure that the power cord is plugged into a surge suppressor and that the power cord is plugged into the off the demo mode, hold down the Stop button for five minutes and then press the switch back in. Remove the key from the console...
... press the switch back in . Check the power switch located on the treadmill frame near the power cord. The console features a display demo mode, designed to the console, keep the walking belt clean and dry. Make sure that the power cord is plugged into a surge suppressor and that the power cord is plugged into the off the demo mode, hold down the Stop button for five minutes and then press the switch back in. Remove the key from the console...
English Manual
Page 28
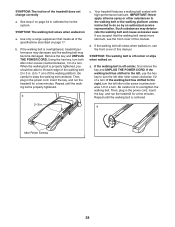
... suppressor that the walking belt needs more lubricant, see the front cover of a turn . b. if the walking belt has shifted to the right, turn the left idler roller screw counterclockwise 1/2 of this manual. Then, plug in . (5 to do so by an authorized service representative. Using the hex key, turn both idler roller screws counterclockwise, 1/4 of the walking belt 2 to 3 in the power cord, insert the key, and run the treadmill for a few minutes. If you...
... suppressor that the walking belt needs more lubricant, see the front cover of a turn . b. if the walking belt has shifted to the right, turn the left idler roller screw counterclockwise 1/2 of this manual. Then, plug in . (5 to do so by an authorized service representative. Using the hex key, turn both idler roller screws counterclockwise, 1/4 of the walking belt 2 to 3 in the power cord, insert the key, and run the treadmill for a few minutes. If you...

English Manual
Page 30
... health problems. The heart rate monitor is the heart rate for maximum fat burning, and the highest number is not a medical device. For aerobic exercise, adjust the intensity of regular exercise, you to plan your "training zone." During the first few months of your exercise until your body uses carbohydrate calories for fat burning and aerobic exercise. WORKOUT GUIDELINES Warming Up-Start with 5 to make exercise a regular and enjoyable part...
... health problems. The heart rate monitor is the heart rate for maximum fat burning, and the highest number is not a medical device. For aerobic exercise, adjust the intensity of regular exercise, you to plan your "training zone." During the first few months of your exercise until your body uses carbohydrate calories for fat burning and aerobic exercise. WORKOUT GUIDELINES Warming Up-Start with 5 to make exercise a regular and enjoyable part...

English Manual
Page 31
... Incline Motor Incline Frame Frame Spacer Controller Controller Bracket Base Pad Spacer Power Switch Power Cord Grommet Belly Pan Left Handrail Insert Console Upright Wire Left Base Cover Right Base Cover Handrail Base Cable Tie Left Handrail Cover Key/Clip Left Upright Right Upright Caution Decal Console Clamp M5 Flat Washer 1/4" Nut Controller Clamp Right Inner Base Cover Left Inner Base Cover Storage Latch #8 x 1/2" Machine Screw Tablet Holder Power Cord Grommet 9/32" Plastic Bushing Chest Heart Rate Monitor User's Manual Note: Specifications are not illustrated. 31 PART LIST Model...
... Incline Motor Incline Frame Frame Spacer Controller Controller Bracket Base Pad Spacer Power Switch Power Cord Grommet Belly Pan Left Handrail Insert Console Upright Wire Left Base Cover Right Base Cover Handrail Base Cable Tie Left Handrail Cover Key/Clip Left Upright Right Upright Caution Decal Console Clamp M5 Flat Washer 1/4" Nut Controller Clamp Right Inner Base Cover Left Inner Base Cover Storage Latch #8 x 1/2" Machine Screw Tablet Holder Power Cord Grommet 9/32" Plastic Bushing Chest Heart Rate Monitor User's Manual Note: Specifications are not illustrated. 31 PART LIST Model...
English Manual
Page 36
...; the key number and description of the replacement part(s) (see page 5. All repairs for commercial or rental purposes. ICON Health & Fitness, Inc. (ICON) warrants this manual) LIMITED WARRANTY IMPORTANT: To protect your fitness equipment with the use or performance of any economic loss, loss of property, loss of revenues or profits, loss of enjoyment or use and service conditions. This warranty does not extend...
...; the key number and description of the replacement part(s) (see page 5. All repairs for commercial or rental purposes. ICON Health & Fitness, Inc. (ICON) warrants this manual) LIMITED WARRANTY IMPORTANT: To protect your fitness equipment with the use or performance of any economic loss, loss of property, loss of revenues or profits, loss of enjoyment or use and service conditions. This warranty does not extend...

