
Owners Manual
Page 9
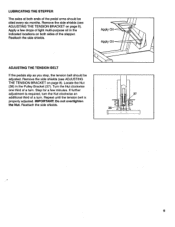
If further adjustment is properly adjusted. Reattach the side shields. 37 38 0 9 Apply Oil Apply Oil ADJUSTING THE TENSION BELT If the pedals slip as you step, the tension belt should be adjusted. Turn the Nut clockwise one third of a turn . IMPORTANT: Do not overtlghten the Nut. Apply a few...should be oiled every six months. Step for a few drops of light multi-purpose oil in the Pulley Bracket (37). Repeat until the tension belt is required, turn the Nut clockwise an additional third of a turn . Remove the side shields (see ADJUSTING THE TENSION BRACKET on page 8)....
If further adjustment is properly adjusted. Reattach the side shields. 37 38 0 9 Apply Oil Apply Oil ADJUSTING THE TENSION BELT If the pedals slip as you step, the tension belt should be adjusted. Turn the Nut clockwise one third of a turn . IMPORTANT: Do not overtlghten the Nut. Apply a few...should be oiled every six months. Step for a few drops of light multi-purpose oil in the Pulley Bracket (37). Repeat until the tension belt is required, turn the Nut clockwise an additional third of a turn . Remove the side shields (see ADJUSTING THE TENSION BRACKET on page 8)....
Owners Manual
Page 10
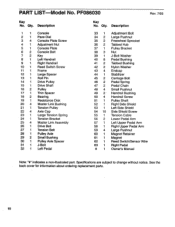
... Disk 20 4 Master Link Bushing 21 1 Tension Pulley 22 4 Axle Cap 23 1 Large Tension Spring 24 1 Tension Bracket 25 4 Master Link Assembly 26 1 Drive Belt 27 1 Tension Belt 28 1 Pulley Axle 29 2 Small Bushing 30 1 Pulley Axle Spacer 31 1 J-Bolt 32 1 Left Pedal Key No. Qty. Qty. See the back cover for...
... Disk 20 4 Master Link Bushing 21 1 Tension Pulley 22 4 Axle Cap 23 1 Large Tension Spring 24 1 Tension Bracket 25 4 Master Link Assembly 26 1 Drive Belt 27 1 Tension Belt 28 1 Pulley Axle 29 2 Small Bushing 30 1 Pulley Axle Spacer 31 1 J-Bolt 32 1 Left Pedal Key No. Qty. Qty. See the back cover for...


