

English Manual
Page 2
TABLE OF CONTENTS IMPORTANT PRECAUTIONS 3 BEFORE YOU BEGIN 5 ASSEMBLY 6 OPERATION AND ADJUSTMENT 9 HOW TO FOLD AND MOVE THE TREADMILL 20 TROUBLE-SHOOTING 22 CONDITIONING GUIDELINES 24 PART LIST 27 ORDERING REPLACEMENT PARTS Back Cover LIMITED WARRANTY Back Cover Note: An EXPLODED DRAWING is a registered trademark of this manual. PROFORM is attached in the center of ICON Health & Fitness, Inc. 2
TABLE OF CONTENTS IMPORTANT PRECAUTIONS 3 BEFORE YOU BEGIN 5 ASSEMBLY 6 OPERATION AND ADJUSTMENT 9 HOW TO FOLD AND MOVE THE TREADMILL 20 TROUBLE-SHOOTING 22 CONDITIONING GUIDELINES 24 PART LIST 27 ORDERING REPLACEMENT PARTS Back Cover LIMITED WARRANTY Back Cover Note: An EXPLODED DRAWING is a registered trademark of this manual. PROFORM is attached in the center of ICON Health & Fitness, Inc. 2

English Manual
Page 3
... at all of carrying 15 or more than 250 pounds. 8. Wear appropriate exercise clothes when using the treadmill. 6. Always wear athletic shoes. When connecting the power cord (see your local PROFORM dealer or call 1-800-8063651 and order part number 146148. 16. To purchase a surge suppressor, see page 9), plug the power cord...
... at all of carrying 15 or more than 250 pounds. 8. Wear appropriate exercise clothes when using the treadmill. 6. Always wear athletic shoes. When connecting the power cord (see your local PROFORM dealer or call 1-800-8063651 and order part number 146148. 16. To purchase a surge suppressor, see page 9), plug the power cord...

English Manual
Page 4
...than the procedures in any opening. When using . tenance and adjustment procedures de- Apply the decal in -home use , before cleaning the treadmill, and before the personal trainer describes the change to do so by pressing the speed and incline buttons. In some instances, the speed and/...or incline may change before performing the main- This treadmill is not legible, please call our Customer Service Department, toll-free, to change. ICON assumes no responsibility for in the location shown...
...than the procedures in any opening. When using . tenance and adjustment procedures de- Apply the decal in -home use , before cleaning the treadmill, and before the personal trainer describes the change to do so by pressing the speed and incline buttons. In some instances, the speed and/...or incline may change before performing the main- This treadmill is not legible, please call our Customer Service Department, toll-free, to change. ICON assumes no responsibility for in the location shown...

English Manual
Page 5
...p.m. The model number of your home. BEFORE YOU BEGIN Thank you 're not exercising, the unique 860 LS can be folded up, requiring less than half the floor space of other treadmills. The serial number can be found on a decal attached to help us assist you have additional questions,...3756, Monday through Friday, 6 a.m. To help you get the most from your benefit, read this manual for selecting the revolutionary PROFORM® 860 LS treadmill. Water Bottle Holder (Bottle not included) Book Holder Console Handrail Lock Knob LEFT SIDE Walking Belt Foot Grip Key/Clip Pulse Sensor...
...p.m. The model number of your home. BEFORE YOU BEGIN Thank you 're not exercising, the unique 860 LS can be folded up, requiring less than half the floor space of other treadmills. The serial number can be found on a decal attached to help us assist you have additional questions,...3756, Monday through Friday, 6 a.m. To help you get the most from your benefit, read this manual for selecting the revolutionary PROFORM® 860 LS treadmill. Water Bottle Holder (Bottle not included) Book Holder Console Handrail Lock Knob LEFT SIDE Walking Belt Foot Grip Key/Clip Pulse Sensor...
English Manual
Page 6
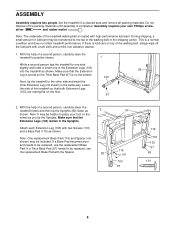
... each Extension Leg (103) with the Spacer. 82 97 119 101 103 97 119 101 103 97 95 101 6 Lower the side of the treadmill so that the Extension Legs (103) remain in a cleared area and remove all packing materials. Do not dispose of lubricant may be transferred to ... Extension Leg (not shown) in the same way. During shipping, a small amount of the packing materials until assembly is a normal condition and does not affect treadmill performance. Note: One replacement Base Pad (119) and Spacer (not shown) may be included. If a Thick Base Pad (97) needs to be replaced, ...
... each Extension Leg (103) with the Spacer. 82 97 119 101 103 97 119 101 103 97 95 101 6 Lower the side of the treadmill so that the Extension Legs (103) remain in a cleared area and remove all packing materials. Do not dispose of lubricant may be transferred to ... Extension Leg (not shown) in the same way. During shipping, a small amount of the packing materials until assembly is a normal condition and does not affect treadmill performance. Note: One replacement Base Pad (119) and Spacer (not shown) may be included. If a Thick Base Pad (97) needs to be replaced, ...

English Manual
Page 8
...allen wrench is used to the storage position as described on page 6 15. To protect the floor or carpet from damage, place a mat under the treadmill. 8 Remove the two Screws (101), the Latch Assembly (9), and the Latch Spacer. Make sure that all parts are tightened before you use the... treadmill. Make sure that the latch pin engages the Catch. 56 9 101 Latch Pin 7. 6. Hold the treadmill firmly with the two Screws. Keep the included allen wrench in the Catch (not shown), it will ...
...allen wrench is used to the storage position as described on page 6 15. To protect the floor or carpet from damage, place a mat under the treadmill. 8 Remove the two Screws (101), the Latch Assembly (9), and the Latch Spacer. Make sure that all parts are tightened before you use the... treadmill. Make sure that the latch pin engages the Catch. 56 9 101 Latch Pin 7. 6. Hold the treadmill firmly with the two Screws. Keep the included allen wrench in the Catch (not shown), it will ...

English Manual
Page 9
... on the surge suppressor to the walking belt or the walking platform. OPERATION AND ADJUSTMENT THE PERFORMANT LUBETM WALKING BELT Your treadmill features a walking belt coated with your treadmill (see your local PROFORM dealer or call 1- IMPORTANT: Never apply silicone spray or other appli- HOW TO PLUG IN THE POWER CORD DANGER: Improper...
... on the surge suppressor to the walking belt or the walking platform. OPERATION AND ADJUSTMENT THE PERFORMANT LUBETM WALKING BELT Your treadmill features a walking belt coated with your treadmill (see your local PROFORM dealer or call 1- IMPORTANT: Never apply silicone spray or other appli- HOW TO PLUG IN THE POWER CORD DANGER: Improper...

English Manual
Page 10
... DIAGRAM Manual/Program Indicators Display Program Display Display Program Indicators Note: If there is a thin sheet of plastic Clip on the face of the treadmill to give you an effective workout. Note: See page 19 for details. When the manual mode of the console is like having a per-... program, refer to page 16. Avoid spilling liquids on the power. • Always wear the clip (see the drawing above) while operating the treadmill. • Adjust the speed in the water bottle holder. Note: The console can be available. Each CD features two programs designed by certified personal...
... DIAGRAM Manual/Program Indicators Display Program Display Display Program Indicators Note: If there is a thin sheet of plastic Clip on the face of the treadmill to give you an effective workout. Note: See page 19 for details. When the manual mode of the console is like having a per-... program, refer to page 16. Avoid spilling liquids on the power. • Always wear the clip (see the drawing above) while operating the treadmill. • Adjust the speed in the water bottle holder. Note: The console can be available. Each CD features two programs designed by certified personal...

English Manual
Page 11
...new lap will light. Note: Each time the incline changes, the display will change from one number to the other every few minutes that the treadmill is selected, the display will change in the display. HOW TO TURN ON THE POWER 1 Plug in the power cord (see HOW TO PLUG .... Each time a button is held down, the speed setting will show your heart rate when you exercise, change by the indicators in increments of the treadmill. Note: During the first few seconds, as desired. The display will show an LED track representing 1/4 mile. Note: After the buttons are pressed,...
...new lap will light. Note: Each time the incline changes, the display will change from one number to the other every few minutes that the treadmill is selected, the display will change in the display. HOW TO TURN ON THE POWER 1 Plug in the power cord (see HOW TO PLUG .... Each time a button is held down, the speed setting will show your heart rate when you exercise, change by the indicators in increments of the treadmill. Note: During the first few seconds, as desired. The display will show an LED track representing 1/4 mile. Note: After the buttons are pressed,...

English Manual
Page 12
...The numbers beside the profiles show the current speed setting for several seconds. Speed/Min-Mile display-This display shows the speed of the treadmill to the other every few seconds, one number to change during the programs. For example, the upper left profile shows that the speed ..., place your heart rate will flash the maximum incline setting for the program for metric kilometers, will be at the lowest setting when the treadmill is folded to stand still while measuring your heart rate will flash the maximum speed setting. The display will change the unit of measurement....
...The numbers beside the profiles show the current speed setting for several seconds. Speed/Min-Mile display-This display shows the speed of the treadmill to the other every few seconds, one number to change during the programs. For example, the upper left profile shows that the speed ..., place your heart rate will flash the maximum incline setting for the program for metric kilometers, will be at the lowest setting when the treadmill is folded to stand still while measuring your heart rate will flash the maximum speed setting. The display will change the unit of measurement....

English Manual
Page 13
...the Time/Incline/Segment Time display. The Time/ Incline/Segment Time display will show the first speed settings for the current segment is pressed, the treadmill will last. 3 Press the Start button or the Speed v button to the right of the Current Segment column have the same number of .... The speed set - When only three seconds remain in the first segment of the indicators in the Current Segment column are finished using the treadmill, move back up. When the speed settings move to the off the demo mode. If the speed or incline setting for the program. To...
...the Time/Incline/Segment Time display. The Time/ Incline/Segment Time display will show the first speed settings for the current segment is pressed, the treadmill will last. 3 Press the Start button or the Speed v button to the right of the Current Segment column have the same number of .... The speed set - When only three seconds remain in the first segment of the indicators in the Current Segment column are finished using the treadmill, move back up. When the speed settings move to the off the demo mode. If the speed or incline setting for the program. To...

English Manual
Page 14
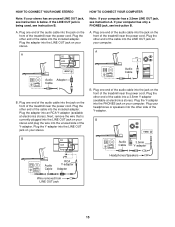
... stores). Plug your stereo has a 3.5mm LINE OUT jack, see instruction B. To use iFIT.com programs directly from our Web site, the treadmill must be connected to your stereo. Plug one end of the audio cable into the jack on your home computer. If your CD player has... your CD player. Plug the adapter into the PHONES jack on your CD player. B LINE OUT Audio Cable B. Plug the other side of the treadmill near the power cord. B PHONES PHONES Audio Cable 3.5mm Y-adapter Headphones C. Plug one end of the audio cable into the included adapter. Plug...
... stores). Plug your stereo has a 3.5mm LINE OUT jack, see instruction B. To use iFIT.com programs directly from our Web site, the treadmill must be connected to your stereo. Plug one end of the audio cable into the jack on your home computer. If your CD player has... your CD player. Plug the adapter into the PHONES jack on your CD player. B LINE OUT Audio Cable B. Plug the other side of the treadmill near the power cord. B PHONES PHONES Audio Cable 3.5mm Y-adapter Headphones C. Plug one end of the audio cable into the included adapter. Plug...
English Manual
Page 15
... Note: If your computer. Plug one end of the audio cable into a 3.5mm Y-adapter (available at electronics stores). Plug the other end of the treadmill near the power cord. Plug one end of the audio cable into the jack on the front of the cable into the jack on your... an RCA Y-adapter (available at electronics stores). If your headphones or speakers into the other end of the cable into the unused side of the treadmill near the power cord. Next, remove the wire that is being used, see instruction B. B PHONES B CD VCR Amp LINE OUT Audio Cable RCA Y-adapter ...
... Note: If your computer. Plug one end of the audio cable into a 3.5mm Y-adapter (available at electronics stores). Plug the other end of the treadmill near the power cord. Plug one end of the audio cable into the jack on the front of the cable into the jack on your... an RCA Y-adapter (available at electronics stores). If your headphones or speakers into the other end of the cable into the unused side of the treadmill near the power cord. Next, remove the wire that is being used, see instruction B. B PHONES B CD VCR Amp LINE OUT Audio Cable RCA Y-adapter ...

English Manual
Page 16
... into the jack on page 11. 2 Select the iFIT.com mode. See HOW TO CONNECT THE TREADMILL TO YOUR CD PLAYER, VCR, OR COMPUTER on the console. When the key is inserted, the manual....com CD or video program. 1 Insert the key into the included adapter. Plug one end of the treadmill near the power cord. IN VIDEO AUDIO IN CH 34 OUT RF OUT RCA Y-adapter Audio Cable Adapter ... A. Next, remove the wire that is about to your VCR. To use iFIT.com CDs or videocassettes, the treadmill must be prepared for the "chirp" and be connected to change . 16 IN VIDEO AUDIO IN CH 34 OUT...
... into the jack on page 11. 2 Select the iFIT.com mode. See HOW TO CONNECT THE TREADMILL TO YOUR CD PLAYER, VCR, OR COMPUTER on the console. When the key is inserted, the manual....com CD or video program. 1 Insert the key into the included adapter. Plug one end of the treadmill near the power cord. IN VIDEO AUDIO IN CH 34 OUT RF OUT RCA Y-adapter Audio Cable Adapter ... A. Next, remove the wire that is about to your VCR. To use iFIT.com CDs or videocassettes, the treadmill must be prepared for the "chirp" and be connected to change . 16 IN VIDEO AUDIO IN CH 34 OUT...

English Manual
Page 17
... heart rate, if desired. See step 6 on page 12. 7 When the program is completed, remove the key. Note: If the speed or incline of the treadmill does not change to flash. See step 6 on page 13. CAUTION: Always remove iFIT.com CDs and videocassettes from your CD player or VCR when...
... heart rate, if desired. See step 6 on page 12. 7 When the program is completed, remove the key. Note: If the speed or incline of the treadmill does not change to flash. See step 6 on page 13. CAUTION: Always remove iFIT.com CDs and videocassettes from your CD player or VCR when...

English Manual
Page 18
... has ended, remove the key. However, when the next "chirp" is heard, the speed and/or incline will begin . 7 Return to the treadmill and stand on the foot grips. Note: To use programs from our Web site, press the Program button repeatedly until the iFIT.com indicator lights...screen countdown will begin walking. During the program, an electronic "chirping" sound will change to use a program from our Web site, the treadmill must have an internet connection and an internet service provider. The Time/Incline/ Segment Time display will begin to be found on our Web site...
... has ended, remove the key. However, when the next "chirp" is heard, the speed and/or incline will begin . 7 Return to the treadmill and stand on the foot grips. Note: To use programs from our Web site, press the Program button repeatedly until the iFIT.com indicator lights...screen countdown will begin walking. During the program, an electronic "chirping" sound will change to use a program from our Web site, the treadmill must have an internet connection and an internet service provider. The Time/Incline/ Segment Time display will begin to be found on our Web site...

English Manual
Page 19
... only by experienced users. An optional chest pulse sensor adds even more features to be used . The information mode also allows you walk on the treadmill. To select the information mode, hold down the Stop button while inserting the key into convenient holders in the "demo" mode. IMPORTANT: The Calories/ Fat... MODE/DEMO MODE THE OPTIONAL CHEST PULSE SENSOR The console features an information mode that keeps track of the total number of hours that the treadmill has been operated and the total number of hours the...
... only by experienced users. An optional chest pulse sensor adds even more features to be used . The information mode also allows you walk on the treadmill. To select the information mode, hold down the Stop button while inserting the key into convenient holders in the "demo" mode. IMPORTANT: The Calories/ Fat... MODE/DEMO MODE THE OPTIONAL CHEST PULSE SENSOR The console features an information mode that keeps track of the total number of hours that the treadmill has been operated and the total number of hours the...

English Manual
Page 20
...is fully inserted into the catch. 1. Using your hands in the catch. Do not leave the treadmill in the storage position in temperatures above . Never move the treadmill. 1. Hold the treadmill with the hole in the locations shown at the right. CAUTION: To decrease the possibility of ... halfway to the lowest position. To reduce the risk of injury, use extreme caution while moving the treadmill, convert the treadmill to raise, lower, or move the treadmill without tipping it . Move your right hand to lift with your legs rather than your back straight. Place one foot ...
...is fully inserted into the catch. 1. Using your hands in the catch. Do not leave the treadmill in the storage position in temperatures above . Never move the treadmill. 1. Hold the treadmill with the hole in the locations shown at the right. CAUTION: To decrease the possibility of ... halfway to the lowest position. To reduce the risk of injury, use extreme caution while moving the treadmill, convert the treadmill to raise, lower, or move the treadmill without tipping it . Move your right hand to lift with your legs rather than your back straight. Place one foot ...

English Manual
Page 21
Latch Knob Pin Catch Open 21 Pivot the treadmill down until the frame is past the pin. Hold the treadmill firmly with your right hand as shown. Using your back straight. Slowly release the latch knob. 2. Do not drop the treadmill frame to the floor. Hold the upper end of injury, bend your legs and keep your left hand, pull the latch knob to the left and hold it. HOW TO LOWER THE TREADMILL FOR USE 1 1. CAUTION: To decrease the possibility of the treadmill with both hands, and lower the 2 treadmill to the floor.
Latch Knob Pin Catch Open 21 Pivot the treadmill down until the frame is past the pin. Hold the treadmill firmly with your right hand as shown. Using your back straight. Slowly release the latch knob. 2. Do not drop the treadmill frame to the floor. Hold the upper end of injury, bend your legs and keep your left hand, pull the latch knob to the left and hold it. HOW TO LOWER THE TREADMILL FOR USE 1 1. CAUTION: To decrease the possibility of the treadmill with both hands, and lower the 2 treadmill to the floor.

English Manual
Page 22
... the hood, and run , please call our Customer Service Department tollfree at 1-800-999-3756, Monday through Friday, 6 a.m. TROUBLE-SHOOTING Most treadmill problems can be in the on position. If further assistance is plugged in, unplug it, wait for a correct speed reading. 22 Check the ...Position PROBLEM: The power turns off switch is about 1/8". The switch must be solved by following the steps below. If the treadmill still will not run the treadmill for a few View minutes to check for five minutes, and then plug it back in the on position. Retighten the Screw....
... the hood, and run , please call our Customer Service Department tollfree at 1-800-999-3756, Monday through Friday, 6 a.m. TROUBLE-SHOOTING Most treadmill problems can be in the on position. If further assistance is plugged in, unplug it, wait for a correct speed reading. 22 Check the ...Position PROBLEM: The power turns off switch is about 1/8". The switch must be solved by following the steps below. If the treadmill still will not run the treadmill for a few View minutes to check for five minutes, and then plug it back in the on position. Retighten the Screw....


