

English Manual
Page 3
... in this treadmill are recommended for 120 volts AC and 15 amps. Always wear athletic shoes. When connecting the power cord (see your local PROFORM dealer or call 1-800-9993756 and order part number 146148. 12. Use only a single-outlet surge suppressor that the storage latch is intended... protector into a grounded circuit capable of all times. Do not place the treadmill on /off switch to raise, lower, or move the walking belt while the power is not a medical device. The treadmill should be able to ensure that blocks air openings. Never use an extension cord. 18...
... in this treadmill are recommended for 120 volts AC and 15 amps. Always wear athletic shoes. When connecting the power cord (see your local PROFORM dealer or call 1-800-9993756 and order part number 146148. 12. Use only a single-outlet surge suppressor that the storage latch is intended... protector into a grounded circuit capable of all times. Do not place the treadmill on /off switch to raise, lower, or move the walking belt while the power is not a medical device. The treadmill should be able to ensure that blocks air openings. Never use an extension cord. 18...
English Manual
Page 5
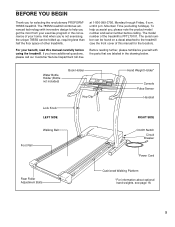
... (Bottle not included) Book Holder Lock Knob LEFT SIDE Key/Clip Hand Weight Holder* Console Pulse Sensor Handrail RIGHT SIDE Walking Belt Foot Rail On/Off Switch Circuit Breaker Power Cord Rear Roller Adjustment Bolts Cushioned Walking Platform *For information about optional hand weights..., see the front cover of other treadmills. The model number of your benefit, read this manual for selecting the revolutionary PROFORM® 785SS treadmill. Mountain Time (excluding holidays). And when you , please note the product model number and serial number before...
... (Bottle not included) Book Holder Lock Knob LEFT SIDE Key/Clip Hand Weight Holder* Console Pulse Sensor Handrail RIGHT SIDE Walking Belt Foot Rail On/Off Switch Circuit Breaker Power Cord Rear Roller Adjustment Bolts Cushioned Walking Platform *For information about optional hand weights..., see the front cover of other treadmills. The model number of your benefit, read this manual for selecting the revolutionary PROFORM® 785SS treadmill. Mountain Time (excluding holidays). And when you , please note the product model number and serial number before...
English Manual
Page 6
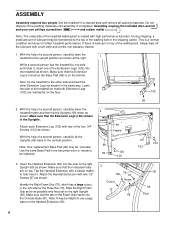
...small amount of lubricant may be transferred to the top of the packing materials until assembly is completed. Lower the side of the treadmill walking belt is on top. Insert the Handrail Extension (66) into the post on the Foam Grip inserts into the treadmill as shown. Make sure...rubber mallet . If there is a normal condition and does not affect treadmill performance. Attach each Extension Leg (102) with two of the walking belt, simply wipe off the lubricant with high-performance lubricant. Note: One replacement Base Pad (99) may be helpful to be included. Set the ...
...small amount of lubricant may be transferred to the top of the packing materials until assembly is completed. Lower the side of the treadmill walking belt is on top. Insert the Handrail Extension (66) into the post on the Foam Grip inserts into the treadmill as shown. Make sure...rubber mallet . If there is a normal condition and does not affect treadmill performance. Attach each Extension Leg (102) with two of the walking belt, simply wipe off the lubricant with high-performance lubricant. Note: One replacement Base Pad (99) may be helpful to be included. Set the ...
English Manual
Page 7
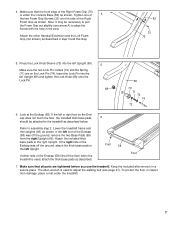
... all parts are on the End- Foot 58 Foot 7. If the left foot of the Right Foam Grip (75) is used to adjust the walking belt (see arrow A) to the treadmill as shown. Keep the included allen wrench in the post.
... all parts are on the End- Foot 58 Foot 7. If the left foot of the Right Foam Grip (75) is used to adjust the walking belt (see arrow A) to the treadmill as shown. Keep the included allen wrench in the post.
English Manual
Page 8
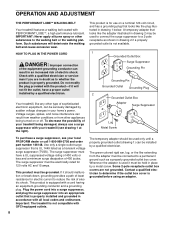
...volt circuit, and has a grounding plug that looks like extending from other substances to reduce the risk of your local PROFORM dealer or call 1-800-999-3756 and order part number 146148. This product must be grounded. If it will deteriorate the walking... Lug Metal Screw To purchase a surge suppressor, see drawing 1 at the right). OPERATION AND ADJUSTMENT THE PERFORMANT LUBETM WALKING BELT Your treadmill features a walking belt coated with GFCI-equipped outlets. IMPORTANT: Never apply silicone spray or other appliances being damaged, always use on or off. Voltage...
...volt circuit, and has a grounding plug that looks like extending from other substances to reduce the risk of your local PROFORM dealer or call 1-800-999-3756 and order part number 146148. This product must be grounded. If it will deteriorate the walking... Lug Metal Screw To purchase a surge suppressor, see drawing 1 at the right). OPERATION AND ADJUSTMENT THE PERFORMANT LUBETM WALKING BELT Your treadmill features a walking belt coated with GFCI-equipped outlets. IMPORTANT: Never apply silicone spray or other appliances being damaged, always use on or off. Voltage...
English Manual
Page 9
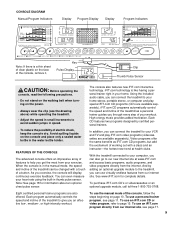
... personal trainers. Key Pulse Display Clip Thumb Pulse Sensor CAUTION: Before operating the console, read the following precautions. • Do not stand on the walking belt when turning on the power. • Always wear the clip (see the drawing above) while operating the treadmill. • Adjust the speed in small increments...
... personal trainers. Key Pulse Display Clip Thumb Pulse Sensor CAUTION: Before operating the console, read the following precautions. • Do not stand on the walking belt when turning on the power. • Always wear the clip (see the drawing above) while operating the treadmill. • Adjust the speed in small increments...
English Manual
Page 10
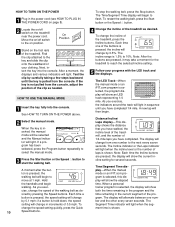
... program is held down, the speed setting will show the elapsed time. As you have completed. When the key is pressed, the walking belt will light. The display will change by carefully taking a few steps backward until you have walked, the incline level of the treadmill, and.... 3 Press the Start button or the Speed v button to flash. A moment after the but- Hold the handrails and begin to start the walking belt. sired by 0.1 mph; Each time a button is selected, the program display will change the speed setting quickly, press the Quick 10 Speed buttons....
... program is held down, the speed setting will show the elapsed time. As you have completed. When the key is pressed, the walking belt will light. The display will change by carefully taking a few steps backward until you have walked, the incline level of the treadmill, and.... 3 Press the Start button or the Speed v button to flash. A moment after the but- Hold the handrails and begin to start the walking belt. sired by 0.1 mph; Each time a button is selected, the program display will change the speed setting quickly, press the Quick 10 Speed buttons....
English Manual
Page 11
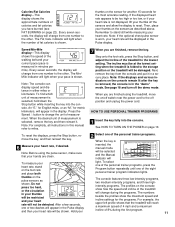
.... When you are finished using the pulse sensor, make sure that the treadmill will reach a maximum speed of 4 mph and a maximum incline of the walking belt and your thumbs on /off switch near the power cord to stand still while measuring your heart rate will light. HOW TO USE PERSONAL TRAINER...
.... When you are finished using the pulse sensor, make sure that the treadmill will reach a maximum speed of 4 mph and a maximum incline of the walking belt and your thumbs on /off switch near the power cord to stand still while measuring your heart rate will light. HOW TO USE PERSONAL TRAINER...
English Manual
Page 12
... desired. Refer to the right. ments of the treadmill is too high or too low, you are not shown in the program display. The walking belt will show how long the program will move downward so that only the highest indicators in the columns will light or darken in the Current...
... desired. Refer to the right. ments of the treadmill is too high or too low, you are not shown in the program display. The walking belt will show how long the program will move downward so that only the highest indicators in the columns will light or darken in the Current...
English Manual
Page 16
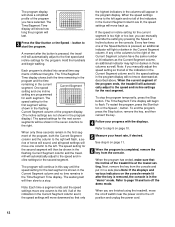
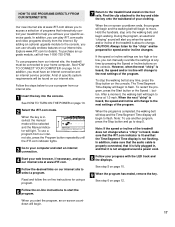
...To restart the program, press the Start button or the Speed v button. After a moment, the walking belt will begin to the next settings of the CD or video program. The program can manually override the settings...the key and go to step 1 on page 11. 7 When the program is completed, the walking belt will change to flash. If the speed or incline settings are too high or too low, you ..., and that the Time/Segment Time display is heard, the speed and incline will stop the walking belt at any time by pressing the Stop button on the console • adjust the volume of the ...
...To restart the program, press the Start button or the Speed v button. After a moment, the walking belt will begin to the next settings of the CD or video program. The program can manually override the settings...the key and go to step 1 on page 11. 7 When the program is completed, the walking belt will change to flash. If the speed or incline settings are too high or too low, you ..., and that the Time/Segment Time display is heard, the speed and incline will stop the walking belt at any time by pressing the Stop button on the console • adjust the volume of the ...
English Manual
Page 17
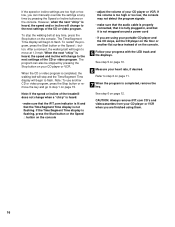
...LED track and the displays. Note: To use a program from the internet. Explore www.iFIT.com for using a program. After a moment, the walking belt will begin to the console, you to access a selection of the treadmill does not change to step 5. When you achieve your clothing. Follow the steps... on page 12. 6 Follow the on-line instructions to the treadmill and stand on -screen countdown ends, the program will begin and the walking belt will begin to flash. HOW TO USE PROGRAMS DIRECTLY FROM OUR INTERNET SITE 7 Return to start the program. Find the clip attached to select a ...
...LED track and the displays. Note: To use a program from the internet. Explore www.iFIT.com for using a program. After a moment, the walking belt will begin to the console, you to access a selection of the treadmill does not change to step 5. When you achieve your clothing. Follow the steps... on page 12. 6 Follow the on-line instructions to the treadmill and stand on -screen countdown ends, the program will begin and the walking belt will begin to flash. HOW TO USE PROGRAMS DIRECTLY FROM OUR INTERNET SITE 7 Return to start the program. Find the clip attached to select a ...
English Manual
Page 18
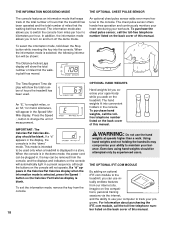
... telephone number listed on the back cover of this manual. The Time/Segment Time display will show the total number of miles that the walking belt has moved. Press the Speed v button to maintain your computer to be removed from the console. OPTIONAL HAND WEIGHTS Hand weights let you exercise your... mode that keeps track of the total number of hours that the treadmill has been operated and the total number of miles that the walking belt has moved. When the information mode is treadmill, you to kilometers per hour to turn off the demo mode. from miles per hour. An ...
... telephone number listed on the back cover of this manual. The Time/Segment Time display will show the total number of miles that the walking belt has moved. Press the Speed v button to maintain your computer to be removed from the console. OPTIONAL HAND WEIGHTS Hand weights let you exercise your... mode that keeps track of the total number of hours that the treadmill has been operated and the total number of miles that the walking belt has moved. When the information mode is treadmill, you to kilometers per hour to turn off the demo mode. from miles per hour. An ...
English Manual
Page 21
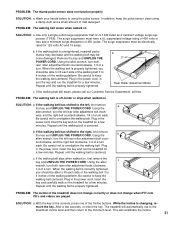
... keep the pulse sensor clean using the pulse sensor. Be careful to lift each side of mild detergent. b. Repeat until the walking belt is centered. If the walking belt slips when walked on SOLUTION: a. Plug in the power cord, insert the key and carefully walk on SOLUTION: a. With the key... 120 volts AC and 15 amps. Using the allen wrench, turn the left rear roller adjustment bolt coun- Be careful not to keep the walking belt centered. Plug in the console, press one of a turn each . PROBLEM: The incline of a turn . After a few seconds, re-insert the key. Use ...
... keep the pulse sensor clean using the pulse sensor. Be careful to lift each side of mild detergent. b. Repeat until the walking belt is centered. If the walking belt slips when walked on SOLUTION: a. Plug in the power cord, insert the key and carefully walk on SOLUTION: a. With the key... 120 volts AC and 15 amps. Using the allen wrench, turn the left rear roller adjustment bolt coun- Be careful not to keep the walking belt centered. Plug in the console, press one of a turn each . PROBLEM: The incline of a turn . After a few seconds, re-insert the key. Use ...
English Manual
Page 23
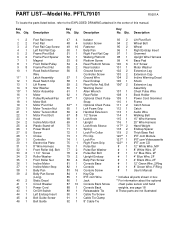
... Nut Incline Motor Incline Motor Stop Belly Pan Belly Pan Screw (Long) Static Decal Circuit Breaker Power Cord On/Off Switch Left Endcap Insert Belt Guide Screw Belt Guide 47 4 48 4 49 16 50 1 51 1 52 1 53 6 54 4 55 2 56 5 57 1 58 1 59 2 60 1 61 1 62 1 63** 1 64** 1 65 1 66 2 67 8 ...Roller/Pulley Frame Pivot Nut Reed Switch/Sensor Wire Latch Assembly Reed Switch Clip Lift Frame Star Washer Motor Assembly Motor Pulley/Flywheel/Fan Motor Belt Motor Pivot Nut Motor Tension Nut Motor Tension Bolt Motor Pivot Bolt Hood Incline Motor Bolt Plastic Stand-off Power Board Screw Choke Controller ...
... Nut Incline Motor Incline Motor Stop Belly Pan Belly Pan Screw (Long) Static Decal Circuit Breaker Power Cord On/Off Switch Left Endcap Insert Belt Guide Screw Belt Guide 47 4 48 4 49 16 50 1 51 1 52 1 53 6 54 4 55 2 56 5 57 1 58 1 59 2 60 1 61 1 62 1 63** 1 64** 1 65 1 66 2 67 8 ...Roller/Pulley Frame Pivot Nut Reed Switch/Sensor Wire Latch Assembly Reed Switch Clip Lift Frame Star Washer Motor Assembly Motor Pulley/Flywheel/Fan Motor Belt Motor Pivot Nut Motor Tension Nut Motor Tension Bolt Motor Pivot Bolt Hood Incline Motor Bolt Plastic Stand-off Power Board Screw Choke Controller ...


