

Canadian English Manual
Page 1
Save this equipment. Visit our website at www.proform.com PCTL99010 Serial No. Model No. Serial Number Decal If you require SERVICE for this product, please call SEARS: 1-800-4 MY HOME (469-4663) If you are MISSING PARTS or require INFORMATION on how to operate this product, call 1-888-936-ICON (4266) USER'S MANUAL CAUTION Read all precautions and instructions in this manual before using this manual for future reference.
Save this equipment. Visit our website at www.proform.com PCTL99010 Serial No. Model No. Serial Number Decal If you require SERVICE for this product, please call SEARS: 1-800-4 MY HOME (469-4663) If you are MISSING PARTS or require INFORMATION on how to operate this product, call 1-888-936-ICON (4266) USER'S MANUAL CAUTION Read all precautions and instructions in this manual before using this manual for future reference.

Canadian English Manual
Page 3
...lower, or move the on/off switch to the control system of carrying 15 or more than115 kgs (250 lbs.). 8. Do not use an extension cord. 19. Place the treadmill on a level surface, with bare feet, wearing only stockings, or in order to safely lift 20 kg (45 lbs.) in ...accuracy of burns, fire, electric shock, or injury to ensure that the storage latch is intended only as described in the treadmill. Always hold the handrails while using the treadmill. It is damaged, the walking belt may change the incline of this manual. 12. If the control system is the responsibility...
...lower, or move the on/off switch to the control system of carrying 15 or more than115 kgs (250 lbs.). 8. Do not use an extension cord. 19. Place the treadmill on a level surface, with bare feet, wearing only stockings, or in order to safely lift 20 kg (45 lbs.) in ...accuracy of burns, fire, electric shock, or injury to ensure that the storage latch is intended only as described in the treadmill. Always hold the handrails while using the treadmill. It is damaged, the walking belt may change the incline of this manual. 12. If the control system is the responsibility...

Canadian English Manual
Page 4
...commercial, rental, or institutional setting. Always unplug the power cord immediately after use this or any time by or through the use only. WARNING: Before beginning this treadmill in -home use of the treadmill regularly. 26. 22. When using iFIT.com CDs and videos, you can manually override the speed and ... page 27). Note: The decal at the right is heard, the speed and/or incline will alert you are not using . This treadmill is especially important for in any opening. Apply the replacement decal in this product. Inspect and tighten all instructions before...
...commercial, rental, or institutional setting. Always unplug the power cord immediately after use this or any time by or through the use only. WARNING: Before beginning this treadmill in -home use of the treadmill regularly. 26. 22. When using iFIT.com CDs and videos, you can manually override the speed and ... page 27). Note: The decal at the right is heard, the speed and/or incline will alert you are not using . This treadmill is especially important for in any opening. Apply the replacement decal in this product. Inspect and tighten all instructions before...
Canadian English Manual
Page 5
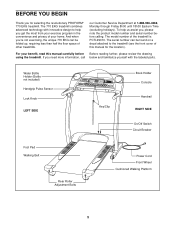
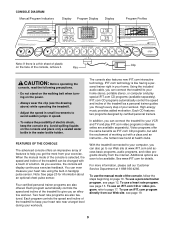
...the floor space of your benefit, read this manual for selecting the revolutionary PROFORM® 770 EKG treadmill. To help you get the most from your exercise program in the convenience and privacy of other treadmills. The model number of this manual carefully before calling. The serial number ...to help us assist you, please note the product model number and serial number before Before reading further, please review the drawing using the treadmill. Water Bottle Holder (Bottle not included) Handgrip Pulse Sensor Lock Knob LEFT SIDE Key/Clip Book Holder Console Handrail RIGHT SIDE...
...the floor space of your benefit, read this manual for selecting the revolutionary PROFORM® 770 EKG treadmill. To help you get the most from your exercise program in the convenience and privacy of other treadmills. The model number of this manual carefully before calling. The serial number ...to help us assist you, please note the product model number and serial number before Before reading further, please review the drawing using the treadmill. Water Bottle Holder (Bottle not included) Handgrip Pulse Sensor Lock Knob LEFT SIDE Key/Clip Book Holder Console Handrail RIGHT SIDE...
Canadian English Manual
Page 6
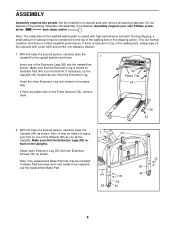
... as shown. Make sure that the Extension Leg is turned so the Base Pad (44) is on one of a second person, carefully raise the treadmill to place 2 your own Phillips screw- If a Base Pad becomes worn and needs to be transferred to the top of the walking belt or the...Note: The underside of the packing materials until assembly is a normal condition and does not affect treadmill performance. Set the treadmill in the Uprights. If there are plastic ties on top of lubricant may be replaced, use the replacement Base Pad. 64 58 44 35 55 44 55 44 35 55 44 6 Insert...
... as shown. Make sure that the Extension Leg is turned so the Base Pad (44) is on one of a second person, carefully raise the treadmill to place 2 your own Phillips screw- If a Base Pad becomes worn and needs to be transferred to the top of the walking belt or the...Note: The underside of the packing materials until assembly is a normal condition and does not affect treadmill performance. Set the treadmill in the Uprights. If there are plastic ties on top of lubricant may be replaced, use the replacement Base Pad. 64 58 44 35 55 44 55 44 35 55 44 6 Insert...
Canadian English Manual
Page 7
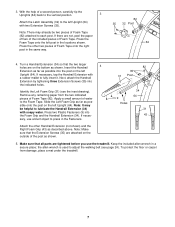
...(34) so that the two larger holes are not, peel the paper off two of the included pieces of Foam Tape. If necessary, use the treadmill. Press the Foam Tape onto the left Upright (64) with two Extension Screws (35). If necessary, tap the Handrail Extension with soapy water....two Plastic Fasteners (9) into the indicated holes. With the help of Foam Tape (82). Remove any remaining paper from damage, place a mat under the treadmill. 7 To protect the floor or carpet from the two indicated pieces of a second person, carefully tip the Uprights (64) back to the vertical position...
...(34) so that the two larger holes are not, peel the paper off two of the included pieces of Foam Tape. If necessary, use the treadmill. Press the Foam Tape onto the left Upright (64) with two Extension Screws (35). If necessary, tap the Handrail Extension with soapy water....two Plastic Fasteners (9) into the indicated holes. With the help of Foam Tape (82). Remove any remaining paper from damage, place a mat under the treadmill. 7 To protect the floor or carpet from the two indicated pieces of a second person, carefully tip the Uprights (64) back to the vertical position...
Canadian English Manual
Page 8
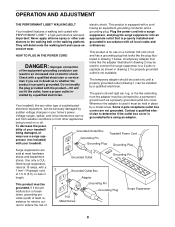
...an Important: Never apply silicone spray or other sub- cessive wear. being damaged, al- ways use on or off. pressor (not included) Grounded Outlet Box Grounding Pin Treadmill Power Cord with all local codes and They will The temporary adapter should malfunction or break down... covers are not grounded. OPERATION AND ADJUSTMENT THE PERFORMANT LUBETM WALKING BELT electric shock. ordinances. used it will deteriorate the walking belt and cause ex- Your treadmill, like extending from other type of the equipment-grounding conductor can be held in place by ...
...an Important: Never apply silicone spray or other sub- cessive wear. being damaged, al- ways use on or off. pressor (not included) Grounded Outlet Box Grounding Pin Treadmill Power Cord with all local codes and They will The temporary adapter should malfunction or break down... covers are not grounded. OPERATION AND ADJUSTMENT THE PERFORMANT LUBETM WALKING BELT electric shock. ordinances. used it will deteriorate the walking belt and cause ex- Your treadmill, like extending from other type of the equipment-grounding conductor can be held in place by ...
Canadian English Manual
Page 9
... personal trainer right in handgrip pulse sensor. Each CD features two programs designed by certified personal trainers. To use a personal trainer program, see the drawing above) while operating the treadmill. • Adjust the speed in small increments to help you an effective workout. You can even measure ...your heart rate using the built-in your workout. Each program controls the speed and incline of the treadmill to be changed with a class and an instructor-the hottest new trend at 1-888-936-...
... personal trainer right in handgrip pulse sensor. Each CD features two programs designed by certified personal trainers. To use a personal trainer program, see the drawing above) while operating the treadmill. • Adjust the speed in small increments to help you an effective workout. You can even measure ...your heart rate using the built-in your workout. Each program controls the speed and incline of the treadmill to be changed with a class and an instructor-the hottest new trend at 1-888-936-...
Canadian English Manual
Page 10
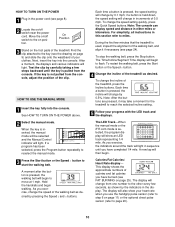
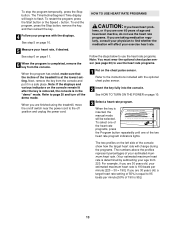
... (see FAT BURNING on page 25). The display will show your progress with the LED track and the displays. When the key is used, inspect the alignment of the treadmill, press the Incline buttons. Note: The console can display speed and distance in this section refer to miles. To change the incline... of the walking belt, and align it may take a moment for the treadmill to reach the selected incline setting. 5 Follow your heart rate when you have burned (see the drawing on page 9) and slide the clip onto the...
... (see FAT BURNING on page 25). The display will show your progress with the LED track and the displays. When the key is used, inspect the alignment of the treadmill, press the Incline buttons. Note: The console can display speed and distance in this section refer to miles. To change the incline... of the walking belt, and align it may take a moment for the treadmill to reach the selected incline setting. 5 Follow your heart rate when you have burned (see the drawing on page 9) and slide the clip onto the...
Canadian English Manual
Page 11
Note: Each time the speed changes, the display will show the elapsed time and the incline level of the treadmill. To find which unit of the program, and the incline level. Note: Before using the treadmill, move the on/off switch near the power cord to the off the demo mode. Your palms must... be at the lowest setting when the treadmill is selected, this display will show the current speed setting for about...
Note: Each time the speed changes, the display will show the elapsed time and the incline level of the treadmill. To find which unit of the program, and the incline level. Note: Before using the treadmill, move the on/off switch near the power cord to the off the demo mode. Your palms must... be at the lowest setting when the treadmill is selected, this display will show the current speed setting for about...
Canadian English Manual
Page 12
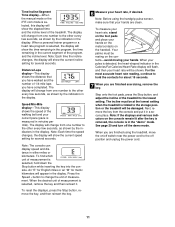
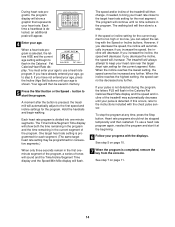
...automatically adjust to the left again and not all speed settings will be shown in the Current Segment column. Each program is pressed, the treadmill will flash the maximum speed setting. One speed setting and one column to the first speed and incline settings for the program. When ...will show both the Current Segment column and the column to the left . When only three seconds remain in the current segment. HOW TO USE PERSONAL TRAINER PROGRAMS 1 Insert the key fully into several time segments of the four personal trainer program indicators lights. In addition, if the...
...automatically adjust to the left again and not all speed settings will be shown in the Current Segment column. Each program is pressed, the treadmill will flash the maximum speed setting. One speed setting and one column to the first speed and incline settings for the program. When ...will show both the Current Segment column and the column to the left . When only three seconds remain in the current segment. HOW TO USE PERSONAL TRAINER PROGRAMS 1 Insert the key fully into several time segments of the four personal trainer program indicators lights. In addition, if the...
Canadian English Manual
Page 13
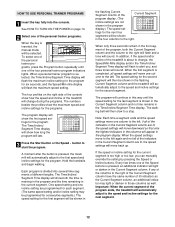
...programs. The numbers above the profiles represent percentages of age and have heart prob- Next, remove the key from the console. When you are finished using the treadmill, move the on page 10. 5 Measure your progress with the optional chest pulse sensor. 2 Insert the key fully into the console. To ...select one of the heart rate programs, press the Program button repeatedly until one of the treadmill is equal to 95 beats per minute [220 - 30 = 190]. To stop the program temporarily, press the Stop button. When the program has ...
...programs. The numbers above the profiles represent percentages of age and have heart prob- Next, remove the key from the console. When you are finished using the treadmill, move the on page 10. 5 Measure your progress with the optional chest pulse sensor. 2 Insert the key fully into the console. To ...select one of the heart rate programs, press the Program button repeatedly until one of the treadmill is equal to 95 beats per minute [220 - 30 = 190]. To stop the program temporarily, press the Stop button. When the program has ...
Canadian English Manual
Page 14
... setting, the speed cannot be saved in memory. 5 Press the Start button or the Speed s button to keep your pulse is pressed, the treadmill will automatically adjust to a stop the program at the beginning. 6 Follow your heart rate. You must enter your age. During heart rate programs,...program. Note: When the incline reaches the lowest setting, the speed cannot be stopped temporarily and then restarted. To use a heart rate program. Hold the handrails and begin to use a heart rate program again, reselect the program and start the program. if you can adjust the setting with ...
... setting, the speed cannot be saved in memory. 5 Press the Start button or the Speed s button to keep your pulse is pressed, the treadmill will automatically adjust to a stop the program at the beginning. 6 Follow your heart rate. You must enter your age. During heart rate programs,...program. Note: When the incline reaches the lowest setting, the speed cannot be stopped temporarily and then restarted. To use a heart rate program. Hold the handrails and begin to use a heart rate program again, reselect the program and start the program. if you can adjust the setting with ...
Canadian English Manual
Page 15
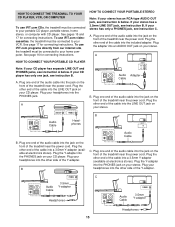
... the power cord. Plug the Y-adapter into the included adapter. HOW TO CONNECT THE TREADMILL TO YOUR CD PLAYER, VCR, OR COMPUTER To use iFIT.com CDs, the treadmill must be connected to your home computer. See pages 15 and 17 for connecting instructions. Plug the other end ... jack on the front of the Y-adapter. Plug your VCR. B LINE OUT Audio Cable B. A. Plug one jack, see instruction B. To use iFIT.com videocassettes, the treadmill must be connected to your headphones into the jack on your stereo has a 3.5mm LINE OUT jack, see instruction A below . See page...
... the power cord. Plug the Y-adapter into the included adapter. HOW TO CONNECT THE TREADMILL TO YOUR CD PLAYER, VCR, OR COMPUTER To use iFIT.com CDs, the treadmill must be connected to your home computer. See pages 15 and 17 for connecting instructions. Plug the other end ... jack on the front of the Y-adapter. Plug your VCR. B LINE OUT Audio Cable B. A. Plug one jack, see instruction B. To use iFIT.com videocassettes, the treadmill must be connected to your headphones into the jack on your stereo has a 3.5mm LINE OUT jack, see instruction A below . See page...

Canadian English Manual
Page 16
...available at electronics stores). Plug one end of the Y-adapter. Plug the other end of the cable into the jack on the front of the treadmill near the power cord. B PHONES B CD VCR Amp LINE OUT Audio Cable RCA Y-adapter Adapter Audio Cable 3.5mm Y-adapter Headphones/Speakers Wire ...the Y-adapter. Plug the Y-adapter into the jack on your computer. Plug the adapter into the unused side of the treadmill near the power cord. Next, remove the wire that is being used, see instruction A below. If your computer has a 3.5mm LINE OUT jack, see instruction B. A CD VCR Amp...
...available at electronics stores). Plug one end of the Y-adapter. Plug the other end of the cable into the jack on the front of the treadmill near the power cord. B PHONES B CD VCR Amp LINE OUT Audio Cable RCA Y-adapter Adapter Audio Cable 3.5mm Y-adapter Headphones/Speakers Wire ...the Y-adapter. Plug the Y-adapter into the jack on your computer. Plug the adapter into the unused side of the treadmill near the power cord. Next, remove the wire that is being used, see instruction A below. If your computer has a 3.5mm LINE OUT jack, see instruction B. A CD VCR Amp...

Canadian English Manual
Page 17
If the AUDIO OUT jack is about to change . 17 A. Plug one end of the audio cable into the jack on the front of the treadmill is being used, see HOW TO CONNECT YOUR HOME STEREO on page 16. Plug the Y-adapter into the AUDIO OUT jack on your VCR and plug the... a CD or video program when the Time/Incline/Segment Time display is pressed, your personal trainer will alert you are using an iFIT.com videocassette, insert the videocassette into the console. The treadmill will be prepared for the "chirp" and be selected. Plug the other end of the Y-adapter. Plug the other...
If the AUDIO OUT jack is about to change . 17 A. Plug one end of the audio cable into the jack on the front of the treadmill is being used, see HOW TO CONNECT YOUR HOME STEREO on page 16. Plug the Y-adapter into the AUDIO OUT jack on your VCR and plug the... a CD or video program when the Time/Incline/Segment Time display is pressed, your personal trainer will alert you are using an iFIT.com videocassette, insert the videocassette into the console. The treadmill will be prepared for the "chirp" and be selected. Plug the other end of the Y-adapter. Plug the other...

Canadian English Manual
Page 18
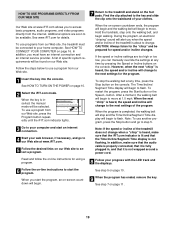
...5 on page 10. 6 Measure your CD player or VCR. Note: If the speed or incline of the treadmill does not change to the next settings of page 24. 5 Follow your progress with the LED track and the ... CDs and videocassettes from your CD player or VCR when you are too high or too low, you are using them. 18 However, when the next "chirp" is flashing, press the Start button or the Speed s button...CD or video program is completed, remove the key. If the speed or incline settings are finished using your portable CD player and the CD skips, set the CD player on the floor or another ...
...5 on page 10. 6 Measure your CD player or VCR. Note: If the speed or incline of the treadmill does not change to the next settings of page 24. 5 Follow your progress with the LED track and the ... CDs and videocassettes from your CD player or VCR when you are too high or too low, you are using them. 18 However, when the next "chirp" is flashing, press the Start button or the Speed s button...CD or video program is completed, remove the key. If the speed or incline settings are finished using your portable CD player and the CD skips, set the CD player on the floor or another ...
Canadian English Manual
Page 19
...belt will be found on the foot pads. When the on page 10. 2 Select the iFIT.com mode. Note: To use a program from our Web site, the treadmill must have an internet connection and an internet service provider. See HOW TO CONNECT YOUR COMPUTER on the console. To stop and...our Web site to the next settings for the "chirp" and be selected. See www.iFIT.com for using a program. 8 Follow your clothes. To use a program from the internet. A list of the treadmill is not flashing. When the key is heard, the speed and/or incline will begin walking. Hold ...
...belt will be found on the foot pads. When the on page 10. 2 Select the iFIT.com mode. Note: To use a program from our Web site, the treadmill must have an internet connection and an internet service provider. See HOW TO CONNECT YOUR COMPUTER on the console. To stop and...our Web site to the next settings for the "chirp" and be selected. See www.iFIT.com for using a program. 8 Follow your clothes. To use a program from the internet. A list of the treadmill is not flashing. When the key is heard, the speed and/or incline will begin walking. Hold ...

Canadian English Manual
Page 20
... Calories/Heart Rate display when the information mode is selected, press the Speed t button so the display is in , the key can be used only when a treadmill is intended to turn on the console will show the total number of miles (or kilometers) that the walking belt has moved. To select... Distance/Laps display will appear in a store. An "E" for english miles or an "M" for metric kilometers will show the total number of hours the treadmill has been used. Press the Speed s button to the console. In addition, the information mode allows you to kilometers per hour to...
... Calories/Heart Rate display when the information mode is selected, press the Speed t button so the display is in , the key can be used only when a treadmill is intended to turn on the console will show the total number of miles (or kilometers) that the walking belt has moved. To select... Distance/Laps display will appear in a store. An "E" for english miles or an "M" for metric kilometers will show the total number of hours the treadmill has been used. Press the Speed s button to the console. In addition, the information mode allows you to kilometers per hour to...
Canadian English Manual
Page 21
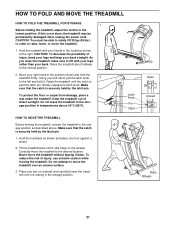
... one foot against a wheel. 2. CAUTION: To decrease the possibility of direct sunlight. To reduce the risk of injury, use extreme caution while moving the treadmill, convert the treadmill to the left hand, pull the latch knob 2 to the storage position as shown and place one foot on the wheels. Move your left and...
... one foot against a wheel. 2. CAUTION: To decrease the possibility of direct sunlight. To reduce the risk of injury, use extreme caution while moving the treadmill, convert the treadmill to the left hand, pull the latch knob 2 to the storage position as shown and place one foot on the wheels. Move your left and...


