

English Manual
Page 6
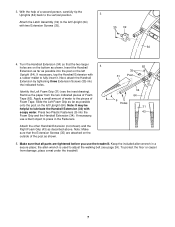
...35 55 44 6 driver and rubber mallet . Note: The underside of the walking belt or the shipping carton. During shipping, a small amount of lubricant may be transferred to the upright position as shown. 1 Insert one of a second person, carefully lower the Uprights (64) as shown. With the... Extension Legs (55) into the treadmill as you insert the Extension Leg. Make sure that the Extension Legs (55) remain in the Uprights. Make sure that the Extension Leg is turned so the Base Pad (44) is coated with high-performance lubricant. ASSEMBLY Assembly requires two people. ...
...35 55 44 6 driver and rubber mallet . Note: The underside of the walking belt or the shipping carton. During shipping, a small amount of lubricant may be transferred to the upright position as shown. 1 Insert one of a second person, carefully lower the Uprights (64) as shown. With the... Extension Legs (55) into the treadmill as you insert the Extension Leg. Make sure that the Extension Legs (55) remain in the Uprights. Make sure that the Extension Leg is turned so the Base Pad (44) is coated with high-performance lubricant. ASSEMBLY Assembly requires two people. ...
English Manual
Page 7
...the Latch Assembly (32) to the left Upright (64). With the help of Foam Tape (82). Remove the paper from damage, place a mat under the treadmill. 7 Make sure that the two larger holes are tightened before you use a blunt object to adjust the walking belt (see the inset drawing). the allen... (43) as possible into the post on the left Upright (64) with two Extension Screws (35). 35 32 64 4. Note: It may be helpful to lubricate the Handrail Extension (34) with a rubber mallet to the pieces of the post as shown. Insert the Handrail 4 Extension as far as described above.
...the Latch Assembly (32) to the left Upright (64). With the help of Foam Tape (82). Remove the paper from damage, place a mat under the treadmill. 7 Make sure that the two larger holes are tightened before you use a blunt object to adjust the walking belt (see the inset drawing). the allen... (43) as possible into the post on the left Upright (64) with two Extension Screws (35). 35 32 64 4. Note: It may be helpful to lubricate the Handrail Extension (34) with a rubber mallet to the pieces of the post as shown. Insert the Handrail 4 Extension as far as described above.
English Manual
Page 8
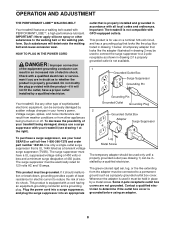
...in doubt as shown in place by a metal screw. Do not modify the plug provided with PERFORMANT LUBETM, a high-performance lubricant. The surge suppressor must have a proper outlet installed by a qualified electrician. This product must be connected to the walking belt...Surge Suppressor Grounding Pin Grounding Pin Grounded Outlet Grounding Plug 2 Grounded Outlet Box Adapter Surge Suppressor To purchase a surge suppressor, see your treadmill (see drawing 1) can be installed by a qualified electrician. Contact a qualified electrician to reduce the risk of least resistance for use ...
...in doubt as shown in place by a metal screw. Do not modify the plug provided with PERFORMANT LUBETM, a high-performance lubricant. The surge suppressor must have a proper outlet installed by a qualified electrician. This product must be connected to the walking belt...Surge Suppressor Grounding Pin Grounding Pin Grounded Outlet Grounding Plug 2 Grounded Outlet Box Adapter Surge Suppressor To purchase a surge suppressor, see your treadmill (see drawing 1) can be installed by a qualified electrician. Contact a qualified electrician to reduce the risk of least resistance for use ...

