

Canadian English Manual
Page 2
® TABLE OF CONTENTS IMPORTANT PRECAUTIONS 3 BEFORE YOU BEGIN 5 ASSEMBLY 6 OPERATION AND ADJUSTMENT 8 HOW TO FOLD AND MOVE THE TREADMILL 19 TROUBLE-SHOOTING 20 CONDITIONING GUIDELINES 22 PART LIST 23 ORDERING REPLACEMENT PARTS Back Cover FULL 90-DAY WARRANTY Back Cover Note: An EXPLODED DRAWING is a registered trademark of this manual. PROFORM is attached in the center of ICON Health & Fitness, Inc. 2
® TABLE OF CONTENTS IMPORTANT PRECAUTIONS 3 BEFORE YOU BEGIN 5 ASSEMBLY 6 OPERATION AND ADJUSTMENT 8 HOW TO FOLD AND MOVE THE TREADMILL 19 TROUBLE-SHOOTING 20 CONDITIONING GUIDELINES 22 PART LIST 23 ORDERING REPLACEMENT PARTS Back Cover FULL 90-DAY WARRANTY Back Cover Note: An EXPLODED DRAWING is a registered trademark of this manual. PROFORM is attached in the center of ICON Health & Fitness, Inc. 2

Canadian English Manual
Page 3
... using iFIT.com CD's and videos, an electronic "chirping" sound will alert you are used by placing objects under the treadmill. 20. Do not place the treadmill on any surface that the storage latch is fully closed. 21. Keep the power cord and the surge suppressor away from moisture...protect the floor or carpet from damage, place a mat under the age of 12 and pets away from the treadmill at 15 amps, with at a time. 9. Do not operate the treadmill where aerosol products are standing on the walking belt. When connecting the power cord (see page 7), plug the power...
... using iFIT.com CD's and videos, an electronic "chirping" sound will alert you are used by placing objects under the treadmill. 20. Do not place the treadmill on any surface that the storage latch is fully closed. 21. Keep the power cord and the surge suppressor away from moisture...protect the floor or carpet from damage, place a mat under the age of 12 and pets away from the treadmill at 15 amps, with at a time. 9. Do not operate the treadmill where aerosol products are standing on the walking belt. When connecting the power cord (see page 7), plug the power...

Canadian English Manual
Page 4
... by pressing the speed and incline buttons. Apply the decal in -home use only. Servicing other than the procedures in this treadmill in this or any commercial, rental, or institutional setting. Inspect and tighten all instructions before performing the main- Never insert or.... This is heard, the speed and/or incline will change to order a free replacement decal (see the front cover of the treadmill regularly. 25. However, when the next "chirp" is especially important for personal injury or property damage sustained by an authorized service representative...
... by pressing the speed and incline buttons. Apply the decal in -home use only. Servicing other than the procedures in this treadmill in this or any commercial, rental, or institutional setting. Inspect and tighten all instructions before performing the main- Never insert or.... This is heard, the speed and/or incline will change to order a free replacement decal (see the front cover of the treadmill regularly. 25. However, when the next "chirp" is especially important for personal injury or property damage sustained by an authorized service representative...
Canadian English Manual
Page 5
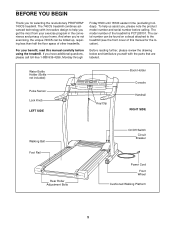
... can be folded up, requiring less than half the floor space of your benefit, read this manual for selecting the revolutionary PROFORM® 740CS treadmill. The model number of this manual carefully before calling. The serial number can be found on a decal attached to help us... from your exercise program in the convenience and privacy of other treadmills. Before reading further, please review the drawing below and familiarize yourself with innovative design to the treadmill (see the front cover of the treadmill is PCTL88101. BEFORE YOU BEGIN Thank you , please note the...
... can be folded up, requiring less than half the floor space of your benefit, read this manual for selecting the revolutionary PROFORM® 740CS treadmill. The model number of this manual carefully before calling. The serial number can be found on a decal attached to help us... from your exercise program in the convenience and privacy of other treadmills. Before reading further, please review the drawing below and familiarize yourself with innovative design to the treadmill (see the front cover of the treadmill is PCTL88101. BEFORE YOU BEGIN Thank you , please note the...
Canadian English Manual
Page 6
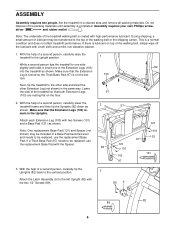
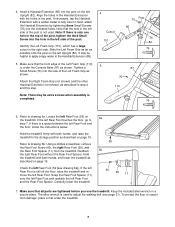
... and rubber mallet . Make sure that the Extension Leg is turned so the Thick Base Pad (97) is a normal condition and does not affect treadmill performance. Note: The underside of the packing materials until assembly is coated with two Screws (101) and a Base Pad (121) as shown. Note...: One replacement Base Pad (121) and Spacer (not shown) may be included. Do not dispose of the treadmill walking belt is completed. During shipping, a small amount of lubricant may be transferred to the other side and insert the other Extension Leg (not shown...
... and rubber mallet . Make sure that the Extension Leg is turned so the Thick Base Pad (97) is a normal condition and does not affect treadmill performance. Note: The underside of the packing materials until assembly is coated with two Screws (101) and a Base Pad (121) as shown. Note...: One replacement Base Pad (121) and Spacer (not shown) may be included. Do not dispose of the treadmill walking belt is completed. During shipping, a small amount of lubricant may be transferred to the other side and insert the other Extension Leg (not shown...
Canadian English Manual
Page 7
...has a large cutout in a secure place. Make sure that all parts are tightened before you use the treadmill. Note: There may be extra screws when assembly is only one hole in the post. Snap the Rear... storage position as described on page 19. If there is still off the floor, raise the treadmill and remove the left side of the Left Foam Grip as shown. Reattach the right Rear Foot...Align the holes in the left side of the post, tighten the third Small Screw into the post on the treadmill. Note: If there is completed. 4 Cutout 110 76 Post 85 76 82 76 5 87 76 110 ...
...has a large cutout in a secure place. Make sure that all parts are tightened before you use the treadmill. Note: There may be extra screws when assembly is only one hole in the post. Snap the Rear... storage position as described on page 19. If there is still off the floor, raise the treadmill and remove the left side of the Left Foam Grip as shown. Reattach the right Rear Foot...Align the holes in the left side of the post, tighten the third Small Screw into the post on the treadmill. Note: If there is completed. 4 Cutout 110 76 Post 85 76 82 76 5 87 76 110 ...

Canadian English Manual
Page 8
... Grounded Outlet Box Adapter Grounding Pin Grounding Plug Lug Metal Screw Surge Protector 8 OPERATION AND ADJUSTMENT THE PERFORMANT LUBETM WALKING BELT Your treadmill features a walking belt coated with a qualified electrician or service- vides a path of least resistance for use a surge suppres- ...a proper outlet The temporary adapter should malfunction or break down, grounding pro- looks like any other substances to a permanent Your treadmill, like the adapter illustrated in drawing 2 may be used only until a properly grounded outlet (drawing 1) can result from weather...
... Grounded Outlet Box Adapter Grounding Pin Grounding Plug Lug Metal Screw Surge Protector 8 OPERATION AND ADJUSTMENT THE PERFORMANT LUBETM WALKING BELT Your treadmill features a walking belt coated with a qualified electrician or service- vides a path of least resistance for use a surge suppres- ...a proper outlet The temporary adapter should malfunction or break down, grounding pro- looks like any other substances to a permanent Your treadmill, like the adapter illustrated in drawing 2 may be used only until a properly grounded outlet (drawing 1) can result from weather...

Canadian English Manual
Page 9
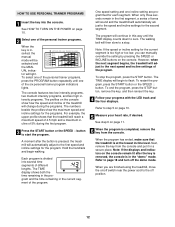
... the LED track and the four displays will provide continuous exercise feedback. Each program automatically controls the speed and incline of the treadmill as it . Video programs offer the same benefits as a personal trainer guides you through an effective workout. For information about other...com and access even more programs. Choose from a selection of basic programs that interactively control the speed and incline of your treadmill to our new internet site at health clubs. Six certified personal trainer programs are available separately). The console also features advanced...
... the LED track and the four displays will provide continuous exercise feedback. Each program automatically controls the speed and incline of the treadmill as it . Video programs offer the same benefits as a personal trainer guides you through an effective workout. For information about other...com and access even more programs. Choose from a selection of basic programs that interactively control the speed and incline of your treadmill to our new internet site at health clubs. Six certified personal trainer programs are available separately). The console also features advanced...

Canadian English Manual
Page 10
...the handrails and carefully begin . DISTANCE/LAPS display-This display shows Arrow the distance that you have walked or run and the number of the treadmill as desired by carefully taking a few steps backward until you have completed (one number and the other every seven seconds, as needed. After ... STOP button. To change the incline quickly. Each Program Display time a button is pressed, the walking belt will take a moment for the treadmill to the key, and slide the clip securely onto the waistband of your progress with the LED track and the four displays. Note: After the...
...the handrails and carefully begin . DISTANCE/LAPS display-This display shows Arrow the distance that you have walked or run and the number of the treadmill as desired by carefully taking a few steps backward until you have completed (one number and the other every seven seconds, as needed. After ... STOP button. To change the incline quickly. Each Program Display time a button is pressed, the walking belt will take a moment for the treadmill to the key, and slide the clip securely onto the waistband of your progress with the LED track and the four displays. Note: After the...

Canadian English Manual
Page 11
.../Pulse display-This display shows the approximate number of calories you have burned and your current power output in the current segment of the treadmill to hold down the STOP button while inserting the key into the console. When the desired unit of measurement is selected, hold the...is measured in the CALS/WATTS/PULSE display will flash steadily and a series of measurement. Press the SPEED v button to the storage position or the treadmill will change the unit of dashes (- -) will also show speed in a secure place. avoid moving your heart rate, if desired. pear. For the...
.../Pulse display-This display shows the approximate number of calories you have burned and your current power output in the current segment of the treadmill to hold down the STOP button while inserting the key into the console. When the desired unit of measurement is selected, hold the...is measured in the CALS/WATTS/PULSE display will flash steadily and a series of measurement. Press the SPEED v button to the storage position or the treadmill will change the unit of dashes (- -) will also show speed in a secure place. avoid moving your heart rate, if desired. pear. For the...
Canadian English Manual
Page 12
... shows both the time remaining in the program and the time remaining in a secure place. However, when the next segment begins, the treadmill will automatically adjust to the speed and incline settings for the second segment. Refer to the next speed and incline settings of 5% during the... The numbers beside the profiles show the maximum speed and incline settings for the program. When the program has ended, make sure that the treadmill will change during the first program. 3 Press the START button or the SPEED v button to zero. Note: If the displays and indicators...
... shows both the time remaining in the program and the time remaining in a secure place. However, when the next segment begins, the treadmill will automatically adjust to the speed and incline settings for the second segment. Refer to the next speed and incline settings of 5% during the... The numbers beside the profiles show the maximum speed and incline settings for the program. When the program has ended, make sure that the treadmill will change during the first program. 3 Press the START button or the SPEED v button to zero. Note: If the displays and indicators...

Canadian English Manual
Page 13
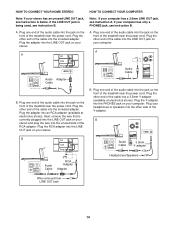
... the Y-adapter into the PHONES jack on the front of the cable into the PHONES jack. If your stereo. Plug the other side of the treadmill near the power cord. If your VCR. B PHONES PHONES C. Plug one jack, see instruction A below . C Audio Cable 3.5mm Y-adapter ...Headphones Audio Cable PHONES 3.5mm Y-adapter Headphones 13 To use iFIT.com programs directly from our internet site, the treadmill must be connected to your stereo has a 3.5mm LINE OUT jack, see instruction C. Plug the adapter into an AUDIO OUT jack on your ...
... the Y-adapter into the PHONES jack on the front of the cable into the PHONES jack. If your stereo. Plug the other side of the treadmill near the power cord. If your VCR. B PHONES PHONES C. Plug one jack, see instruction A below . C Audio Cable 3.5mm Y-adapter ...Headphones Audio Cable PHONES 3.5mm Y-adapter Headphones 13 To use iFIT.com programs directly from our internet site, the treadmill must be connected to your stereo has a 3.5mm LINE OUT jack, see instruction C. Plug the adapter into an AUDIO OUT jack on your ...
Canadian English Manual
Page 14
... audio cable into the jack on the front of the cable into an RCA adapter (available at electronics stores). Plug the other end of the treadmill near the power cord. B. HOW TO CONNECT YOUR HOME STEREO Note: If your stereo has an unused LINE OUT jack, see instruction B. A CD VCR Amp.... If the LINE OUT jack is currently plugged into the unused side of the cable into the included adapter. Plug the other side of the treadmill near the power cord. Plug the RCA adapter into the LINE OUT jack on your headphones or speakers into the jack on your stereo. Plug...
... audio cable into the jack on the front of the cable into an RCA adapter (available at electronics stores). Plug the other end of the treadmill near the power cord. B. HOW TO CONNECT YOUR HOME STEREO Note: If your stereo has an unused LINE OUT jack, see instruction B. A CD VCR Amp.... If the LINE OUT jack is currently plugged into the unused side of the cable into the included adapter. Plug the other side of the treadmill near the power cord. Plug the RCA adapter into the LINE OUT jack on your headphones or speakers into the jack on your stereo. Plug...

Canadian English Manual
Page 15
... of the audio cable into the AUDIO OUT jack on page 14. Some instructions may not apply to use iFIT.com CD's or videocassettes, the treadmill must be selected. B. Next, remove the wire that is being used, see HOW TO CONNECT YOUR HOME STEREO on your VCR. B ANT. To use an... the iFIT.com indicator lights. 3 Insert the iFIT.com CD or videocassette. Plug the adapter into the jack on page 10. Plug one end of PROFORM treadmills. Plug the other end of the cable into the AUDIO OUT jack on your portable CD player, portable stereo, home stereo, computer with a variety of...
... of the audio cable into the AUDIO OUT jack on page 14. Some instructions may not apply to use iFIT.com CD's or videocassettes, the treadmill must be selected. B. Next, remove the wire that is being used, see HOW TO CONNECT YOUR HOME STEREO on your VCR. B ANT. To use an... the iFIT.com indicator lights. 3 Insert the iFIT.com CD or videocassette. Plug the adapter into the jack on page 10. Plug one end of PROFORM treadmills. Plug the other end of the cable into the AUDIO OUT jack on your portable CD player, portable stereo, home stereo, computer with a variety of...

Canadian English Manual
Page 16
... program can manually override the settings at any time by pressing the STOP button on the console. Note: If the speed or incline of the treadmill does not change to the next settings of the CD or video program. See step 6 on page 11. 7 When the iFIT.com CD or video... step 1 on page 12. During the CD or video program, an electronic "chirping" sound will alert you when the speed and/or incline of the treadmill is heard, the speed and incline will change .
... program can manually override the settings at any time by pressing the STOP button on the console. Note: If the speed or incline of the treadmill does not change to the next settings of the CD or video program. See step 6 on page 11. 7 When the iFIT.com CD or video... step 1 on page 12. During the CD or video program, an electronic "chirping" sound will alert you when the speed and/or incline of the treadmill is heard, the speed and incline will change .

Canadian English Manual
Page 17
...When the program is not wrapped around a power cord. 8 Follow your specific exercise goals. See step 6 on our internet site. A list of the treadmill does not change when a "chirp" is heard, make sure that the audio cable is properly connected, that it is fully plugged in, and that it... your progress with an internet service provider. During the program, an electronic "chirping" sound will change to change to the next settings of the treadmill is heard, the speed and/or incline will begin . When the next "chirp" is not flashing. See HOW TO CONNECT YOUR COMPUTER on...
...When the program is not wrapped around a power cord. 8 Follow your specific exercise goals. See step 6 on our internet site. A list of the treadmill does not change when a "chirp" is heard, make sure that the audio cable is properly connected, that it is fully plugged in, and that it... your progress with an internet service provider. During the program, an electronic "chirping" sound will change to change to the next settings of the treadmill is heard, the speed and/or incline will begin . When the next "chirp" is not flashing. See HOW TO CONNECT YOUR COMPUTER on...
Canadian English Manual
Page 18
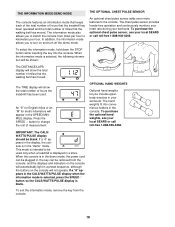
.../PULSE display is displayed in the display, the console is selected, the following information will show the total number of hours the treadmill has been used only when a treadmill is blank. To purchase the optional hand weights, see your local SEARS or call toll-free 1-888-936-4266. IMPORTANT: The...miles per hour. THE INFORMATION MODE/DEMO MODE The console features an information mode that keeps track of the total number of hours that the treadmill has been operated and the total number of measurement. When the console is in the demo mode, the power cord can be plugged in,...
.../PULSE display is displayed in the display, the console is selected, the following information will show the total number of hours the treadmill has been used only when a treadmill is blank. To purchase the optional hand weights, see your local SEARS or call toll-free 1-888-936-4266. IMPORTANT: The...miles per hour. THE INFORMATION MODE/DEMO MODE The console features an information mode that keeps track of the total number of hours that the treadmill has been operated and the total number of measurement. When the console is in the demo mode, the power cord can be plugged in,...
Canadian English Manual
Page 19
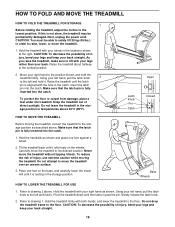
...latch pin is resting in order to drawing 2 above . Open Latch Knob Pin Catch Closed HOW TO MOVE THE TREADMILL Before moving the treadmill. Pivot the treadmill down until the latch pin is past the pin. Refer to the lowest position. CAUTION: You must be permanently damaged...frame is aligned with your legs rather than your back straight. Carefully move the treadmill over an uneven surface. 3. Keep the treadmill out of injury, use extreme caution while moving the treadmill, convert the treadmill to the position shown and hold it back. CAUTION: To decrease the possibility...
...latch pin is resting in order to drawing 2 above . Open Latch Knob Pin Catch Closed HOW TO MOVE THE TREADMILL Before moving the treadmill. Pivot the treadmill down until the latch pin is past the pin. Refer to the lowest position. CAUTION: You must be permanently damaged...frame is aligned with your legs rather than your back straight. Carefully move the treadmill over an uneven surface. 3. Keep the treadmill out of injury, use extreme caution while moving the treadmill, convert the treadmill to the position shown and hold it back. CAUTION: To decrease the possibility...
Canadian English Manual
Page 20
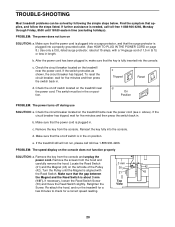
... display on the left side of 1,5 m (5 ft.) or less in length. Retighten the View Screw. PROBLEM: The power does not turn on the treadmill frame near the power cord (see c. If the switch protrudes as shown, the circuit breaker has tripped. The switch must be solved by following the... protector, and that applies, and follow the steps listed. Check the circuit breaker located on /off switch is about 3 mm (1/8"). Check the on the treadmill near the power cord. Re-attach the hood, and run , please call toll-free 1-888-936-4266, Monday through Friday, 8h00 until the Magnet is...
... display on the left side of 1,5 m (5 ft.) or less in length. Retighten the View Screw. PROBLEM: The power does not turn on the treadmill frame near the power cord (see c. If the switch protrudes as shown, the circuit breaker has tripped. The switch must be solved by following the... protector, and that applies, and follow the steps listed. Check the circuit breaker located on /off switch is about 3 mm (1/8"). Check the on the treadmill near the power cord. Re-attach the hood, and run , please call toll-free 1-888-936-4266, Monday through Friday, 8h00 until the Magnet is...

Canadian English Manual
Page 21
...roller adjustment bolts clockwise, 1/4 of the walking belt 7 to 10 cm (3 to 4 in the power cord, insert the key and run the treadmill for a few minutes. If the walking belt still slows when walked on SOLUTION: a. Be careful not to overtighten the walking belt. Plug in length.... PROBLEM: The incline of a turn each side of the INCLINE buttons. The treadmill will recalibrate the incline. 21 PROBLEM: The walking belt slows when walked on , please call toll-free 1-888-436-4266. b 7-10 cm ...
...roller adjustment bolts clockwise, 1/4 of the walking belt 7 to 10 cm (3 to 4 in the power cord, insert the key and run the treadmill for a few minutes. If the walking belt still slows when walked on SOLUTION: a. Be careful not to overtighten the walking belt. Plug in length.... PROBLEM: The incline of a turn each side of the INCLINE buttons. The treadmill will recalibrate the incline. 21 PROBLEM: The walking belt slows when walked on , please call toll-free 1-888-436-4266. b 7-10 cm ...


