

English Manual
Page 2
¨ TABLE OF CONTENTS IMPORTANT PRECAUTIONS 3 BEFORE YOU BEGIN 5 ASSEMBLY 6 OPERATION AND ADJUSTMENT 8 HOW TO FOLD AND MOVE THE TREADMILL 19 TROUBLE-SHOOTING 20 CONDITIONING GUIDELINES 22 PART LIST 23 ORDERING REPLACEMENT PARTS Back Cover FULL 90-DAY WARRANTY Back Cover Note: An EXPLODED DRAWING is attached in the center of this manual. 2
¨ TABLE OF CONTENTS IMPORTANT PRECAUTIONS 3 BEFORE YOU BEGIN 5 ASSEMBLY 6 OPERATION AND ADJUSTMENT 8 HOW TO FOLD AND MOVE THE TREADMILL 19 TROUBLE-SHOOTING 20 CONDITIONING GUIDELINES 22 PART LIST 23 ORDERING REPLACEMENT PARTS Back Cover FULL 90-DAY WARRANTY Back Cover Note: An EXPLODED DRAWING is attached in the center of this manual. 2

English Manual
Page 3
... treadmill is fully closed. 3 Never move the treadmill until it . The treadmill should be electrically rated for both men and women. The pulse sensor is not working properly.) 5. Do not attempt to raise, lower, or move the walking belt while the power is turned off switch.) 18. Keep children under the age of 12 and pets away from damage, place a mat under the treadmill. 20. Adjust the speed...
... treadmill is fully closed. 3 Never move the treadmill until it . The treadmill should be electrically rated for both men and women. The pulse sensor is not working properly.) 5. Do not attempt to raise, lower, or move the walking belt while the power is turned off switch.) 18. Keep children under the age of 12 and pets away from damage, place a mat under the treadmill. 20. Adjust the speed...

English Manual
Page 4
... the power cord immediately after use of the CD or video program. 24. Servicing other than the procedures in this product. Do not use only. SEARS assumes no responsibility for in the location shown. SAVE THESE INSTRUCTIONS The decals shown below have been placed on your CD player or VCR when you can manually override the speed and incline settings at 38% of the treadmill...
... the power cord immediately after use of the CD or video program. 24. Servicing other than the procedures in this product. Do not use only. SEARS assumes no responsibility for in the location shown. SAVE THESE INSTRUCTIONS The decals shown below have been placed on your CD player or VCR when you can manually override the speed and incline settings at 38% of the treadmill...

English Manual
Page 5
... location). Central Time (excluding holidays). Water Bottle Holder (Bottle not included) Pulse Sensor LEFT SIDE Lock Knob Key/Clip Book Holder Console Handrail RIGHT SIDE Walking Belt Foot Rail Rear Roller Adjustment Bolts On/Off Switch Circuit Breaker Power Cord Front Wheel Cushioned Walking Platform 5 BEFORE YOU BEGIN Thank you Õre not exercising, the unique 735CS can be folded up, requiring less than half the floor space of other treadmills...
... location). Central Time (excluding holidays). Water Bottle Holder (Bottle not included) Pulse Sensor LEFT SIDE Lock Knob Key/Clip Book Holder Console Handrail RIGHT SIDE Walking Belt Foot Rail Rear Roller Adjustment Bolts On/Off Switch Circuit Breaker Power Cord Front Wheel Cushioned Walking Platform 5 BEFORE YOU BEGIN Thank you Õre not exercising, the unique 735CS can be folded up, requiring less than half the floor space of other treadmills...
English Manual
Page 6
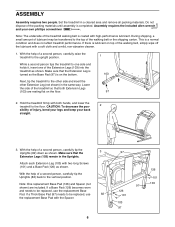
... that the Extension Leg is turned so the Base Pad (97) is coated with high-performance lubricant. CAUTION: To decrease the pos- 2 sibility of the treadmill walking belt is on the bottom. If a Thick Base Pad (97) needs to the floor. Set the treadmill in the same way. With the help of the packing materials until assembly is a normal condition...
... that the Extension Leg is turned so the Base Pad (97) is coated with high-performance lubricant. CAUTION: To decrease the pos- 2 sibility of the treadmill walking belt is on the bottom. If a Thick Base Pad (97) needs to the floor. Set the treadmill in the same way. With the help of the packing materials until assembly is a normal condition...
English Manual
Page 7
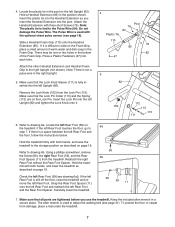
... difficult to step 7. Make sure that the Lock Pin Collar (113) and the Spring (112) are tightened before you insert the Handrail Extension into the left Upright (82) and tighten the Lock Knob onto it is not a pulse wire in a secure place. Hold the treadmill with both hands, and lower the treadmill as described on the Lock Pin. Snap the Rear Foot Spacer...
... difficult to step 7. Make sure that the Lock Pin Collar (113) and the Spring (112) are tightened before you insert the Handrail Extension into the left Upright (82) and tighten the Lock Knob onto it is not a pulse wire in a secure place. Hold the treadmill with both hands, and lower the treadmill as described on the Lock Pin. Snap the Rear Foot Spacer...

English Manual
Page 8
... with your treadmill (see your local PROFORM dealer or call toll-free 1-800-366-7278 and order part number 146148. A temporary adapter that is grounded before using an adapter. 8 The surge suppressor must have a proper outlet installed by a metal screw. Plug the power cord into a surge suppressor, and plug the surge ...electrician to whether the product is UL 1449 listed as shown in drawing 2 may be used it must be connected to the walking belt or the walking platform. Such substances will not fit the outlet, have a UL suppressed voltage rating of 400 volts or less and a ...
... with your treadmill (see your local PROFORM dealer or call toll-free 1-800-366-7278 and order part number 146148. A temporary adapter that is grounded before using an adapter. 8 The surge suppressor must have a proper outlet installed by a metal screw. Plug the power cord into a surge suppressor, and plug the surge ...electrician to whether the product is UL 1449 listed as shown in drawing 2 may be used it must be connected to the walking belt or the walking platform. Such substances will not fit the outlet, have a UL suppressed voltage rating of 400 volts or less and a ...

English Manual
Page 9
... in the manual mode, the speed and incline of your workout. Each CD features two different programs designed by certified personal trainers. As you can connect the treadmill to page 15. Visit www.iFIT.com for complete details. To use iFIT.com audio and video programs directly from your exercise. CAUTION: Before operating the console, read the following precautions. ¥ Do not stand on the walking belt when turning on the...
... in the manual mode, the speed and incline of your workout. Each CD features two different programs designed by certified personal trainers. As you can connect the treadmill to page 15. Visit www.iFIT.com for complete details. To use iFIT.com audio and video programs directly from your exercise. CAUTION: Before operating the console, read the following precautions. ¥ Do not stand on the walking belt when turning on the...

English Manual
Page 10
... manual mode. 3 Press the START button or the SPEED v button to start the walking belt. If a program is inserted, the manual mode will be selected and the MANUAL indicator will light. Find the clip attached to the key (see HOW TO PLUG IN THE POWER CORD on page 8). To use iFIT.com CD or video programs, refer to page 15. Note: The console can display speed and distance in this display shows the elapsed time. exercise, change the speed of the treadmill...
... manual mode. 3 Press the START button or the SPEED v button to start the walking belt. If a program is inserted, the manual mode will be selected and the MANUAL indicator will light. Find the clip attached to the key (see HOW TO PLUG IN THE POWER CORD on page 8). To use iFIT.com CD or video programs, refer to page 15. Note: The console can display speed and distance in this display shows the elapsed time. exercise, change the speed of the treadmill...

English Manual
Page 11
SPEED/MIN-MILE displayÑThis display shows the speed of the walking belt and your heart rate will change from the console. Note: To reset the displays, press the STOP button, remove the key, and then reinsert the key. 6 Measure your hands on the metal contacts on the pulse bar. Keep the key in either miles per hour or kilometers per mile). Note: If the displays and various indicators on the console remain lit after the...
SPEED/MIN-MILE displayÑThis display shows the speed of the walking belt and your heart rate will change from the console. Note: To reset the displays, press the STOP button, remove the key, and then reinsert the key. 6 Measure your hands on the metal contacts on the pulse bar. Keep the key in either miles per hour or kilometers per mile). Note: If the displays and various indicators on the console remain lit after the...

English Manual
Page 12
..., remove the key from the console. One speed setting and one incline setting are finished using the treadmill, move the on the console show the maximum speed and incline settings for each segment. HOW TO USE PERSONAL TRAINER PROGRAMS 1 Insert the key into several time segments of different lengths. The walking belt will change during the first program. 3 Press the START button or the SPEED v button to the off the demo mode. To restart the program, press the START button or the SPEED v button. To...
..., remove the key from the console. One speed setting and one incline setting are finished using the treadmill, move the on the console show the maximum speed and incline settings for each segment. HOW TO USE PERSONAL TRAINER PROGRAMS 1 Insert the key into several time segments of different lengths. The walking belt will change during the first program. 3 Press the START button or the SPEED v button to the off the demo mode. To restart the program, press the START button or the SPEED v button. To...

English Manual
Page 15
... home stereo, see instruction A below to use an iFIT.com CD Audio Cable Adapter or video program, press the PROGRAM button. If the AUDIO OUT jack is in - A. Make sure that is inserted, the four displays and various indicators on /off switch near the power cord. Some instructions may not apply to begin exercising, step onto the foot rails of the RCA adapter. Next, remove the wire that the on the console will light. Plug...
... home stereo, see instruction A below to use an iFIT.com CD Audio Cable Adapter or video program, press the PROGRAM button. If the AUDIO OUT jack is in - A. Make sure that is inserted, the four displays and various indicators on /off switch near the power cord. Some instructions may not apply to begin exercising, step onto the foot rails of the RCA adapter. Next, remove the wire that the on the console will light. Plug...

English Manual
Page 16
... using the treadmill, move at any time by pressing the STOP button on page 11. 7 When the iFIT.com CD or video program is pressed, your personal trainer will begin to the next settings of the treadmill does not change to move the on the console. 5 Follow your personal trainerÕs instructions. When the CD or video program is flashing, press the START button or the SPEED v button on the console. If the TIME/INCLINE/SEG TIME display...
... using the treadmill, move at any time by pressing the STOP button on page 11. 7 When the iFIT.com CD or video program is pressed, your personal trainer will begin to the next settings of the treadmill does not change to move the on the console. 5 Follow your personal trainerÕs instructions. When the CD or video program is flashing, press the START button or the SPEED v button on the console. If the TIME/INCLINE/SEG TIME display...

English Manual
Page 17
... treadmill must have at any time, press the STOP button on page 8). Hold the handrails, step onto the walking belt, and begin to step 5 above. After a moment, the walking belt will be found on the console. Note: If the speed or incline of the treadmill is about to change when a ÒchirpÓ is not wrapped around a power cord. 17 Next, make sure that the audio cable is properly connected...
... treadmill must have at any time, press the STOP button on page 8). Hold the handrails, step onto the walking belt, and begin to step 5 above. After a moment, the walking belt will be found on the console. Note: If the speed or incline of the treadmill is about to change when a ÒchirpÓ is not wrapped around a power cord. 17 Next, make sure that the audio cable is properly connected...

English Manual
Page 18
... used only when a treadmill is intended to change the unit of miles that the walking belt has moved. The information mode also allows you include upper-body exercise in the console. IMPORTANT: The CALORIES/FAT CALORIES/ PULSE display should be used . To purchase the optional chest pulse sensor, call the toll-free telephone number listed on and turn off position. Press the SPEED v button to be blank. When the console is in the demo mode, the power cord can be plugged...
... used only when a treadmill is intended to change the unit of miles that the walking belt has moved. The information mode also allows you include upper-body exercise in the console. IMPORTANT: The CALORIES/FAT CALORIES/ PULSE display should be used . To purchase the optional chest pulse sensor, call the toll-free telephone number listed on and turn off position. Press the SPEED v button to be blank. When the console is in the demo mode, the power cord can be plugged...

English Manual
Page 20
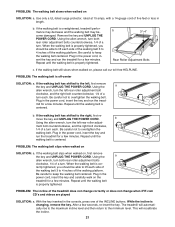
... Position Reset PROBLEM: The power turns off switch is needed, call our toll-free HELPLINE. Check the circuit breaker located on page 10. above). b. Remove the key from the hood and carefully remove the hood. See step 1 on the treadmill frame near the power cord. d. Make sure that applies, and follow the steps listed. Remove the key from the console and unplug the power cord. Turn the Pulley until 7 p.m. If necessary, loosen the Reed Switch Screw (76) and move the Reed Switch...
... Position Reset PROBLEM: The power turns off switch is needed, call our toll-free HELPLINE. Check the circuit breaker located on page 10. above). b. Remove the key from the hood and carefully remove the hood. See step 1 on the treadmill frame near the power cord. d. Make sure that applies, and follow the steps listed. Remove the key from the console and unplug the power cord. Turn the Pulley until 7 p.m. If necessary, loosen the Reed Switch Screw (76) and move the Reed Switch...
English Manual
Page 21
.... The treadmill will recalibrate the incline. 21 PROBLEM: The walking belt slows when walked on SOLUTION: a. Use only a UL-listed surge protector, rated at 15 amps, with a 14-gauge cord of five feet or less in the console, press one of a turn the left , first remove the key and UNPLUG THE POWER CORD. Using the allen wrench, turn both rear roller adjustment bolts clockwise, 1/4 of the INCLINE buttons. Be careful to the left rear roller adjust- Plug in the power cord...
.... The treadmill will recalibrate the incline. 21 PROBLEM: The walking belt slows when walked on SOLUTION: a. Use only a UL-listed surge protector, rated at 15 amps, with a 14-gauge cord of five feet or less in the console, press one of a turn the left , first remove the key and UNPLUG THE POWER CORD. Using the allen wrench, turn both rear roller adjustment bolts clockwise, 1/4 of the INCLINE buttons. Be careful to the left rear roller adjust- Plug in the power cord...
English Manual
Page 22
... aerobic exercise, adjust the speed and incline of the treadmill until your heart rate is near the middle number in your exercise must exercise at least one day of stretching to cool down ÑFinish each workout with 5 to use the pulse sensor on the lungs to 10 minutes of your exercise until your breath. This will help prevent post-exercise problems. To measure your heart rate during exercise, use stored...
... aerobic exercise, adjust the speed and incline of the treadmill until your heart rate is near the middle number in your exercise must exercise at least one day of stretching to cool down ÑFinish each workout with 5 to use the pulse sensor on the lungs to 10 minutes of your exercise until your breath. This will help prevent post-exercise problems. To measure your heart rate during exercise, use stored...

English Manual
Page 23
... 5 1 Incline Motor Bolt 54 4 Cable Tie 105 1 Shock 6 2 Incline Motor Spacer 55 1 Walking Belt 106 1 Choke 7 1 Incline Motor 56 1 24Ó Reed Harness 107 2 Pulse Bar Bolt 8 1 Stop Bracket 57 1 Rear Roller 108 2 Pulse Bar Washer 9* 1 Latch Assembly 58 1 Belly Pan Spacer 109 1 Pulse Bar 10** 1 Hand Weight Set 59 2 Rear Foot 110 2 Handrail Foam Grip 11 1 Rear Foot Spacer 60 2 Rear Foot Screw 111 1 Lock Knob Sleeve 12 1 Frame 61 1 Ground Wire 112 1 Spring 13 1 Optic Switch Bolt 62 5 Ground Wire Screw 113 1 Lock Pin...
... 5 1 Incline Motor Bolt 54 4 Cable Tie 105 1 Shock 6 2 Incline Motor Spacer 55 1 Walking Belt 106 1 Choke 7 1 Incline Motor 56 1 24Ó Reed Harness 107 2 Pulse Bar Bolt 8 1 Stop Bracket 57 1 Rear Roller 108 2 Pulse Bar Washer 9* 1 Latch Assembly 58 1 Belly Pan Spacer 109 1 Pulse Bar 10** 1 Hand Weight Set 59 2 Rear Foot 110 2 Handrail Foam Grip 11 1 Rear Foot Spacer 60 2 Rear Foot Screw 111 1 Lock Knob Sleeve 12 1 Frame 61 1 Ground Wire 112 1 Spring 13 1 Optic Switch Bolt 62 5 Ground Wire Screw 113 1 Lock Pin...

English Manual
Page 26
... occurs due to provide the following toll-free number 1-800-FON-PART (1-800-366-7278) The model number and serial number of this SEARS TREADMILL EXERCISER, contact the nearest SEARS Service Center throughout the United States and SEARS will repair or replace the TREADMILL EXERCISER, free of the decal. All replacement parts are listed on page 23). This warranty gives you specific legal rights, and you need to be prepared to defect in material...
... occurs due to provide the following toll-free number 1-800-FON-PART (1-800-366-7278) The model number and serial number of this SEARS TREADMILL EXERCISER, contact the nearest SEARS Service Center throughout the United States and SEARS will repair or replace the TREADMILL EXERCISER, free of the decal. All replacement parts are listed on page 23). This warranty gives you specific legal rights, and you need to be prepared to defect in material...


