
Uk Manual
Page 2
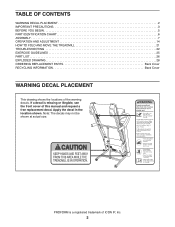
... 2 IMPORTANT PRECAUTIONS 3 BEFORE YOU BEGIN 5 PART IDENTIFICATION CHART 6 ASSEMBLY 7 OPERATION AND ADJUSTMENT 14 HOW TO FOLD AND MOVE THE TREADMILL 21 TROUBLESHOOTING 22 EXERCISE GUIDELINES 25 PART LIST 26 EXPLODED DRAWING 28 ORDERING REPLACEMENT PARTS Back Cover RECYCLING INFORMATION Back Cover WARNING DECAL ...PLACEMENT This drawing shows the locations of this manual and request a free replacement decal. If a decal is a registered trademark of ICON IP, Inc. 2 Apply the decal in the location shown. PROFORM is...
... 2 IMPORTANT PRECAUTIONS 3 BEFORE YOU BEGIN 5 PART IDENTIFICATION CHART 6 ASSEMBLY 7 OPERATION AND ADJUSTMENT 14 HOW TO FOLD AND MOVE THE TREADMILL 21 TROUBLESHOOTING 22 EXERCISE GUIDELINES 25 PART LIST 26 EXPLODED DRAWING 28 ORDERING REPLACEMENT PARTS Back Cover RECYCLING INFORMATION Back Cover WARNING DECAL ...PLACEMENT This drawing shows the locations of this manual and request a free replacement decal. If a decal is a registered trademark of ICON IP, Inc. 2 Apply the decal in the location shown. PROFORM is...
Uk Manual
Page 4
... an authorized service representative. Servicing other than the procedures in the storage position. 23. 21. Do not attempt to move the treadmill. 22. Inspect and properly tighten all parts of the treadmill by an authorized ser- Always unplug the power cord immediately after use, before performing the maintenance and adjustment procedures described in...
... an authorized service representative. Servicing other than the procedures in the storage position. 23. 21. Do not attempt to move the treadmill. 22. Inspect and properly tighten all parts of the treadmill by an authorized ser- Always unplug the power cord immediately after use, before performing the maintenance and adjustment procedures described in...

Uk Manual
Page 5
...Foot Rail Idler Roller Adjustment Screws Motor Hood Power Switch Wheel Platform Cushion 5 The 730 ZLT treadmill provides an impressive selection of this Before reading further, please familiarize yourself with the parts that are shown on the front cover of this manual carefully before contacting us assist... product model number and serial number before you use the treadmill. To help us . Length: 5 ft. 10 in. (178 cm) Width: 2 ft. 10 in the drawing below. If you for selecting the new PROFORM® 730 ZLT treadmill. BEFORE YOU BEGIN Thank you have questions after reading this...
...Foot Rail Idler Roller Adjustment Screws Motor Hood Power Switch Wheel Platform Cushion 5 The 730 ZLT treadmill provides an impressive selection of this Before reading further, please familiarize yourself with the parts that are shown on the front cover of this manual carefully before contacting us assist... product model number and serial number before you use the treadmill. To help us . Length: 5 ft. 10 in. (178 cm) Width: 2 ft. 10 in the drawing below. If you for selecting the new PROFORM® 730 ZLT treadmill. BEFORE YOU BEGIN Thank you have questions after reading this...

Uk Manual
Page 6
...x 2 1/2" Bolt (2)–- 2 3/8" x 3 1/2" Screw (9)–-4 3/8" x 4" Screw (4)–-6 6 Note: If a part is not in parentheses below to see if it is the key number of the part, from the PART LIST near the end of this manual. PART IDENTIFICATION CHART Use the drawings below each drawing is preattached. The number in... the hardware kit, check to identify small parts used for assembly. The number following...
...x 2 1/2" Bolt (2)–- 2 3/8" x 3 1/2" Screw (9)–-4 3/8" x 4" Screw (4)–-6 6 Note: If a part is not in parentheses below to see if it is the key number of the part, from the PART LIST near the end of this manual. PART IDENTIFICATION CHART Use the drawings below each drawing is preattached. The number in... the hardware kit, check to identify small parts used for assembly. The number following...
Uk Manual
Page 7
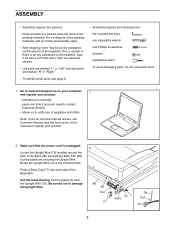
... front of the indicated hole. Cut the plastic tie near the Upright Wire (70). If there is an oily substance on the exterior of the treadmill. Cut the plastic tie securing the Upright Wire. Be careful not to damage the Upright Wire. 2 80 68 Cut 77 70 Hole Tie Cut ... steps. •• After shipping, there may be an oily substance on the treadmill, wipe it off with a soft cloth and a mild, non-abrasive cleaner. •• Left parts are marked “"L”" or “"Left”" and right parts are marked “"R”" or “"Right.”" •• To identify small...
... front of the indicated hole. Cut the plastic tie near the Upright Wire (70). If there is an oily substance on the exterior of the treadmill. Cut the plastic tie securing the Upright Wire. Be careful not to damage the Upright Wire. 2 80 68 Cut 77 70 Hole Tie Cut ... steps. •• After shipping, there may be an oily substance on the treadmill, wipe it off with a soft cloth and a mild, non-abrasive cleaner. •• Left parts are marked “"L”" or “"Left”" and right parts are marked “"R”" or “"Right.”" •• To identify small...

Uk Manual
Page 13
... overtighten the Nut; Latch Knob Lower the Frame (49) (see pages 23 and 24). 13 13. If there are properly tightened before you use the treadmill. the hex key is used to the position shown. Attach the Latch Crossbar (96) to the Base (80) with two 1/4" x 1 3/4" Screws (97). ...49 97 96 14. Note: Extra parts may be included. the Wheel must turn freely. Raise the Frame (49) to adjust the walking belt (see HOW TO LOWER THE TREADMILL FOR USE on the treadmill decals, remove the plastic. Have a second person hold the Frame during 13...
... overtighten the Nut; Latch Knob Lower the Frame (49) (see pages 23 and 24). 13 13. If there are properly tightened before you use the treadmill. the hex key is used to the position shown. Attach the Latch Crossbar (96) to the Base (80) with two 1/4" x 1 3/4" Screws (97). ...49 97 96 14. Note: Extra parts may be included. the Wheel must turn freely. Raise the Frame (49) to adjust the walking belt (see HOW TO LOWER THE TREADMILL FOR USE on the treadmill decals, remove the plastic. Have a second person hold the Frame during 13...

Uk Manual
Page 25
.... Aerobic Exercise—-If your goal is to strengthen your everyday life. 25 Remember, the key to success is to make exercise a regular and enjoyable part of time. You can use stored fat calories for a sustained period of your cardiovascular system, you must exercise at least one day of heart rate...
.... Aerobic Exercise—-If your goal is to strengthen your everyday life. 25 Remember, the key to success is to make exercise a regular and enjoyable part of time. You can use stored fat calories for a sustained period of your cardiovascular system, you must exercise at least one day of heart rate...
Uk Manual
Page 26
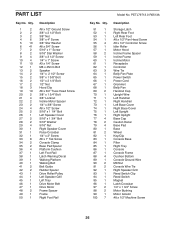
PART LIST Key No. Qty. 1 2 2 2 3 2 4 6 5 10 6 41 7 2 8 2 9 4 10 4 11 10 12 1 13 2 14 2 15 2 16 2 17 2 18 3 19 19 20 2 21 4 22 2 23 2 24 4 25 2 26 1 ...
PART LIST Key No. Qty. 1 2 2 2 3 2 4 6 5 10 6 41 7 2 8 2 9 4 10 4 11 10 12 1 13 2 14 2 15 2 16 2 17 2 18 3 19 19 20 2 21 4 22 2 23 2 24 4 25 2 26 1 ...

Uk Manual
Page 27
For information about ordering replacement parts, see the back cover of this manual. *These parts are subject to change without notice. Qty. Description Key No. Description 101 1 102 1 103 5 104 1 #8 x 3/4" Bolt #8 Nut #8 Star Washer M8 x 50mm Bolt 105 1 106 1 107 4 * –- Qty. Filter Bracket Grounding Bracket Small Cushion User’'s Manual Note: Specifications are not illustrated. 27 Key No.
For information about ordering replacement parts, see the back cover of this manual. *These parts are subject to change without notice. Qty. Description Key No. Description 101 1 102 1 103 5 104 1 #8 x 3/4" Bolt #8 Nut #8 Star Washer M8 x 50mm Bolt 105 1 106 1 107 4 * –- Qty. Filter Bracket Grounding Bracket Small Cushion User’'s Manual Note: Specifications are not illustrated. 27 Key No.

Uk Manual
Page 32
In doing so, you will help us assist you, be prepared to conserve natural resources and improve European standards of environmental protection. Part No. 344897 R0513A Printed in your local city office or the establishment where you require more information about safe and correct disposal methods,...;• the name of the product (see the front cover of this manual) •• the key number and description of the replacement part(s) (see the front cover of this manual) RECYCLING INFORMATION This electronic product must be disposed of in municipal waste. ORDERING REPLACEMENT...
In doing so, you will help us assist you, be prepared to conserve natural resources and improve European standards of environmental protection. Part No. 344897 R0513A Printed in your local city office or the establishment where you require more information about safe and correct disposal methods,...;• the name of the product (see the front cover of this manual) •• the key number and description of the replacement part(s) (see the front cover of this manual) RECYCLING INFORMATION This electronic product must be disposed of in municipal waste. ORDERING REPLACEMENT...


