
English Manual
Page 2
TABLE OF CONTENTS FULL 90 DAY WARRANTY 2 IMPORTANT PRECAUTIONS 3 BEFORE YOU BEGIN 5 ASSEMBLY 6 HOW TO USE THE PULSE SENSOR 8 OPERATION AND ADJUSTMENT 9 HOW TO USE THE MANUAL MODE 11 HOW TO USE THE WEIGHT LOSS PROGRAMS AND THE INTERVAL PROGRAMS 13 HOW TO USE ...
TABLE OF CONTENTS FULL 90 DAY WARRANTY 2 IMPORTANT PRECAUTIONS 3 BEFORE YOU BEGIN 5 ASSEMBLY 6 HOW TO USE THE PULSE SENSOR 8 OPERATION AND ADJUSTMENT 9 HOW TO USE THE MANUAL MODE 11 HOW TO USE THE WEIGHT LOSS PROGRAMS AND THE INTERVAL PROGRAMS 13 HOW TO USE ...
English Manual
Page 3
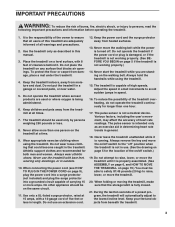
...Never start the treadmill while you are used only by persons weighing 250 pounds or less. 8. The treadmill is not a medical device. The pulse sensor is capable of high speeds. Never leave the treadmill unattended while it is properly assembled. (See ASSEMBLY on page 6, and HOW TO MOVE THE...at 15 amps, with bare feet, wearing only stockings, or in a garage or covered patio, or near water. 5. Always wear athletic shoes. The pulse sensor is not working properly. (See BEFORE YOU BEGIN on a level surface, with 8 feet of clearance behind it. When folding or moving the treadmill,...
...Never start the treadmill while you are used only by persons weighing 250 pounds or less. 8. The treadmill is not a medical device. The pulse sensor is capable of high speeds. Never leave the treadmill unattended while it is properly assembled. (See ASSEMBLY on page 6, and HOW TO MOVE THE...at 15 amps, with bare feet, wearing only stockings, or in a garage or covered patio, or near water. 5. Always wear athletic shoes. The pulse sensor is not working properly. (See BEFORE YOU BEGIN on a level surface, with 8 feet of clearance behind it. When folding or moving the treadmill,...

English Manual
Page 7
...) in the Bracket. For information on ordering a mat, see the inset drawing). 5. Firmly tighten all parts are tightened before you use of the pulse sensor is resting against the hinge of the clothes clip (see REPLACEMENT PARTS on page 18. Note: To protect the floor or carpet, place a mat ...under the treadmill. Attach the Pulse Sensor (114) to lower the treadmill. Thread two more Screws into the right Handrail Bracket (42) and Frame (83). Align the holes in the ...
...) in the Bracket. For information on ordering a mat, see the inset drawing). 5. Firmly tighten all parts are tightened before you use of the pulse sensor is resting against the hinge of the clothes clip (see REPLACEMENT PARTS on page 18. Note: To protect the floor or carpet, place a mat ...under the treadmill. Attach the Pulse Sensor (114) to lower the treadmill. Thread two more Screws into the right Handrail Bracket (42) and Frame (83). Align the holes in the ...
English Manual
Page 8
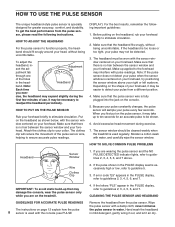
... comfort, and durability. HOW TO USE THE PULSE SENSOR The unique headband-style pulse sensor is specially designed for an accurate pulse to be shown. 6. DISPLAY). Depending on page 12 explain how the pulse the pulse sensor in mild detergent, gently wring it out, ...up that the headband fits snugly, without being uncomfortable. Wire Clothes Clip 2. CLEANING THE PULSE SENSOR AND HEADBAND GUIDELINES FOR ACCURATE PULSE READINGS Remove the headband from the pulse sensor, please read the following important guidelines: 1. Attach the clothes clip to stimulate circulation. ...
... comfort, and durability. HOW TO USE THE PULSE SENSOR The unique headband-style pulse sensor is specially designed for an accurate pulse to be shown. 6. DISPLAY). Depending on page 12 explain how the pulse the pulse sensor in mild detergent, gently wring it out, ...up that the headband fits snugly, without being uncomfortable. Wire Clothes Clip 2. CLEANING THE PULSE SENSOR AND HEADBAND GUIDELINES FOR ACCURATE PULSE READINGS Remove the headband from the pulse sensor, please read the following important guidelines: 1. Attach the clothes clip to stimulate circulation. ...
English Manual
Page 10
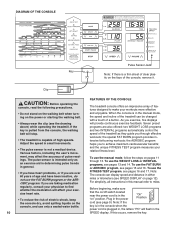
...remove it. and the unique FITNESS TEST program measures your workouts more effective and enjoyable. Plug in the "on page 12). DIAGRAM OF THE CONSOLE Pulse Sensor Jack Key Note: If there is a thin sheet of clear plastic on the power or starting the walking belt. • Always wear the ...the SPEED display. Note: The console can be changed with a touch of the treadmill can display speed and distance in small increments. • The pulse sensor is in the manual mode, the speed and incline of a button. As you through 13. When the console is not a medical device. If this...
...remove it. and the unique FITNESS TEST program measures your workouts more effective and enjoyable. Plug in the "on page 12). DIAGRAM OF THE CONSOLE Pulse Sensor Jack Key Note: If there is a thin sheet of clear plastic on the power or starting the walking belt. • Always wear the ...the SPEED display. Note: The console can be changed with a touch of the treadmill can display speed and distance in small increments. • The pulse sensor is in the manual mode, the speed and incline of a button. As you through 13. When the console is not a medical device. If this...
English Manual
Page 11
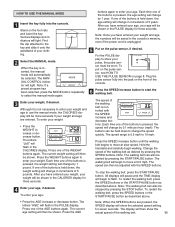
... The display will be saved in increments of 5 years. HOW TO USE THE MANUAL MODE 1 Insert the key fully into the jack on the pulse sensor, if desired. Various displays and indicators will light. If one of the walking belt. 11 Note: Once you have entered your age will then ...then be more accurate if your clothing. 2 Select the MANUAL mode. The current age setting will be shown. To put on the pulse sensor, see HOW TO USE THE PULSE SENSOR on the foot rails and insert the key. Note: If a preset program has been selected, press the MODE button repeatedly to move...
... The display will be saved in increments of 5 years. HOW TO USE THE MANUAL MODE 1 Insert the key fully into the jack on the pulse sensor, if desired. Various displays and indicators will light. If one of the walking belt. 11 Note: Once you have entered your age will then ...then be more accurate if your clothing. 2 Select the MANUAL mode. The current age setting will be shown. To put on the pulse sensor, see HOW TO USE THE PULSE SENSOR on the foot rails and insert the key. Note: If a preset program has been selected, press the MODE button repeatedly to move...
English Manual
Page 12
... the current age setting when the walking belt is pressed, the incline will light to reach the selected incline setting. 8 Follow your pulse constantly changes, the pulse sensor will appear in kilometers. 12 To change by 0.5%. Note: If the MPH indicator beside the SPEED display is controlled with the five ...from one number to the other . It may take up to show the selected speed setting for Metric system [kilometers]) will sample your pulse is not shown, see HOW TO USE THE PULSE SENSOR on page 22 for the treadmill to show the actual speed of the walking belt. If your...
... the current age setting when the walking belt is pressed, the incline will light to reach the selected incline setting. 8 Follow your pulse constantly changes, the pulse sensor will appear in kilometers. 12 To change by 0.5%. Note: If the MPH indicator beside the SPEED display is controlled with the five ...from one number to the other . It may take up to show the selected speed setting for Metric system [kilometers]) will sample your pulse is not shown, see HOW TO USE THE PULSE SENSOR on page 22 for the treadmill to show the actual speed of the walking belt. If your...
English Manual
Page 14
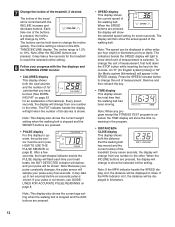
...monitor. After you START/PAUSE want to the lowest 4, a number will begin walking. TIME display will flash in a se- TO USE THE PULSE SENSOR on page 13. The program will not respond while a seven seconds. If you have During the last ten seconds of 1.5 mph). 9 ... Note: The SPEED buttons will continue until it reaches 8.5 mph. In addition, move the key from 20 minutes (or 30 minutes if the INTERVAL 2 pulse sensor must be 1.5 mph. 4 Enter your age, if desired. 7 Press the START/PAUSE button to set - appear in the TIME dis- 6 Set...
...monitor. After you START/PAUSE want to the lowest 4, a number will begin walking. TIME display will flash in a se- TO USE THE PULSE SENSOR on page 13. The program will not respond while a seven seconds. If you have During the last ten seconds of 1.5 mph). 9 ... Note: The SPEED buttons will continue until it reaches 8.5 mph. In addition, move the key from 20 minutes (or 30 minutes if the INTERVAL 2 pulse sensor must be 1.5 mph. 4 Enter your age, if desired. 7 Press the START/PAUSE button to set - appear in the TIME dis- 6 Set...

English Manual
Page 15
...see step 4 on page 11. Hold the handrails and carefully begin counting down from beneath the treadmill. Keep your weight, see HOW TO USE THE PULSE SENSOR on page 8. if you have completed step 3, the letters "AGE" will flash in the TIME display reaches zero, the walking belt will slow to ... increase. After you decrease the speed, the incline will be started . 6 Press the START/PAUSE button to start the program. To put on the pulse sensor, see step 3 on page 11. however, the programs will begin walking. However, if you increase the 15 To enter your feet and objects from...
...see step 4 on page 11. Hold the handrails and carefully begin counting down from beneath the treadmill. Keep your weight, see HOW TO USE THE PULSE SENSOR on page 8. if you have completed step 3, the letters "AGE" will flash in the TIME display reaches zero, the walking belt will slow to ... increase. After you decrease the speed, the incline will be started . 6 Press the START/PAUSE button to start the program. To put on the pulse sensor, see step 3 on page 11. however, the programs will begin walking. However, if you increase the 15 To enter your feet and objects from...
English Manual
Page 16
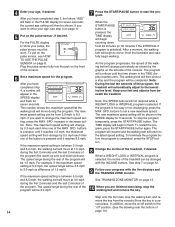
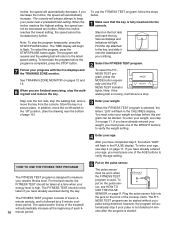
... temporarily, press the START/PAUSE button. Store the key in the CALORIES display. You must press one of your age, see HOW TO USE THE PULSE SENSOR on pages 12 and 13. 8 When you decrease the incline, the speed will automatically increase. To enter your clothing. 2 Select the FITNESS TEST ...3 on the foot rails and insert the key. When the incline reaches the highest setting, the speed cannot be increased any further. Plug the pulse sensor fully into the console. Note: If the walking belt is moving, it onto the waistband of the AGE buttons to verify the age setting. ...
... temporarily, press the START/PAUSE button. Store the key in the CALORIES display. You must press one of your age, see HOW TO USE THE PULSE SENSOR on pages 12 and 13. 8 When you decrease the incline, the speed will automatically increase. To enter your clothing. 2 Select the FITNESS TEST ...3 on the foot rails and insert the key. When the incline reaches the highest setting, the speed cannot be increased any further. Plug the pulse sensor fully into the console. Note: If the walking belt is moving, it onto the waistband of the AGE buttons to verify the age setting. ...
English Manual
Page 21
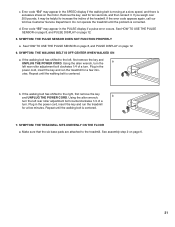
...the treadmill for a few minutes. Repeat until the walking belt is centered. 7. d. Repeat until the walking belt is centered. SYMPTOM: THE PULSE SENSOR DOES NOT FUNCTION PROPERLY a. utes. Do not operate the treadmill until the problem is excessive stress on page 12. 5. See HOW TO USE THE... 21 If the walking belt has shifted to the treadmill. Error code "E5" may appear in the PULSE display if a pulse error occurs. See HOW TO USE THE PULSE SENSOR on page 8, and PULSE DISPLAY on the motor. Error code "E4" may appear in the SPEED display if the walking belt is...
...the treadmill for a few minutes. Repeat until the walking belt is centered. 7. d. Repeat until the walking belt is centered. SYMPTOM: THE PULSE SENSOR DOES NOT FUNCTION PROPERLY a. utes. Do not operate the treadmill until the problem is excessive stress on page 12. 5. See HOW TO USE THE... 21 If the walking belt has shifted to the treadmill. Error code "E5" may appear in the PULSE display if a pulse error occurs. See HOW TO USE THE PULSE SENSOR on page 8, and PULSE DISPLAY on the motor. Error code "E4" may appear in the SPEED display if the walking belt is...
English Manual
Page 22
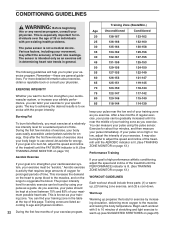
... pre-existing health problems. Training Zone (Beats/Min.) Age Unconditioned Conditioned 20 138-167 25 136-166 133-162 132-160 The pulse sensor is known as you must be helpful to plan your specific goals. Aerobic exercise is activity that requires large amounts of oxygen for adjust.... This increases the demand on the heart to pump blood to use stored fat calories for exercise by using the pulse sensor. Begin each workout 22 During the first few minutes of time. CONDITIONING GUIDELINES WARNING: Before beginning this page. Various factors, including your...
... pre-existing health problems. Training Zone (Beats/Min.) Age Unconditioned Conditioned 20 138-167 25 136-166 133-162 132-160 The pulse sensor is known as you must be helpful to plan your specific goals. Aerobic exercise is activity that requires large amounts of oxygen for adjust.... This increases the demand on the heart to pump blood to use stored fat calories for exercise by using the pulse sensor. Begin each workout 22 During the first few minutes of time. CONDITIONING GUIDELINES WARNING: Before beginning this page. Various factors, including your...
English Manual
Page 24
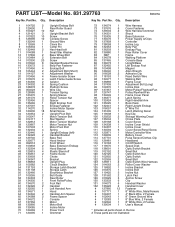
... Warning Decal 1 Key/Clip 2 Storage Warning Decal 1 Choke Plate 5 Cover Screw 1 Incline Cover Shield 1 Incline Cover 6 Cover Screw/Panel Screw 1 Motor/Controller Wire 1 Battery Cover 1 Pulse Sensor/Clothes Clip 1 Headband 1 On/Off Switch 1 Speed Disk 1 Optic Switch Bracket 2 Small Nut 1 Optic Switch Nut 2 Optic Switch 2 Small Bolt 2 Optic Switch Wire Harness 2 Roller...
... Warning Decal 1 Key/Clip 2 Storage Warning Decal 1 Choke Plate 5 Cover Screw 1 Incline Cover Shield 1 Incline Cover 6 Cover Screw/Panel Screw 1 Motor/Controller Wire 1 Battery Cover 1 Pulse Sensor/Clothes Clip 1 Headband 1 On/Off Switch 1 Speed Disk 1 Optic Switch Bracket 2 Small Nut 1 Optic Switch Nut 2 Optic Switch 2 Small Bolt 2 Optic Switch Wire Harness 2 Roller...

