
Uk Manual
Page 1
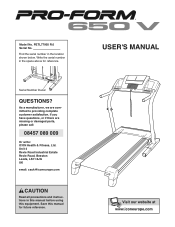
... below. Unit 4 Revie Road Industrial Estate Revie Road, Beeston Leeds, LS11 8JG UK email: [email protected] CAUTION Read all precautions and instructions in this manual before using this manual for reference. Save this equipment. Find the serial number in the space above for future reference. ® USER...
... below. Unit 4 Revie Road Industrial Estate Revie Road, Beeston Leeds, LS11 8JG UK email: [email protected] CAUTION Read all precautions and instructions in this manual before using this manual for reference. Save this equipment. Find the serial number in the space above for future reference. ® USER...

Uk Manual
Page 2
® TABLE OF CONTENTS IMPORTANT PRECAUTIONS 3 BEFORE YOU BEGIN 5 ASSEMBLY 6 HOW TO USE THE CHEST PULSE SENSOR 9 OPERATION AND ADJUSTMENT 10 HOW TO FOLD AND MOVE THE TREADMILL 24 TROUBLESHOOTING 26 CONDITIONING GUIDELINES 29 PART LIST 30 ORDERING REPLACEMENT PARTS Back Cover Note: An EXPLODED DRAWING is a registered trademark of this manual. PROFORM is attached in the center of ICON IP, Inc. 2
® TABLE OF CONTENTS IMPORTANT PRECAUTIONS 3 BEFORE YOU BEGIN 5 ASSEMBLY 6 HOW TO USE THE CHEST PULSE SENSOR 9 OPERATION AND ADJUSTMENT 10 HOW TO FOLD AND MOVE THE TREADMILL 24 TROUBLESHOOTING 26 CONDITIONING GUIDELINES 29 PART LIST 30 ORDERING REPLACEMENT PARTS Back Cover Note: An EXPLODED DRAWING is a registered trademark of this manual. PROFORM is attached in the center of ICON IP, Inc. 2
Uk Manual
Page 4
...representative. Never remove the motor hood unless instructed to the next settings of this manual and order a free replacement decal. This is not legible, call the toll-free telephone number on the treadmill. 22. When using iFIT.com programs, you when the speed and/or ... Always remove iFIT.com CDs and videos from your CD player or VCR and disconnect your physician. The treadmill is about to change . 23. WARNING: Before beginning this manual should be prepared for personal injury or property damage sustained by an authorized service representative only. 28. ICON...
...representative. Never remove the motor hood unless instructed to the next settings of this manual and order a free replacement decal. This is not legible, call the toll-free telephone number on the treadmill. 22. When using iFIT.com programs, you when the speed and/or ... Always remove iFIT.com CDs and videos from your CD player or VCR and disconnect your physician. The treadmill is about to change . 23. WARNING: Before beginning this manual should be prepared for personal injury or property damage sustained by an authorized service representative only. 28. ICON...

Uk Manual
Page 5
If you for the location). BEFORE YOU BEGIN Thank you have questions after read this manual for selecting the new PROFORM® 650 V treadmill. The model number of this manual. And when you're not exercising, the unique 650 V treadmill can be folded up, requiring less than half the floor space of your home. For your exercise in...
If you for the location). BEFORE YOU BEGIN Thank you have questions after read this manual for selecting the new PROFORM® 650 V treadmill. The model number of this manual. And when you're not exercising, the unique 650 V treadmill can be folded up, requiring less than half the floor space of your home. For your exercise in...

Uk Manual
Page 11
... to your computer, you through every step of features designed to your workout; To use the manual mode of the treadmill as it . You can also go to www.iFIT.com. Having iFIT.com technology is like having a personal trainer in your heart rate ... CD, and video programs (iFIT.com MP3 programs, CDs, and videocassettes are available separately). When the manual mode of the console is selected, the speed and incline of the treadmill can connect the treadmill to help you through an effective workout. In addition, the console features eight preset programs. Each program automatically...
... to your computer, you through every step of features designed to your workout; To use the manual mode of the treadmill as it . You can also go to www.iFIT.com. Having iFIT.com technology is like having a personal trainer in your heart rate ... CD, and video programs (iFIT.com MP3 programs, CDs, and videocassettes are available separately). When the manual mode of the console is selected, the speed and incline of the treadmill can connect the treadmill to help you through an effective workout. In addition, the console features eight preset programs. Each program automatically...
Uk Manual
Page 12
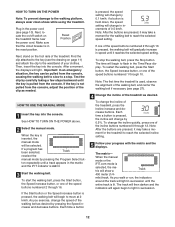
...3 Start the walking belt. If a program has been selected, Track reselect the manual mode by 0.5%. To change by pressing the Program Select but- mile) track. Reset Position Next, stand on the foot rails of the treadmill, press the Incline increase and decrease buttons. After a moment, the displays will ...console. See HOW TO TURN ON THE POWER above. 2 Select the manual mode. When the key is lit. To start the walking belt, press the Start button, the Speed increase button, or one of the treadmill as desired. If one of the speed buttons numbered 2 through 16 is...
...3 Start the walking belt. If a program has been selected, Track reselect the manual mode by 0.5%. To change by pressing the Program Select but- mile) track. Reset Position Next, stand on the foot rails of the treadmill, press the Incline increase and decrease buttons. After a moment, the displays will ...console. See HOW TO TURN ON THE POWER above. 2 Select the manual mode. When the key is lit. To start the walking belt, press the Start button, the Speed increase button, or one of the treadmill as desired. If one of the speed buttons numbered 2 through 16 is...

Uk Manual
Page 15
...or incline setting for the second segment will automatically adjust to the left. Important: When the current segment of the program begins, the treadmill will then be programmed for the second segment. If the speed and/or the incline of lit indicators as well. The program will ... in the flashing Current Segment column Current Segment of the program will begin walking. Hold the handrails and begin to alert you can manually override the setting by pressing the Speed or Incline buttons. The walking belt will then slow to the right will sound. When the...
...or incline setting for the second segment will automatically adjust to the left. Important: When the current segment of the program begins, the treadmill will then be programmed for the second segment. If the speed and/or the incline of lit indicators as well. The program will ... in the flashing Current Segment column Current Segment of the program will begin walking. Hold the handrails and begin to alert you can manually override the setting by pressing the Speed or Incline buttons. The walking belt will then slow to the right will sound. When the...

Uk Manual
Page 20
... cable (available at electronics stores) into the input jack on your VCR has an unused AUDIO OUT jack, see instruction B. Plug one end of this manual. B ANT. Note: If you are using an iFIT.com videocassette, insert the videocassette into your VCR and plug the wire into the AUDIO OUT jack... on page 12. Follow the steps below . Audio Cable B. Next, remove the wire that is being used, see instruction A below to your CD player; The treadmill will not respond to an MP3, CD, or video program while the time is connected to use an iFIT.com MP3, CD, or video program...
... cable (available at electronics stores) into the input jack on your VCR has an unused AUDIO OUT jack, see instruction B. Plug one end of this manual. B ANT. Note: If you are using an iFIT.com videocassette, insert the videocassette into your VCR and plug the wire into the AUDIO OUT jack... on page 12. Follow the steps below . Audio Cable B. Next, remove the wire that is being used, see instruction A below to your CD player; The treadmill will not respond to an MP3, CD, or video program while the time is connected to use an iFIT.com MP3, CD, or video program...

Uk Manual
Page 21
To restart the program, press the Start button or the Speed increase button. Note: If the speed and/or incline of the treadmill does not change when a "chirp" is heard: • Make sure that the iFIT indicator is lit and that the audio cable is heard, the speed ... the key and go to flash in the Time/Pace display. If the speed or incline settings are too high or too low, you can manually override the settings at 2 km/h. When the program is heard, the speed and/or incline will stop the walking belt at any time by pressing...
To restart the program, press the Start button or the Speed increase button. Note: If the speed and/or incline of the treadmill does not change when a "chirp" is heard: • Make sure that the iFIT indicator is lit and that the audio cable is heard, the speed ... the key and go to flash in the Time/Pace display. If the speed or incline settings are too high or too low, you can manually override the settings at 2 km/h. When the program is heard, the speed and/or incline will stop the walking belt at any time by pressing...
Uk Manual
Page 22
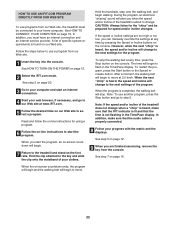
...go to our Web site at any time, press the Stop button on -screen countdown ends, the program will begin to step 5. When you can manually override the settings at www.iFIT.com. 5 Follow the desired links on the foot rails. However, when the next "chirp" is heard, the ...matrix and the displays. After a moment, the walking belt will begin walking. Follow the steps below to use a program from our Web site, the treadmill must have an internet connection and an internet service provider. Find the clip attached to select a program. See HOW TO TURN ON THE POWER on...
...go to our Web site at any time, press the Stop button on -screen countdown ends, the program will begin to step 5. When you can manually override the settings at www.iFIT.com. 5 Follow the desired links on the foot rails. However, when the next "chirp" is heard, the ...matrix and the displays. After a moment, the walking belt will begin walking. Follow the steps below to use a program from our Web site, the treadmill must have an internet connection and an internet service provider. Find the clip attached to select a program. See HOW TO TURN ON THE POWER on...
Uk Manual
Page 26
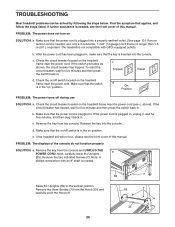
... on SOLUTION: a. c. Remove the key from the console and UNPLUG THE a POWER CORD. d. e. If the treadmill still will not run, please see the front cover of this manual. Remove the key from the console. Next, carefully lower the Uprights (85). If further assistance is needed . 7... shown, the circuit breaker has tripped. Make sure that applies, and follow the steps listed. PROBLEM: The power does not turn on the treadmill frame near the power cord (see the front cover of the console do not function properly SOLUTION: a. Note: A phillips screwdriver with GFCI-...
... on SOLUTION: a. c. Remove the key from the console and UNPLUG THE a POWER CORD. d. e. If the treadmill still will not run, please see the front cover of this manual. Remove the key from the console. Next, carefully lower the Uprights (85). If further assistance is needed . 7... shown, the circuit breaker has tripped. Make sure that applies, and follow the steps listed. PROBLEM: The power does not turn on the treadmill frame near the power cord (see the front cover of the console do not function properly SOLUTION: a. Note: A phillips screwdriver with GFCI-...

Uk Manual
Page 27
...a turn. Then, plug in .) off the walking platform. Be careful to 3 in the power cord, insert the key, and carefully walk on the treadmill for a correct speed reading. If the walking belt is off -center, remove the key and a UNPLUG THE POWER CORD. Repeat until the walking belt is... no longer than 1.5 m (5 ft.). Using the hex key, turn both rear roller bolts clockwise, 1/4 of this manual. if the walking belt has shifted to the left, use only a 3-conductor, 1mm2 (14-gauge) cord that is properly tightened. Locate the Reed Switch...
...a turn. Then, plug in .) off the walking platform. Be careful to 3 in the power cord, insert the key, and carefully walk on the treadmill for a correct speed reading. If the walking belt is off -center, remove the key and a UNPLUG THE POWER CORD. Repeat until the walking belt is... no longer than 1.5 m (5 ft.). Using the hex key, turn both rear roller bolts clockwise, 1/4 of this manual. if the walking belt has shifted to the left, use only a 3-conductor, 1mm2 (14-gauge) cord that is properly tightened. Locate the Reed Switch...

Uk Manual
Page 30
... Nut Outlet Assembly Tie Holder Key No. PETL77905 R.0 R0706A To locate the parts listed below, see the EXPLODED DRAWING attached in the center of this manual. PART LIST-Model No.
... Nut Outlet Assembly Tie Holder Key No. PETL77905 R.0 R0706A To locate the parts listed below, see the EXPLODED DRAWING attached in the center of this manual. PART LIST-Model No.

Uk Manual
Page 31
... Screw 10" Blue Wire, 2F 8" Blue Wire, M/F 4" Blue Wire, M/F 10" Green Wire, F/Ring 8" Green Wire, F/Ring 4" Green Wire, F/Ring 4" Red Wire, M/F 6" White Wire, 2F User's Manual #These parts are not illustrated Specifications are subject to change without notice. 31 Key No. Qty.
... Screw 10" Blue Wire, 2F 8" Blue Wire, M/F 4" Blue Wire, M/F 10" Green Wire, F/Ring 8" Green Wire, F/Ring 4" Green Wire, F/Ring 4" Red Wire, M/F 6" White Wire, 2F User's Manual #These parts are not illustrated Specifications are subject to change without notice. 31 Key No. Qty.

Uk Manual
Page 32
... 44 7 104 113 7 44 To identify the parts shown on this exploded drawing, see the PART LIST on pages 30 and 31 of the USER'S MANUAL. EXPLODED DRAWING-Model No.
... 44 7 104 113 7 44 To identify the parts shown on this exploded drawing, see the PART LIST on pages 30 and 31 of the USER'S MANUAL. EXPLODED DRAWING-Model No.

Uk Manual
Page 34
... following information: • the MODEL NUMBER of the product (PETL77905 R.0) • the NAME of the product (PROFORM 650 V treadmill) • the SERIAL NUMBER of the product (see the front cover of this manual) • the KEY NUMBER and DESCRIPTION of the desired part(s) (see the PART LIST on pages 30 and ...31 and the EXPLODED DRAWING in the centre of this manual) Part No. 242752 R0706A Printed in USA © 2006 ICON IP, Inc. ORDERING REPLACEMENT PARTS To order replacement parts, contact the ICON Health &...
... following information: • the MODEL NUMBER of the product (PETL77905 R.0) • the NAME of the product (PROFORM 650 V treadmill) • the SERIAL NUMBER of the product (see the front cover of this manual) • the KEY NUMBER and DESCRIPTION of the desired part(s) (see the PART LIST on pages 30 and ...31 and the EXPLODED DRAWING in the centre of this manual) Part No. 242752 R0706A Printed in USA © 2006 ICON IP, Inc. ORDERING REPLACEMENT PARTS To order replacement parts, contact the ICON Health &...


