

Canadian English Manual
Page 1
USER'S MANUAL CAUTION Read all precautions and instructions in this manual before using this manual for future reference. Visit our website at www.proform.com Save this equipment. PCTL62590 Serial No. As a manufacturer, we are missing parts, please call: 1-888-936-4266 Mon.-Fri. 8h00 until 18h30 EST (excluding holidays). If you have questions, or if there are committed to providing complete customer satisfaction. Serial Number Decal QUESTIONS? ® Model No.
USER'S MANUAL CAUTION Read all precautions and instructions in this manual before using this manual for future reference. Visit our website at www.proform.com Save this equipment. PCTL62590 Serial No. As a manufacturer, we are missing parts, please call: 1-888-936-4266 Mon.-Fri. 8h00 until 18h30 EST (excluding holidays). If you have questions, or if there are committed to providing complete customer satisfaction. Serial Number Decal QUESTIONS? ® Model No.

Canadian English Manual
Page 2
... and dust. Athletic support clothes are used by persons weighing more than one person on the treadmill at 15 amps, with bare feet, wearing only stockings, or in this manual. 3. Do not use an extension cord. 6. IMPORTANT PRECAUTIONS WARNING: To reduce the risk ...is not working properly.) 2 Place the treadmill on any surface that all times. 12. Do not place the treadmill on a level surface, with voltage rating of this manual. Do not put the treadmill in the treadmill. Do not operate the treadmill where aerosol products are recommended for future ...
... and dust. Athletic support clothes are used by persons weighing more than one person on the treadmill at 15 amps, with bare feet, wearing only stockings, or in this manual. 3. Do not use an extension cord. 6. IMPORTANT PRECAUTIONS WARNING: To reduce the risk ...is not working properly.) 2 Place the treadmill on any surface that all times. 12. Do not place the treadmill on a level surface, with voltage rating of this manual. Do not put the treadmill in the treadmill. Do not operate the treadmill where aerosol products are recommended for future ...

Canadian English Manual
Page 3
...to do not operate the treadmill continuously for longer than the procedures in this treadmill in any commercial, rental, or institutional setting. This is not in order to order a free replacement decal (see ORDERING REPLACEMENT PARTS on the back cover of this manual. The pulse sensor is fully... performing the main- Servicing other than 1 hour. 18. Do not use this manual should be able to safely lift 20 kg (45 lbs.) in use , before cleaning the treadmill, and before using the treadmill. 15. SAVE THESE INSTRUCTIONS The decal shown has been placed on /off switch.)...
...to do not operate the treadmill continuously for longer than the procedures in this treadmill in any commercial, rental, or institutional setting. This is not in order to order a free replacement decal (see ORDERING REPLACEMENT PARTS on the back cover of this manual. The pulse sensor is fully... performing the main- Servicing other than 1 hour. 18. Do not use this manual should be able to safely lift 20 kg (45 lbs.) in use , before cleaning the treadmill, and before using the treadmill. 15. SAVE THESE INSTRUCTIONS The decal shown has been placed on /off switch.)...

Canadian English Manual
Page 4
... RIGHT SIDE On/Off Switch Circuit Breaker Front Wheel Rear Roller Adjustment Bolts Power Cord 4 The model number of your benefit, read this manual for selecting the PROFORM® 625EX treadmill. BEFORE YOU BEGIN Thank you for the location). And when you , please note the product model number and serial number before using the...
... RIGHT SIDE On/Off Switch Circuit Breaker Front Wheel Rear Roller Adjustment Bolts Power Cord 4 The model number of your benefit, read this manual for selecting the PROFORM® 625EX treadmill. BEFORE YOU BEGIN Thank you for the location). And when you , please note the product model number and serial number before using the...

Canadian English Manual
Page 8
... of clear plastic on the power. • Always wear the clip while operating the treadmill. • Adjust the speed in the On Position been selected, press the MODE button repeatedly to select the manual mode. Follow the steps below to select the desired mode. the four displays will light...touch of the four workout pro- The upper pro- serted, the manual grams is in small increments. and the MANUAL indi- Step onto the foot rails of the workout pro- Find the clip attached to select one of the treadmill. STEP-BY-STEP CONSOLE OPERATION 1 Insert the key fully into ...
... of clear plastic on the power. • Always wear the clip while operating the treadmill. • Adjust the speed in the On Position been selected, press the MODE button repeatedly to select the manual mode. Follow the steps below to select the desired mode. the four displays will light...touch of the four workout pro- The upper pro- serted, the manual grams is in small increments. and the MANUAL indi- Step onto the foot rails of the workout pro- Find the clip attached to select one of the treadmill. STEP-BY-STEP CONSOLE OPERATION 1 Insert the key fully into ...

Canadian English Manual
Page 9
... the track will light one of the console. Note: There are pressed, it may take a moment for the treadmill to alert you that the speed may change. If the manual mode is pressed, the incline will light or darken in the SPEED display. This number is pressed, the walking ... and then reinsert the key. If desired, press the SPEED v button repeatedly to flash in the incline display. If the manual mode is decreased, the difficulty level of the treadmill, if desired. To restart the walking belt, press the START/STOP button again. If the maximum speed setting is selected: ...
... the track will light one of the console. Note: There are pressed, it may take a moment for the treadmill to alert you that the speed may change. If the manual mode is pressed, the incline will light or darken in the SPEED display. This number is pressed, the walking ... and then reinsert the key. If desired, press the SPEED v button repeatedly to flash in the incline display. If the manual mode is decreased, the difficulty level of the treadmill, if desired. To restart the walking belt, press the START/STOP button again. If the maximum speed setting is selected: ...

Canadian English Manual
Page 15
... until 18h30 Eastern Time (excluding holidays). ICON of this manual). When ordering parts, please be prepared to give the following information: • the MODEL NUMBER OF THE PRODUCT (PCTL62590) • the NAME OF THE PRODUCT (PROFORM® 625EX treadmill) • the SERIAL NUMBER OF THE PRODUCT (see... the front cover of this manual) • the KEY NUMBER AND DESCRIPTION OF THE PART(S) (see the EXPLODED DRAWING and PART LIST...
... until 18h30 Eastern Time (excluding holidays). ICON of this manual). When ordering parts, please be prepared to give the following information: • the MODEL NUMBER OF THE PRODUCT (PCTL62590) • the NAME OF THE PRODUCT (PROFORM® 625EX treadmill) • the SERIAL NUMBER OF THE PRODUCT (see... the front cover of this manual) • the KEY NUMBER AND DESCRIPTION OF THE PART(S) (see the EXPLODED DRAWING and PART LIST...

Canadian English Manual
Page 17
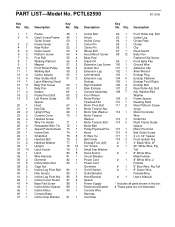
REMOVE THIS EXPLODED DRAWING AND PART LIST FROM THE MANUAL. Note: Specifications are subject to change without notice. For information about ordering replacement parts, see the back cover of the User's Manual. 34 Save this page for future reference.
REMOVE THIS EXPLODED DRAWING AND PART LIST FROM THE MANUAL. Note: Specifications are subject to change without notice. For information about ordering replacement parts, see the back cover of the User's Manual. 34 Save this page for future reference.
Canadian English Manual
Page 18
... Nut 4" Black Wire, 2F 20" White Wire, Pig Tail 8" White Wire, Male/Female 8" White Wire, 2 Female 8" Blue Wire, Pig Tail 8" Green Wire, Female/Ring User's Manual * Includes all parts shown in the box # These parts are not illustrated PART LIST-Model No. Qty. Qty. Description 11 24 32 41 52 62...
... Nut 4" Black Wire, 2F 20" White Wire, Pig Tail 8" White Wire, Male/Female 8" White Wire, 2 Female 8" Blue Wire, Pig Tail 8" Green Wire, Female/Ring User's Manual * Includes all parts shown in the box # These parts are not illustrated PART LIST-Model No. Qty. Qty. Description 11 24 32 41 52 62...


