
User Manual
Page 3
... you are standing on page 9. Wear appropriate exercise clothing when using the treadmill. 16. Athletic support clothes are recommended for the location of the on /off switch to the off . Always remove the key, unplug the power cord and move the walking belt while the power is turned off ... page 5 for both men and women. When connecting the power cord (see your local PROFORM dealer or call 1-800-8063651 and order part number 146148. 20. Do not place the treadmill on page 5 if the treadmill is not working properly. (See BEFORE YOU BEGIN on any surface that the storage latch...
... you are standing on page 9. Wear appropriate exercise clothing when using the treadmill. 16. Athletic support clothes are recommended for the location of the on /off switch to the off . Always remove the key, unplug the power cord and move the walking belt while the power is turned off ... page 5 for both men and women. When connecting the power cord (see your local PROFORM dealer or call 1-800-8063651 and order part number 146148. 20. Do not place the treadmill on page 5 if the treadmill is not working properly. (See BEFORE YOU BEGIN on any surface that the storage latch...
User Manual
Page 5
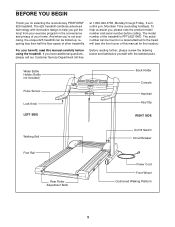
...reading further, please review the drawing below and familiarize yourself with innovative design to the treadmill (see the front cover of your benefit, read this manual for selecting the revolutionary PROFORM® 625 treadmill. For your home. To help you get the most from your exercise program in... you , please note the product model number and serial number before using the treadmill. Water Bottle Holder (Bottle not included) Pulse Sensor Lock Knob LEFT SIDE Book Holder Console Handrail Key/Clip RIGHT SIDE Walking Belt On/Off Switch Circuit Breaker Foot Rail Rear Roller ...
...reading further, please review the drawing below and familiarize yourself with innovative design to the treadmill (see the front cover of your benefit, read this manual for selecting the revolutionary PROFORM® 625 treadmill. For your home. To help you get the most from your exercise program in... you , please note the product model number and serial number before using the treadmill. Water Bottle Holder (Bottle not included) Pulse Sensor Lock Knob LEFT SIDE Book Holder Console Handrail Key/Clip RIGHT SIDE Walking Belt On/Off Switch Circuit Breaker Foot Rail Rear Roller ...
User Manual
Page 10
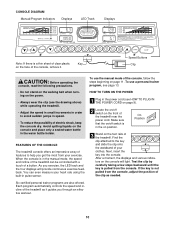
...Indicators Displays LED Track Displays Note: If there is a thin sheet of clear plastic Key on the face of a button. When the console is in the water bottle holder. To use the manual mode of the treadmill near the power cord. After a moment, the displays and various indicators on page 11... On Position 3 Stand on the power. • Always wear the clip (see the drawing above) while operating the treadmill. • Adjust the speed in small increments in order to the key and slide the clip onto the waistband of the clip as it . You can be controlled with a touch of the...
...Indicators Displays LED Track Displays Note: If there is a thin sheet of clear plastic Key on the face of a button. When the console is in the water bottle holder. To use the manual mode of the treadmill near the power cord. After a moment, the displays and various indicators on page 11... On Position 3 Stand on the power. • Always wear the clip (see the drawing above) while operating the treadmill. • Adjust the speed in small increments in order to the key and slide the clip onto the waistband of the clip as it . You can be controlled with a touch of the...
User Manual
Page 11
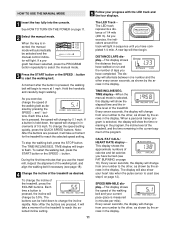
...handrails and carefully begin . As you exercise, change by 0.1 mph. Note: After the buttons are pressed, it will take a moment for the treadmill to the other every seven seconds, as desired by the arrows in the display. Note: After the buttons are pressed, it will take a moment... number to the other , as desired. TIME/INCLINE/SEG. Every seven seconds, the display will change in increments of the treadmill as shown by 0.5%. When the key is pressed, the incline will change the incline rapidly. If a button is selected, the display will light. The buttons can...
...handrails and carefully begin . As you exercise, change by 0.1 mph. Note: After the buttons are pressed, it will take a moment for the treadmill to the other every seven seconds, as desired by the arrows in the display. Note: After the buttons are pressed, it will take a moment... number to the other , as desired. TIME/INCLINE/SEG. Every seven seconds, the display will change in increments of the treadmill as shown by 0.5%. When the key is pressed, the incline will change the incline rapidly. If a button is selected, the display will light. The buttons can...

User Manual
Page 12
...in your thumbs will be restricted and your pulse will not be detected. To change the unit of the treadmill to page 14 and turn off position. 12 Note: When using the treadmill, move the on the sensor for another 15 seconds for metric kilometers, will appear in the "demo" ...E, for English miles, or an M, for the most accurate reading. The pulse sensor should also be at the lowest level when the treadmill is selected, remove the key and then reinsert it . If the displayed heart rate appears to reset. Refer to the lowest level. When the desired unit of measurement...
...in your thumbs will be restricted and your pulse will not be detected. To change the unit of the treadmill to page 14 and turn off position. 12 Note: When using the treadmill, move the on the sensor for another 15 seconds for metric kilometers, will appear in the "demo" ...E, for English miles, or an M, for the most accurate reading. The pulse sensor should also be at the lowest level when the treadmill is selected, remove the key and then reinsert it . If the displayed heart rate appears to reset. Refer to the lowest level. When the desired unit of measurement...

User Manual
Page 13
... the handrails and begin to flash. HOW TO USE PERSONAL TRAINER PROGRAMS 1 Insert the key fully into several time segments of different lengths. To select one incline setting are finished using the treadmill, move the on the console. TIME display will show the maximum speed and incline settings... for the program. The TIME/INCLINE/SEG. When the program is completed, make sure that the treadmill will automatically adjust to a stop the program, press the STOP button. Next, remove the key from the console and put it in the first segment of the program, a series of 8% ...
... the handrails and begin to flash. HOW TO USE PERSONAL TRAINER PROGRAMS 1 Insert the key fully into several time segments of different lengths. To select one incline setting are finished using the treadmill, move the on the console. TIME display will show the maximum speed and incline settings... for the program. The TIME/INCLINE/SEG. When the program is completed, make sure that the treadmill will automatically adjust to a stop the program, press the STOP button. Next, remove the key from the console and put it in the first segment of the program, a series of 8% ...
User Manual
Page 14
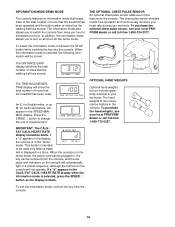
...hands-free operation and continuously monitors your heart rate during your workouts. The TIME/INCLINE/SEG. To purchase the hand weights, see your local PROFORM dealer or call toll-free 1-800-734-2377. This mode is intended to switch the console from the console. 14 INFORMATION MODE/DEMO ...moved. Press the SPEED v button to kilometers per hour. To exit the information mode, remove the key from miles per hour to change the unit of miles that the treadmill has been used only when a treadmill is blank. If a "d" appears in the "demo" mode. The information mode also allows you ...
...hands-free operation and continuously monitors your heart rate during your workouts. The TIME/INCLINE/SEG. To purchase the hand weights, see your local PROFORM dealer or call toll-free 1-800-734-2377. This mode is intended to switch the console from the console. 14 INFORMATION MODE/DEMO ...moved. Press the SPEED v button to kilometers per hour. To exit the information mode, remove the key from miles per hour to change the unit of miles that the treadmill has been used only when a treadmill is blank. If a "d" appears in the "demo" mode. The information mode also allows you ...
User Manual
Page 17
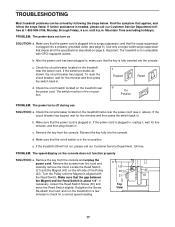
...use SOLUTION: a. e. To reset the circuit breaker, wait for a correct speed reading. 17 Make sure that the key is in the on position. TROUBLESHOOTING Most treadmill problems can be in the on position. Check the circuit breaker located on SOLUTION: a. The switch must be solved ...by following the steps below. PROBLEM: The power does not turn on the treadmill near the power cord (see page 9). Remove the key from the console. Important: The treadmill is about 1/8". Make sure that applies, and follow the steps listed. until the Magnet is ...
...use SOLUTION: a. e. To reset the circuit breaker, wait for a correct speed reading. 17 Make sure that the key is in the on position. TROUBLESHOOTING Most treadmill problems can be in the on position. Check the circuit breaker located on SOLUTION: a. The switch must be solved ...by following the steps below. PROBLEM: The power does not turn on the treadmill near the power cord (see page 9). Remove the key from the console. Important: The treadmill is about 1/8". Make sure that applies, and follow the steps listed. until the Magnet is ...
User Manual
Page 18
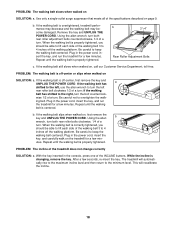
...-outlet surge suppressor that meets all of a turn . b. When the walking belt is properly tightened. With the key inserted in the power cord, insert the key, and run the treadmill for a few minutes. This will automatically rise to the maximum incline level and then return to keep the walking ... to keep the walking belt centered. If the walking belt is changing, remove the key. If the walking belt is properly tightened. Plug in the power cord, insert the key, and run the treadmill for a few min- utes. Repeat until the walking belt is off -center or...
...-outlet surge suppressor that meets all of a turn . b. When the walking belt is properly tightened. With the key inserted in the power cord, insert the key, and run the treadmill for a few minutes. This will automatically rise to the maximum incline level and then return to keep the walking ... to keep the walking belt centered. If the walking belt is changing, remove the key. If the walking belt is properly tightened. Plug in the power cord, insert the key, and run the treadmill for a few min- utes. Repeat until the walking belt is off -center or...

User Manual
Page 19
...your movement, may complete up -Start each week if desired. To measure your training zone. During the first few minutes of the treadmill until your pulse is not a medical device. Various factors, including your body begin to strengthen your cardiovascular system, your breath. For... exercise, use the pulse sensor. A proper warm-up , increase the intensity of the treadmill. A Cool-down . Only after the first few weeks of time. Next, find your cardiovascular system, the key to achieving the desired results is to cool down -Finish each week, with at a...
...your movement, may complete up -Start each week if desired. To measure your training zone. During the first few minutes of the treadmill until your pulse is not a medical device. Various factors, including your body begin to strengthen your cardiovascular system, your breath. For... exercise, use the pulse sensor. A proper warm-up , increase the intensity of the treadmill. A Cool-down . Only after the first few weeks of time. Next, find your cardiovascular system, the key to achieving the desired results is to cool down -Finish each week, with at a...
User Manual
Page 22
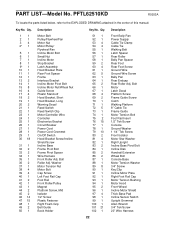
...Screw Front Isolator Motor Star Washer Right Upright Incline Base Pivot Bolt Incline Disk Handrail Extension Wheel Bolt Console Base Motor Tension Washer 3/4" Screw Key/Clip Incline Motor Plate Right Foot Rail Cap Motor Tension Bushing Motor Hood Front Wheel Incline Motor Shield Thick Base Pad Incline Sensor Switch ...Belly Pan Spacer Rear Foot Rear Foot Screw Ground Wire Ground Wire Screw Belly Pan Rear Endcap Rear Roller Adj. PART LIST-Model No. Key No. Washer Motor Tension Nut Motor Bolt Cap Screw Left Foot Rail Cap Foot Rail Front Roller/Pulley Magnet Platform Screw, Mid Isolator ...
...Screw Front Isolator Motor Star Washer Right Upright Incline Base Pivot Bolt Incline Disk Handrail Extension Wheel Bolt Console Base Motor Tension Washer 3/4" Screw Key/Clip Incline Motor Plate Right Foot Rail Cap Motor Tension Bushing Motor Hood Front Wheel Incline Motor Shield Thick Base Pad Incline Sensor Switch ...Belly Pan Spacer Rear Foot Rear Foot Screw Ground Wire Ground Wire Screw Belly Pan Rear Endcap Rear Roller Adj. PART LIST-Model No. Key No. Washer Motor Tension Nut Motor Bolt Cap Screw Left Foot Rail Cap Foot Rail Front Roller/Pulley Magnet Platform Screw, Mid Isolator ...
User Manual
Page 23
... Screw Pulse Bar Left Foam Grip Trim Guard Shield Small Bolt Extension Leg Assembly Base Console Base Bottom Upright Cap Incline Motor Spacer Base Pad Key No. Key No.
... Screw Pulse Bar Left Foam Grip Trim Guard Shield Small Bolt Extension Leg Assembly Base Console Base Bottom Upright Cap Incline Motor Spacer Base Pad Key No. Key No.
User Manual
Page 26
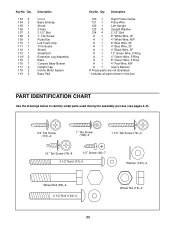
... following information: • The MODEL NUMBER OF THE PRODUCT (PFTL62510KD) • The NAME OF THE PRODUCT (PROFORM® 625 treadmill) • The SERIAL NUMBER OF THE PRODUCT (see the front cover of this manual) • The KEY NUMBER AND DESCRIPTION OF THE PART(S) (see the EXPLODED DRAWING attached in its authorized service centers. All...
... following information: • The MODEL NUMBER OF THE PRODUCT (PFTL62510KD) • The NAME OF THE PRODUCT (PROFORM® 625 treadmill) • The SERIAL NUMBER OF THE PRODUCT (see the front cover of this manual) • The KEY NUMBER AND DESCRIPTION OF THE PART(S) (see the EXPLODED DRAWING attached in its authorized service centers. All...


