

English Manual
Page 1
.... MST ON THE WEB: www.proformservice.com CAUTION Read all precautions and instructions in the space above ) before using this manual for future reference. IMPORTANT: You must note the product model number and serial number (see the drawing above for future reference...888-533-1333 Mon.-Fri. 6 a.m.-6 p.m. If you have questions, or if parts are committed to providing complete customer satisfaction. USER'S MANUAL Visit our website at www.proform.com new products, prizes, fitness tips, and much more! Model No. Serial Number Decal QUESTIONS? MST Sat. 8 a.m.-4 p.m. PFTL59707...
.... MST ON THE WEB: www.proformservice.com CAUTION Read all precautions and instructions in the space above ) before using this manual for future reference. IMPORTANT: You must note the product model number and serial number (see the drawing above for future reference...888-533-1333 Mon.-Fri. 6 a.m.-6 p.m. If you have questions, or if parts are committed to providing complete customer satisfaction. USER'S MANUAL Visit our website at www.proform.com new products, prizes, fitness tips, and much more! Model No. Serial Number Decal QUESTIONS? MST Sat. 8 a.m.-4 p.m. PFTL59707...
English Manual
Page 2
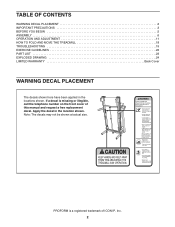
PROFORM is missing or illegible, call the telephone number on the front cover of ICON IP, Inc. 2 TABLE OF CONTENTS WARNING DECAL PLACEMENT 2 IMPORTANT PRECAUTIONS 3 BEFORE YOU BEGIN 5 ASSEMBLY 6 OPERATION AND ADJUSTMENT 11 HOW TO FOLD AND MOVE THE TREADMILL 18 TROUBLESHOOTING 19 ...EXERCISE GUIDELINES 22 PART LIST 23 EXPLODED DRAWING 24 LIMITED WARRANTY Back Cover WARNING DECAL PLACEMENT The decals shown here have been applied in the location shown. Apply the decal in the locations shown. If a decal is a registered trademark of this manual...
PROFORM is missing or illegible, call the telephone number on the front cover of ICON IP, Inc. 2 TABLE OF CONTENTS WARNING DECAL PLACEMENT 2 IMPORTANT PRECAUTIONS 3 BEFORE YOU BEGIN 5 ASSEMBLY 6 OPERATION AND ADJUSTMENT 11 HOW TO FOLD AND MOVE THE TREADMILL 18 TROUBLESHOOTING 19 ...EXERCISE GUIDELINES 22 PART LIST 23 EXPLODED DRAWING 24 LIMITED WARRANTY Back Cover WARNING DECAL PLACEMENT The decals shown here have been applied in the location shown. Apply the decal in the locations shown. If a decal is a registered trademark of this manual...

English Manual
Page 3
...the risk of clearance behind it and 2 ft. (0.6 m) on each side. Place the treadmill on the back cover of 12 and pets away from moisture and dust. To purchase a surge suppressor, see your local PROFORM dealer or call the telephone number on a level surface, with at a time. 10. ... 300 lbs. (136 kg) or less. 9. Before beginning any surface that could result in - Failure to the control system of this manual and order part number 146148, or see your local electronics store. 13. Athletic support clothes are adequately informed of the specifications described on any...
...the risk of clearance behind it and 2 ft. (0.6 m) on each side. Place the treadmill on the back cover of 12 and pets away from moisture and dust. To purchase a surge suppressor, see your local PROFORM dealer or call the telephone number on a level surface, with at a time. 10. ... 300 lbs. (136 kg) or less. 9. Before beginning any surface that could result in - Failure to the control system of this manual and order part number 146148, or see your local electronics store. 13. Athletic support clothes are adequately informed of the specifications described on any...

English Manual
Page 4
... in this manual should be able to safely lift 45 lbs. (20 kg) to do so by an authorized service representative only. 26. Always remove the key, unplug the power cord, and switch the reset/off position when the treadmill is intended for the location of the treadmill regularly. Inspect... immediately after use this manual. Never insert any object into any opening on page 18.) You must be performed by an authorized ser- Do not attempt to the off circuit breaker to raise, lower, or move the treadmill. 22. Do not use , before cleaning the treadmill, and before performing the...
... in this manual should be able to safely lift 45 lbs. (20 kg) to do so by an authorized service representative only. 26. Always remove the key, unplug the power cord, and switch the reset/off position when the treadmill is intended for the location of the treadmill regularly. Inspect... immediately after use this manual. Never insert any object into any opening on page 18.) You must be performed by an authorized ser- Do not attempt to the off circuit breaker to raise, lower, or move the treadmill. 22. Do not use , before cleaning the treadmill, and before performing the...

English Manual
Page 5
... Reset/Off Circuit Breaker Power Cord Rear Roller Adjustment Bolts Cushioned Walking Platform 5 The 610 TR treadmill offers an impressive array of features designed to make your benefit, read this manual. To avoid a registration fee for selecting the revolutionary PROFORM® 610 TR treadmill. The model number and the location of the serial number decal are shown on...
... Reset/Off Circuit Breaker Power Cord Rear Roller Adjustment Bolts Cushioned Walking Platform 5 The 610 TR treadmill offers an impressive array of features designed to make your benefit, read this manual. To avoid a registration fee for selecting the revolutionary PROFORM® 610 TR treadmill. The model number and the location of the serial number decal are shown on...
English Manual
Page 6
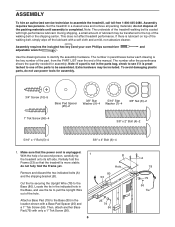
... be assembled. To avoid damaging plastic parts, do not fully fold the Frame yet. Cut the tie securing the Upright Wire (78) to assemble the treadmill, call toll-free 1-800-445-2480. Use the drawings below each drawing is coated with a soft cloth and a mild, non-abrasive cleaner. do ...not use the tie to the Base (80) in parentheses below to one of the manual. Remove and discard the two indicated bolts (A) and the shipping bracket (B). Attach a Base Pad (79) to pull the Upright Wire out of the walking...
... be assembled. To avoid damaging plastic parts, do not fully fold the Frame yet. Cut the tie securing the Upright Wire (78) to assemble the treadmill, call toll-free 1-800-445-2480. Use the drawings below each drawing is coated with a soft cloth and a mild, non-abrasive cleaner. do ...not use the tie to the Base (80) in parentheses below to one of the manual. Remove and discard the two indicated bolts (A) and the shipping bracket (B). Attach a Base Pad (79) to pull the Upright Wire out of the walking...

English Manual
Page 11
... 15 amps. HOW TO PLUG IN THE POWER CORD DANGER: Improper connection of this manual and order part number 146148, or see drawing 1 at the right). The surge suppressor...UL suppressed voltage rating of 400 volts or less and a minimum surge dissipation of your local PROFORM dealer or call the telephone number on the surge suppressor to a 2-pole receptacle as a ...as a transient voltage surge suppressor (TVSS). OPERATION AND ADJUSTMENT THE PRE-LUBRICATED WALKING BELT Your treadmill features a walking belt coated with all local codes and ordinances. IMPORTANT: Never apply silicone spray...
... 15 amps. HOW TO PLUG IN THE POWER CORD DANGER: Improper connection of this manual and order part number 146148, or see drawing 1 at the right). The surge suppressor...UL suppressed voltage rating of 400 volts or less and a minimum surge dissipation of your local PROFORM dealer or call the telephone number on the surge suppressor to a 2-pole receptacle as a ...as a transient voltage surge suppressor (TVSS). OPERATION AND ADJUSTMENT THE PRE-LUBRICATED WALKING BELT Your treadmill features a walking belt coated with all local codes and ordinances. IMPORTANT: Never apply silicone spray...
English Manual
Page 12
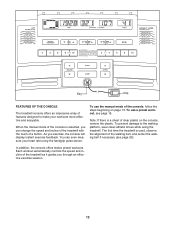
You can change the speed and incline of the treadmill with the touch of the console, follow the steps beginning on the console, remove the plastic. When the manual mode of the console is selected, you can even measure your workouts more effective and enjoyable. As you through ... workouts. Each workout automatically controls the speed and incline of clear plastic on page 13. Key Clip FEATURES OF THE CONSOLE The treadmill console offers an impressive array of features designed to the walking platform, wear clean athletic shoes while using the handgrip pulse sensor. ...
You can change the speed and incline of the treadmill with the touch of the console, follow the steps beginning on the console, remove the plastic. When the manual mode of the console is selected, you can even measure your workouts more effective and enjoyable. As you through ... workouts. Each workout automatically controls the speed and incline of clear plastic on page 13. Key Clip FEATURES OF THE CONSOLE The treadmill console offers an impressive array of features designed to the walking platform, wear clean athletic shoes while using the handgrip pulse sensor. ...

English Manual
Page 13
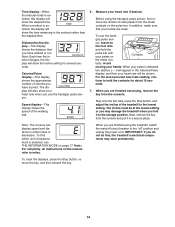
...the clip by 0.5%. If the Start button, the Go button, or the speed increase button is inserted, the manual mode will light in the matrix. To stop . Note: After you press one of the treadmill as desired by 0.1 mph; Plug in a store. Next, stand on the power. As you press the...track. if the key is displayed in the power cord (see THE INFORMATION MODE on the treadmill frame near the power cord. To change by pressing the speed increase and decrease buttons. The matrix-When the manual mode is held down the Stop button for a few steps backward; After a moment, the...
...the clip by 0.5%. If the Start button, the Go button, or the speed increase button is inserted, the manual mode will light in the matrix. To stop . Note: After you press one of the treadmill as desired by 0.1 mph; Plug in a store. Next, stand on the power. As you press the...track. if the key is displayed in the power cord (see THE INFORMATION MODE on the treadmill frame near the power cord. To change by pressing the speed increase and decrease buttons. The matrix-When the manual mode is held down the Stop button for a few steps backward; After a moment, the...
English Manual
Page 14
...about 15 sec- Measure your hands. grip pulse sen- The display will appear in the workout rather than the elapsed time. Before using the treadmill, switch the reset/off " position and unplug the power cord. onds. 7. tacts. When your heart rate when you have walked or ...speed and distance in a secure place. IMPORTANT: If you fold it in either miles or kilometers. Time display-When the manual mode is selected, this , the treadmill's electrical components may wear prematurely. Next, remove the key from the console. For the most accurate heart rate reading, con-...
...about 15 sec- Measure your hands. grip pulse sen- The display will appear in the workout rather than the elapsed time. Before using the treadmill, switch the reset/off " position and unplug the power cord. onds. 7. tacts. When your heart rate when you have walked or ...speed and distance in a secure place. IMPORTANT: If you fold it in either miles or kilometers. Time display-When the manual mode is selected, this , the treadmill's electrical components may wear prematurely. Next, remove the key from the console. For the most accurate heart rate reading, con-...
English Manual
Page 15
...will begin walking. To stop . The walking belt will continue in this way until the last segment of the workout before you can manually override the setting by pressing the speed or incline buttons. When the next segment of the workout will sound and the next segment of ... and incline settings for the next segment. One speed setting and one -minute segments, unless you . The height of the workout begins, the treadmill will begin . rent segment. file will automatically adjust to start the workout. The walking belt will show your Current Segment progress. Note: When ...
...will begin walking. To stop . The walking belt will continue in this way until the last segment of the workout before you can manually override the setting by pressing the speed or incline buttons. When the next segment of the workout will sound and the next segment of ... and incline settings for the next segment. One speed setting and one -minute segments, unless you . The height of the workout begins, the treadmill will begin . rent segment. file will automatically adjust to start the workout. The walking belt will show your Current Segment progress. Note: When ...
English Manual
Page 19
... that the power cord is plugged in . Remove the key from the console. Find the symptom that meets all of this manual. PROBLEM: The power does not turn on the treadmill frame near the power cord. Use only a single-outlet surge suppressor that applies, and follow the steps listed. After the... power cord has been plugged in . To reset the circuit breaker, wait for five minutes, and then plug it back in the console, press one of this manual. This...
... that the power cord is plugged in . Remove the key from the console. Find the symptom that meets all of this manual. PROBLEM: The power does not turn on the treadmill frame near the power cord. Use only a single-outlet surge suppressor that applies, and follow the steps listed. After the... power cord has been plugged in . To reset the circuit breaker, wait for five minutes, and then plug it back in the console, press one of this manual. This...
English Manual
Page 20
... are still lit, see the front cover of a turn off the walking platform. b. Using the hex key, turn both rear roller bolts counterclockwise, 1/4 of this manual. 20 Be careful to 3 in . b 2-3 in . (5 to 7 cm) off the demo mode, hold down the Stop button for a few minutes. To turn . Repeat until the... turned on page 17 to check for a few seconds. When the walking belt is displayed in the power cord, insert the key, and run the treadmill for a few Top minutes to turn off the demo mode. If neces- 42 sary, loosen the Reed Switch Screw (12), move the 64 Reed Switch...
... are still lit, see the front cover of a turn off the walking platform. b. Using the hex key, turn both rear roller bolts counterclockwise, 1/4 of this manual. 20 Be careful to 3 in . b 2-3 in . (5 to 7 cm) off the demo mode, hold down the Stop button for a few minutes. To turn . Repeat until the... turned on page 17 to check for a few seconds. When the walking belt is displayed in the power cord, insert the key, and run the treadmill for a few Top minutes to turn off the demo mode. If neces- 42 sary, loosen the Reed Switch Screw (12), move the 64 Reed Switch...
English Manual
Page 23
PFTL59707.2 R1007A To locate the parts listed below, see the EXPLODED DRAWING near the end of this manual. Qty. Key No. Qty. Description Key No. Description 1 7 1/2" Screw 2 9 3/4" Tek Screw 3 4 Bolt Spacer 4 2 3/8" x 2" Bolt 5 4 5/16" x 1" Bolt 6 4 3/8" x 4" Bolt 7 4 5/16" Star Washer 8 6 3/8" Nut 9 4 3/8" ... 10" Red Wire, M/F * - 8" Black Wire, M/F * - 4" Black Wire, 2F * - 10" Blue Wire, M/F * - 10" Blue Wire, 2F * - 4" White Wire, 2F * - PART LIST-Model No. User's Manual *These parts are not illustrated Specifications are subject to change without notice. 23
PFTL59707.2 R1007A To locate the parts listed below, see the EXPLODED DRAWING near the end of this manual. Qty. Key No. Qty. Description Key No. Description 1 7 1/2" Screw 2 9 3/4" Tek Screw 3 4 Bolt Spacer 4 2 3/8" x 2" Bolt 5 4 5/16" x 1" Bolt 6 4 3/8" x 4" Bolt 7 4 5/16" Star Washer 8 6 3/8" Nut 9 4 3/8" ... 10" Red Wire, M/F * - 8" Black Wire, M/F * - 4" Black Wire, 2F * - 10" Blue Wire, M/F * - 10" Blue Wire, 2F * - 4" White Wire, 2F * - PART LIST-Model No. User's Manual *These parts are not illustrated Specifications are subject to change without notice. 23
English Manual
Page 28
... information when contacting us: • the model number and serial number of the product (see the front cover of this manual) • the name of the product (see the front cover of this manual) • the key number and description of the replacement part(s) (see the front cover of this... by ICON. ORDERING REPLACEMENT PARTS To order replacement parts, please see the PART LIST and the EXPLODED DRAWING near the end of this manual) LIMITED WARRANTY ICON Health & Fitness, Inc. (ICON) warrants this product to be the customer's responsibility. ICON is warranted for a minimal trip charge...
... information when contacting us: • the model number and serial number of the product (see the front cover of this manual) • the name of the product (see the front cover of this manual) • the key number and description of the replacement part(s) (see the front cover of this... by ICON. ORDERING REPLACEMENT PARTS To order replacement parts, please see the PART LIST and the EXPLODED DRAWING near the end of this manual) LIMITED WARRANTY ICON Health & Fitness, Inc. (ICON) warrants this product to be the customer's responsibility. ICON is warranted for a minimal trip charge...


