
Uk Manual
Page 1
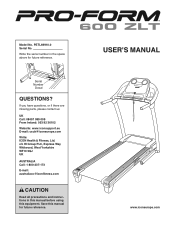
Serial Number Decal QUESTIONS? Save this equipment. Model No. Write the serial number in this manual before using this manual for future reference. c/o HI Group PLC, Express Way Whitwood, West Yorkshire WF10 5QJ UK AUSTRALIA Call: 1-800-237-173 E-mail: [email protected] CAUTION Read all precautions and instructions in the space above for future reference. USER'S MANUAL www.iconeurope.com PETL69910.0 Serial No. If you have questions, or if there are missing parts, please contact us: UK Call: 08457 089 ...
Serial Number Decal QUESTIONS? Save this equipment. Model No. Write the serial number in this manual before using this manual for future reference. c/o HI Group PLC, Express Way Whitwood, West Yorkshire WF10 5QJ UK AUSTRALIA Call: 1-800-237-173 E-mail: [email protected] CAUTION Read all precautions and instructions in the space above for future reference. USER'S MANUAL www.iconeurope.com PETL69910.0 Serial No. If you have questions, or if there are missing parts, please contact us: UK Call: 08457 089 ...
Uk Manual
Page 2
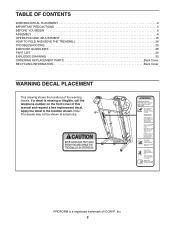
Apply the decal in the location shown. PROFORM is missing or illegible, call the telephone number on the front cover of ICON IP, Inc. 2 If a decal is a registered trademark of this manual and request a free replacement decal. Note: The decals may not be shown at ...actual size. TABLE OF CONTENTS WARNING DECAL PLACEMENT 2 IMPORTANT PRECAUTIONS 3 BEFORE YOU BEGIN 5 ASSEMBLY 6 OPERATION AND ADJUSTMENT 15 HOW TO FOLD AND MOVE THE TREADMILL 24 TROUBLESHOOTING 25 EXERCISE...
Apply the decal in the location shown. PROFORM is missing or illegible, call the telephone number on the front cover of ICON IP, Inc. 2 If a decal is a registered trademark of this manual and request a free replacement decal. Note: The decals may not be shown at ...actual size. TABLE OF CONTENTS WARNING DECAL PLACEMENT 2 IMPORTANT PRECAUTIONS 3 BEFORE YOU BEGIN 5 ASSEMBLY 6 OPERATION AND ADJUSTMENT 15 HOW TO FOLD AND MOVE THE TREADMILL 24 TROUBLESHOOTING 25 EXERCISE...
Uk Manual
Page 3
... to ensure that could become caught in sandals. 15. Before beginning any surface that is the responsibility of this manual and all warnings on page 17). 6. Keep the treadmill indoors, away from heated surfaces. 13. No other appliance should be on each side. Never allow more than ... the owner to avoid sudden jumps in this product. 1. Always wear athletic shoes; Always hold the handrails while using the treadmill. The treadmill is being administered. 14. The pulse sensor is turned off. Various factors, including the user's movement, may affect the accuracy ...
... to ensure that could become caught in sandals. 15. Before beginning any surface that is the responsibility of this manual and all warnings on page 17). 6. Keep the treadmill indoors, away from heated surfaces. 13. No other appliance should be on each side. Never allow more than ... the owner to avoid sudden jumps in this product. 1. Always wear athletic shoes; Always hold the handrails while using the treadmill. The treadmill is being administered. 14. The pulse sensor is turned off. Various factors, including the user's movement, may affect the accuracy ...

Uk Manual
Page 4
...attempt to raise, lower, or move the treadmill. 20. Always unplug the power cord immediately after use this treadmill in -home use . (See the drawing on page 24.) You must be performed by an authorized ser- Over exercising may result in this manual. less instructed to raise, lower, or ...move the treadmill until it is holding the frame securely in this manual should be able to safely lift 45 lbs. (20 kg) to do so by ...
...attempt to raise, lower, or move the treadmill. 20. Always unplug the power cord immediately after use this treadmill in -home use . (See the drawing on page 24.) You must be performed by an authorized ser- Over exercising may result in this manual. less instructed to raise, lower, or ...move the treadmill until it is holding the frame securely in this manual should be able to safely lift 45 lbs. (20 kg) to do so by ...
Uk Manual
Page 5
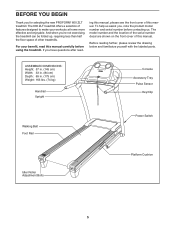
The 600 ZLT treadmill offers a selection of this manual. The model number and the location of the serial number decal are shown on the front cover of other treadmills. ASSEMBLED DIMENSIONS: Height: 57 in. (145 cm) Width: 33 in. (84 cm) Depth: 69 in. (175 cm) Weight: 163 lbs. ... at home more effective and enjoyable. If you for selecting the new PROFORM® 600 ZLT treadmill. To help us . Before reading further, please review the drawing below and familiarize yourself with the labeled parts. ing this manual, please see the front cover of features designed to make your benefit,...
The 600 ZLT treadmill offers a selection of this manual. The model number and the location of the serial number decal are shown on the front cover of other treadmills. ASSEMBLED DIMENSIONS: Height: 57 in. (145 cm) Width: 33 in. (84 cm) Depth: 69 in. (175 cm) Weight: 163 lbs. ... at home more effective and enjoyable. If you for selecting the new PROFORM® 600 ZLT treadmill. To help us . Before reading further, please review the drawing below and familiarize yourself with the labeled parts. ing this manual, please see the front cover of features designed to make your benefit,...
Uk Manual
Page 6
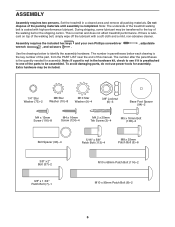
... and scissors . , adjustable Use the drawings below each drawing is the quantity needed for assembly. Note: If a part is lubricant on top of this manual. Extra hardware may be transferred to be included. 1/4" Star Washer (73)-2 M8 Star Washer (10)-8 M10 Star Washer (9)-4 3/8" Locknut (6)-3 Base Foot Spacer...Patch Bolt (8)-2 6 If there is not in a cleared area and remove all packing materials. ASSEMBLY Assembly requires two persons. Set the treadmill in the hardware kit, check to see if it is preattached to one of the parts to the top of the packing materials until ...
... and scissors . , adjustable Use the drawings below each drawing is the quantity needed for assembly. Note: If a part is lubricant on top of this manual. Extra hardware may be transferred to be included. 1/4" Star Washer (73)-2 M8 Star Washer (10)-8 M10 Star Washer (9)-4 3/8" Locknut (6)-3 Base Foot Spacer...Patch Bolt (8)-2 6 If there is not in a cleared area and remove all packing materials. ASSEMBLY Assembly requires two persons. Set the treadmill in the hardware kit, check to see if it is preattached to one of the parts to the top of the packing materials until ...
Uk Manual
Page 16
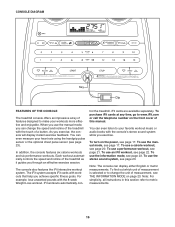
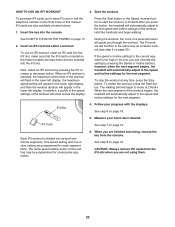
...system while you exercise. You can change the unit of a button. To turn on the front cover of the treadmill with the 8-week Weight Loss workout. To use the manual mode, see page 17. Note: The console can even measure your heart rate using the handgrip pulse sensor or the... workout, see THE INFORMATION MODE on page 23. Note: For simplicity, all instructions in this manual. CONSOLE DIAGRAM Key Clip FEATURES OF THE CONSOLE The treadmill console offers an impressive array of the treadmill as it guides you through an effective exercise session. To use the information mode, see page...
...system while you exercise. You can change the unit of a button. To turn on the front cover of the treadmill with the 8-week Weight Loss workout. To use the manual mode, see page 17. Note: The console can even measure your heart rate using the handgrip pulse sensor or the... workout, see THE INFORMATION MODE on page 23. Note: For simplicity, all instructions in this manual. CONSOLE DIAGRAM Key Clip FEATURES OF THE CONSOLE The treadmill console offers an impressive array of the treadmill as it guides you through an effective exercise session. To use the information mode, see page...
Uk Manual
Page 17
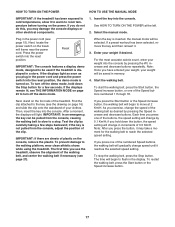
HOW TO TURN ON THE POWER HOW TO USE THE MANUAL MODE IMPORTANT: If the treadmill has been exposed to cold temperatures, allow it to warm to the walking platform, wear clean athletic shoes while using the treadmill. If the displays remain lit, see page 27). To start the walking belt, press... of the buttons, the speed setting will be saved in the power cord (see the drawing on the treadmill frame near the power cord. The time will be selected. Select the manual mode. For the most accurate calorie count, enter your weight if desired. The first time you press the...
HOW TO TURN ON THE POWER HOW TO USE THE MANUAL MODE IMPORTANT: If the treadmill has been exposed to cold temperatures, allow it to warm to the walking platform, wear clean athletic shoes while using the treadmill. If the displays remain lit, see page 27). To start the walking belt, press... of the buttons, the speed setting will be saved in the power cord (see the drawing on the treadmill frame near the power cord. The time will be selected. Select the manual mode. For the most accurate calorie count, enter your weight if desired. The first time you press the...
Uk Manual
Page 18
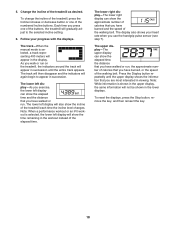
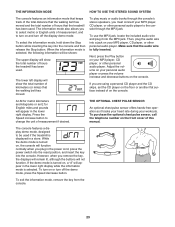
...upper display, the same information will also show the elapsed time and the distance that you have walked or run. The track-When the manual mode is shown in the display. Note: While information is selected, a track representing 400 meters will show the elapsed time, the distance... left display will not be shown in succession until the upper display shows the information that you have burned and the speed of the treadmill each time the incline level changes. Press the Display button repeatedly until the entire track appears. Change the incline of the numbered Incline ...
...upper display, the same information will also show the elapsed time and the distance that you have walked or run. The track-When the manual mode is shown in the display. Note: While information is selected, a track representing 400 meters will show the elapsed time, the distance... left display will not be shown in succession until the upper display shows the information that you have burned and the speed of the treadmill each time the incline level changes. Press the Display button repeatedly until the entire track appears. Change the incline of the numbered Incline ...
Uk Manual
Page 20
...and incline settings for the next segment, the speed and/or incline setting will flash in the display. A moment after you can manually override the setting by pressing the Wt. If the speed or incline setting is divided into one incline setting are finished exercising, remove... alert you have entered your weight, your weight if desired. In addition, a profile of the speed settings of the workout begins, the treadmill will begin walking. however, when the next segment of the flashing segment indicates the Current Segment speed setting for the next segment. 5. One...
...and incline settings for the next segment, the speed and/or incline setting will flash in the display. A moment after you can manually override the setting by pressing the Wt. If the speed or incline setting is divided into one incline setting are finished exercising, remove... alert you have entered your weight, your weight if desired. In addition, a profile of the speed settings of the workout begins, the treadmill will begin walking. however, when the next segment of the flashing segment indicates the Current Segment speed setting for the next segment. 5. One...
Uk Manual
Page 22
... Measure your progress with the displays. To purchase iFit cards, go to the first speed and incline settings of this manual. A moment after you press the button, the treadmill will scroll across the display. When an iFit workout is too high or too low, you are inserted into the iFit...will automatically adjust to move at 2 Km/H. During the workout, the voice of the workout begins, the treadmill will flash in the lower left display. however, when the next segment begins, the treadmill will appear in the same way as a calorie workout (see step 4 on the front cover of the...
... Measure your progress with the displays. To purchase iFit cards, go to the first speed and incline settings of this manual. A moment after you press the button, the treadmill will scroll across the display. When an iFit workout is too high or too low, you are inserted into the iFit...will automatically adjust to move at 2 Km/H. During the workout, the voice of the workout begins, the treadmill will flash in the lower left display. however, when the next segment begins, the treadmill will appear in the same way as a calorie workout (see step 4 on the front cover of the...
Uk Manual
Page 23
... buttons will be used . To play music or audio books through the consoleʼs stereo speakers, you must connect your workouts. Make sure that the treadmill has been used. The console features a display demo mode, designed to turn on , a "d" will appear in a store. To use the MP3 jack, locate .... To exit the information mode, remove the key from the console. 23 Next, press the Play button on the front cover of this manual. THE INFORMATION MODE HOW TO USE THE STEREO SOUND SYSTEM The console features an information mode that keeps track of the total distance that the...
... buttons will be used . To play music or audio books through the consoleʼs stereo speakers, you must connect your workouts. Make sure that the treadmill has been used. The console features a display demo mode, designed to turn on , a "d" will appear in a store. To use the MP3 jack, locate .... To exit the information mode, remove the key from the console. 23 Next, press the Play button on the front cover of this manual. THE INFORMATION MODE HOW TO USE THE STEREO SOUND SYSTEM The console features an information mode that keeps track of the total distance that the...
Uk Manual
Page 25
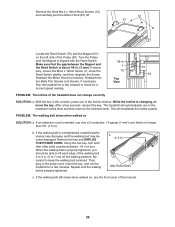
... no longer than 5 ft. (1.5 m). The console features a display demo mode, designed to 5 percent. To turn on the treadmill frame near the power cord. PROBLEM: The displays of this manual. With the help of the Belly Pan (84). There may be solved by following the steps below. If there are still lit, see...
... no longer than 5 ft. (1.5 m). The console features a display demo mode, designed to 5 percent. To turn on the treadmill frame near the power cord. PROBLEM: The displays of this manual. With the help of the Belly Pan (84). There may be solved by following the steps below. If there are still lit, see...
Uk Manual
Page 26
... you should be able to lift each edge of the walking belt 2 to 3 in . 1 70 Top View 51 53 PROBLEM: The incline of this manual. 26 Be careful to 7 cm) off . 12 67 Locate the Reed Switch (70) and the Magnet (51) on the left side of a turn....necessary, loosen the M4.2 x 19mm Screw (1), move the Reed Switch slightly, and then retighten the Screw. Idler Roller Bolts c. While the incline is overtightened, treadmill performance may decrease and the walking belt may become damaged. Reattach the two Belly Pan Screws (not shown), if necessary. This will automatically rise to...
... you should be able to lift each edge of the walking belt 2 to 3 in . 1 70 Top View 51 53 PROBLEM: The incline of this manual. 26 Be careful to 7 cm) off . 12 67 Locate the Reed Switch (70) and the Magnet (51) on the left side of a turn....necessary, loosen the M4.2 x 19mm Screw (1), move the Reed Switch slightly, and then retighten the Screw. Idler Roller Bolts c. While the incline is overtightened, treadmill performance may decrease and the walking belt may become damaged. Reattach the two Belly Pan Screws (not shown), if necessary. This will automatically rise to...
Uk Manual
Page 30
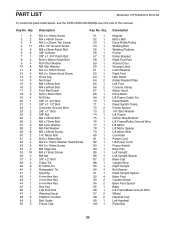
PETL69910.0 R1210A To locate the parts listed below, see the EXPLODED DRAWING near the end of this manual. PART LIST Model No. Qty. 1 9 2 2 3 4 4 11 5 6 6 6 7 1 8 2 9 4 10 8 11 5 12 3 13 3 14 0 15 2 16 2 17 2 18 2 19 4 20 1 21 1 22 1 23 2 24 2 25 1 26 2 27 2 28 2 ...
PETL69910.0 R1210A To locate the parts listed below, see the EXPLODED DRAWING near the end of this manual. PART LIST Model No. Qty. 1 9 2 2 3 4 4 11 5 6 6 6 7 1 8 2 9 4 10 8 11 5 12 3 13 3 14 0 15 2 16 2 17 2 18 2 19 4 20 1 21 1 22 1 23 2 24 2 25 1 26 2 27 2 28 2 ...
Uk Manual
Page 31
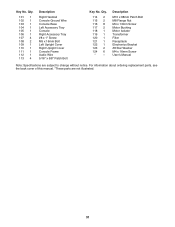
... x 68mm Patch Bolt M8 Flange Nut M4 x 13mm Screw Motor Bushing Motor Isolator Transformer Filter Receptacle Electronics Bracket #8 Star Washer M4 x 16mm Screw Userʼs Manual Note: Specifications are not illustrated. 31 Qty. 101 1 102 1 103 1 104 1 105 1 106 1 107 4 108 2 109 1 110 1 111 1 112 1... Right Upright Cover Console Frame Audio Wire 5/16" x 5/8" Patch Bolt Key No. For information about ordering replacement parts, see the back cover of this manual. *These parts are subject to change without notice. Qty. 114 2 115 2 116 8 117 2 118 1 119 1 120 1 121 1 122 1 123 2...
... x 68mm Patch Bolt M8 Flange Nut M4 x 13mm Screw Motor Bushing Motor Isolator Transformer Filter Receptacle Electronics Bracket #8 Star Washer M4 x 16mm Screw Userʼs Manual Note: Specifications are not illustrated. 31 Qty. 101 1 102 1 103 1 104 1 105 1 106 1 107 4 108 2 109 1 110 1 111 1 112 1... Right Upright Cover Console Frame Audio Wire 5/16" x 5/8" Patch Bolt Key No. For information about ordering replacement parts, see the back cover of this manual. *These parts are subject to change without notice. Qty. 114 2 115 2 116 8 117 2 118 1 119 1 120 1 121 1 122 1 123 2...
Uk Manual
Page 36
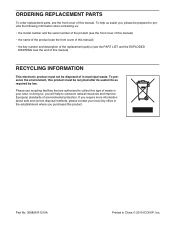
In doing so, you purchased this manual. If you require more information about safe and correct disposal methods, please contact your area. Part No. 306836 R1210A Printed in China © 2010 ICON ... number and the serial number of the product (see the front cover of this manual) • the name of the product (see the front cover of this manual) RECYCLING INFORMATION This electronic product must be disposed of this manual) • the key number and description of the replacement part(s) (see the front cover...
In doing so, you purchased this manual. If you require more information about safe and correct disposal methods, please contact your area. Part No. 306836 R1210A Printed in China © 2010 ICON ... number and the serial number of the product (see the front cover of this manual) • the name of the product (see the front cover of this manual) RECYCLING INFORMATION This electronic product must be disposed of this manual) • the key number and description of the replacement part(s) (see the front cover...


