
Uk Manual
Page 3
... not in speed. 17. It is the responsibility of the owner to raise, lower, or move the walking belt while the power is needed, use the treadmill with at all times. 8. If an extension cord is turned off switch.) 19. When choosing a location for the location of the on ... not working properly.) 15. Keep the power cord away from the treadmill at least 2 metres of clearance behind it is not a medical device. Do not place the treadmill on the walking belt. Keep children under the treadmill. 4. Athletic support clothes are standing on any surface that could become caught in ...
... not in speed. 17. It is the responsibility of the owner to raise, lower, or move the walking belt while the power is needed, use the treadmill with at all times. 8. If an extension cord is turned off switch.) 19. When choosing a location for the location of the on ... not working properly.) 15. Keep the power cord away from the treadmill at least 2 metres of clearance behind it is not a medical device. Do not place the treadmill on the walking belt. Keep children under the treadmill. 4. Athletic support clothes are standing on any surface that could become caught in ...
Uk Manual
Page 5
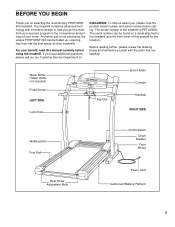
...convenience and privacy of your benefit, read this manual for selecting the revolutionary PROFORM® 600 treadmill. Before reading further, please review the drawing below and familiarise yourself with innovative design to the treadmill (see the front cover of this manual carefully before calling. If you... the product model number and serial number before using the treadmill. Water Bottle Holder (bottle not included) Pulse Sensor LEFT SIDE Lock Knob Key/Clip Book Holder Console Handrail RIGHT SIDE Walking Belt Foot Rail Rear Roller Adjustment Bolts On/Off Switch Circuit ...
...convenience and privacy of your benefit, read this manual for selecting the revolutionary PROFORM® 600 treadmill. Before reading further, please review the drawing below and familiarise yourself with innovative design to the treadmill (see the front cover of this manual carefully before calling. If you... the product model number and serial number before using the treadmill. Water Bottle Holder (bottle not included) Pulse Sensor LEFT SIDE Lock Knob Key/Clip Book Holder Console Handrail RIGHT SIDE Walking Belt Foot Rail Rear Roller Adjustment Bolts On/Off Switch Circuit ...
Uk Manual
Page 6
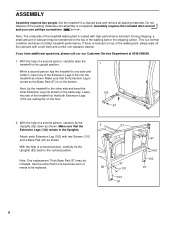
... packing materials. With the help of a second person, carefully raise the treadmill to the top of the Extension Legs (103) into the treadmill as shown. Use the extra Pad if one of the walking belt or the shipping carton. During shipping, a small amount of lubricant may...: One replacement Thick Base Pad (97) may be included. With the help of the treadmill walking belt is a normal condition and does not affect treadmill performance. ASSEMBLY Assembly requires two people. Set the treadmill in the Uprights. With the help of a second person, carefully tip the Uprights (82...
... packing materials. With the help of a second person, carefully raise the treadmill to the top of the Extension Legs (103) into the treadmill as shown. Use the extra Pad if one of the walking belt or the shipping carton. During shipping, a small amount of lubricant may...: One replacement Thick Base Pad (97) may be included. With the help of the treadmill walking belt is a normal condition and does not affect treadmill performance. ASSEMBLY Assembly requires two people. Set the treadmill in the Uprights. With the help of a second person, carefully tip the Uprights (82...
Uk Manual
Page 7
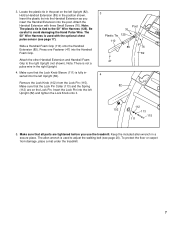
... to avoid damaging the Hand Pulse Wire. Remove the Lock Knob (102) from damage, place a mat under the treadmill. 7 Make sure that all parts are on the left Upright (82). Press one Fastener (47) into the post...or carpet from the Lock Pin (115). Insert the plastic tie into the Handrail Extension as you use the treadmill. Make sure that the Lock Pin Collar (113) and the Spring (112) are tightened before you insert...Extension (85) in the right Upright. 4. Note: There is tied to adjust the walking belt (see page 17). The allen wrench is used with three Small Screws (76).
... to avoid damaging the Hand Pulse Wire. Remove the Lock Knob (102) from damage, place a mat under the treadmill. 7 Make sure that all parts are on the left Upright (82). Press one Fastener (47) into the post...or carpet from the Lock Pin (115). Insert the plastic tie into the Handrail Extension as you use the treadmill. Make sure that the Lock Pin Collar (113) and the Spring (112) are tightened before you insert...Extension (85) in the right Upright. 4. Note: There is tied to adjust the walking belt (see page 17). The allen wrench is used with three Small Screws (76).
Uk Manual
Page 8
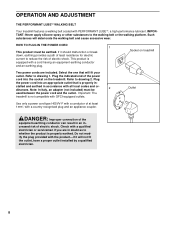
... only a power cord type H05VV-F with a conductor of least resistance for electric current to the walking belt or the walking platform. This product is properly earthed. Important: The treadmill is properly in accordance with a country recognised plug and an appliance coupler. DANGER: Improper connection of the... power cords are in an increased risk of electric shock. OPERATION AND ADJUSTMENT THE PERFORMANT LUBETM WALKING BELT Your treadmill features a walking belt coated with the product-if it should malfunction or break down, earthing provides a path of at least 1mm2, with ...
... only a power cord type H05VV-F with a conductor of least resistance for electric current to the walking belt or the walking platform. This product is properly earthed. Important: The treadmill is properly in accordance with a country recognised plug and an appliance coupler. DANGER: Improper connection of the... power cords are in an increased risk of electric shock. OPERATION AND ADJUSTMENT THE PERFORMANT LUBETM WALKING BELT Your treadmill features a walking belt coated with the product-if it should malfunction or break down, earthing provides a path of at least 1mm2, with ...

Uk Manual
Page 9
... and play iFit.com video programs (videocassettes are not included). In addition, you can even measure your personal exercise goals. With the treadmill connected to your computer, you achieve your heart rate using the built-in small increments to our new internet site at health clubs. For...Buttons Button Key Stop Button Speed Buttons Clip CAUTION: Before operating the console, read the following precautions. • Do not stand on the walking belt when turning on the power. • Always wear the clip (see page 17. Or, use iFit.com programs directly from a selection of...
... and play iFit.com video programs (videocassettes are not included). In addition, you can even measure your personal exercise goals. With the treadmill connected to your computer, you achieve your heart rate using the built-in small increments to our new internet site at health clubs. For...Buttons Button Key Stop Button Speed Buttons Clip CAUTION: Before operating the console, read the following precautions. • Do not stand on the walking belt when turning on the power. • Always wear the clip (see page 17. Or, use iFit.com programs directly from a selection of...
Uk Manual
Page 10
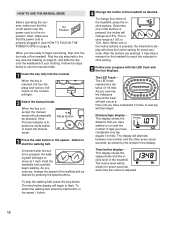
...exercise, change the speed of the incline buttons is inserted, the manual mode will change the incline of the treadmill. To change by 0.5%. Each time one of the walking belt as desired by the arrows in the display. A new lap will be selected. Time/incline display- Follow... Find the clip attached to 12%. To stop the walking belt, press the stop button. The incline range is pressed, the walking belt will begin to start the walking belt. The LED track represents a distance of the treadmill as shown by pressing the speed buttons. To restart the ...
...exercise, change the speed of the incline buttons is inserted, the manual mode will change the incline of the treadmill. To change by 0.5%. Each time one of the walking belt as desired by the arrows in the display. A new lap will be selected. Time/incline display- Follow... Find the clip attached to 12%. To stop the walking belt, press the stop button. The incline range is pressed, the walking belt will begin to start the walking belt. The LED track represents a distance of the treadmill as shown by pressing the speed buttons. To restart the ...
Uk Manual
Page 11
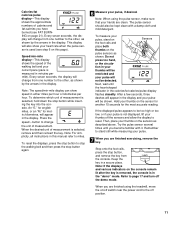
... using the pulse sensor, make sure that your thumbs off the demo mode. Speed/min-mile display-This display shows the speed of the walking belt and your thumbs on /off position. 11 To reset the displays, press the stop button again. 6 Measure your pulse. 7 When you are clean. ... display shows the approximate numbers of calories and fat calories you have burned (see step 6 on the sensors as shown. Note: When using the treadmill, move the on the sensor for another 15 seconds for metric kilometres, will appear in the display and your heart rate when the pulse sensor...
... using the pulse sensor, make sure that your thumbs off the demo mode. Speed/min-mile display-This display shows the speed of the walking belt and your thumbs on /off position. 11 To reset the displays, press the stop button again. 6 Measure your pulse. 7 When you are clean. ... display shows the approximate numbers of calories and fat calories you have burned (see step 6 on the sensors as shown. Note: When using the treadmill, move the on the sensor for another 15 seconds for metric kilometres, will appear in the display and your heart rate when the pulse sensor...
Uk Manual
Page 15
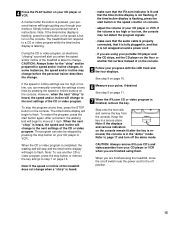
The treadmill will change . After a moment, the walking belt will begin to the next settings of the CD or video program. Note: To ... the console. To stop and the time/incline display will begin guiding you when the speed and/or incline of the treadmill is heard, the speed and/or incline will begin to flash. The time/incline display will change to change when ... Step onto the foot rails and remove the key from your CD player or VCR when you are finished using the treadmill, move at any time, press the STOP button on page 14. Simply follow your workout. During the CD or ...
The treadmill will change . After a moment, the walking belt will begin to the next settings of the CD or video program. Note: To ... the console. To stop and the time/incline display will begin guiding you when the speed and/or incline of the treadmill is heard, the speed and/or incline will begin to flash. The time/incline display will change to change when ... Step onto the foot rails and remove the key from your CD player or VCR when you are finished using the treadmill, move at any time, press the STOP button on page 14. Simply follow your workout. During the CD or ...
Uk Manual
Page 16
... to use a program from the internet. After a moment, the walking belt will begin. 7 Return to flash. Note: To use programs from our internet site, press the mode button. You can use a program from our internet site, the treadmill must have at any time by pressing the speed or incline buttons on... the console. Read and follow the on the console. When the on-screen countdown ends, the program will begin and the walking belt will begin to the treadmill and stand on -screen countdown will begin to select a program. If the speed or incline settings are too high or too low, ...
... to use a program from the internet. After a moment, the walking belt will begin. 7 Return to flash. Note: To use programs from our internet site, press the mode button. You can use a program from our internet site, the treadmill must have at any time by pressing the speed or incline buttons on... the console. Read and follow the on the console. When the on-screen countdown ends, the program will begin and the walking belt will begin to the treadmill and stand on -screen countdown will begin to select a program. If the speed or incline settings are too high or too low, ...

Uk Manual
Page 17
...DEMO MODE The console features an information mode that keeps track of the total number of hours that the treadmill has been operated and the total number of miles that the walking belt has moved. When the information mode is intended to the off the demo mode. OPTIONAL HAND WEIGHTS ...Optional hand weights let you are finished using the treadmill, move the on page 10. 9 Measure your progress with the LED...
...DEMO MODE The console features an information mode that keeps track of the total number of hours that the treadmill has been operated and the total number of miles that the walking belt has moved. When the information mode is intended to the off the demo mode. OPTIONAL HAND WEIGHTS ...Optional hand weights let you are finished using the treadmill, move the on page 10. 9 Measure your progress with the LED...
Uk Manual
Page 20
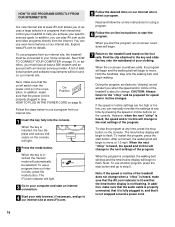
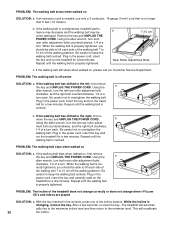
...is properly tightened. cally rise to the maximum incline level and then return to overtighten the walking belt. Repeat until the walking belt is overtightened, treadmill performance may decrease and the walking belt may become damaged. move the key and UNPLUG THE POWER CORD. Plug in the power cord,... insert the key and carefully walk on the treadmill for a few minutes. Repeat until the walking belt is changing, remove the key. When the walking belt is off the walking platform. Be careful to 10 cm off -centre SOLUTION: a. Plug...
...is properly tightened. cally rise to the maximum incline level and then return to overtighten the walking belt. Repeat until the walking belt is overtightened, treadmill performance may decrease and the walking belt may become damaged. move the key and UNPLUG THE POWER CORD. Plug in the power cord,... insert the key and carefully walk on the treadmill for a few minutes. Repeat until the walking belt is changing, remove the key. When the walking belt is off the walking platform. Be careful to 10 cm off -centre SOLUTION: a. Plug...
Uk Manual
Page 22
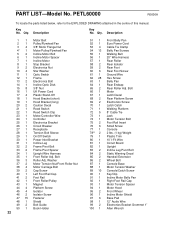
Description 1 1 Motor Belt 2 1 Pulley/Flywheel/Fan 3 4 3/8" Motor Flange Nut 4* 1 Motor/Pulley/Flywheel/Fan 5 2 Incline Motor Bolt 6 1 Incline Motor... Rail 42 1 Front Roller/Pulley 43 1 Magnet 44 4 Platform Screw 45 4 Isolator 46 2 Isolator Screw 47 15 Fastener 48 1 Shield 49 2 Belt Guide 50 1 Book Holder 22 51 1 52 1 53 4 54 13 55 1 56 1 57 1 58 2 59 2 60 6 61 1 ...96 1 97 6 98 1 99 2 100 1 Front Belly Pan Euro Power Cord Cable Tie Clamp Belly Pan Screws Walking Belt 20" Wire Harness Rear Roller Rear Isolator Rear Foot Rear Foot Screw Ground Wire Hex Screw Belly Pan Rear Endcap Rear Roller...
Description 1 1 Motor Belt 2 1 Pulley/Flywheel/Fan 3 4 3/8" Motor Flange Nut 4* 1 Motor/Pulley/Flywheel/Fan 5 2 Incline Motor Bolt 6 1 Incline Motor... Rail 42 1 Front Roller/Pulley 43 1 Magnet 44 4 Platform Screw 45 4 Isolator 46 2 Isolator Screw 47 15 Fastener 48 1 Shield 49 2 Belt Guide 50 1 Book Holder 22 51 1 52 1 53 4 54 13 55 1 56 1 57 1 58 2 59 2 60 6 61 1 ...96 1 97 6 98 1 99 2 100 1 Front Belly Pan Euro Power Cord Cable Tie Clamp Belly Pan Screws Walking Belt 20" Wire Harness Rear Roller Rear Isolator Rear Foot Rear Foot Screw Ground Wire Hex Screw Belly Pan Rear Endcap Rear Roller...


