

English Manual
Page 1
... www.proformservice.com. Serial Number Decal ACTIVATE YOUR WARRANTY To register your product and activate your warranty today, go to www.proformservice.com/ registration. www.proform.com Model No. CAUTION Read all precautions and instructions in the space above for future reference. Or call 1-888-533-1333 Mon.–-Fri. 6 a.m.–...
... www.proformservice.com. Serial Number Decal ACTIVATE YOUR WARRANTY To register your product and activate your warranty today, go to www.proformservice.com/ registration. www.proform.com Model No. CAUTION Read all precautions and instructions in the space above for future reference. Or call 1-888-533-1333 Mon.–-Fri. 6 a.m.–...

English Manual
Page 2
... WARNING DECAL PLACEMENT 2 IMPORTANT PRECAUTIONS 3 BEFORE YOU BEGIN 6 PART IDENTIFICATION CHART 7 ASSEMBLY 8 OPERATION AND ADJUSTMENT 14 HOW TO FOLD AND MOVE THE TREADMILL 20 TROUBLESHOOTING 21 EXERCISE GUIDELINES 23 PART LIST 24 EXPLODED DRAWING 25 ORDERING REPLACEMENT PARTS Back Cover LIMITED WARRANTY Back Cover WARNING DECAL PLACEMENT This...a free replacement decal. If a decal is a registered trademark of ICON IP, Inc. 2 Note: The decals may not be shown at actual size. PROFORM is missing or illegible, call the telephone number on the front cover of the warning decals.
... WARNING DECAL PLACEMENT 2 IMPORTANT PRECAUTIONS 3 BEFORE YOU BEGIN 6 PART IDENTIFICATION CHART 7 ASSEMBLY 8 OPERATION AND ADJUSTMENT 14 HOW TO FOLD AND MOVE THE TREADMILL 20 TROUBLESHOOTING 21 EXERCISE GUIDELINES 23 PART LIST 24 EXPLODED DRAWING 25 ORDERING REPLACEMENT PARTS Back Cover LIMITED WARRANTY Back Cover WARNING DECAL PLACEMENT This...a free replacement decal. If a decal is a registered trademark of ICON IP, Inc. 2 Note: The decals may not be shown at actual size. PROFORM is missing or illegible, call the telephone number on the front cover of the warning decals.

English Manual
Page 3
...floor or carpet from damage, place a mat under age 12 and pets away from the treadmill at a time. 11. Do not wear loose clothes that all users of this manual, or see your local PROFORM dealer, call the telephone number on the walking belt. Always hold the handrails while using... the treadmill. Keep the treadmill indoors, away from heated surfaces. 16. ICON assumes no responsibility for persons over age 35...
...floor or carpet from damage, place a mat under age 12 and pets away from the treadmill at a time. 11. Do not wear loose clothes that all users of this manual, or see your local PROFORM dealer, call the telephone number on the walking belt. Always hold the handrails while using... the treadmill. Keep the treadmill indoors, away from heated surfaces. 16. ICON assumes no responsibility for persons over age 35...

English Manual
Page 4
...affect the accuracy of heart rate readings. Inspect and properly tighten all parts of the power switch), and unplug the power cord when the treadmill is holding the frame securely in general. 21. If you feel faint or if you experience pain while exercising, stop immediately and cool ...Never insert any object into the off position (see the drawing on page 20.) You must be performed by an authorized service representative. ing the treadmill, and before clean- Various factors, including the user’'s movement, may result in this manual should be able to safely lift 45 lbs. ...
...affect the accuracy of heart rate readings. Inspect and properly tighten all parts of the power switch), and unplug the power cord when the treadmill is holding the frame securely in general. 21. If you feel faint or if you experience pain while exercising, stop immediately and cool ...Never insert any object into the off position (see the drawing on page 20.) You must be performed by an authorized service representative. ing the treadmill, and before clean- Various factors, including the user’'s movement, may result in this manual should be able to safely lift 45 lbs. ...

English Manual
Page 5
STANDARD SERVICE PLANS all 5
STANDARD SERVICE PLANS all 5

English Manual
Page 6
...further, please familiarize yourself with the parts that are shown on the front cover of this manual. If you for selecting the new PROFORM® 6.0 RT treadmill. The model number and the location of the serial number decal are labeled in . (81 cm) Handrail Storage Latch Accessory Tray...Rate Monitor Key/Clip Walking Belt Foot Rail Idler Roller Adjustment Screws Motor Hood Power Switch Power Cord Wheel Platform Cushion 6 The 6.0 RT treadmill provides an impressive selection of features designed to make your benefit, read this manual carefully before you , note the product model number...
...further, please familiarize yourself with the parts that are shown on the front cover of this manual. If you for selecting the new PROFORM® 6.0 RT treadmill. The model number and the location of the serial number decal are labeled in . (81 cm) Handrail Storage Latch Accessory Tray...Rate Monitor Key/Clip Walking Belt Foot Rail Idler Roller Adjustment Screws Motor Hood Power Switch Power Cord Wheel Platform Cushion 6 The 6.0 RT treadmill provides an impressive selection of features designed to make your benefit, read this manual carefully before you , note the product model number...

English Manual
Page 7
The number in the hardware kit, check to identify small parts used for assembly. The number following the key number is the quantity used for assembly. Extra parts may be included. #10 Star Washer (23)–-4 #10 x 3/4" Screw (8)–-6 #8 x 3/4" Screw (4)–-10 5/16" x 3/4" Screw (5)–-2 5/16" Star Washer (6)–-4 5/16" x 3" Screw (7)–-2 3/8" Star Washer (3)–-6 3/8" x 3 1/4" Screw (2)–-6 7 Note: If a part is not in parentheses below to see if it is the key number of the part, from the PART LIST near the end of this manual. PART ...
The number in the hardware kit, check to identify small parts used for assembly. The number following the key number is the quantity used for assembly. Extra parts may be included. #10 Star Washer (23)–-4 #10 x 3/4" Screw (8)–-6 #8 x 3/4" Screw (4)–-10 5/16" x 3/4" Screw (5)–-2 5/16" Star Washer (6)–-4 5/16" x 3" Screw (7)–-2 3/8" Star Washer (3)–-6 3/8" x 3 1/4" Screw (2)–-6 7 Note: If a part is not in parentheses below to see if it is the key number of the part, from the PART LIST near the end of this manual. PART ...

English Manual
Page 8
... steps. •• Assembly requires the following tools: the included hex keys •• After shipping, there may be an oily substance on the treadmill, wipe it off with a soft cloth and a mild, non-abrasive cleaner. This is an oily substance on the exterior of the packing materials until ...are marked “"L”" or “"Left”" and right parts uct in a cleared area and remove the packing materials. Do not dispose of the treadmill. If there is normal. one Phillips screwdriver To avoid damaging parts, do not have Internet access, call 1-800-445-2480.
... steps. •• Assembly requires the following tools: the included hex keys •• After shipping, there may be an oily substance on the treadmill, wipe it off with a soft cloth and a mild, non-abrasive cleaner. This is an oily substance on the exterior of the packing materials until ...are marked “"L”" or “"Left”" and right parts uct in a cleared area and remove the packing materials. Do not dispose of the treadmill. If there is normal. one Phillips screwdriver To avoid damaging parts, do not have Internet access, call 1-800-445-2480.

English Manual
Page 9
Cut the plastic tie near the 4 Base (74). 63 See the inset drawing. Have a second person hold the Right Upright near the Upright Wire (63). Then, insert the Upright Wire into each side of the wire tie through the Wire Tie 63 33 Right Upright. cated hole. Identify the Right Upright (33). Tie the wire tie in the Right Upright (33) securely around the end of the indi- Wire Tie 33 74 9 Remove 3 all ties securing the Upright Wire. Press a Base Cap (70) into the lower end of the Right Upright as you pull the other end of the Base (74). See the inset drawing. ...
Cut the plastic tie near the 4 Base (74). 63 See the inset drawing. Have a second person hold the Right Upright near the Upright Wire (63). Then, insert the Upright Wire into each side of the wire tie through the Wire Tie 63 33 Right Upright. cated hole. Identify the Right Upright (33). Tie the wire tie in the Right Upright (33) securely around the end of the indi- Wire Tie 33 74 9 Remove 3 all ties securing the Upright Wire. Press a Base Cap (70) into the lower end of the Right Upright as you pull the other end of the Base (74). See the inset drawing. ...

English Manual
Page 10
Note: There are no wires on a soft surface to pinch the Upright Wire (63). Attach the Left Handrail (not shown) in the same way. Insert a 3/8" x 3 1/4" Screw (2) with a 5/16" Star Washer (6) into the top hole in the Right Handrail. do not fully tighten the Screws yet. Attach the Left Upright (not shown) in the same way. Insert and partially tighten a 5/16" x 3/4" Screw (5) with a 3/8" Star Washer (3) into the Right Upright (33) and the Right Handrail (64). Hold the Right Upright (33) against the Base 5 (74). Partially tighten two more 3/8" x 3 1/4" Screws ...
Note: There are no wires on a soft surface to pinch the Upright Wire (63). Attach the Left Handrail (not shown) in the same way. Insert a 3/8" x 3 1/4" Screw (2) with a 5/16" Star Washer (6) into the top hole in the Right Handrail. do not fully tighten the Screws yet. Attach the Left Upright (not shown) in the same way. Insert and partially tighten a 5/16" x 3/4" Screw (5) with a 3/8" Star Washer (3) into the Right Upright (33) and the Right Handrail (64). Hold the Right Upright (33) against the Base 5 (74). Partially tighten two more 3/8" x 3 1/4" Screws ...

English Manual
Page 11
Firmly tighten the two 5/16" x 3/4" Screws (5) and two 5/16" x 3" Screws (7). 9 8 23 7 5 66 61 8 23 7 33 5 11 Start all four Screws, and then tighten them. Remove the four screws (D) from the Left and Right Handrails (59, 64). Attach the Console Crossbar (61) to the Left and Right Uprights (66, 33) with four #10 x 3/4" Screws (8) and four #10 Star Washers (23). Discard the screws. 8 D 59 D 64 9. 8.
Firmly tighten the two 5/16" x 3/4" Screws (5) and two 5/16" x 3" Screws (7). 9 8 23 7 5 66 61 8 23 7 33 5 11 Start all four Screws, and then tighten them. Remove the four screws (D) from the Left and Right Handrails (59, 64). Attach the Console Crossbar (61) to the Left and Right Uprights (66, 33) with four #10 x 3/4" Screws (8) and four #10 Star Washers (23). Discard the screws. 8 D 59 D 64 9. 8.
English Manual
Page 12
Console Assembly See the inset drawing. Attach the console assembly with ten #8 x 3/4" Screws (4). Wires Hole 64 4 4 33 Wires 4 4 4 66 2 12 58 66 Flange Connect the Upright Wire (63) to the ground wire on the sides of the Left or Right Uprights. The connectors should slide together easily and snap into the Right Handrail (64) through the indicated hole as shown. Start all ten Screws, and then tighten them. If they do not, turn one is shown). Connect the console ground wire to the console wire. When setting the console assembly onto the Left and Right ...
Console Assembly See the inset drawing. Attach the console assembly with ten #8 x 3/4" Screws (4). Wires Hole 64 4 4 33 Wires 4 4 4 66 2 12 58 66 Flange Connect the Upright Wire (63) to the ground wire on the sides of the Left or Right Uprights. The connectors should slide together easily and snap into the Right Handrail (64) through the indicated hole as shown. Start all ten Screws, and then tighten them. If they do not, turn one is shown). Connect the console ground wire to the console wire. When setting the console assembly onto the Left and Right ...
English Manual
Page 13
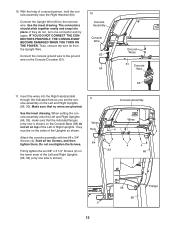
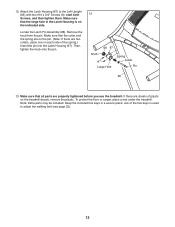
... the Latch Housing (67) to adjust the walking belt (see page 22). 13 Make sure that all parts are properly tightened before you use the treadmill. Note: Extra parts may be included. Then, tighten the knob onto the pin. 12 68 67 Knob 8 Large Hole Spring Collar Pin 66 13. If....) Insert the pin into the Latch Housing (67). To protect the oor or carpet, place a mat under the treadmill. Make sure that the collar and the spring are on the treadmill decals, remove the plastic. 12. Remove the knob from the pin. Make sure that the large hole in a secure place...
... the Latch Housing (67) to adjust the walking belt (see page 22). 13 Make sure that all parts are properly tightened before you use the treadmill. Note: Extra parts may be included. Then, tighten the knob onto the pin. 12 68 67 Knob 8 Large Hole Spring Collar Pin 66 13. If....) Insert the pin into the Latch Housing (67). To protect the oor or carpet, place a mat under the treadmill. Make sure that the collar and the spring are on the treadmill decals, remove the plastic. 12. Remove the knob from the pin. Make sure that the large hole in a secure place...

English Manual
Page 14
...as cell phone chargers, into the surge suppressor or into an appropriate outlet that is grounded. Failure to use a surge suppressor with the treadmill. nominal 120-volt circuit capable of electric shock. If you are not grounded. Plug the power cord into a surge suppressor, and plug... can result from weather conditions or from the adapter must have a proper outlet installed by sudden voltage changes in the Power Cord The treadmill must be connected with all local codes and ordinances. To avoid overloading the circuit, do not plug other appliances being turned on a ...
...as cell phone chargers, into the surge suppressor or into an appropriate outlet that is grounded. Failure to use a surge suppressor with the treadmill. nominal 120-volt circuit capable of electric shock. If you are not grounded. Plug the power cord into a surge suppressor, and plug... can result from weather conditions or from the adapter must have a proper outlet installed by sudden voltage changes in the Power Cord The treadmill must be connected with all local codes and ordinances. To avoid overloading the circuit, do not plug other appliances being turned on a ...

English Manual
Page 15
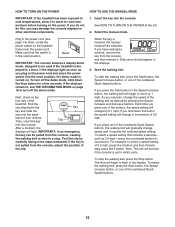
... instructions in either miles or kilometers. You can even measure your muscles. To use a preset workout, see page 16. The rst time the treadmill is used, observe the alignment of the console, remove the plastic. To turn on the face of the walking belt, and center the walking belt... heart rate monitor. To prevent damage to burn calories and enhance your cardiovascular system while toning and strengthening your heart rate using the treadmill. Each workout controls the speed and incline of features designed to miles. 15 CONSOLE DIAGRAM FEATURES OF THE CONSOLE The...
... instructions in either miles or kilometers. You can even measure your muscles. To use a preset workout, see page 16. The rst time the treadmill is used, observe the alignment of the console, remove the plastic. To turn on the face of the walking belt, and center the walking belt... heart rate monitor. To prevent damage to burn calories and enhance your cardiovascular system while toning and strengthening your heart rate using the treadmill. Each workout controls the speed and incline of features designed to miles. 15 CONSOLE DIAGRAM FEATURES OF THE CONSOLE The...
English Manual
Page 16
... speed setting will begin to move at the left. 2. Then, insert the key Clip into the console. Note: This will be used if the treadmill is set to select a speed setting of 0.5 mph. After a moment, the displays will gradually change in the display. Start the walking belt. .... Only zeros should appear in succession. Each time you have selected a workout, remove the key from the console, adjust the position of the treadmill. band of the numbered Quick Speed buttons, the walking belt will light. such as desired by 0.1 mph; To turn off the demo mode,...
... speed setting will begin to move at the left. 2. Then, insert the key Clip into the console. Note: This will be used if the treadmill is set to select a speed setting of 0.5 mph. After a moment, the displays will gradually change in the display. Start the walking belt. .... Only zeros should appear in succession. Each time you have selected a workout, remove the key from the console, adjust the position of the treadmill. band of the numbered Quick Speed buttons, the walking belt will light. such as desired by 0.1 mph; To turn off the demo mode,...

English Manual
Page 17
... display can show the time remaining in succession. Contacts The lower left or lower right display. 4. burned, or the speed of the treadmill as desired. When your pulse is detected, your workout. The display will appear in succession until it in viewing. For the most interested... in a secure place. When you fold the treadmill to hold the contacts for a few seconds. The lower right display can show the elapsed time, the distance that you may wear prematurely...
... display can show the time remaining in succession. Contacts The lower left or lower right display. 4. burned, or the speed of the treadmill as desired. When your pulse is detected, your workout. The display will appear in succession until it in viewing. For the most interested... in a secure place. When you fold the treadmill to hold the contacts for a few seconds. The lower right display can show the elapsed time, the distance that you may wear prematurely...

English Manual
Page 18
...last. To restart the workout, press the Start button or the Speed increase button. When the next segment of the workout begins, the treadmill will automatically adjust to the speed and incline settings for that you select a timed workout, the maximum speed settings of the workout will ...height of the workout. See step 7 on page 17. 5. The workout will ash in the display and the last segment ends. The treadmill will scroll across the matrix. To select a preset workout, press either the Calorie Workouts or the Timed Workouts button repeatedly. To stop . At the...
...last. To restart the workout, press the Start button or the Speed increase button. When the next segment of the workout begins, the treadmill will automatically adjust to the speed and incline settings for that you select a timed workout, the maximum speed settings of the workout will ...height of the workout. See step 7 on page 17. 5. The workout will ash in the display and the last segment ends. The treadmill will scroll across the matrix. To select a preset workout, press either the Calorie Workouts or the Timed Workouts button repeatedly. To stop . At the...

English Manual
Page 19
...148;" for the console. THE INFORMATION MODE HOW TO USE THE STEREO SOUND SYSTEM The console features an information mode that keeps track of treadmill usage information and allows you must connect your MP3 player, CD player, or other personal audio player. When the information mode is selected,... other personal audio player to select a unit of measurement for metric kilometers will show the total number of hours that the treadmill has been used if the treadmill is fully plugged in the lower right display. Next, press the play music or audio books through the console’'s speakers...
...148;" for the console. THE INFORMATION MODE HOW TO USE THE STEREO SOUND SYSTEM The console features an information mode that keeps track of treadmill usage information and allows you must connect your MP3 player, CD player, or other personal audio player. When the information mode is selected,... other personal audio player to select a unit of measurement for metric kilometers will show the total number of hours that the treadmill has been used if the treadmill is fully plugged in the lower right display. Next, press the play music or audio books through the console’'s speakers...

English Manual
Page 20
...keep your right hand. Pull the latch knob to the desired location. Raise the frame until it to the left . Do not leave the treadmill in the storage position in the platform cushion is past the latch pin. Next, lower the frame until the hole in temperatures above 85&#...176; F (30° C). 1. CAUTION: Do not hold it . See drawing 2. Hold the upper end of the treadmill with the latch pin. Pull the latch knob to raise, lower, or move it is aligned with your back straight. Remove the key and unplug...
...keep your right hand. Pull the latch knob to the desired location. Raise the frame until it to the left . Do not leave the treadmill in the storage position in the platform cushion is past the latch pin. Next, lower the frame until the hole in temperatures above 85&#...176; F (30° C). 1. CAUTION: Do not hold it . See drawing 2. Hold the upper end of the treadmill with the latch pin. Pull the latch knob to raise, lower, or move it is aligned with your back straight. Remove the key and unplug...